Classic Human Anatomy in Motion: The Artist's Guide to the Dynamics of Figure Drawing (2015)
Chapter 9
Structures and Planes of the Figure
This chapter begins by exploring how to set up preliminary structures when drawing the human figure. While some artists prefer to start a drawing of the figure without creating any preliminary structure, many others find this training beneficial, because it enables them to quickly draw figures in motion and to draw the figure from memory more accurately. The last part of the chapter examines an alternate but related approach: using the planes of the body to analyze anatomical forms, transforming them into simple geometric shapes.
Preliminary Structures
Beginning a drawing by determining the basic structure of the figure is a technique that goes by many names: the manikin approach, the armature approach, “blocking in,” constructing the figure, structuring the figure, preliminary drawing, and so on. All these terms, however, point to the same fundamental purpose: helping the artist establish a basic framework for the figure.
Many artists begin longer studies—usually anything over ten minutes and up to several hours—with a simplified preliminary drawing of the pose. This is almost like doing a gesture drawing of the pose (see Chapter 10), but it results in a more stable and accurate structural shape. When you start off with a light preliminary drawing, you are, in a way, creating an armature for the later application of organic anatomical forms, much like a sculptor who builds a wire armature and then adds clay to it. Creating such an armature will minimize unintentional distortion when you add the elements of three-dimensionality to the figure. The drawing at right shows how the structural drawing acts like an armature beneath the finished forms of a figure study. The sidebar on this page lists some of the advantages of setting up a basic structure before proceeding to a finished drawing.
STRUCTURE AS ARMATURE
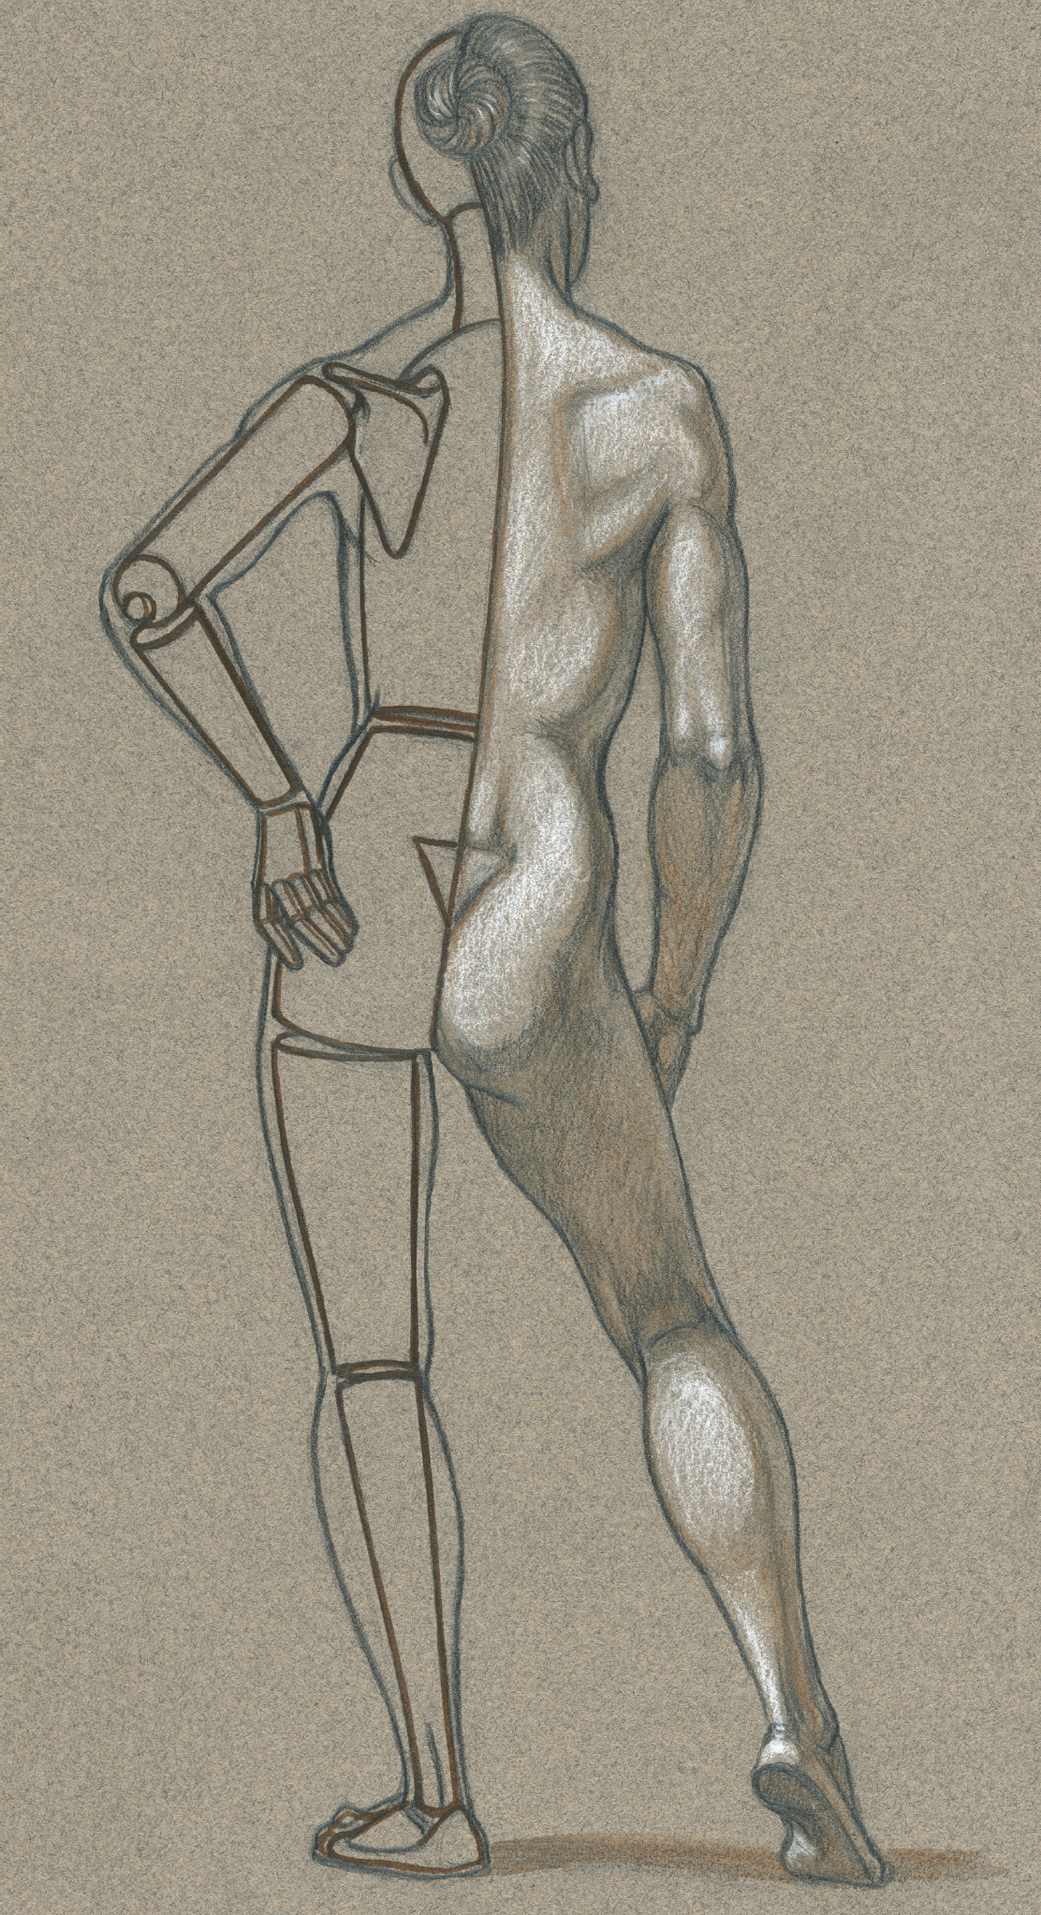
Half structure/half figure
The bones of the human figure are the actual anatomical armature, and indicating the presence of bony landmarks in your studies helps create a more convincing figure. But we do not see evidence of most bones on the surface form, because they are largely covered with muscle and other soft-tissue forms. In creating your armatures, therefore, you have to simplify a body region into a geometric shape or shapes that help position it within a coherent structure of the whole figure.
For example, although we may not see much evidence of the bone of the upper leg (femur) on the surface of the figure, we do see the strong cylindrical shape of the thigh created by the femur and the various muscles and soft-tissue forms attaching to it. So a simple cylindrical shape serves well as a representation of the thigh.
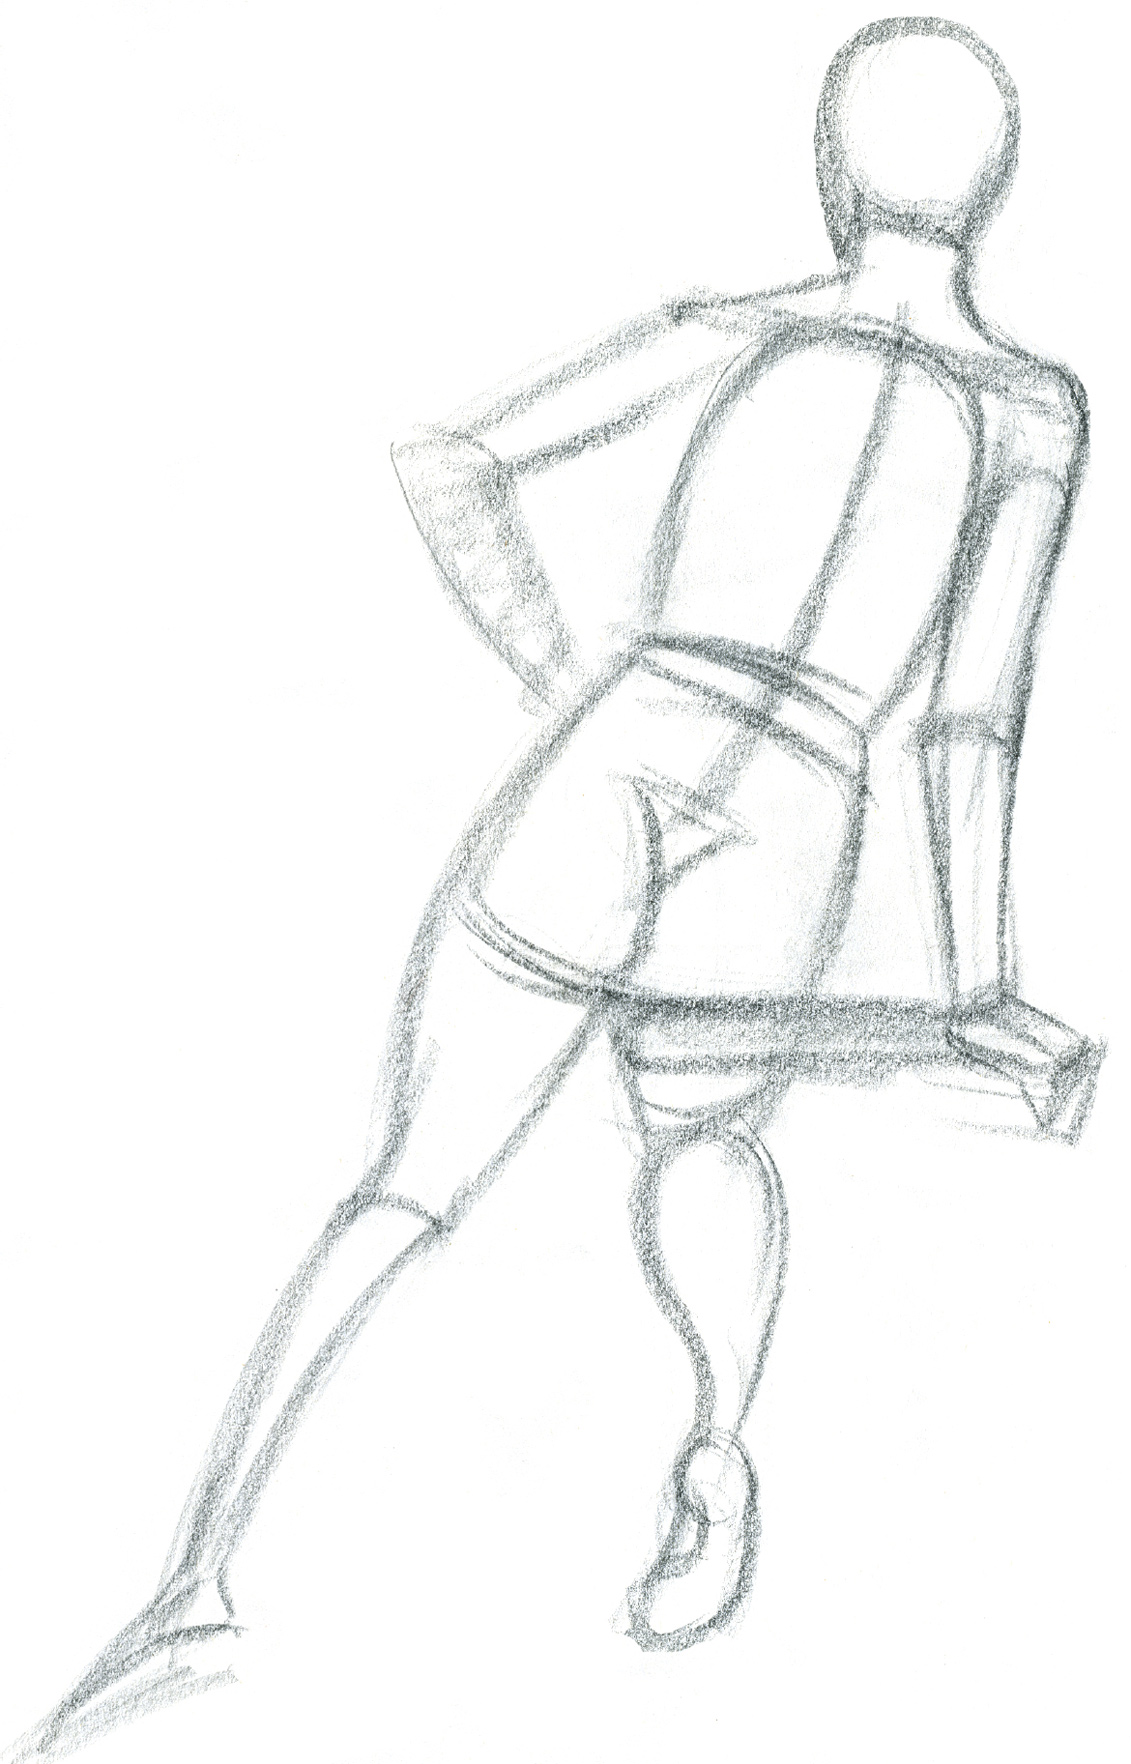
The shapes you use for the armature will differ according to the body part and its position in a pose. Oval and egg shapes are standard for the head, as well as for the rib cage. The limbs are easy to block in using elongated rectangular shapes or cylinders. The pelvis is somewhat harder to define as a bone shape, but a geometric shape such as a wedge, square, or oval may work well, depending on the position of the pelvis. And you need not restrict yourself to strictly geometric shapes; organic shapes, such as kidney bean shapes for torsos or pear shapes for wider hips, can also be used. As you can see, I used a variety of shapes—some geometric, some organic—in the preliminary structure for Study of a Female Figure from a Back View.
PRELIMINARY STRUCTURE FOR “STUDY OF A FEMALE FIGURE FROM A BACK VIEW”
STUDY OF A FEMALE FIGURE FROM A BACK VIEW
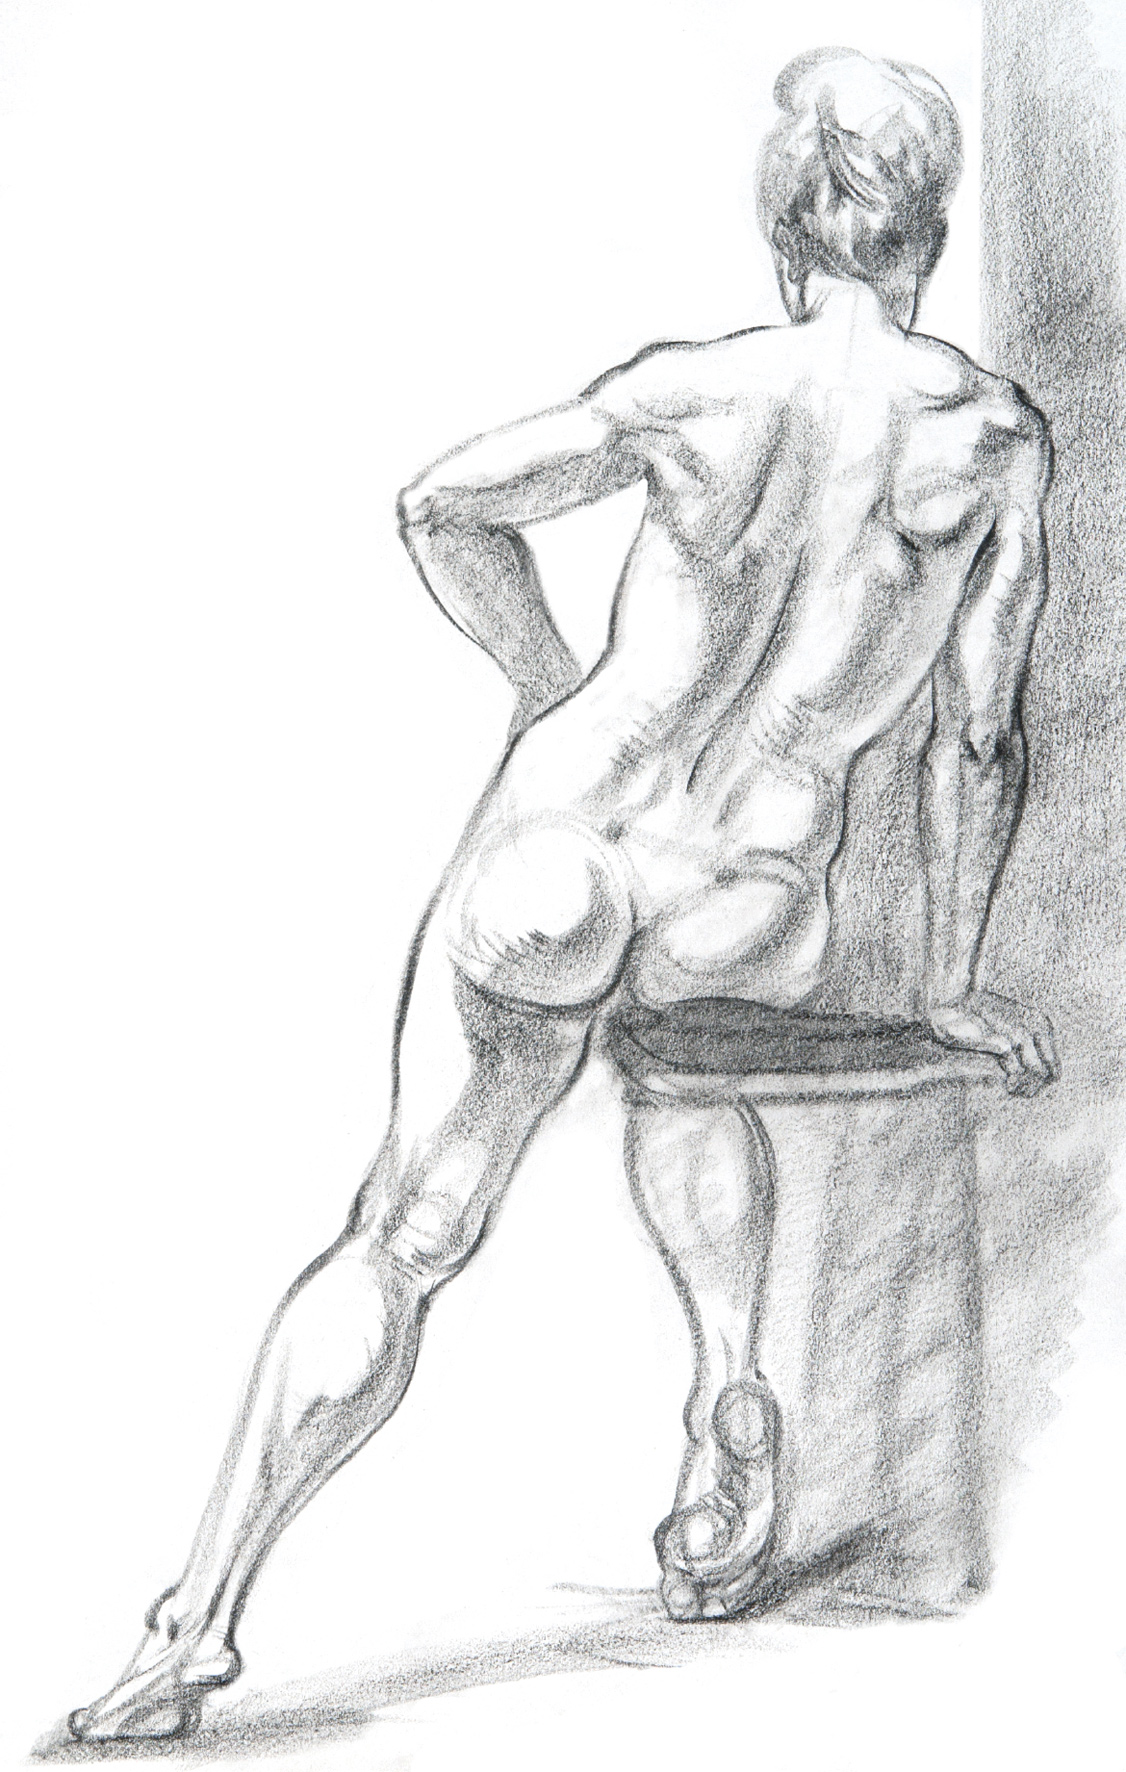
Black Conté crayon on newsprint.
Advantages of Setting Up a Preliminary Structure
Most of the structural drawings throughout this chapter have heavily drawn lines so that you can see the shapes clearly. When drawing from an actual model or a photo source, however, you should indicate the structural shapes with very light lines. Here are some of the advantages of creating a lightly drawn preliminary structure before moving on to the surface planes, anatomical forms, and details of the figure.
Placing the figure on the page
The lightly blocked-in armature will enable you to see whether the figure is properly placed on the page. If you’re drawing the entire figure, are you giving yourself enough room to capture the entire pose? If you intend to crop the pose in your drawing, is the composition as you want it to be? Blocking in the figure lightly on the page will give you a “sneak preview” of how the finished drawing will look. If you need to readjust something compositionally, this is the moment to do it, when the marks are light enough to easily erase.
Quickly checking proportions
The blocked-in armature allows you to quickly assess the basic proportions before you get too involved with the detail of the figure. If you start filling in the details right away, you may be at risk of recognizing a proportional error after it becomes difficult to erase what you’ve done. By establishing a light armature first, you can see whether anything needs to be readjusted structurally or proportionally before you begin applying the anatomical details.
Making alterations within the pose
There will be times when you’ll be working from a model and will realize that some portion of the pose looks awkward. No matter how many times you accurately redraw that area, it will still appear “out of place.” Starting with a lightly drawn armature allows you to solve the issue by altering the pose in your drawing. For instance, if you feel that one of the model’s legs would work better visually if positioned at a different angle, it is very easy to adjust the lightly drawn structure of the leg to see if your idea will work. Although this option might not appeal to artists who prefer to draw exactly what they see in front of them, others will choose to adjust their study to make the pose more dynamic or the overall composition more interesting.
Drawing from memory
One reason I encourage artists to work with preliminary structures is that it helps you draw figures from memory. Artists who use underlying structures realize after a time that they can draw various poses from memory or imagination. The ability to draw from memory can give you more confidence even when working from a live model or photo source, since you’ll be able to alter the pose from memory if you feel the need to do so. Drawing from memory is a great way to practice figure drawing when there is no model or photo source available. You can structure a pose from memory or imagination and then add the anatomical surface forms. This is a useful skill when trying out possible poses for a painting or sculpture or laying out a sequence for a storyboard or comic book panels.
The key when establishing an armature or manikin structure is to make sure you draw it very lightly. Heavy, dark structural lines will compete with your more finished line work and give your drawing a cluttered look. The lightly drawn structural lines are meant only as guides for the later application of anatomical forms. When the drawing is almost finished you may erase any structural lines that are still visible.
If you are planning to work your drawing in charcoal pencil, Conté crayon, or pastel pencil, I recommend that you first block in your armature in vine charcoal because it is very easy to erase or smear out later. If you are working in pen, begin the preliminary armature with a semisoft graphite pencil, such as HB or B. Again, you can erase all evidence of the penciled-in structural lines once the pen work is finished. If you like, you can leave some of the structural lines in the finished drawing as part of the statement. But if the drawing is done on toned paper and you will be adding white chalk highlights where there are some underlying structural lines, you should definitely erase all evidence of the armature before adding the white chalk. Otherwise, it will create a smeared gray tone rather than the clean white gradation of values you want.
Structures for the Head
The basic structure for the head is usually an oval or inverted egg shape, especially for front and three-quarter views. If there is some foreshortening, as when the head tilts forward or back, then a three-dimensional block or cylinder shape might serve better. Some artists prefer drawing a simplified skull shape before building up the anatomical forms.
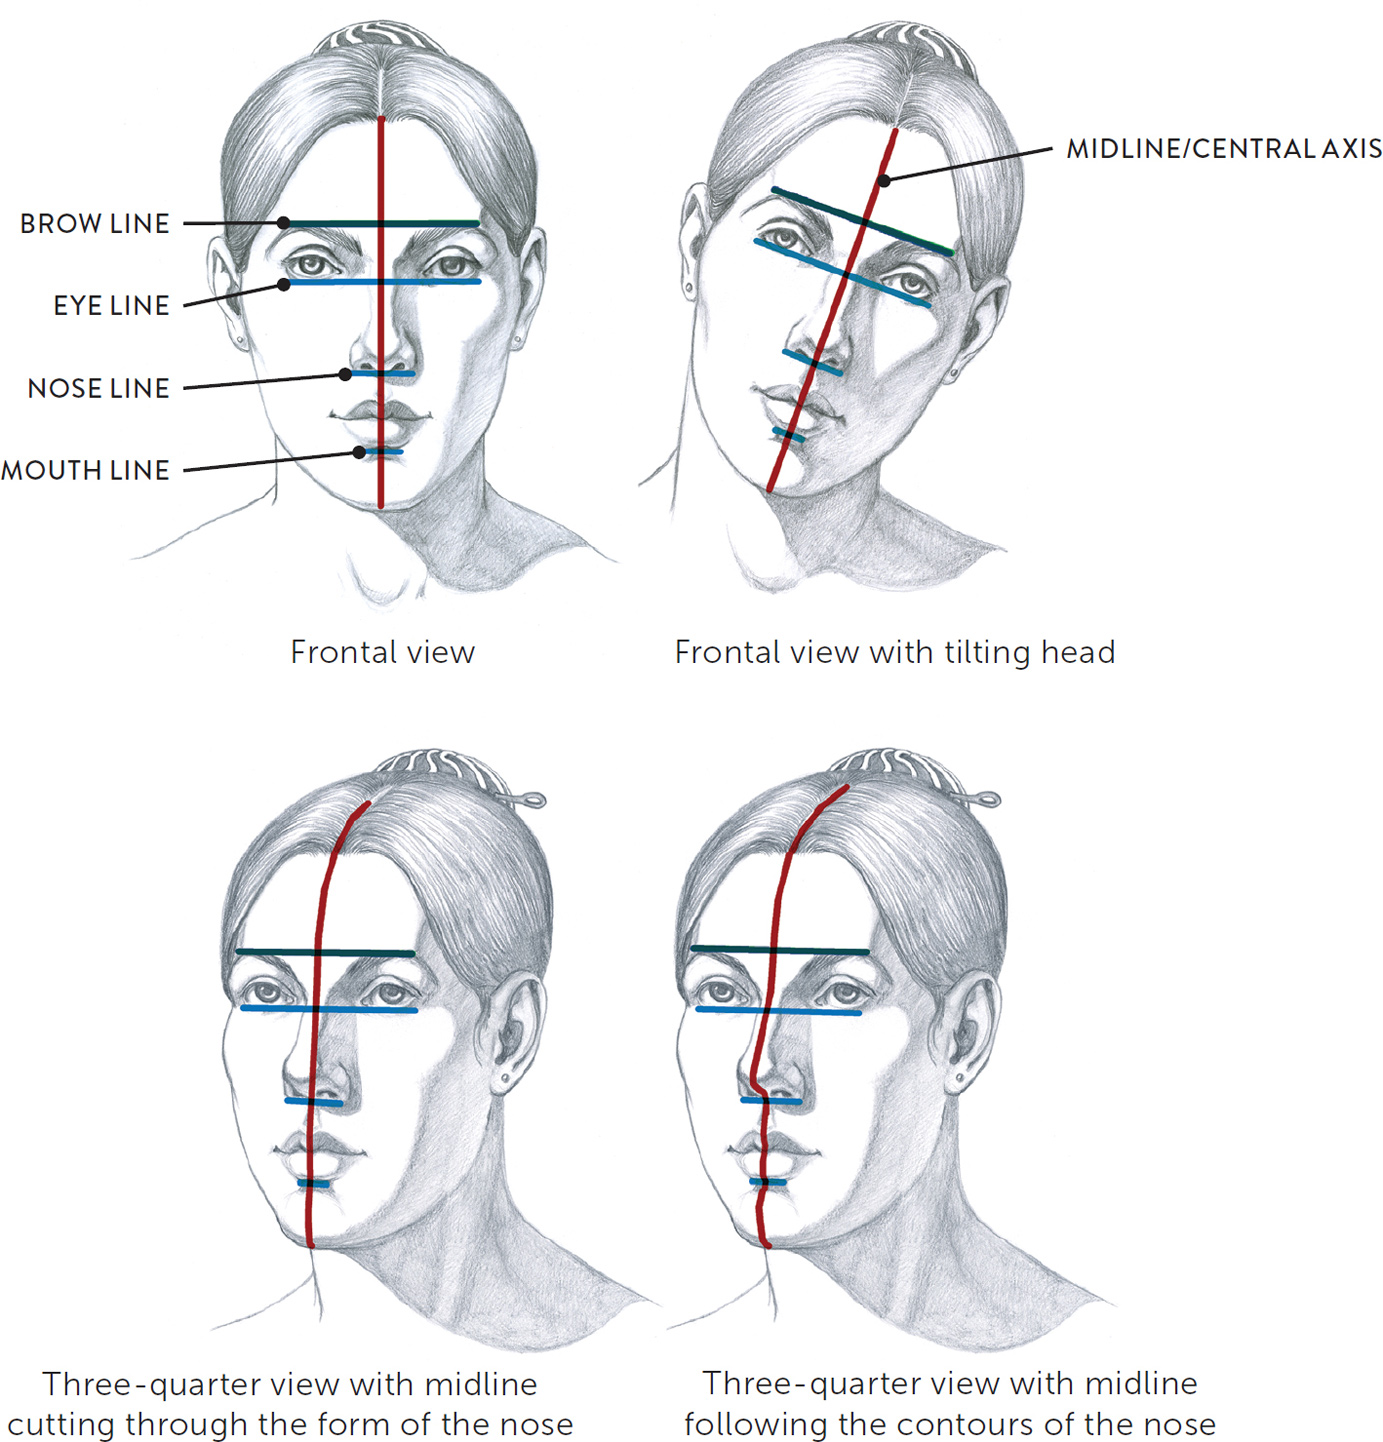
In any pose of the head, the neck and shoulders should also be indicated or at least suggested. The neck supports the cranium, especially when the head is tilting or rotating, and indicating the shape of the neck helps accentuate and counterbalance these actions. Once the basic structures of the head, neck, and shoulders are lightly drawn, locate the central axis, or midline, of the head, using it as a guide when applying the planes of the head and face, the facial features, and other details.
Frontal Views of the Head
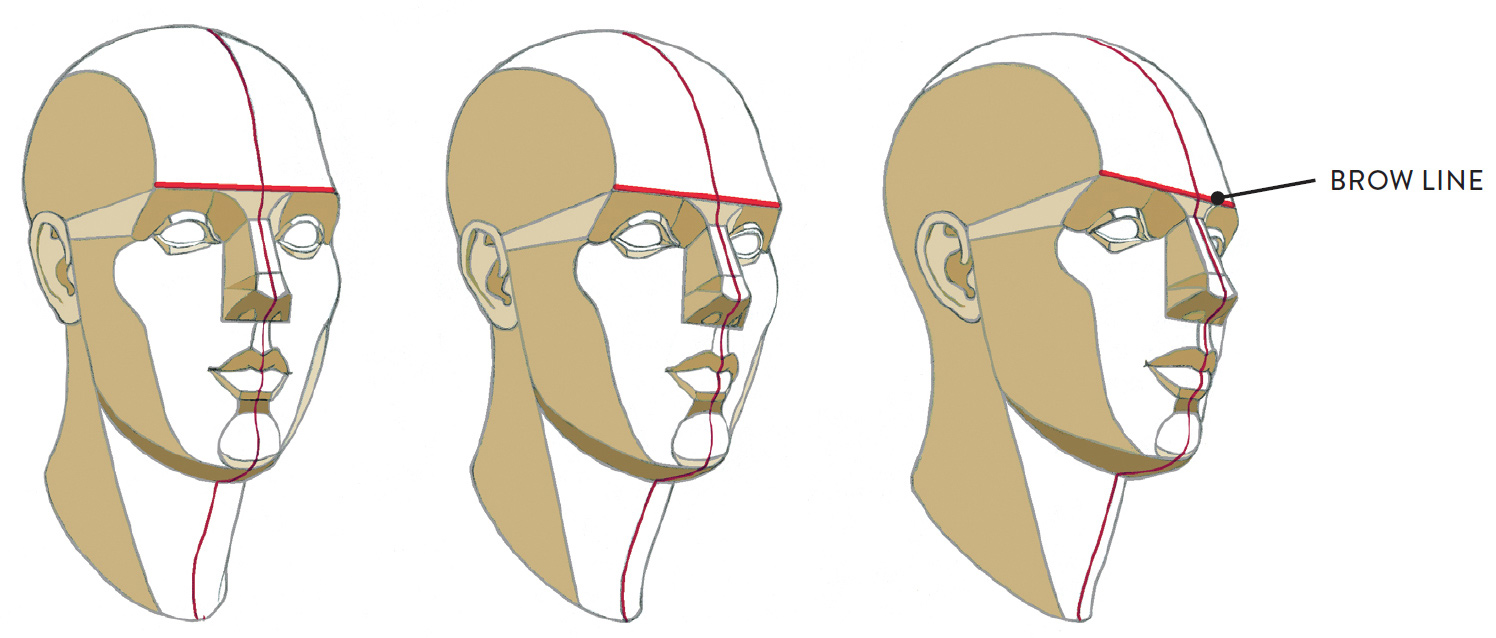
First, observe how the head, neck, and shoulders are positioned in space. In a traditional portrait view, the eye level of the model is aligned with the eye level of the artist. When drawing a frontal view of the head—in which the model is directly facing you—draw the central axis, or midline, as a straight vertical dividing the head into equal halves. Next establish the location of the eye line, on which the pair of eyes will be placed. This is generally placed halfway between the top of the head and the bottom of the chin. Then locate and draw the brow line (for placing the eyebrows), the nose line (at the base of the nose), and the mouth line (at the base of the lower lip). All these lines for the placement of the features run perpendicular to the central axis of the head.
If the head is facing you but tilting to the left or right, the central axis should match the angle of the tilt. The lines for the features will now be angled—but always perpendicular to the line of the central axis.
Three-quarter Views of the Head
If the model’s head is rotated away from you in a three-quarter view, the central axis is no longer in the exact middle of the head but rather off-center to a greater or lesser degree. The facial forms on the far side of the central axis will be more condensed, depending on how much rotation is occurring.
There are many possible degrees of the so-called “three-quarter” view. If you observe a model facing you and then slowly turning his or her head until you see the model’s profile, all the positions of the turning head between the full frontal and full profile views are considered three-quarter views. At each position the head looks slightly different, and the midline must be placed differently in each view.
The following drawing shows a frontal view of the head, a tilted head (facing front), and two drawings of the same three-quarter view. All the views indicate the placement of the midline, or central axis, of the head as well as the lines for the various features. The two three-quarter drawings show two different ways of indicating the midline. In one, the midline travels straight down, cutting through the structure of the nose; in the other, the midline follows the contour of the nose.
MIDLINE/CENTRAL AXIS OF THE HEAD
Showing the placement of the brow, eye, nose, and mouth lines.
Checking Your Eye Level
When you are practicing drawing the head from a live model, I suggest that you periodically position yourself at different levels above and below the model’s eye level. If the model is sitting on a model stand and you are sitting lower down, you are observing the model from an above-eye-level view because the model’s head is above your own eye level. If you are standing at an easel and the model is sitting in a chair set on the floor (rather than on a model stand), your eye level will be higher than the model’s—a below-eye-level view.
As when drawing any head, look for the placement of the head’s midline, or central axis. This will tell you immediately if there is any rotation of the head. Then check the general placement of the eye line. Since the far eye can be partially hidden by the nose in extreme three-quarter views, check the direction of the brow line to determine your eye level in relation to the head you are observing. As the drawing below shows, the brow line will tilt upward in below-eye-level views but downward in above-eye-level views. Once this is established, position the shape of the nose on the midline and then place the rest of the features accordingly.
CHECKING YOUR EYE LEVEL
Observe the direction and alignment of the brow ridge (brow line) to determine your eye level.

Below-eye-level view
The head is positioned lower than your eye level. Brow line tilts upward as the head turns away from you.
Above-eye-level view
The head is positioned higher than your eye level. Brow line tilts downward as the head turns away from you.
Structures for the Neck and Shoulders
There are only a few basic forms on the neck and shoulder that you need to watch for when drawing a front or three-quarter view of the figure. The neck is basically a cylinder emerging from the top of the rib cage structure. Check the position of the breastbone (sternum) to see if the rib cage is facing you directly or is slightly rotated away. Find the pit of the neck, which is the small depression between the inner ends of the collarbones. As you develop the drawing look for additional surface landmarks, such as the collarbones, the acromion process (the end of the spine of the scapula), and the trapezius and deltoid muscles. All these structures appear in the next drawing.
STRUCTURES OF NECK AND SHOULDERS
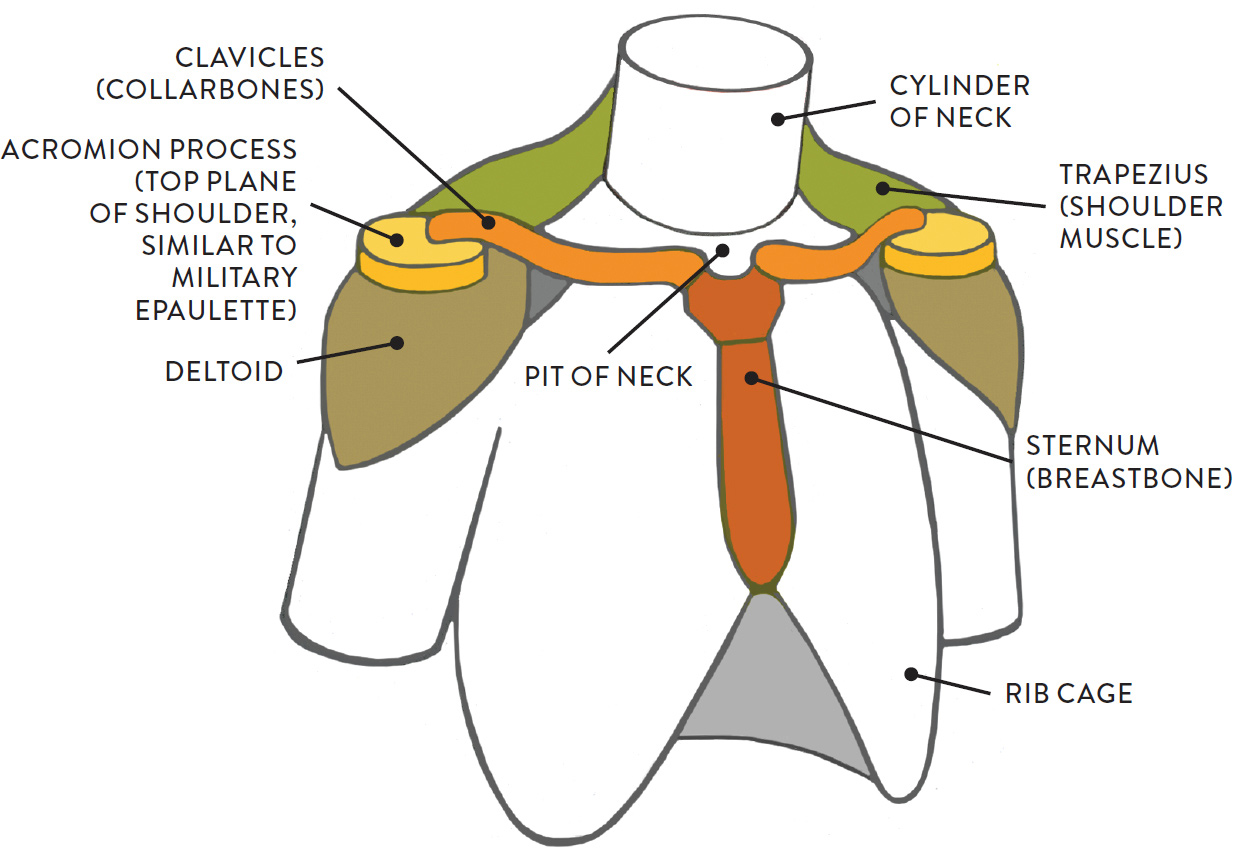
Three-quarter view
Structures for the Rib Cage and Pelvis
In most poses you will be able to sense the rib cage shape easily. The rib cage structure is similar to that of a vintage birdcage, but many artists indicate it very simply, using an egg or oval shape, with the breastbone (sternum) indicating the midline in front views and the vertebral column indicating the midline in back views. If you are able to see the rib cage arch on the model, it can also be lightly added. If the model is tilting toward or away from you, use a three-dimensional structure such as a cylinder or block shape when setting up the torso.
RIB CAGE AND PELVIS STRUCTURES
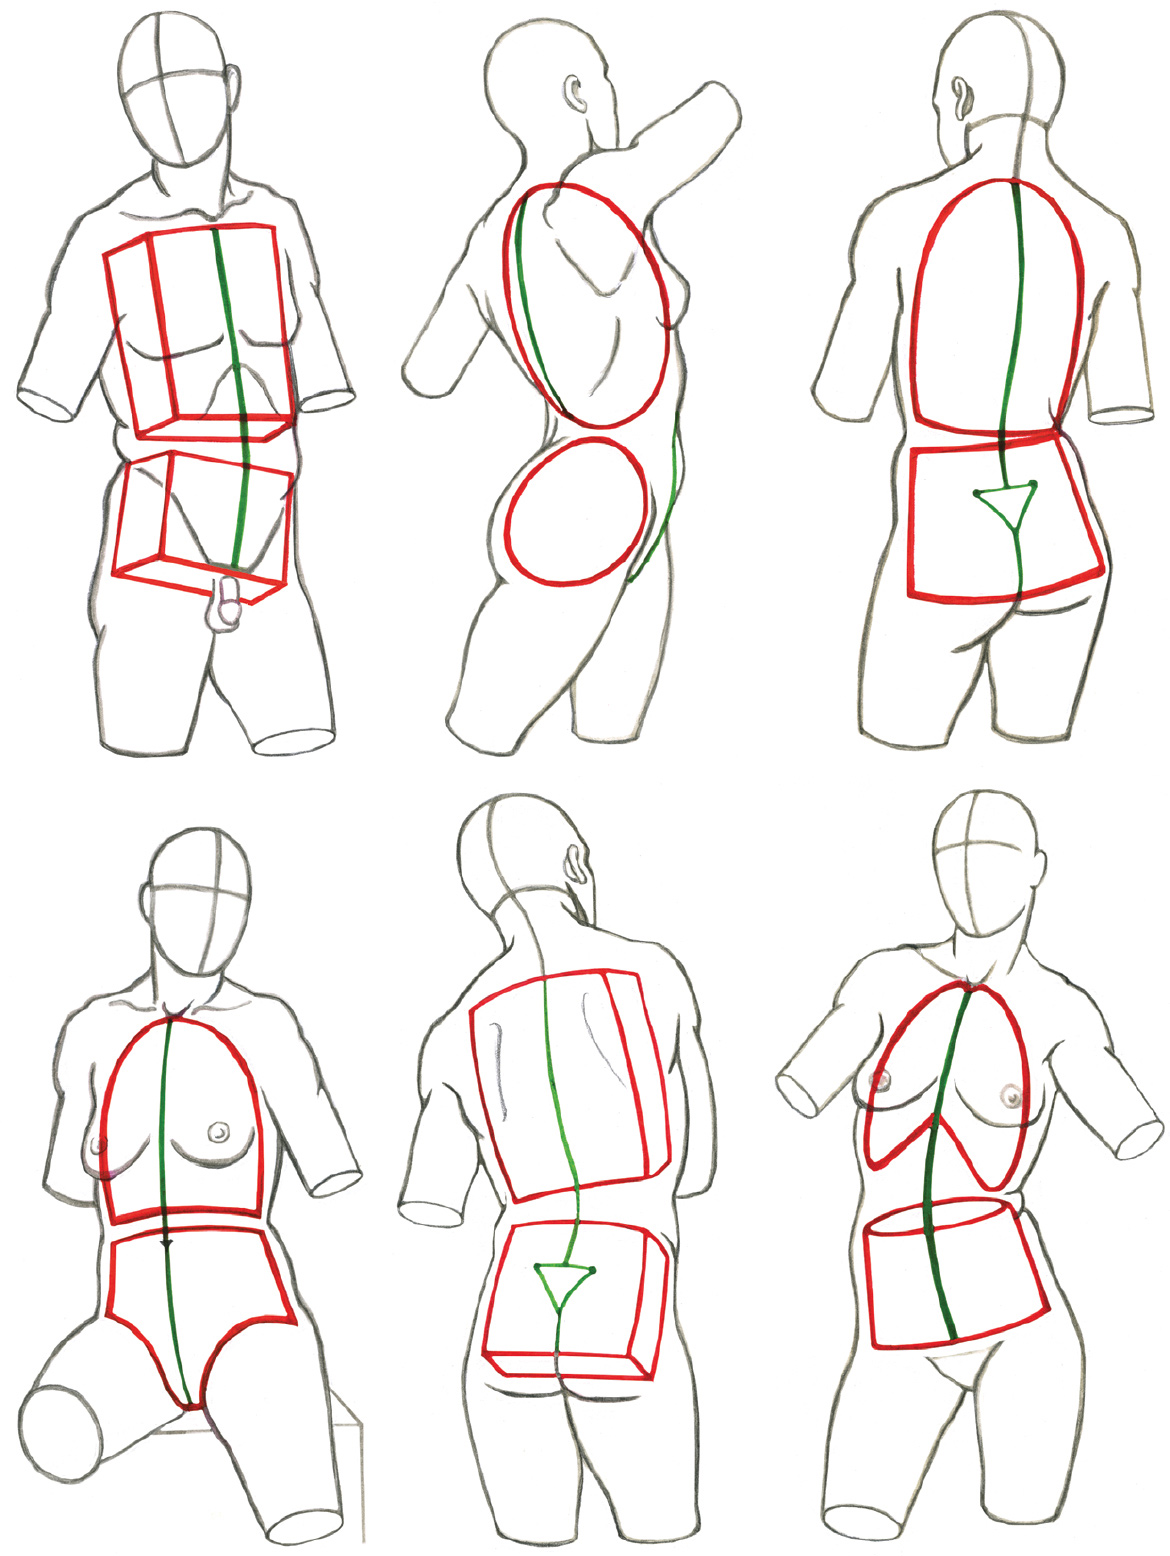
Shapes for blocking in the rib cage include oval, block, birdcage, and skeletal rib cage shapes. Pelvis shapes include blocks, wedges, ovals, and shapes that look like pants.
As we’ve seen, the pelvis bone is hard to locate on the figure because it is mostly covered with soft-tissue forms. The only evidences we see are the triangular bone of the sacrum, on back views; the top ridge of the pelvis (iliac crest), on side views; and the two small bony bumps, each called an ASIS, on front and three-quarter views. These forms may be easy to detect in some poses but not in others. Sometimes strong light or shadow will eradicate any indication of these small landmarks. With scant visual evidence of the pelvis on the body’s surface, many artists use a block shape (pelvic block or pelvis box), a wedge shape, or a pants-shaped form. Oval shapes work well for side views of the hip. You may want to use variations of these shapes depending on what is occurring in the pose and how the legs are positioned as they anchor into the pelvis shape. Combinations of the various shapes are shown in the drawing at left.
The life study Kneeling Male Figure Leaning to One Side, shows a figure bending toward the left and slightly backward. The accompanying structural diagram shows one possible way of establishing the basic structure of the torso in this pose.
KNEELING MALE FIGURE LEANING TO ONE SIDE
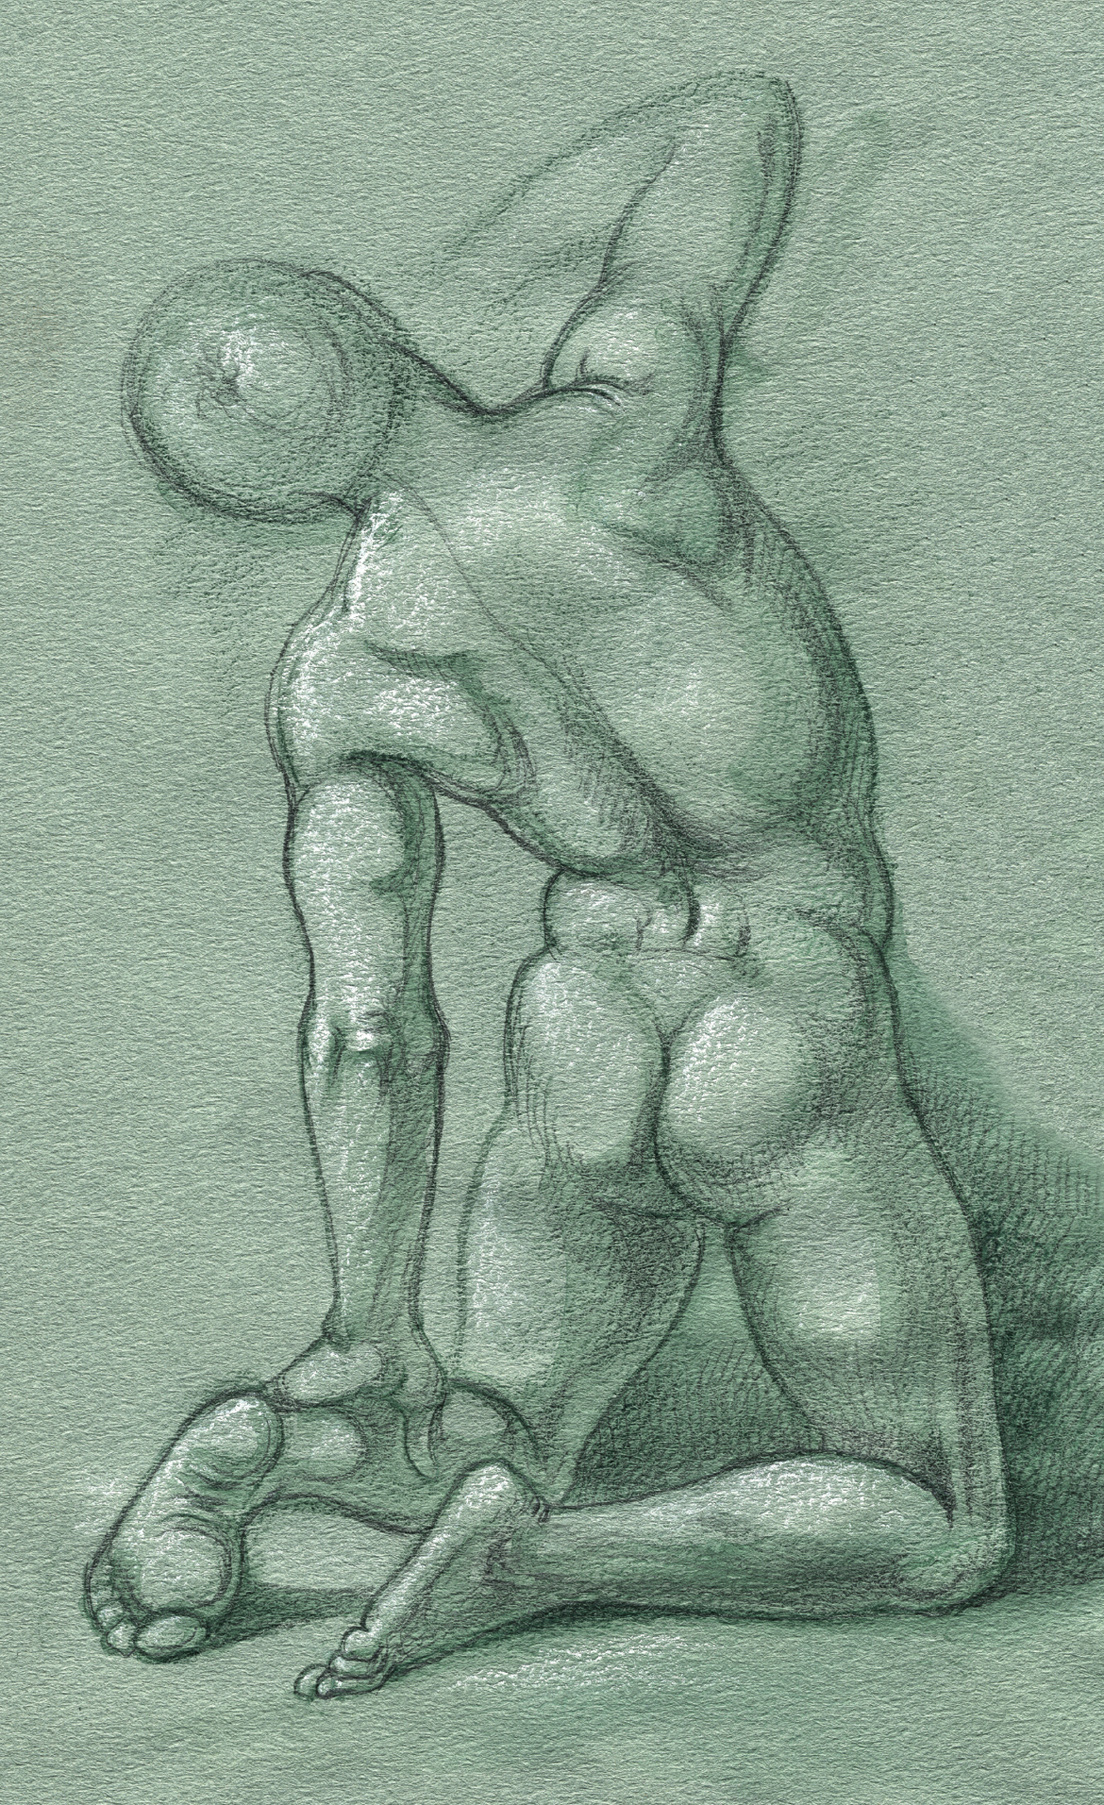
Dark green watercolor pencil, ballpoint pen, and white chalk on toned paper.
STRUCTURAL DIAGRAM
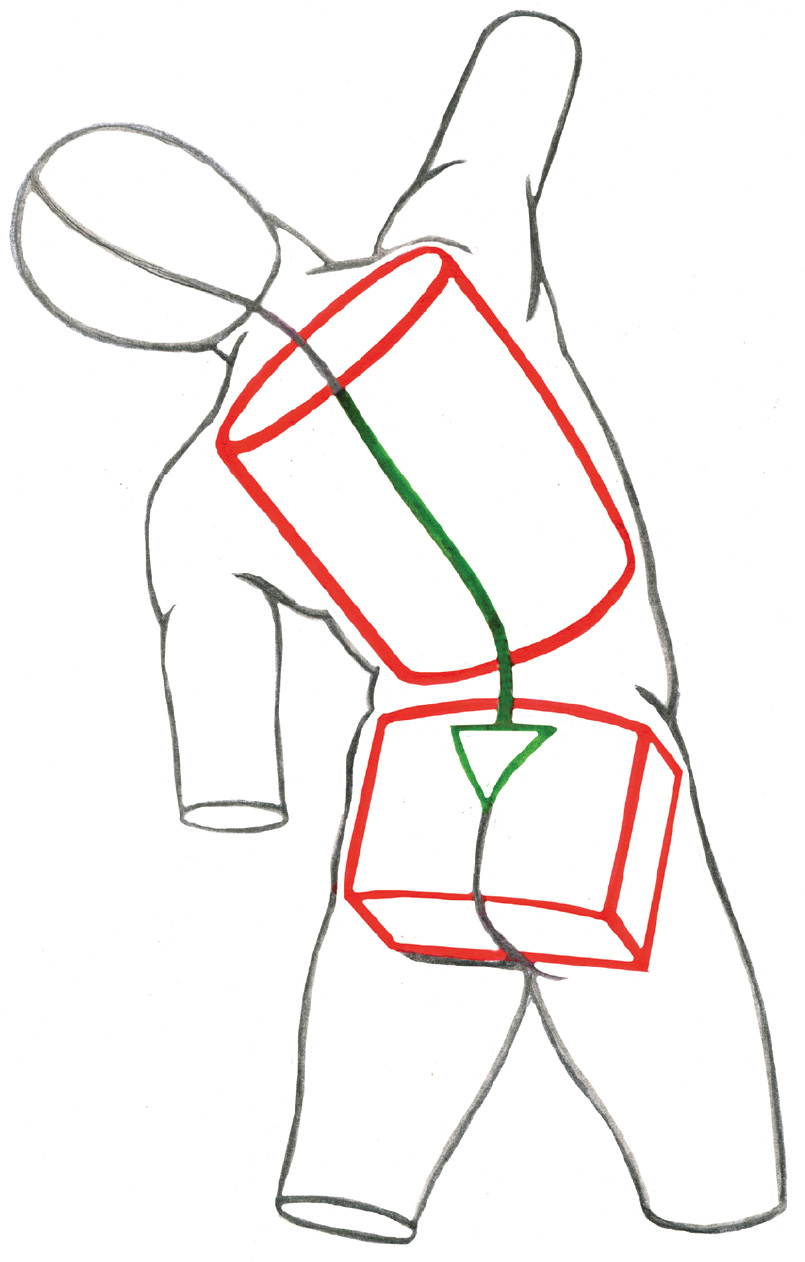
RIB CAGE: Red cylinder shape
PELVIS: Red block shape
CENTRAL AXIS OF TORSO: Green line
Structures for the Arm
Indicating structures for the arms is rather easy—elongated rectangles or cylindrical shapes work well in most poses. When drawing action poses, however, some artists use single lines (called lines of action) to represent the midlines of the upper and lower arms (see this page). When blocking in the structure of the arms, consider how they are placed spatially and whether there is any foreshortening in the view. If an arm is advancing toward you, then this should be indicated by the structure you establish—a foreshortened cylinder. If there is no receding or advancing foreshortening of the arm, you can use simple flat, elongated rectangle shapes.
The following sketchbook studies are based on the arms of some of Michelangelo’s figures in the Sistine Chapel frescoes—a treasure trove for studying the human form. This kind of exercise can, of course, be done using figures from any realistic figurative painting, sculpture, or photograph.
SKETCHBOOK STUDIES OF ARMS FROM MICHELANGELO’S SISTINE CHAPEL FIGURES
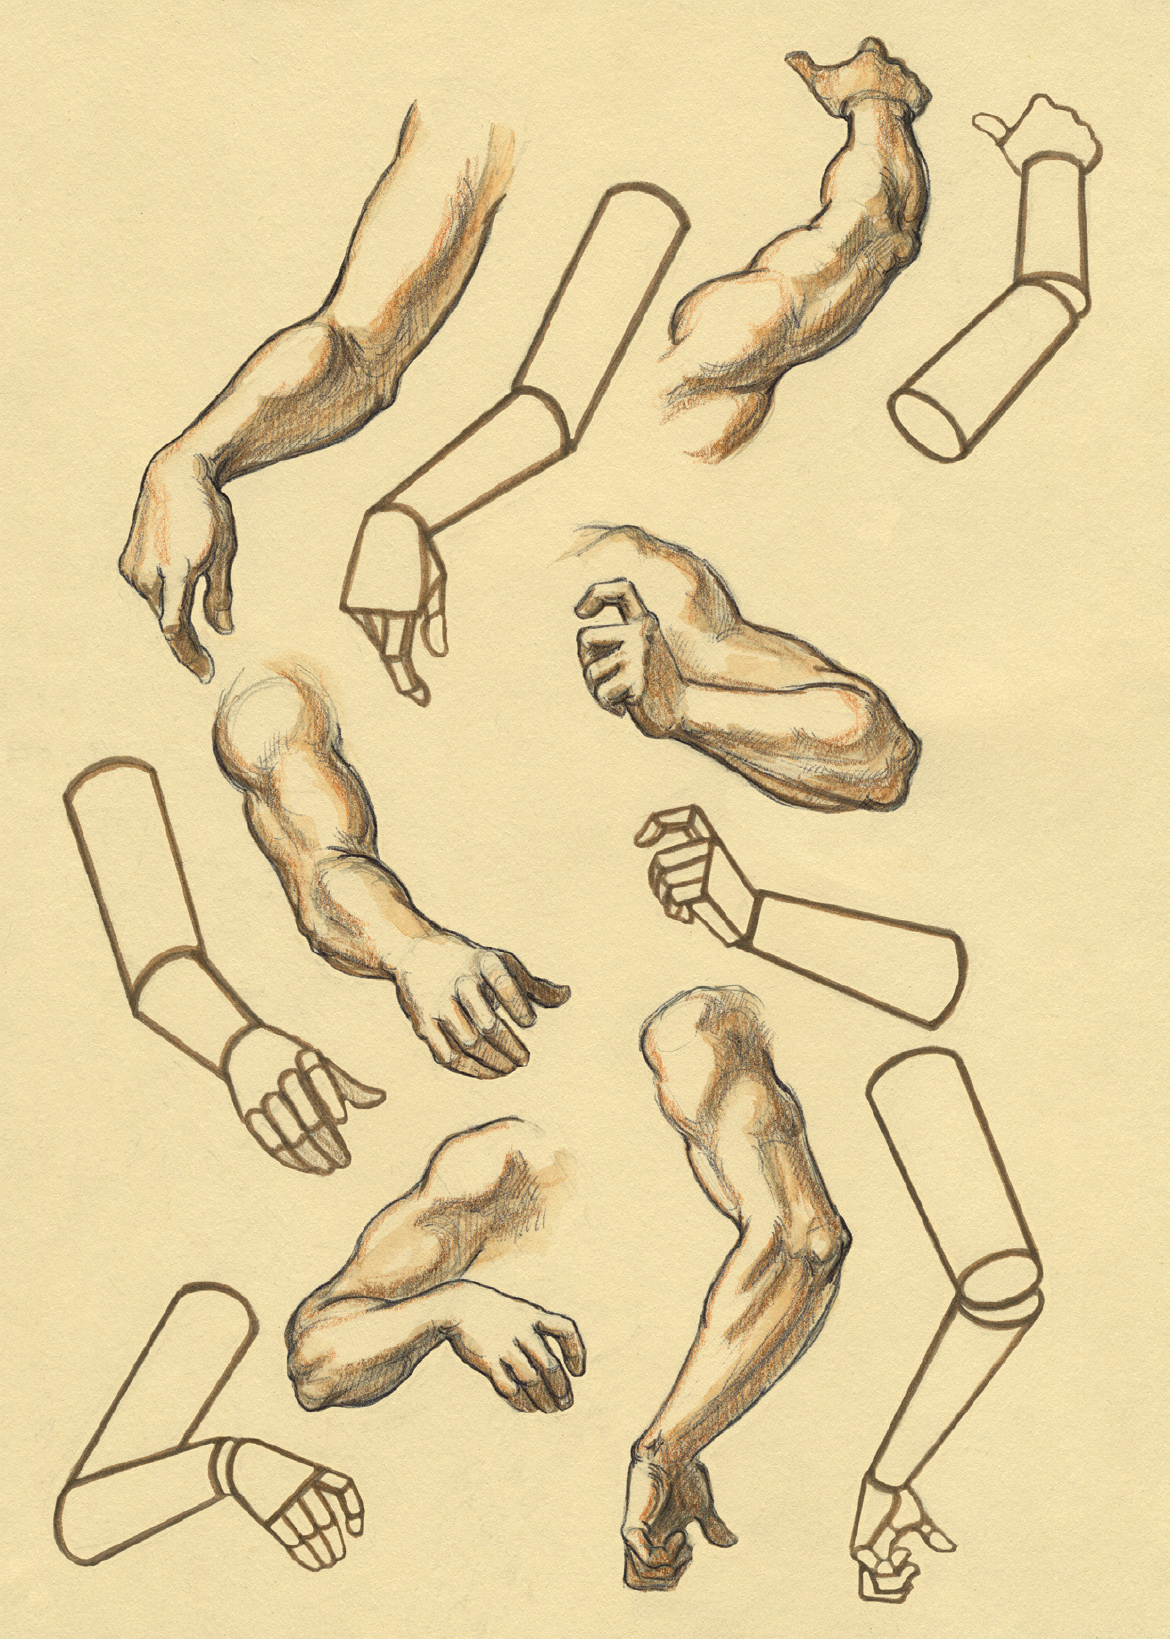
Graphite pencil, watercolor pencil, and brush-pen on light toned paper.
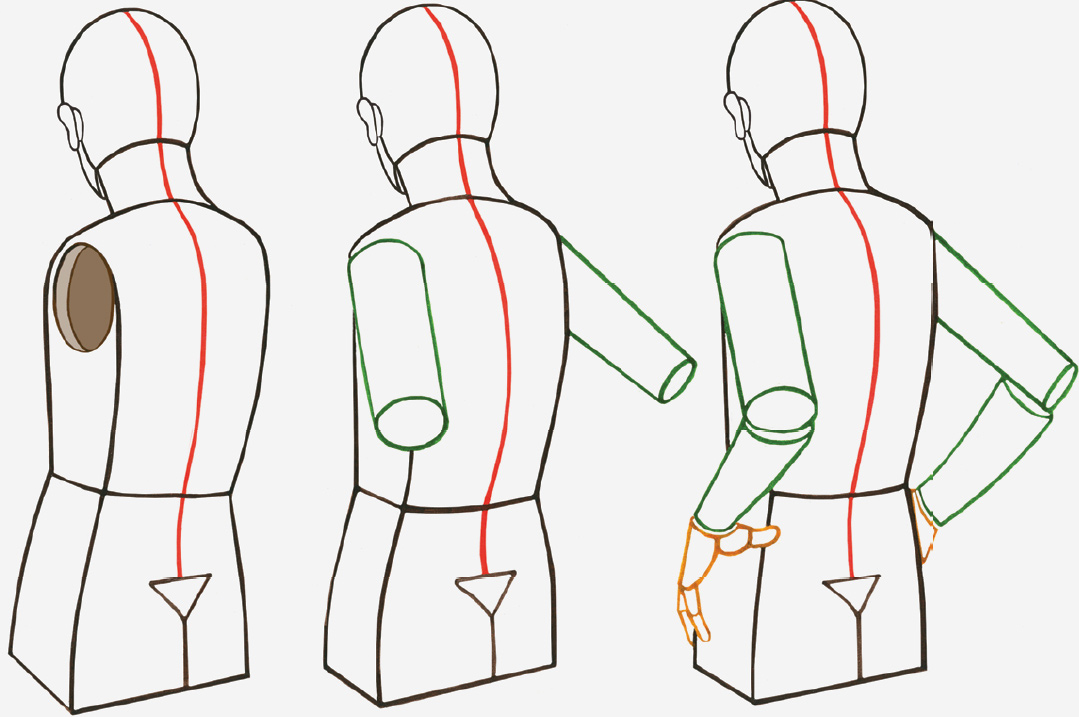
To position the arms in relation to the torso, think of the torso as a manikin with arm holes to which the cylindrical structures of the upper arms can be attached (see the structural diagram Sketchbook Study of Female Figure with Arms Akimbo). Or simply indicate the upper arms as cylinders and the torso as a birdcage shape; as you add anatomical forms on top of these structures, the space between the rib cage and upper arm fills in with form. Structures of the Arms and Rib cage—Two Studies, on following page, shows the structural shapes of rib cages and arms superimposed on finished drawings.
STRUCTURES OF THE ARMS AND RIB CAGE—TWO STUDIES
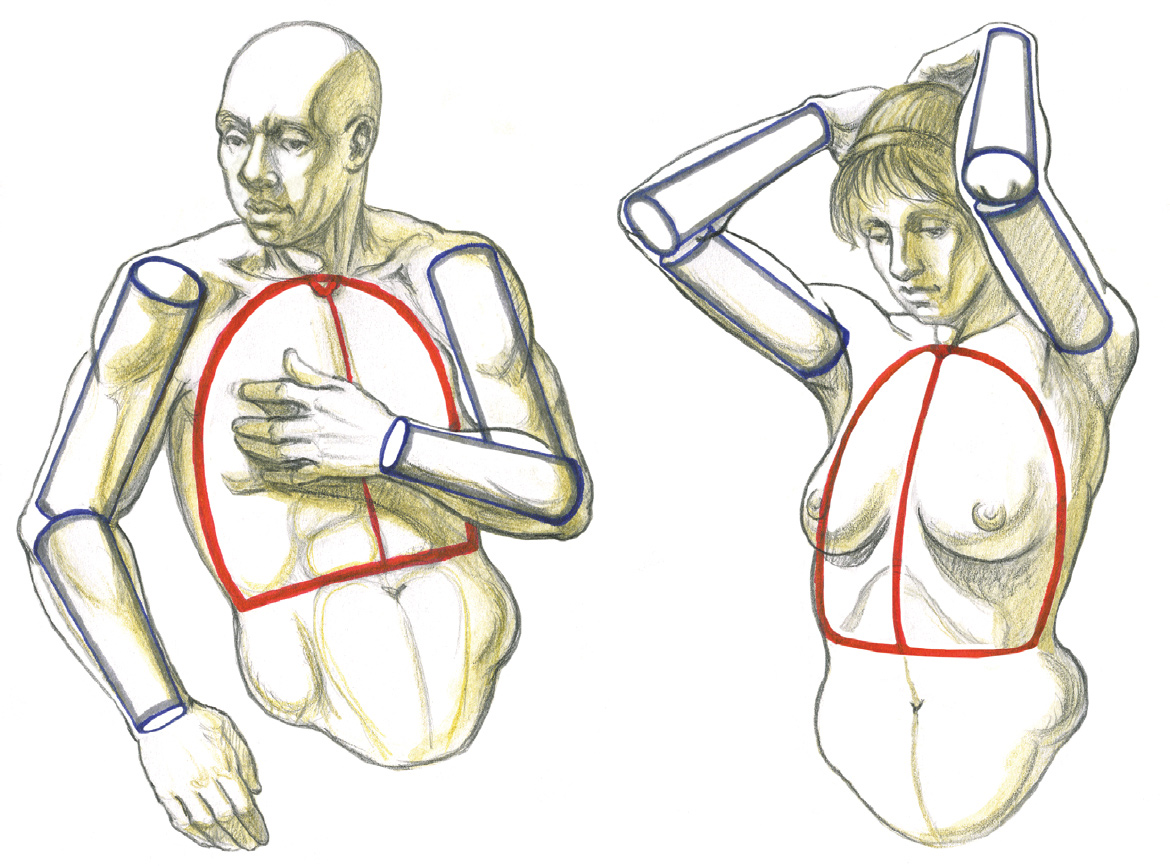
In the life study Male Figure with Hands Clasped behind Head, the figure faces toward us with arms held upward and hands clasped behind his head. Again, elongated cylinders were used as the basic structural shapes, as seen in the accompanying structural diagram.
MALE FIGURE WITH HANDS CLASPED BEHIND HEAD
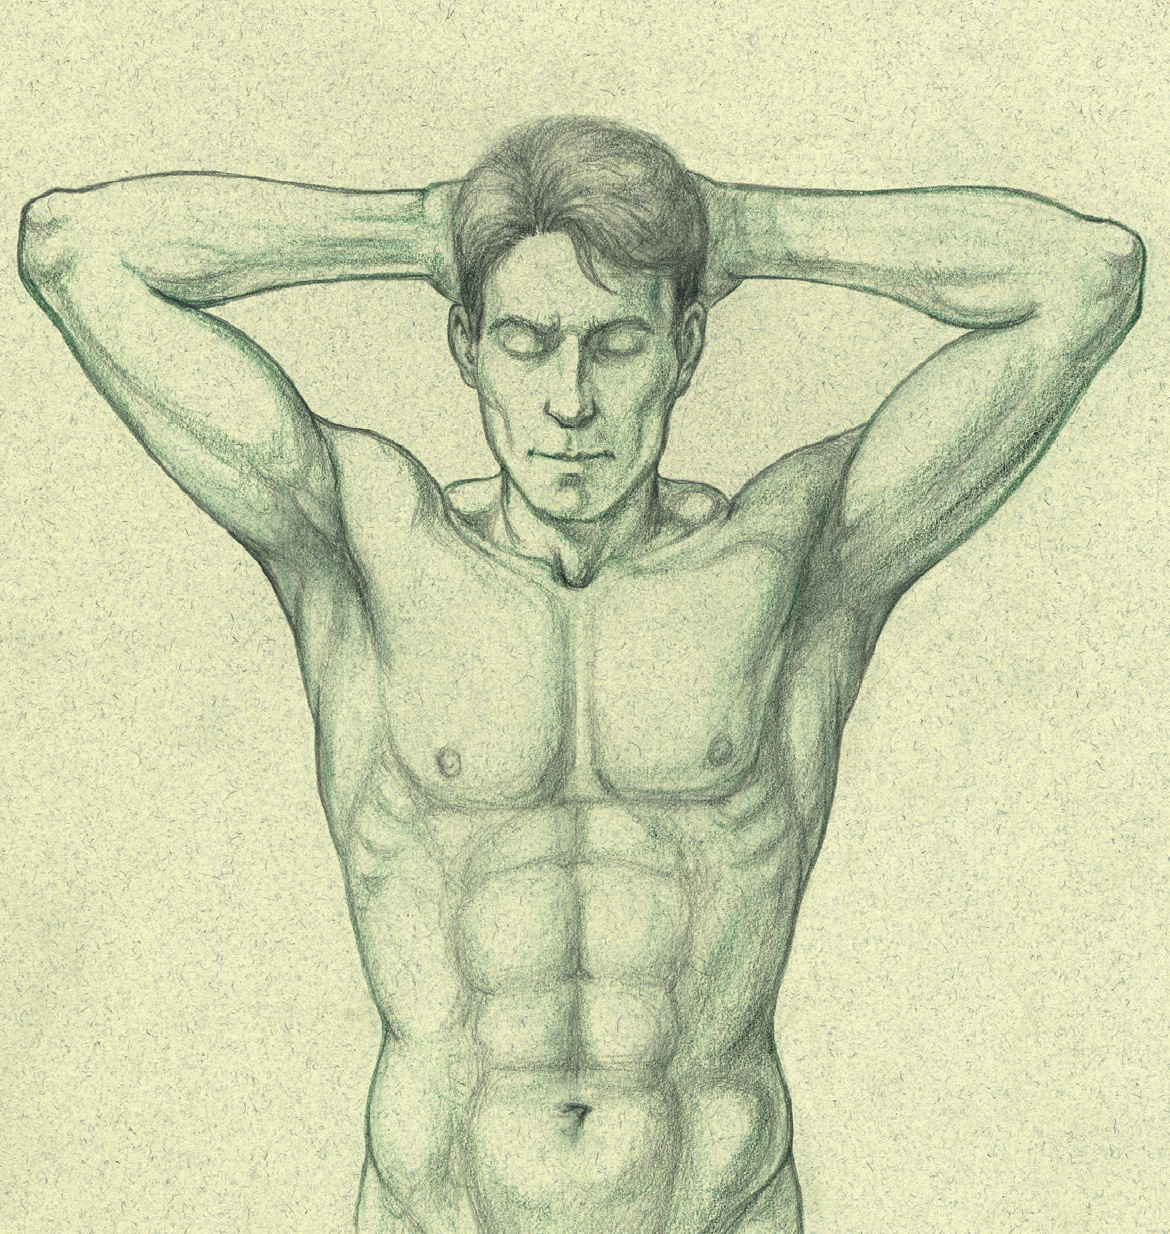
Graphite pencil and colored pencil on light toned paper.
STRUCTURAL DIAGRAM
DARK BROWN LINES: Arm structures
GREEN LINES: Rib cage, neck, and head structures
GRAY LINES: Midline and eye line
DARK YELLOW LINES: Muscle contour
Arms Akimbo
The phrase arms akimbo describes a pose in which both hands are placed on the hips. The upper arm and lower arm are bent, with the elbows pointing outward away from the torso. The hand can be placed on the hip in several different ways:
· With the palm downward and the fingers on the front of the torso while the thumb is positioned toward the back
· With the knuckles resting on the hip and the thumb folded against the index finger in a relaxed or tightly clenched way
· With the palm resting against the hip and the thumb positioned on the front while the fingers face toward the back
· With both the fingers and thumb at front while the palm rests on the hip
Some of these positions are shown in the drawing at left. Note that in such a pose, the hands can be positioned in the same way or in different ways.
ARMS AKIMBO—THREE POSITIONS
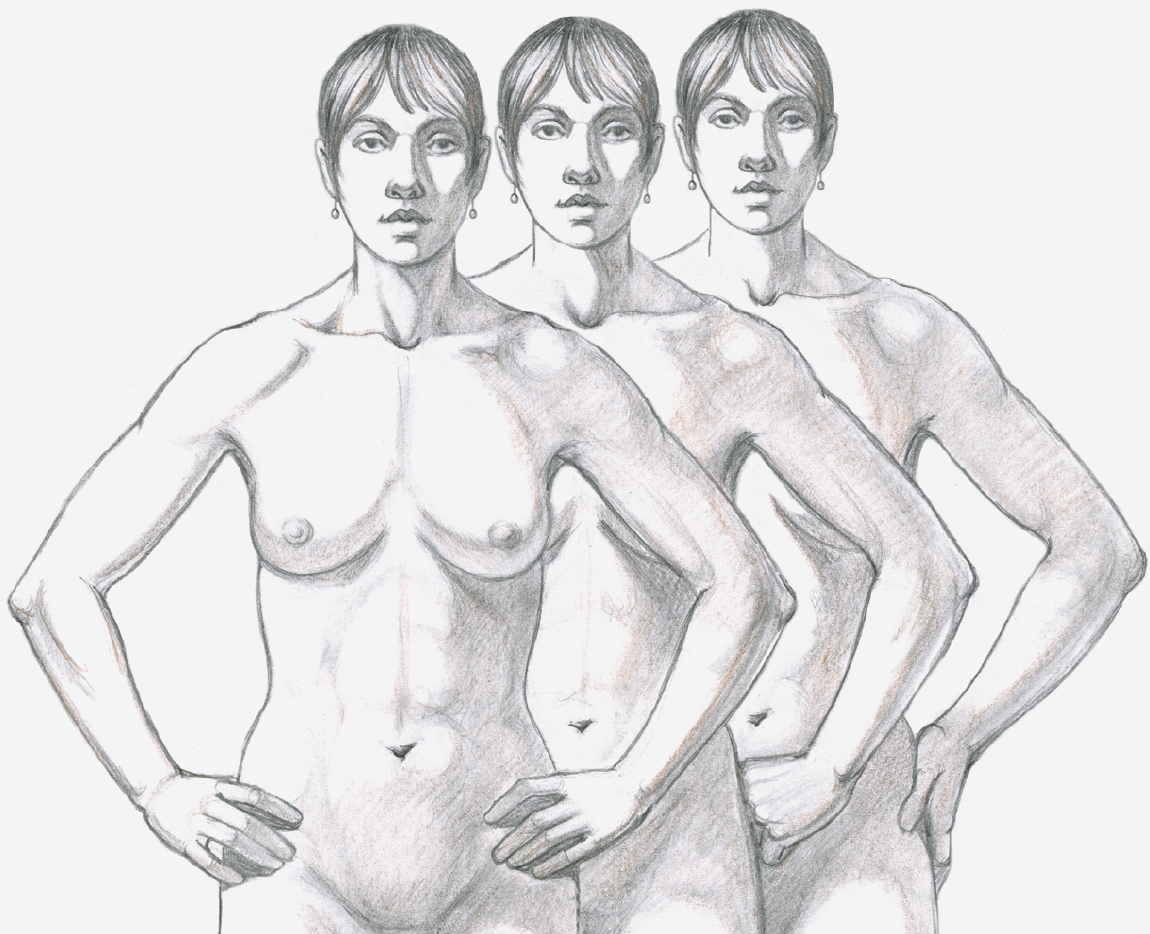
In the figure at left, the fingers are toward the front, with the thumb positioned toward the back. In the middle figure, the knuckles rest on the hips. In the figure at right, the thumb is positioned in front with fingers facing toward the back.
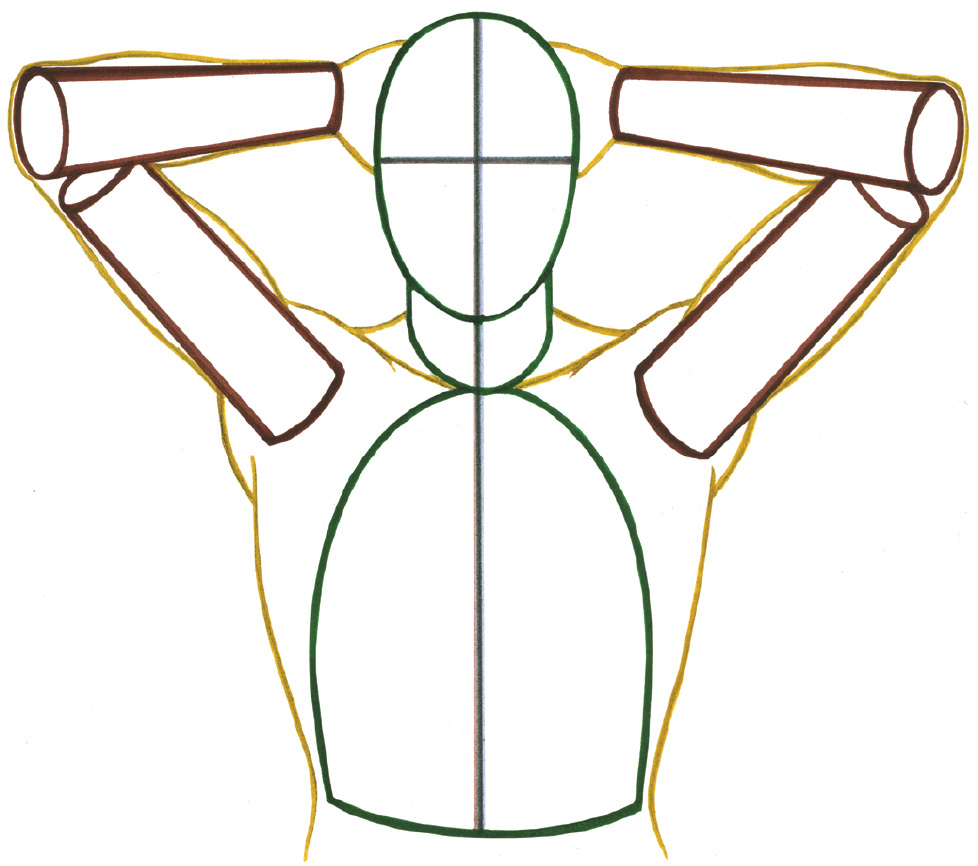
Sketchbook Study of Female Figure with Arms Akimbo, below, shows a woman resting her hands on her hips as seen from a posterior three-quarter view. When deciding how to structure the arms’ attachment into the rib cage, it is helpful to think of the torso as a manikin whose parts are joined together. In the accompanying structural diagram, you can see the arm-hole on the torso of the manikin at the left. In the middle, the upper arms have been attached, and the lower arms and hands have been attached on the manikin at the right.
SKETCHBOOK STUDY OF FEMALE FIGURE WITH ARMS AKIMBO
Graphite pencil, ballpoint pen, watercolor pencil, and white chalk on paper.
STRUCTURAL DIAGRAM—MANIKIN
RED LINES: Midline of torso
GREEN LINES: Arm structures
YELLOW LINES: Hand structures
Structures for the Hand
The armature for a hand study establishes how the hand is positioned spatially and helps you figure out the foreshortened elements, which occur in many views of the hand. If there is not too much foreshortening, then a block shape works well for the basic shape of the hand from the wrist to the base of the fingers. If your view is of the palm side, you may want to add shapes for the large, rounded thenar prominence (of the thumb) and the hypothenar eminence positioned below the little finger. Elongated blocks or cylinders work well as structural shapes for the fingers. The studies in the drawings above show just a few of the many combinations of shapes that may be used when constructing hands.
LIFE STUDIES OF HANDS #1
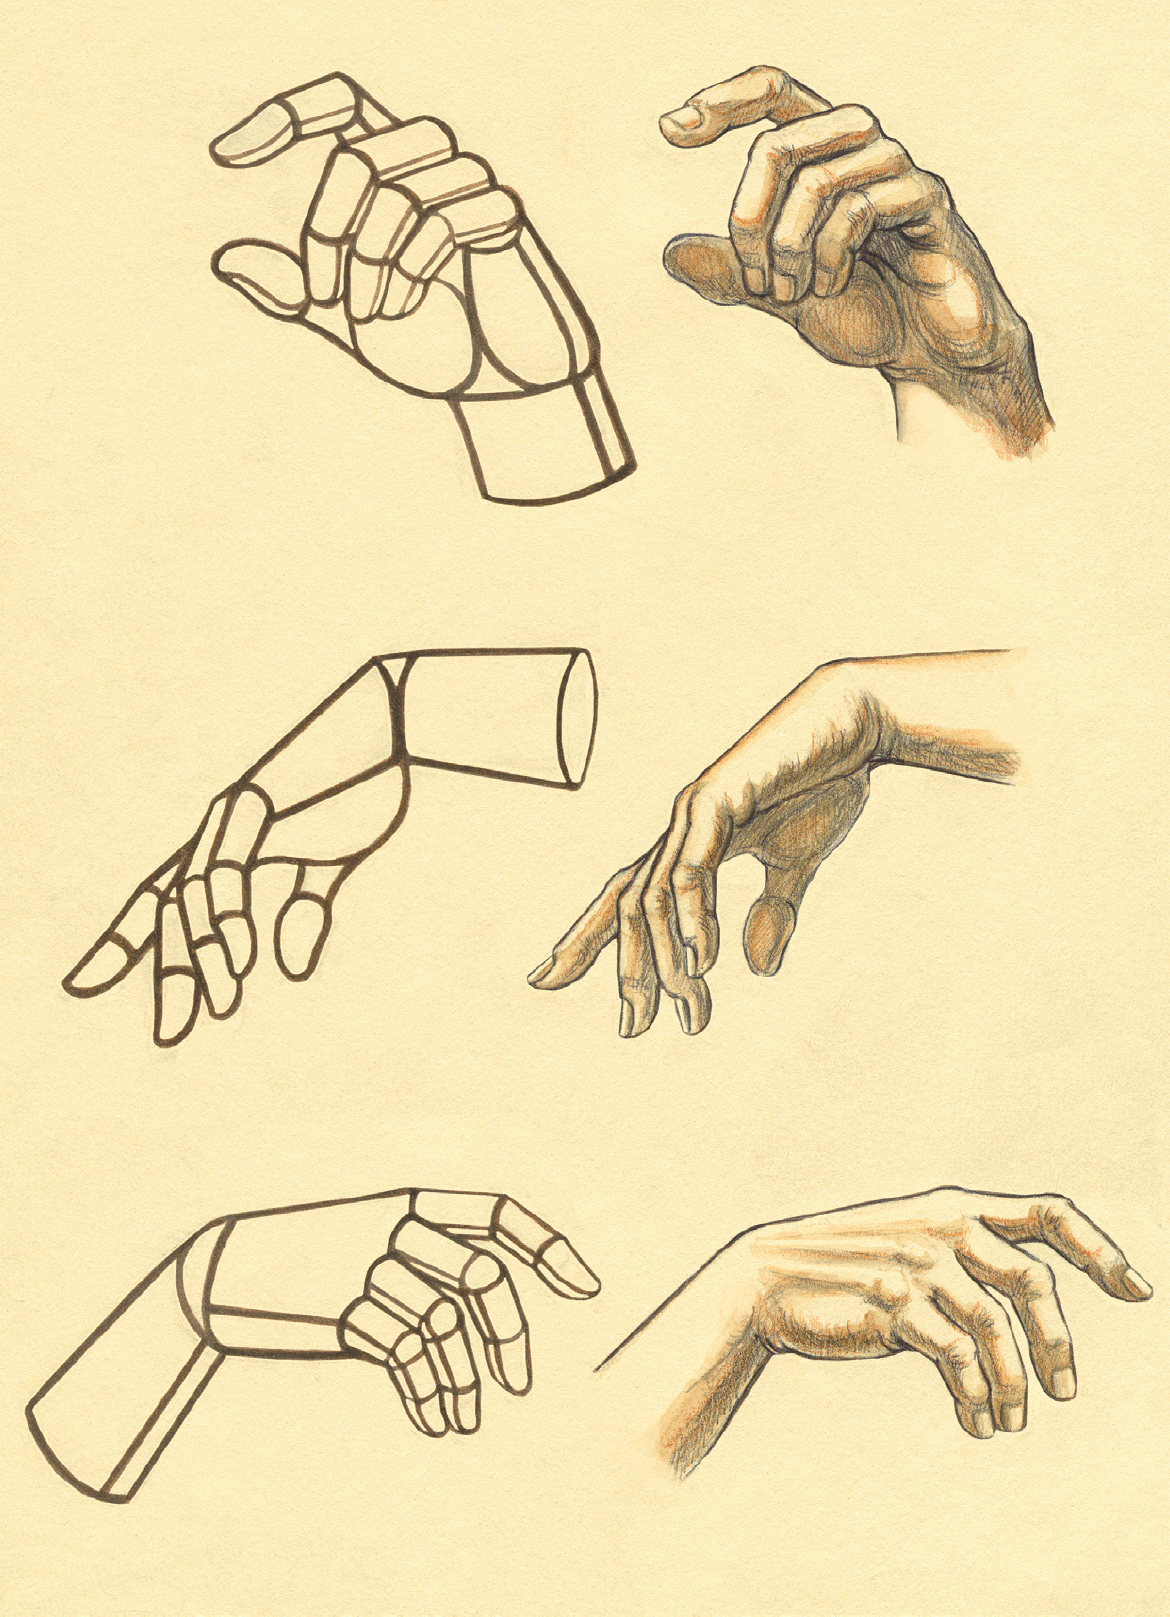
Graphite pencil, ballpoint pen, watercolor pencil, and brush-pen on light toned paper.
LIFE STUDIES OF HANDS #2
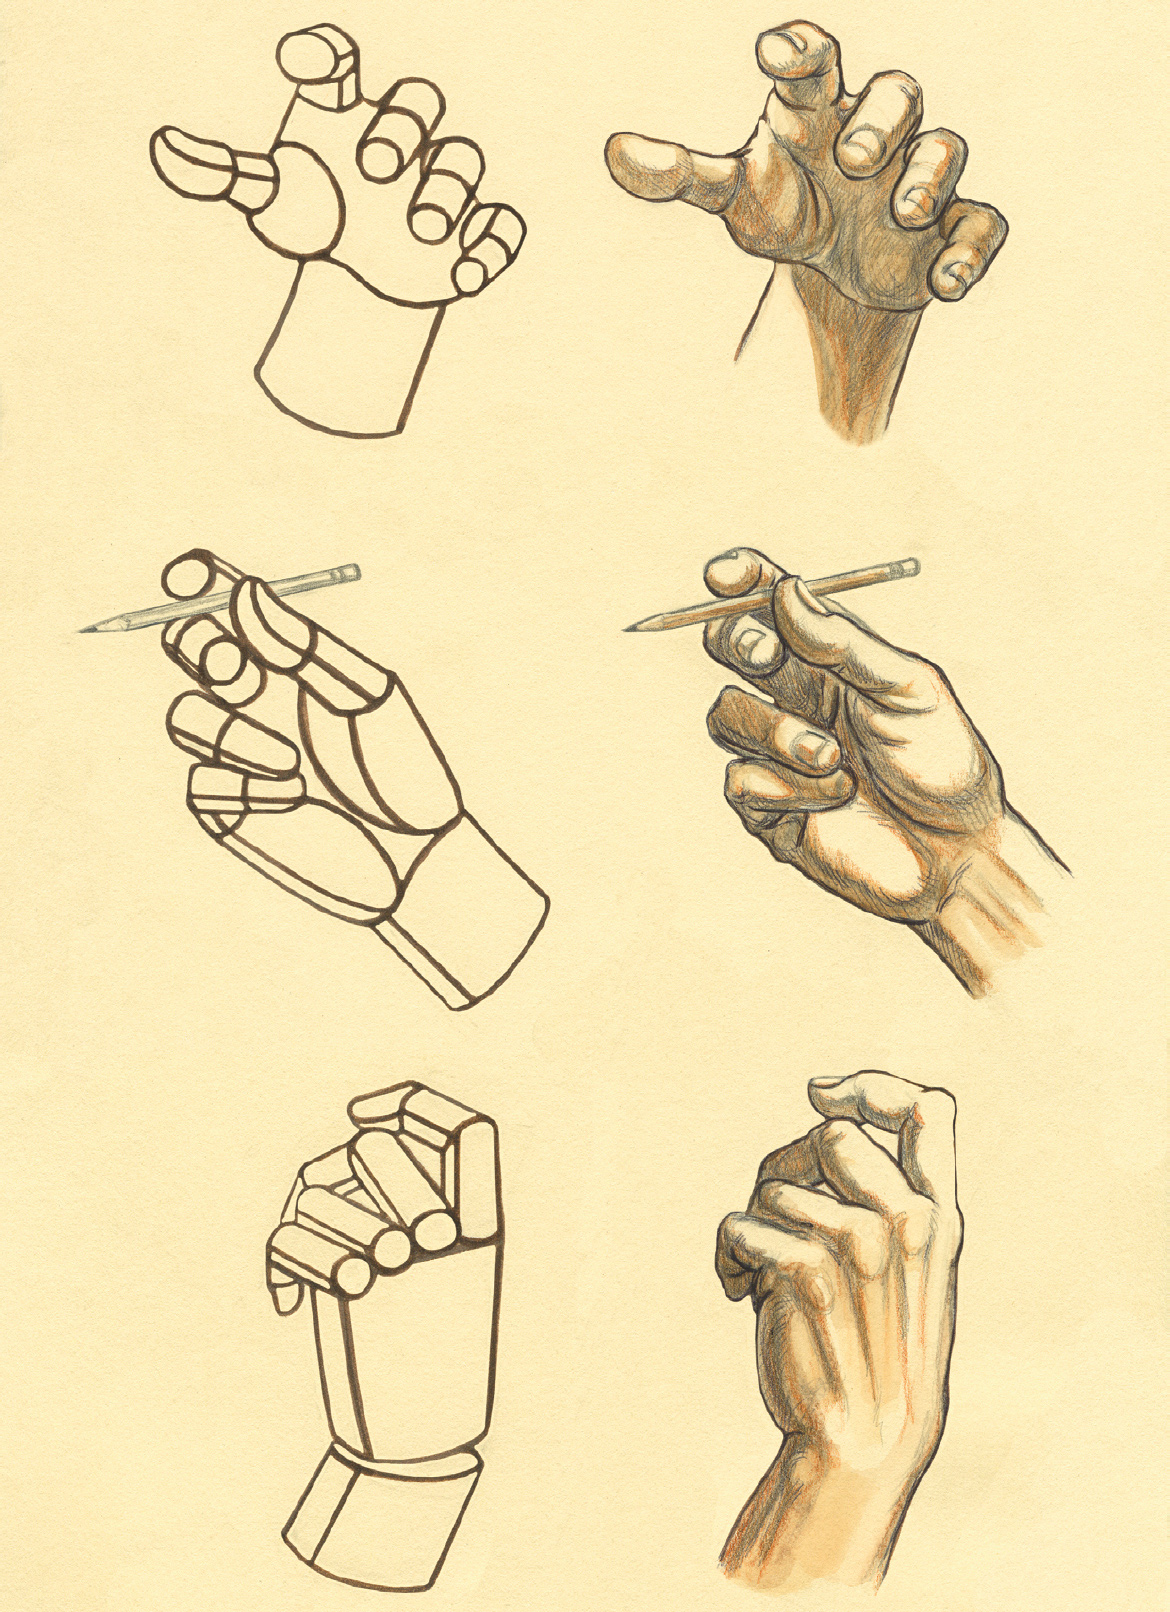
Graphite pencil, ballpoint pen, watercolor pencil, and brush-pen on light toned paper.
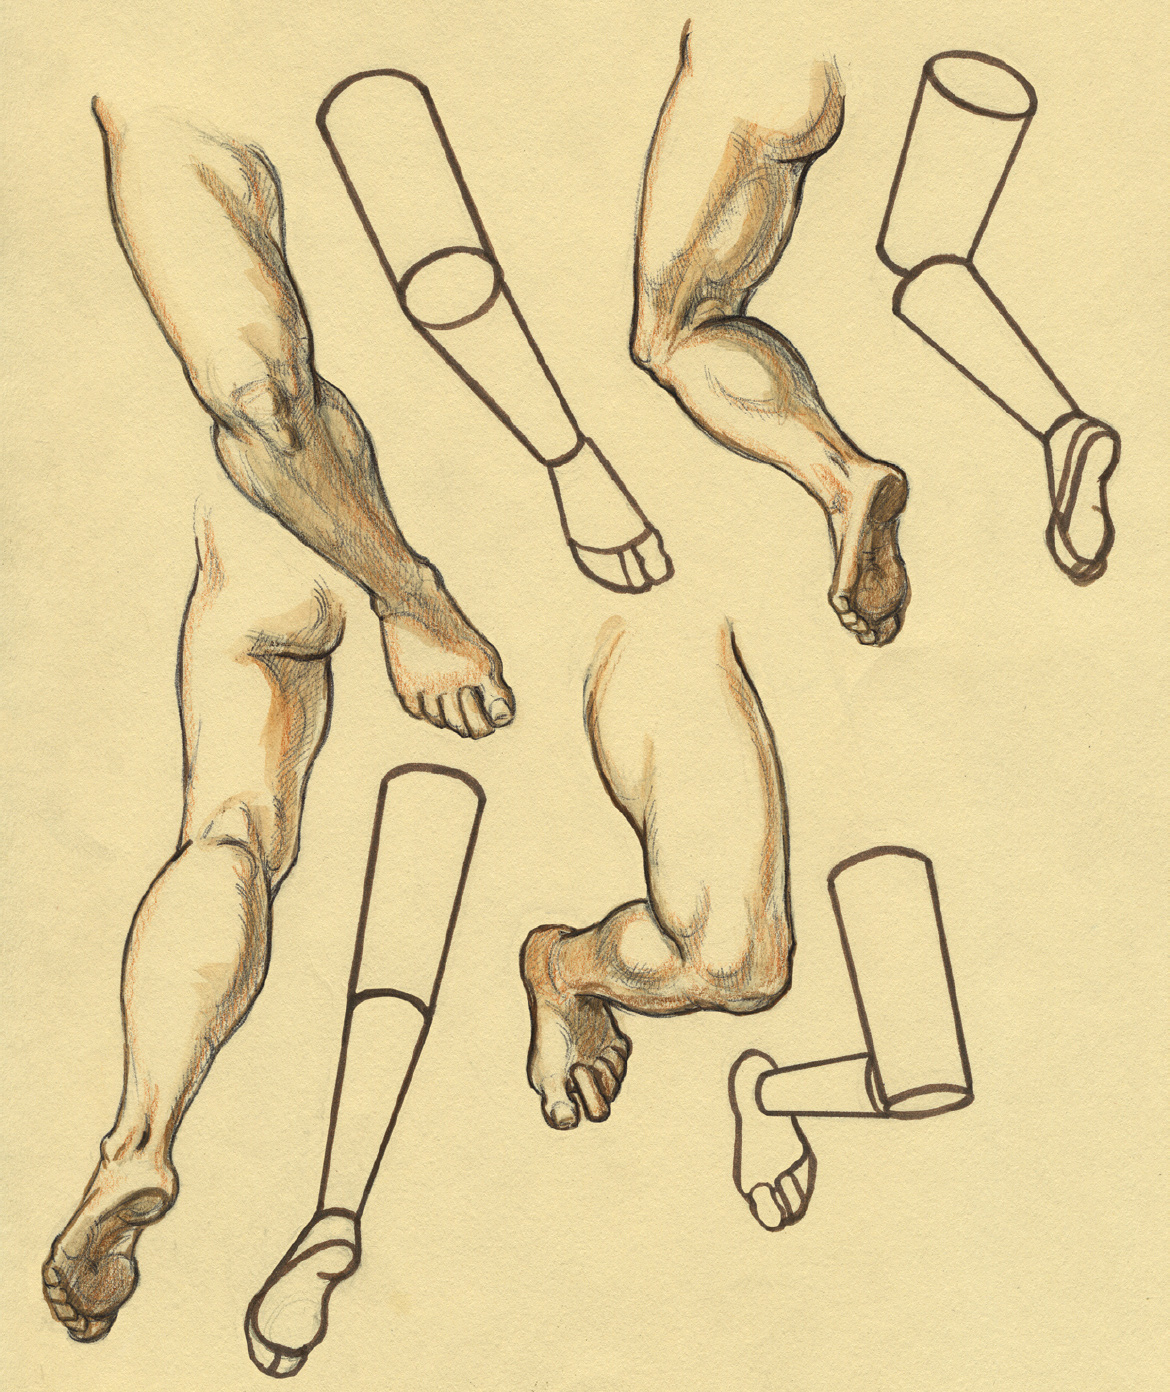
Structures for the Leg
When blocking in the legs, use very simple shapes: cylinders or elongated rectangles. For example, for a bent-leg pose in which the upper leg and knee region are advancing toward you while the lower leg is tucked under and receding away, using cylinders or elongated blocks will immediately indicate the general volume of the upper leg and lower leg and how they are positioned spatially. There can, of course, be endless variations on a bent-leg pose in which you must also convey the tilt or angle of the upper leg and lower leg as well as the way in which the upper leg is anchored in the pelvis unit. You may also use organic shapes, simplified bone shapes, or a combination of organic and geometric shapes when structuring the leg. Since poses vary so greatly, try various structures to see which shape or combination works best for each study. Several approaches are shown in the following drawing.
LEG STRUCTURES
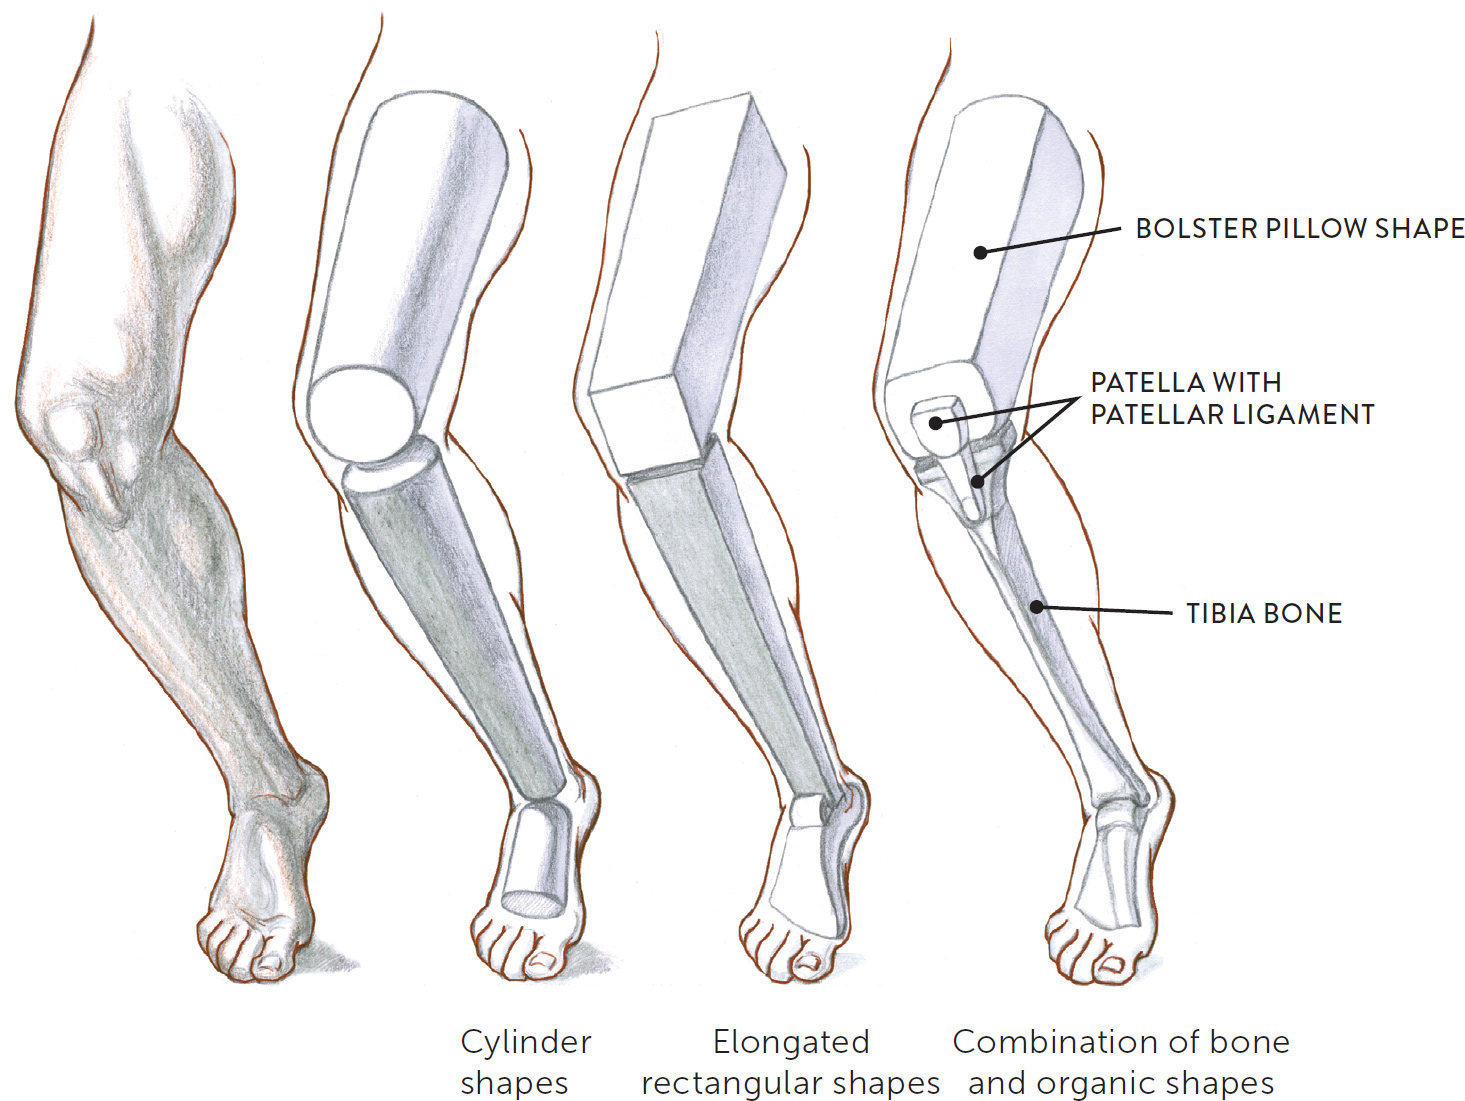
Three-quarter view of a bent leg
The following sketchbook studies, are based on the legs of some of Michelangelo’s figures in the Sistine Chapel frescoes. As I said in the section on structures of the arm, you may use any realistic figurative art as the basis for such studies.
SKETCHBOOK STUDIES OF LEGS FROM MICHELANGELO’S SISTINE CHAPEL FIGURES
Graphite pencil, watercolor pencil, and brush-pen on light toned paper.
In the life study Female Figure in a Sitting Pose on the Floor, one of the model’s legs is slightly foreshortened while the other is stretched out. The accompanying structural diagram shows how a pants shape was used to help connect the upper legs into the pelvis structure. Because of the foreshortening of the right upper leg, a foreshortened block shape was used for that structure. Anatomical forms were added once all the structures of the torso and legs were established. The shadows on and around all the parts of the body that are touching the floor give weight to the figure, grounding it and preventing it from looking as if it were floating in midair.
FEMALE FIGURE IN A SITTING POSE ON THE FLOOR
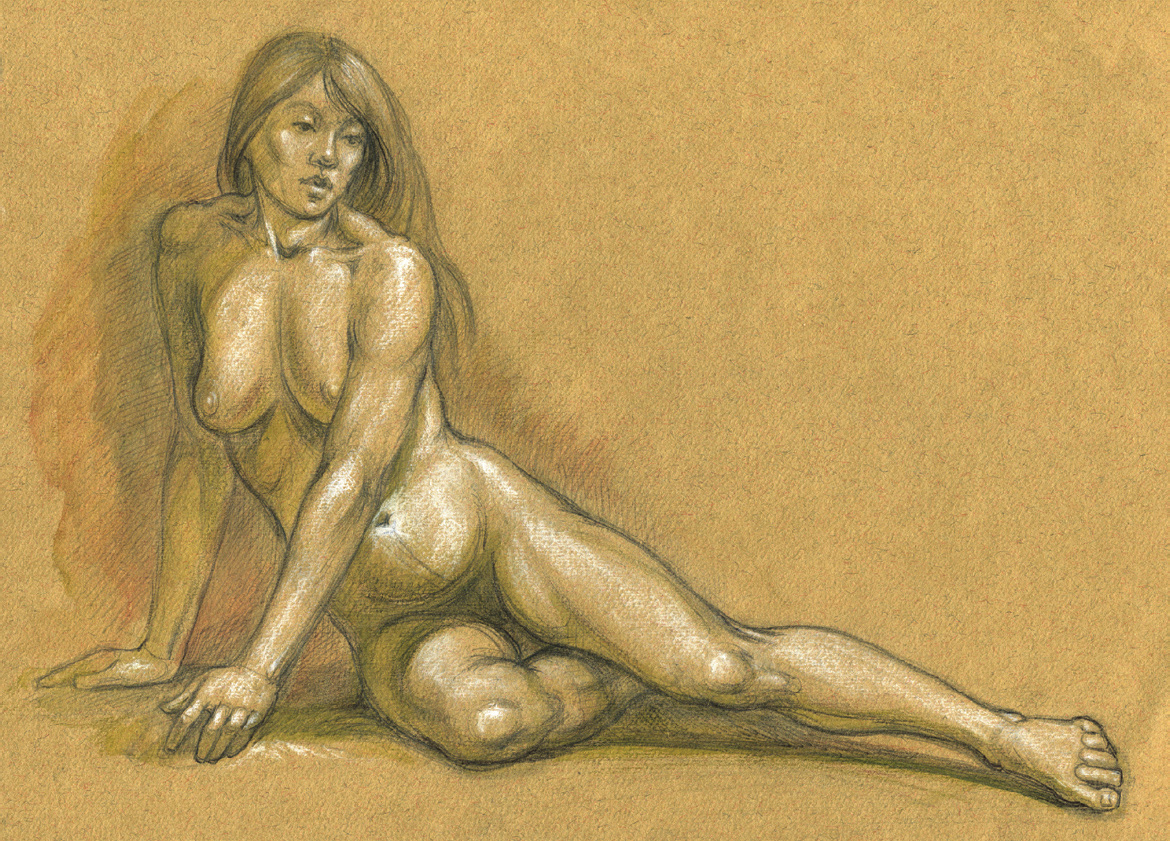
Graphite pencil, ballpoint pen, watercolor pencils, and white chalk on tan toned paper.
STRUCTURAL DIAGRAM
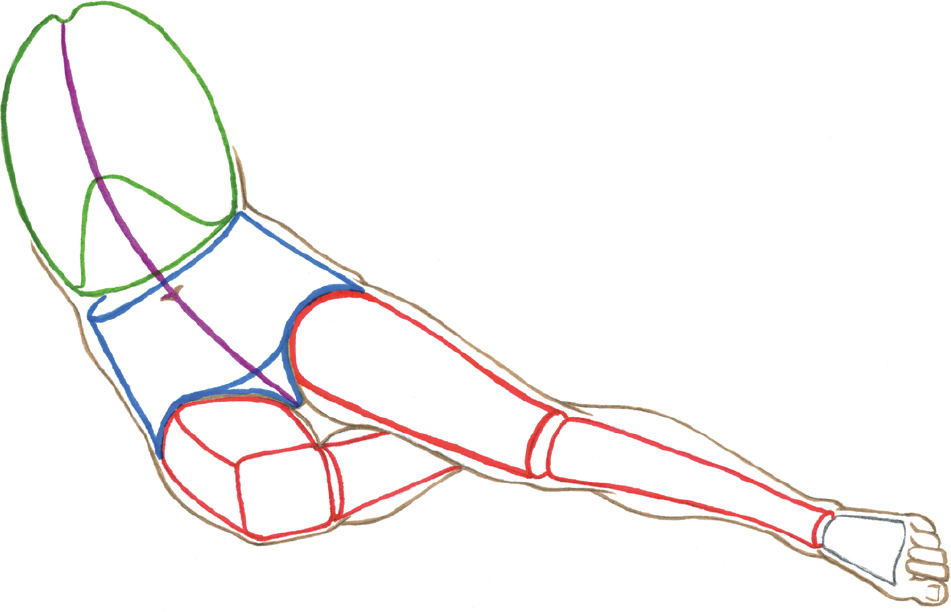
GREEN LINES: Structure of rib cage
BLUE LINES: Structural shape for pelvis
RED LINES: Structural rectangle and cylinder shapes for legs
PURPLE LINE: Central axis of torso
The life study Female Figure Sitting with Legs Crossed, shows a figure facing forward with one leg crossed over the other. The structural diagram shows the cylindrical shapes of the legs as they attach into the pelvis/hip. When drawing poses such as this, find the place where the hip ends—that is, the spot where the figure is actually sitting—and link up that side of the hip to the other side. This linear connection—a structural follow-through line—helps you make sure that the hips are aligned with each other and that one side is not too high or too low.
FEMALE FIGURE SITTING WITH LEGS CROSSED

Graphite pencil and white chalk on toned paper.
STRUCTURAL DIAGRAM
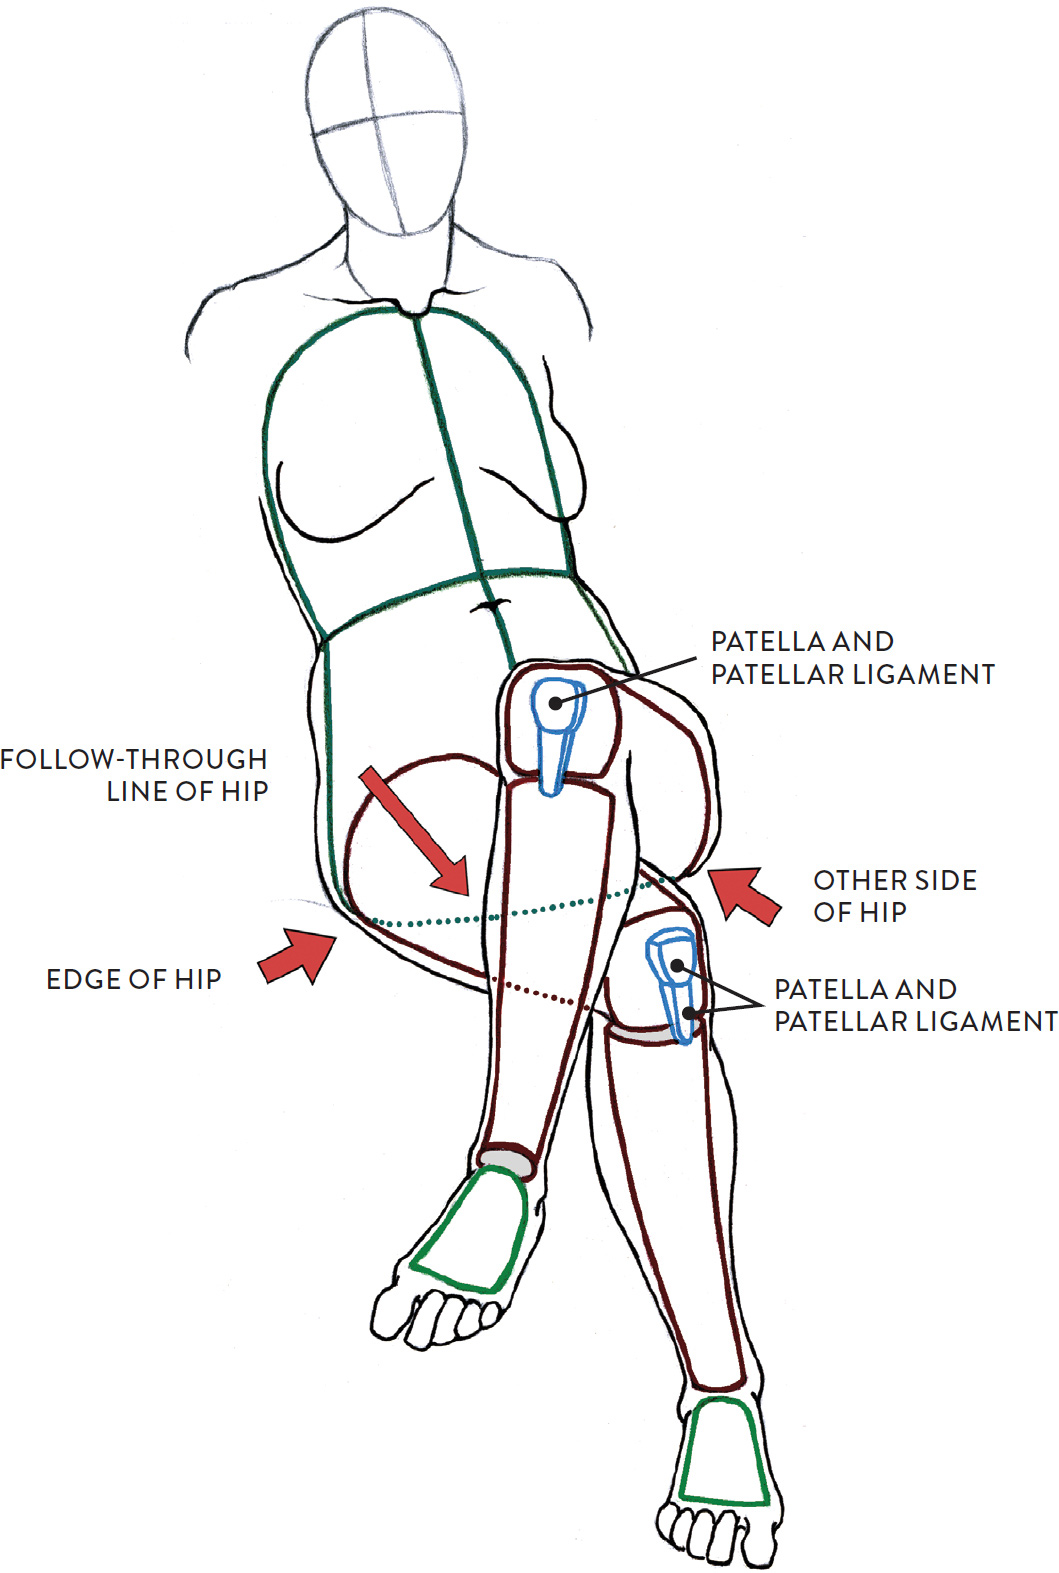
DARK BROWN LINES: Structural cylinders for the legs
BLUE LINES: Patella and patellar ligament
GREEN LINES: Torso structural shapes
RED ARROWS: Edges of hip
Structures for the Foot
Feet are challenging to draw, paint, or sculpt because they take on so many different shapes in different poses. The shapes you choose when blocking in the foot therefore depend on the foot’s position. Elongated triangles work well for side views, wedge shapes for front views, “bootie” or sock shapes for three-quarter views, and footprint shapes for views of the sole. Once your structural shape has been lightly depicted, add the anatomical forms you see in that particular view. The sets of studies in the drawings below show just a few of the many possibilities.
LIFE STUDIES OF FEET #1
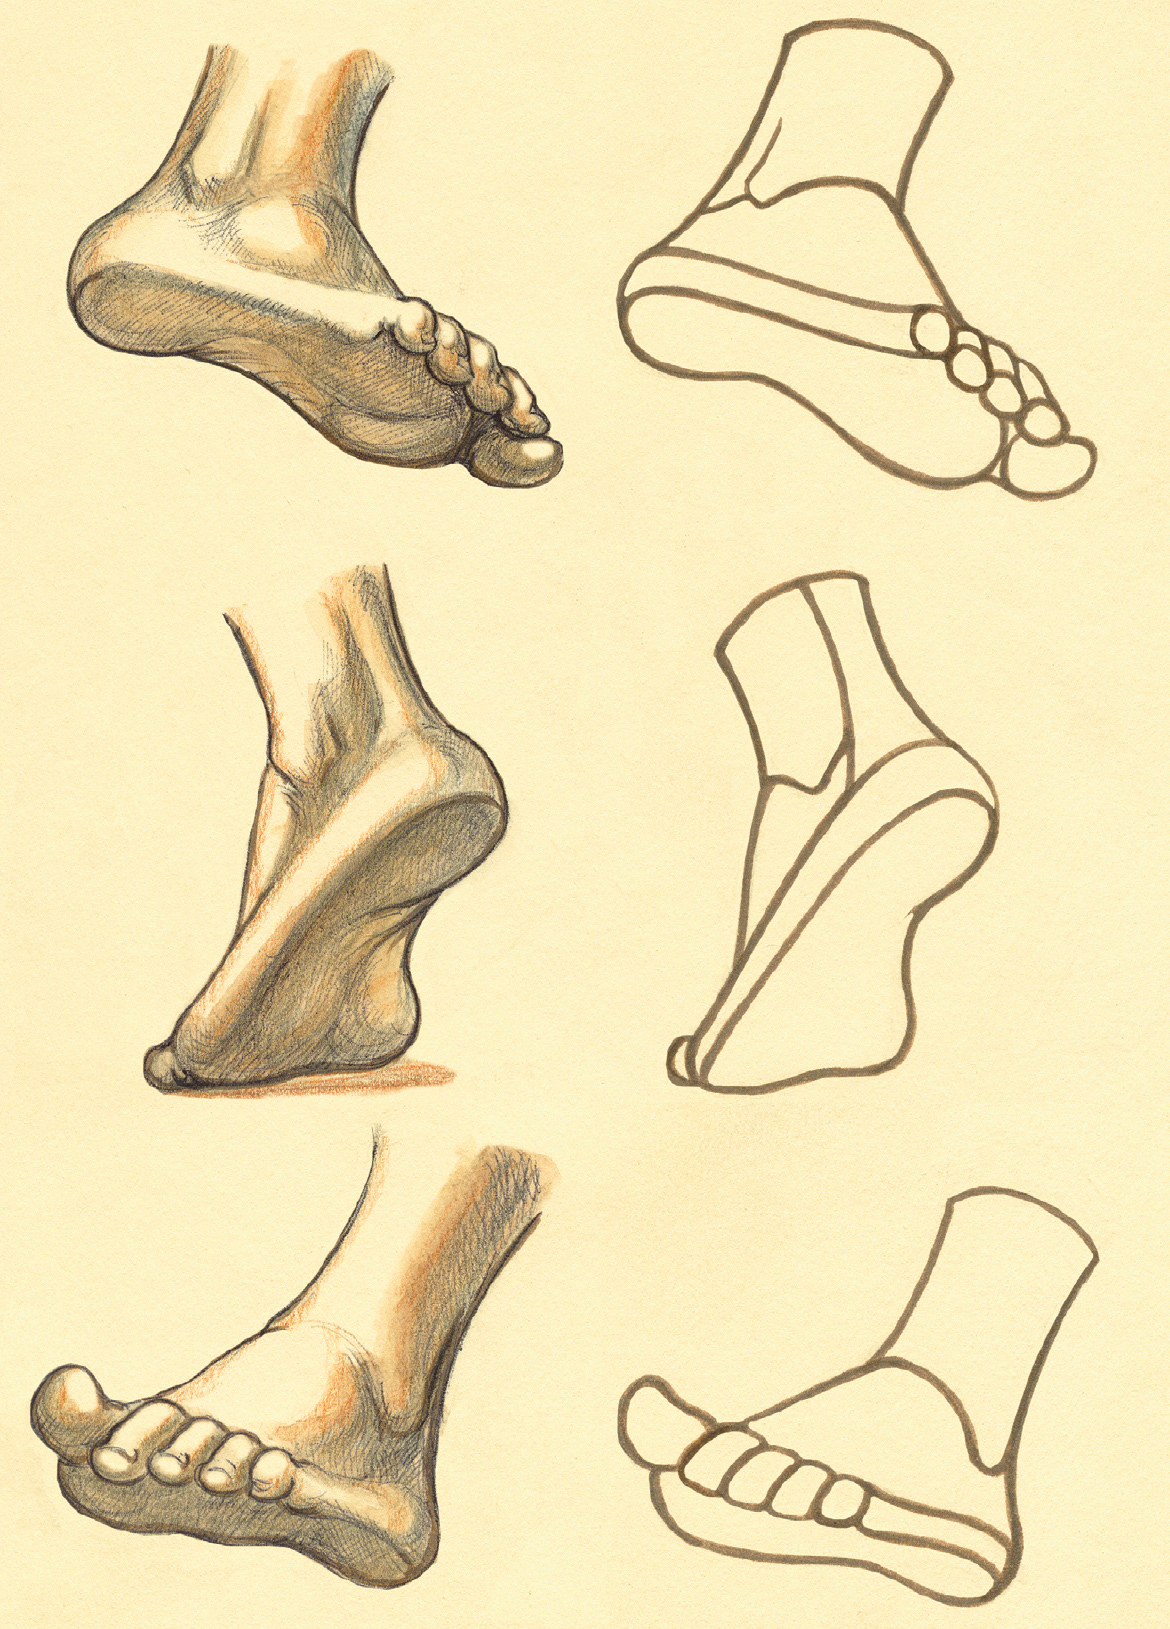
Graphite pencil, ballpoint pen, watercolor pencil, and brush-pen on light toned paper.
LIFE STUDIES OF FEET #2
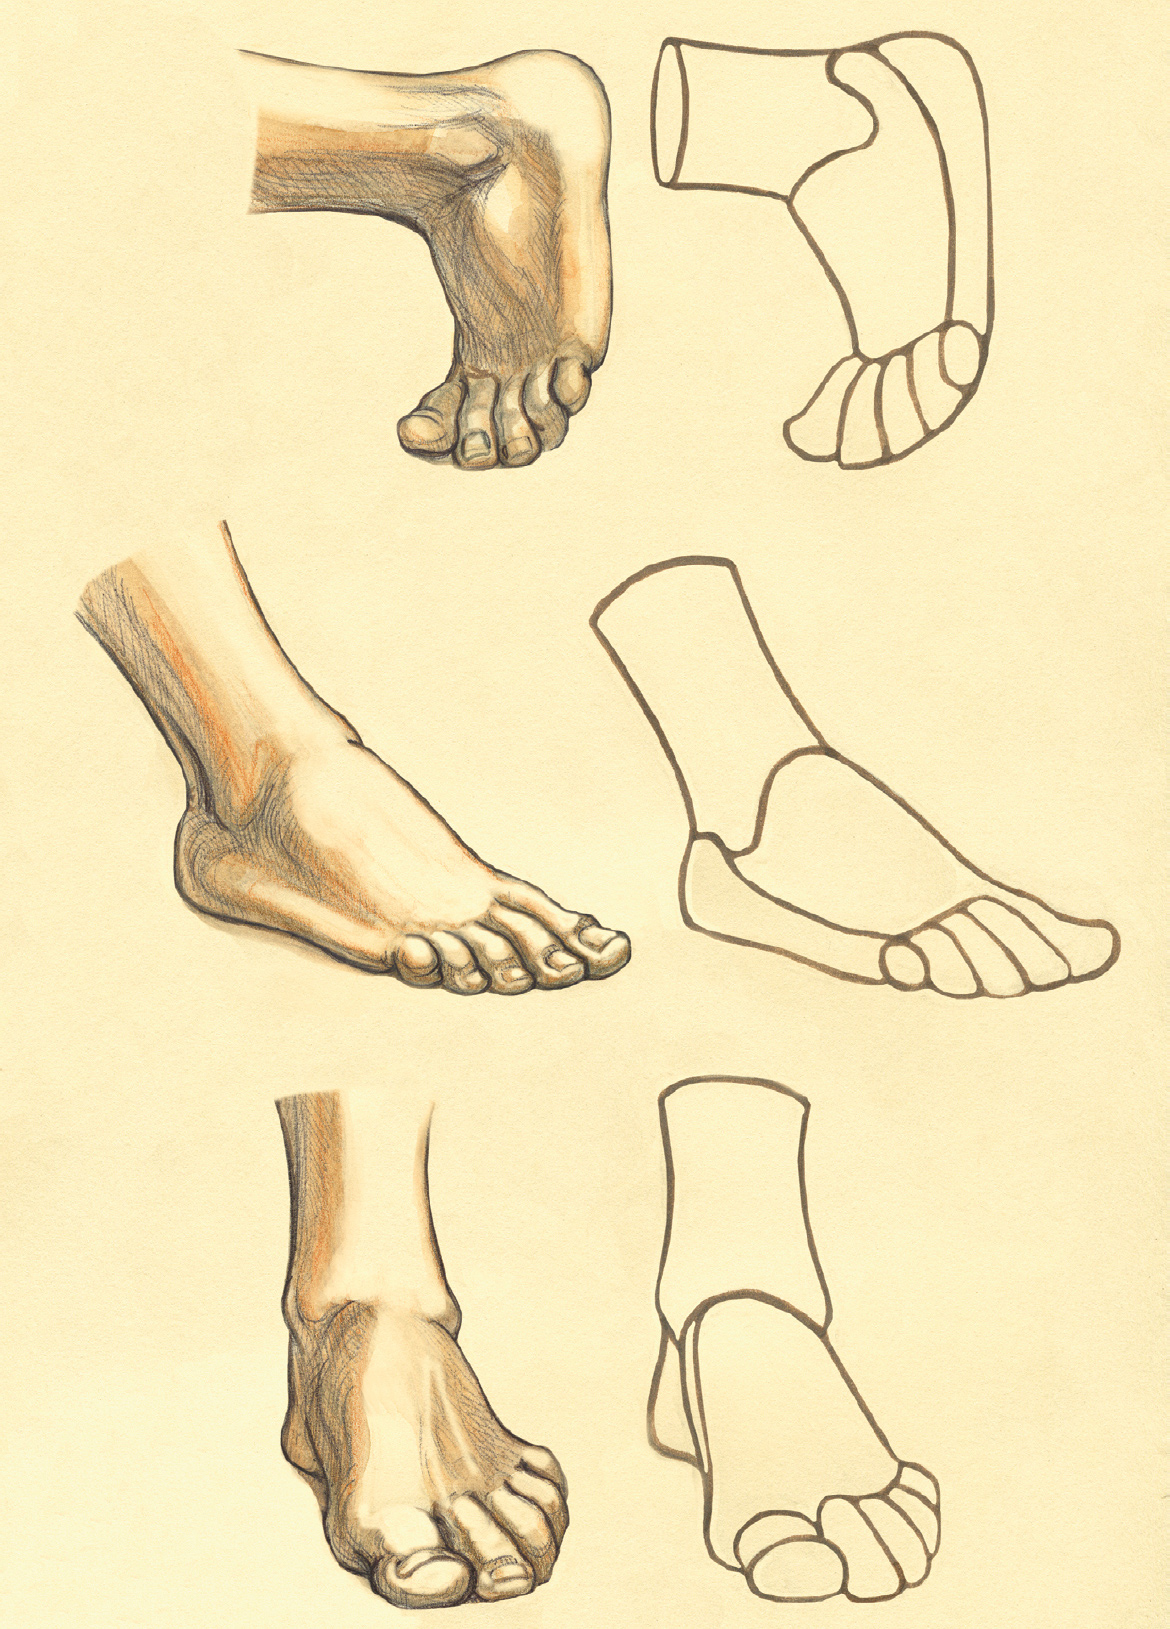
Graphite pencil, ballpoint pen, watercolor pencil, and brush-pen on light toned paper.
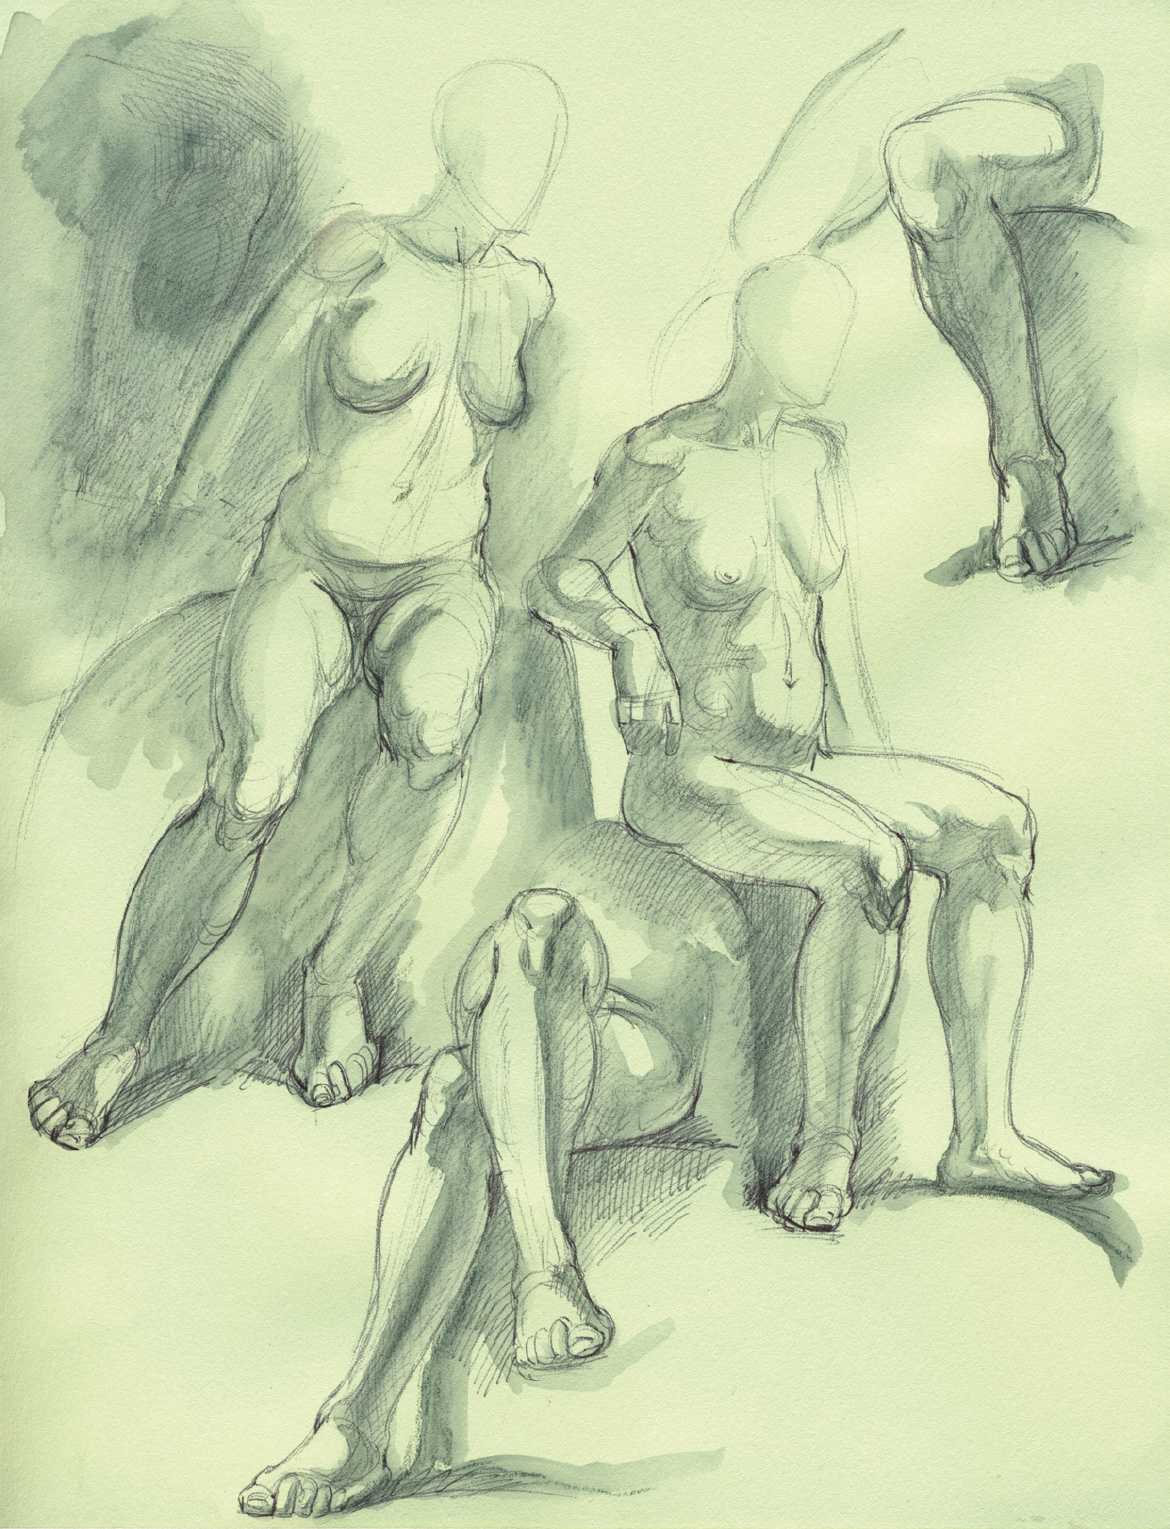
The Planes of the Figure
From the Renaissance to modern times, a number of artists have used the planes of the figure as a way to study the human body. Examples of such work include the pen-and-ink figure studies of Michelangelo (Italian, 1475–1564), the manikin figure studies of Luca Cambiaso (Italian, 1527–1585), and the anatomical drawings of George Bridgman (Canadian-American, 1865–1943).
Indicating the plane changes on the surface of the figure can give a three-dimensional quality to the forms. The approach is simple: Break the surfaces of body parts into four fundamental planes: top, front, side, and bottom. Examples of each of these planes are given in the sidebar on this page.
When breaking the body into planes, you can indicate the surface changes with line work (e.g., cross-hatching), or you can apply tones of differing values to create the illusion of three-dimensional forms. In Study of a Sitting Male Figure Leaning Over, the planes are indicated with hatching and cross-hatching. In Studies of Torsos and Legs, diluted ink washes of darker and lighter values were applied to indicate the planes of the figures and the environment.
STUDY OF A SITTING MALE FIGURE LEANING OVER
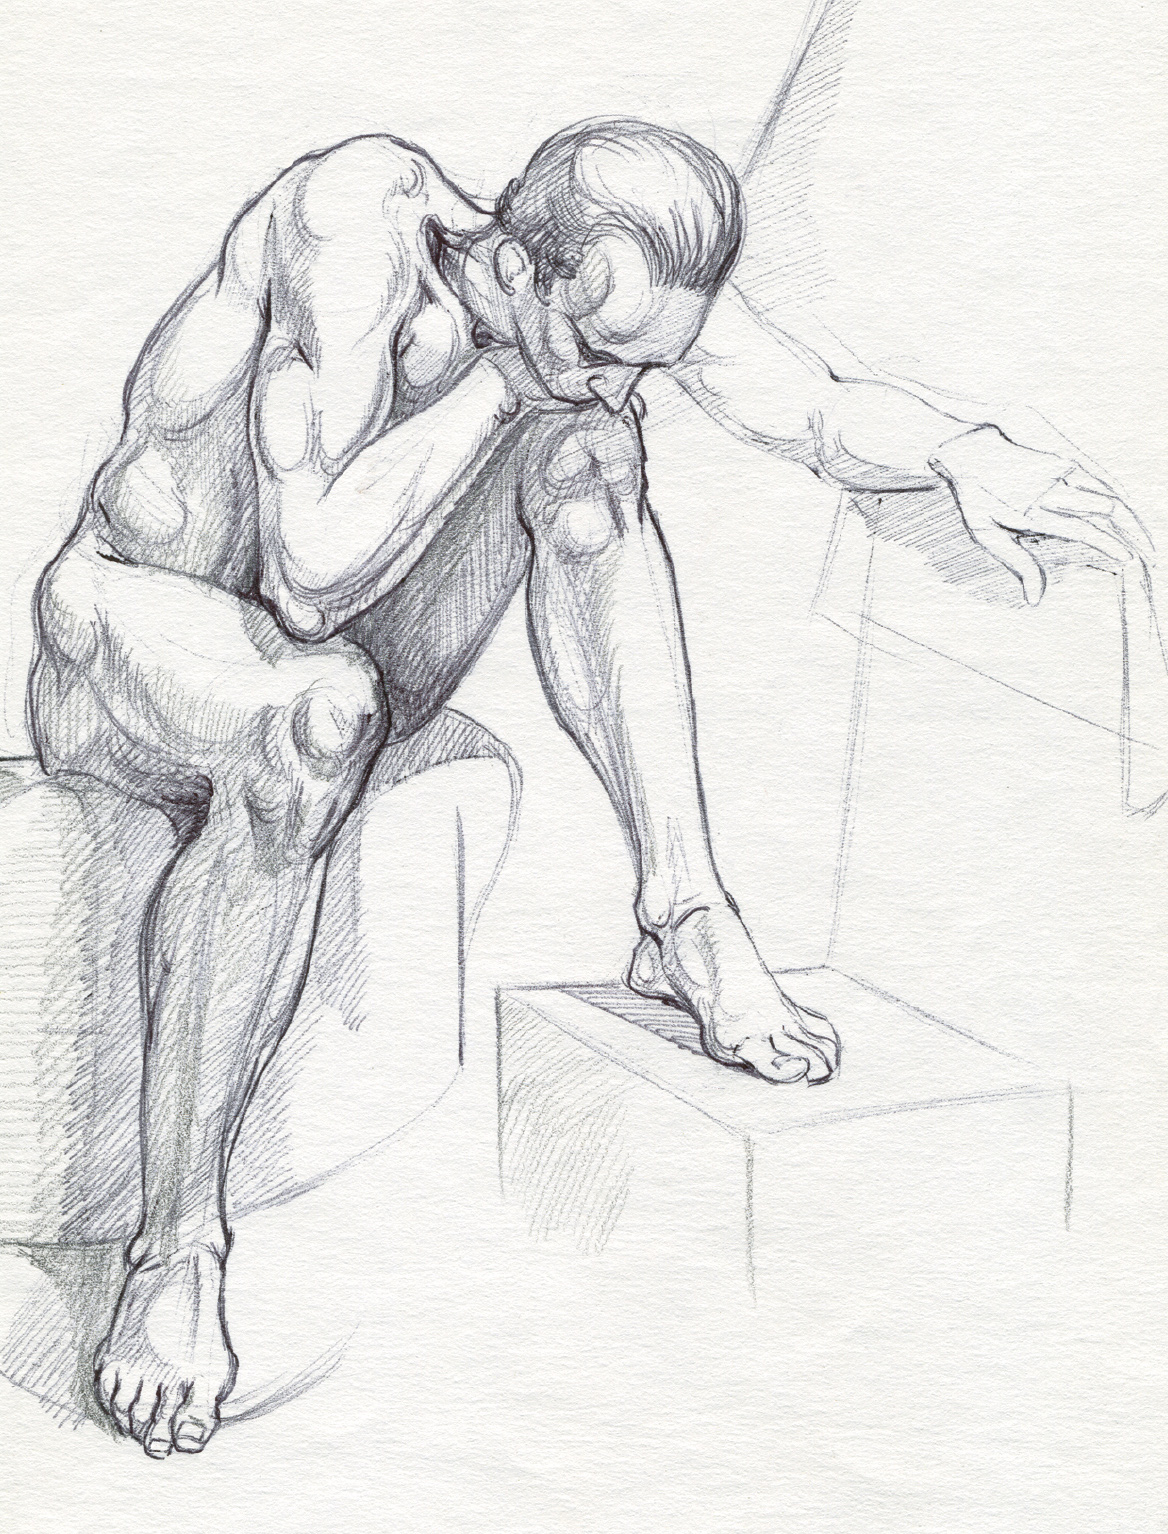
Ballpoint pen with traces of graphite pencil on white paper.
STUDIES OF TORSOS AND LEGS
Ballpoint pen and ink wash on light toned paper.
Directions of Body Planes
Body planes face in four basic directions: top, front, side, and bottom. The direction may change depending on the pose. For example, in an anterior view of a standing pose, the front of the torso is a front plane, but when the model reclines on his or her back, the front of the torso becomes a top plane.
The top plane is usually the uppermost region of a form. In an ordinary standing or sitting pose, top planes would include the top region of the head (easier to see on a head without hair), the top portion of the shoulders (trapezius muscles), and the top (dorsal side) of the foot. If the model is sitting or is raising the thigh at the hip joint, the top of the thigh would be a top plane.
A front plane is an area facing the viewer. The front planes of a body change depending on whether you are observing it from an anterior (front), lateral (side), or posterior (back) view. For example, in a straightforward anterior view of a standing pose, the forehead, front portions of the face (upper cheeks, philtrum, lower lip, chin), front portions of the front of the torso, and the front of the entire leg would be front planes. In a posterior view, however, the portions of the back of the torso that are facing you would be front planes.
Side planes are the parts of the form that are turning away from a front plane. For example, in an anterior view, the sides of the head, which turn away from the forehead at the edges of the temple lines, would be side planes.
Bottom planes are often neglected by artists, but they are very important. Indicating these planes helps create the illusion that the forms are projecting or receding in space. For example, in an ordinary anterior view, bottom planes would include the bottom plane of the nose (where the nostrils are), the upper lip, the bottom plane of the jaw (the transition between the edge of the lower jaw and the cylinder of the neck), the planes beneath prominent cheekbones, and the bottom planes of the chest forms. In a posterior view, they would include the bottom planes of the buttocks.
The edges of planes are transitions from one plane to an adjacent plane. You can render them as soft and subtle, pronounced, or even somewhat sharp in appearance.
By the way, just in case you’re wondering why there is no “back plane” on the list above, the reason is simple: The back plane of a body part is always hidden from an observer’s view.
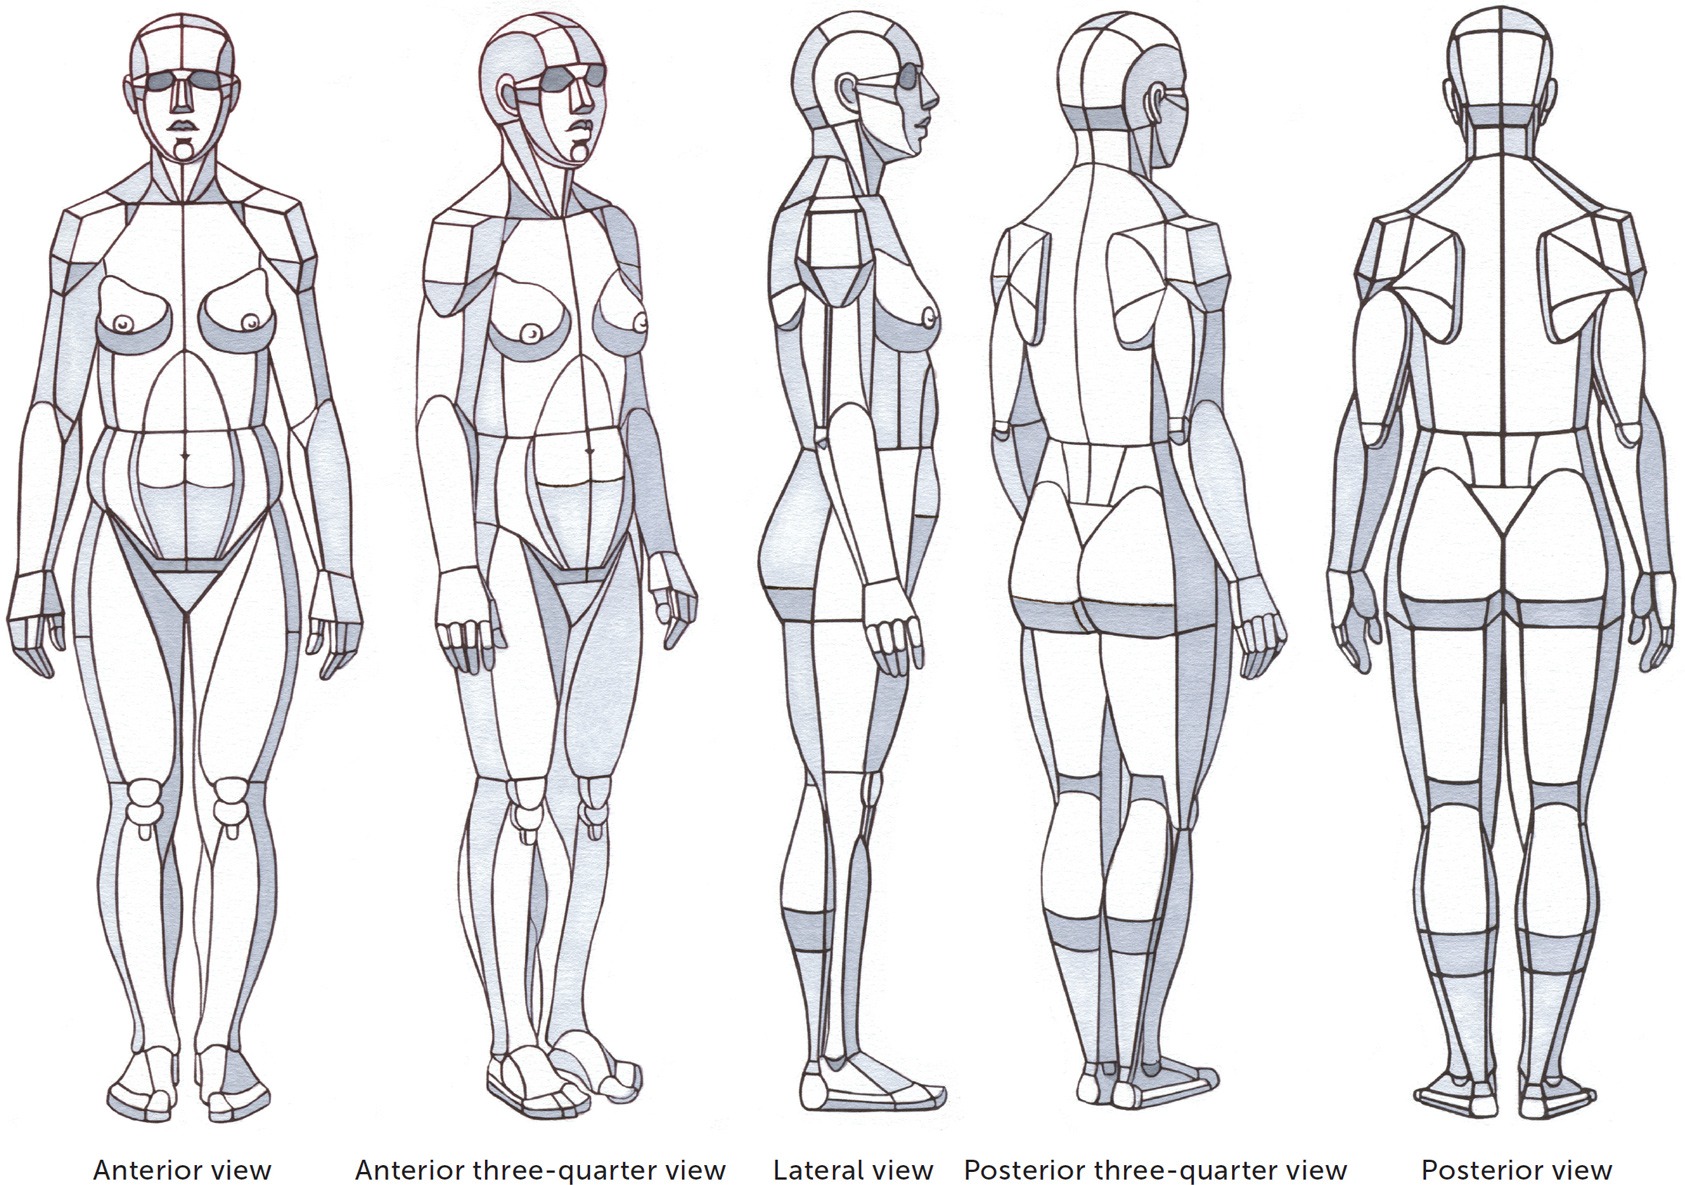
When you apply planes to a drawing, you’re working much like a sculptor who first carves the basic planes out of a piece of marble or shapes them with clay before refining the transitions between anatomical forms. Depending on how you want to treat the surface form, planes can be simple or complex, small or large, flat or curved, angular or round, convex or concave. There can be numerous combinations of planes within one area of the body, as you can see from the drawings on this page, which show rather complex breakdowns of the many surface planes of an athletic male body and a full-figured female body, as well as in the drawings of the planes of the hand and foot.
PLANES OF AN ATHLETIC MALE BODY
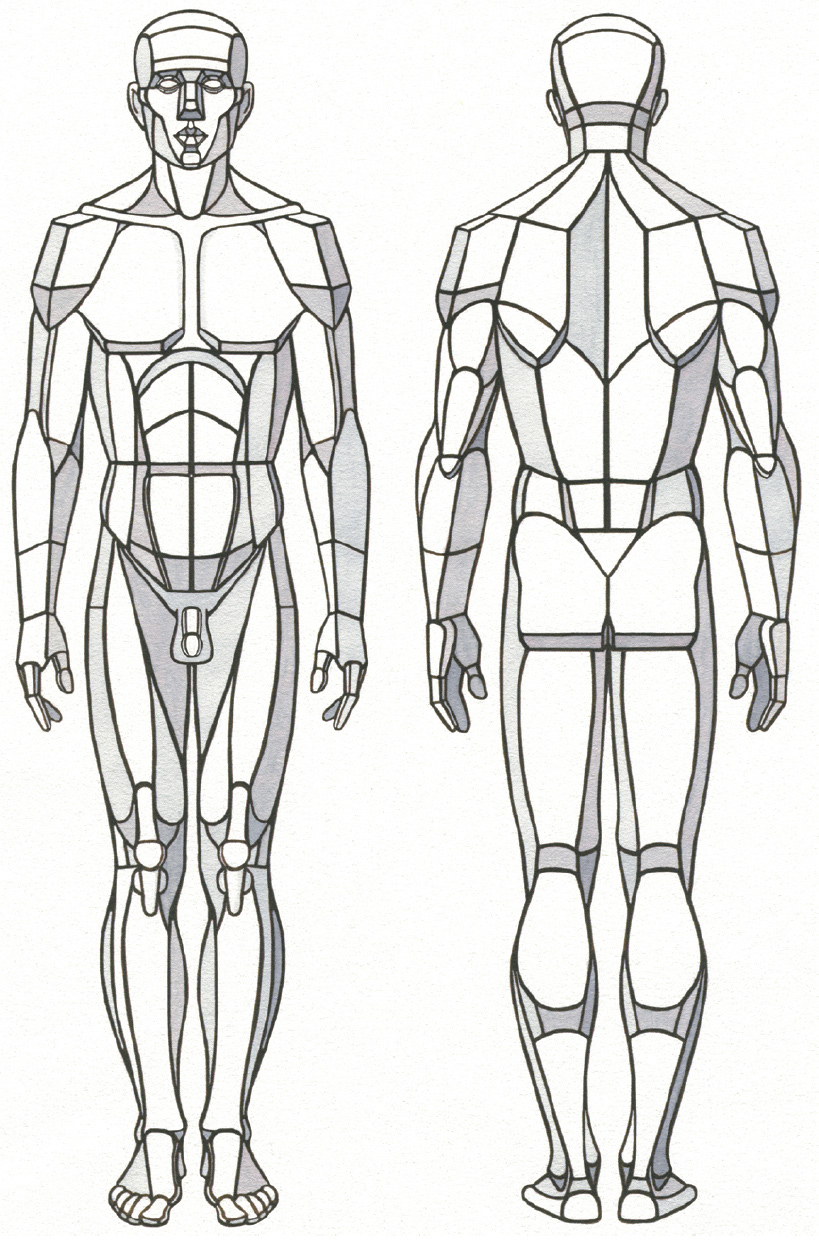
Anterior (left) and posterior (right) views
PLANES OF A FULL-FIGURED FEMALE BODY
PLANES OF THE HAND
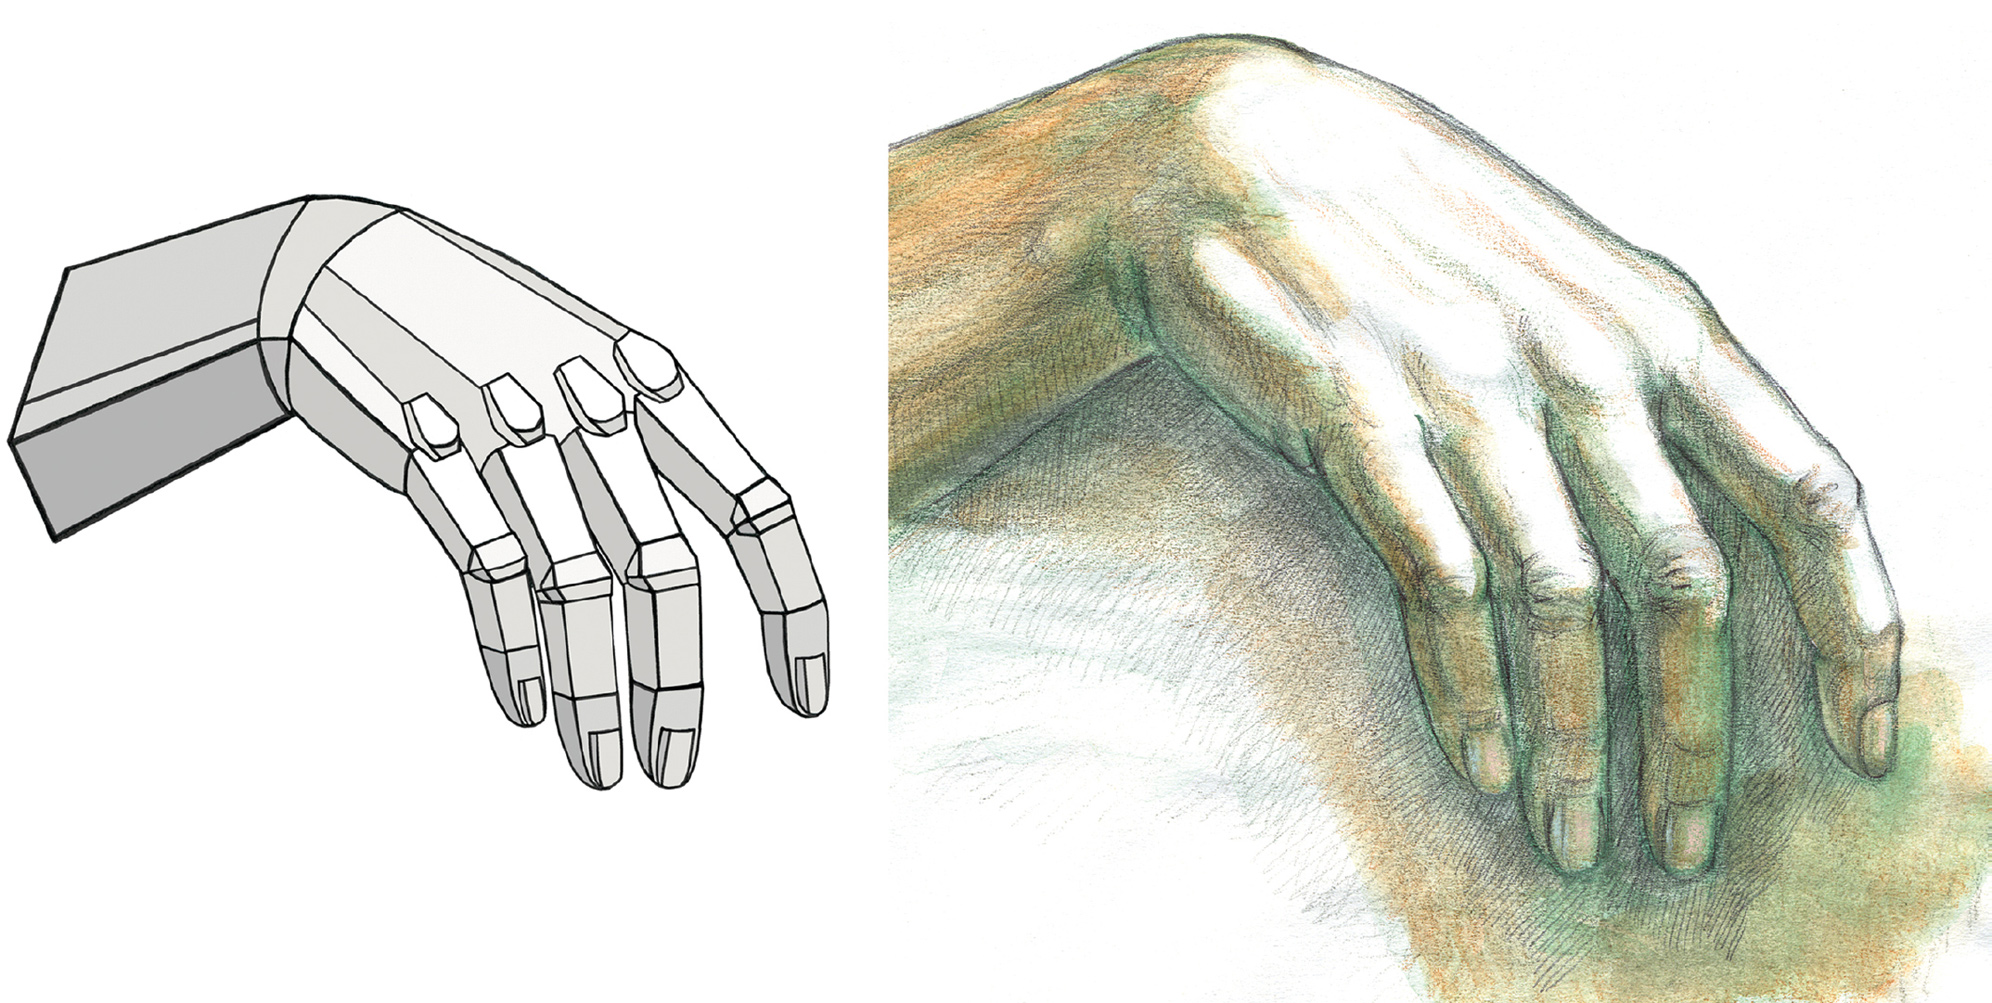
Graphite pencil, ballpoint pen, and watercolor pencils on white paper.
LEFT: Structural diagram
RIGHT: Study of a hand in a resting position
PLANES OF THE FOOT
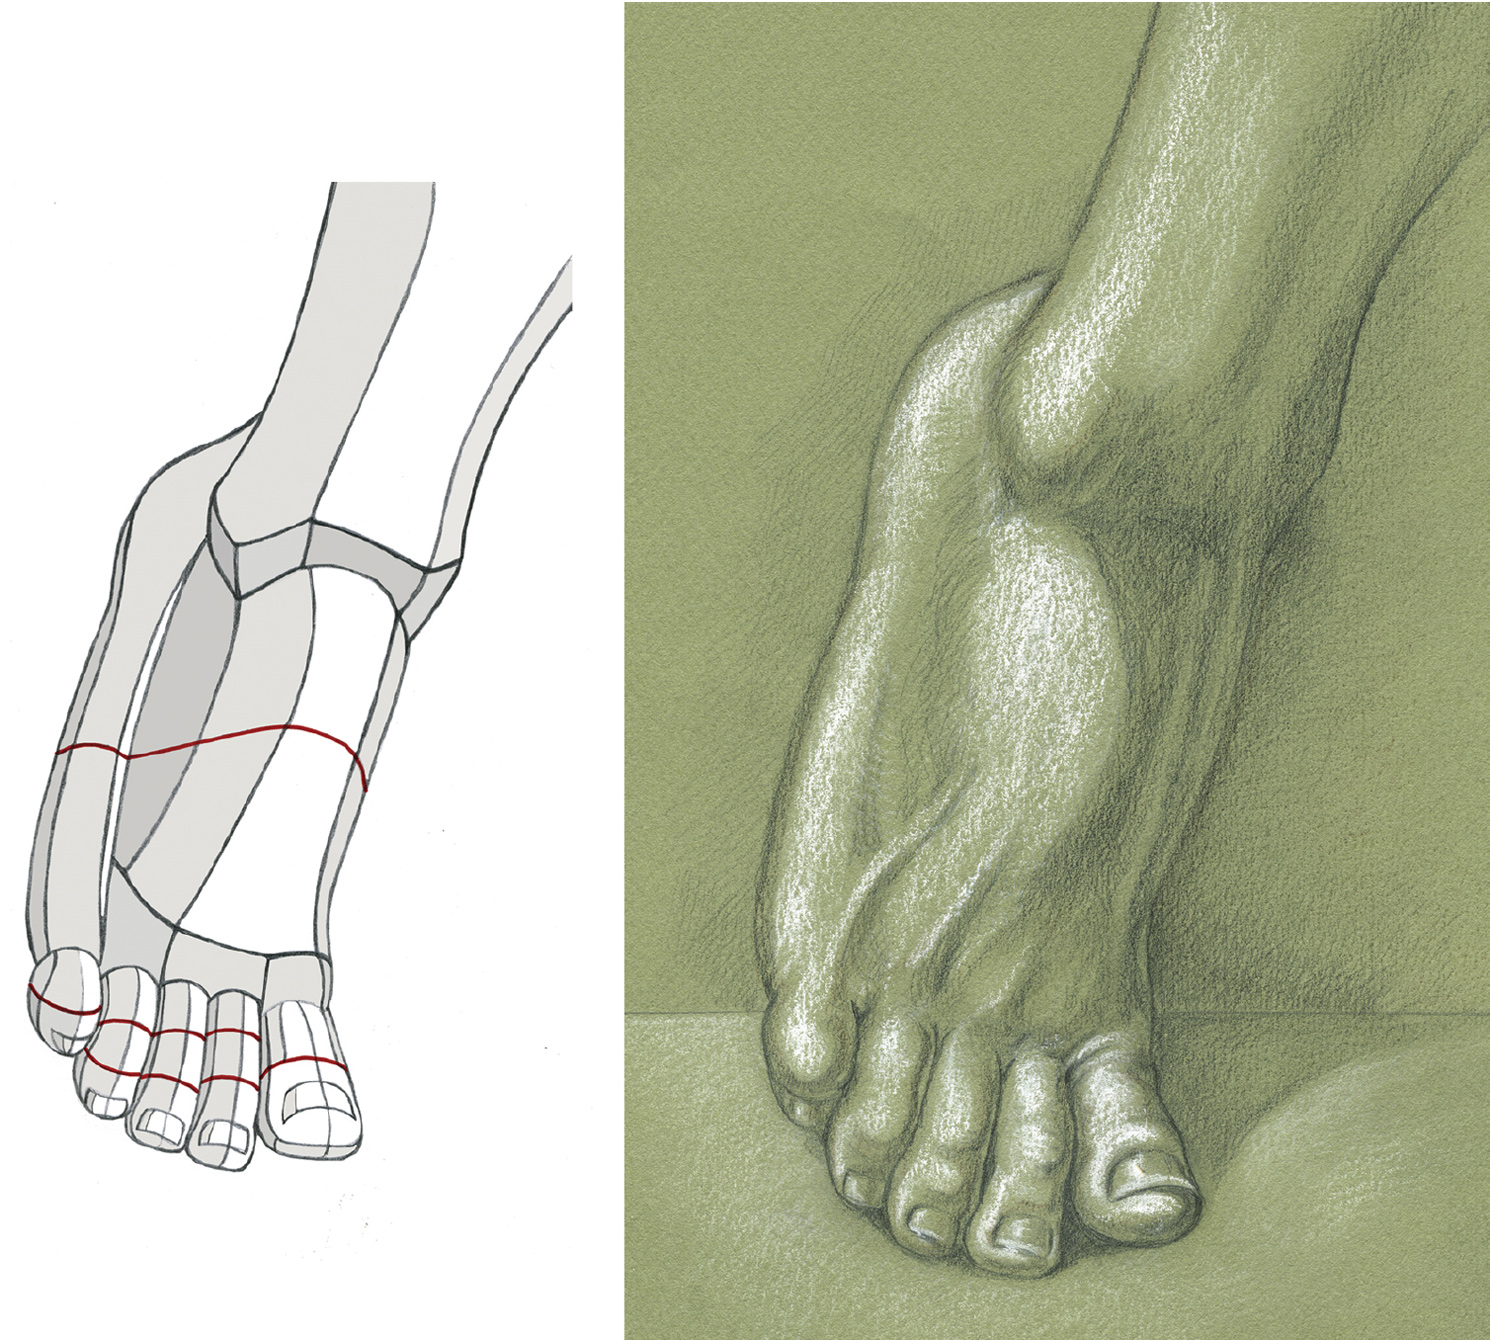
Graphite pencil and white chalk on toned paper.
LEFT: Structural diagram
RIGHT: Study of a poised foot
PLANES OF THE HEAD—FIVE VIEWS
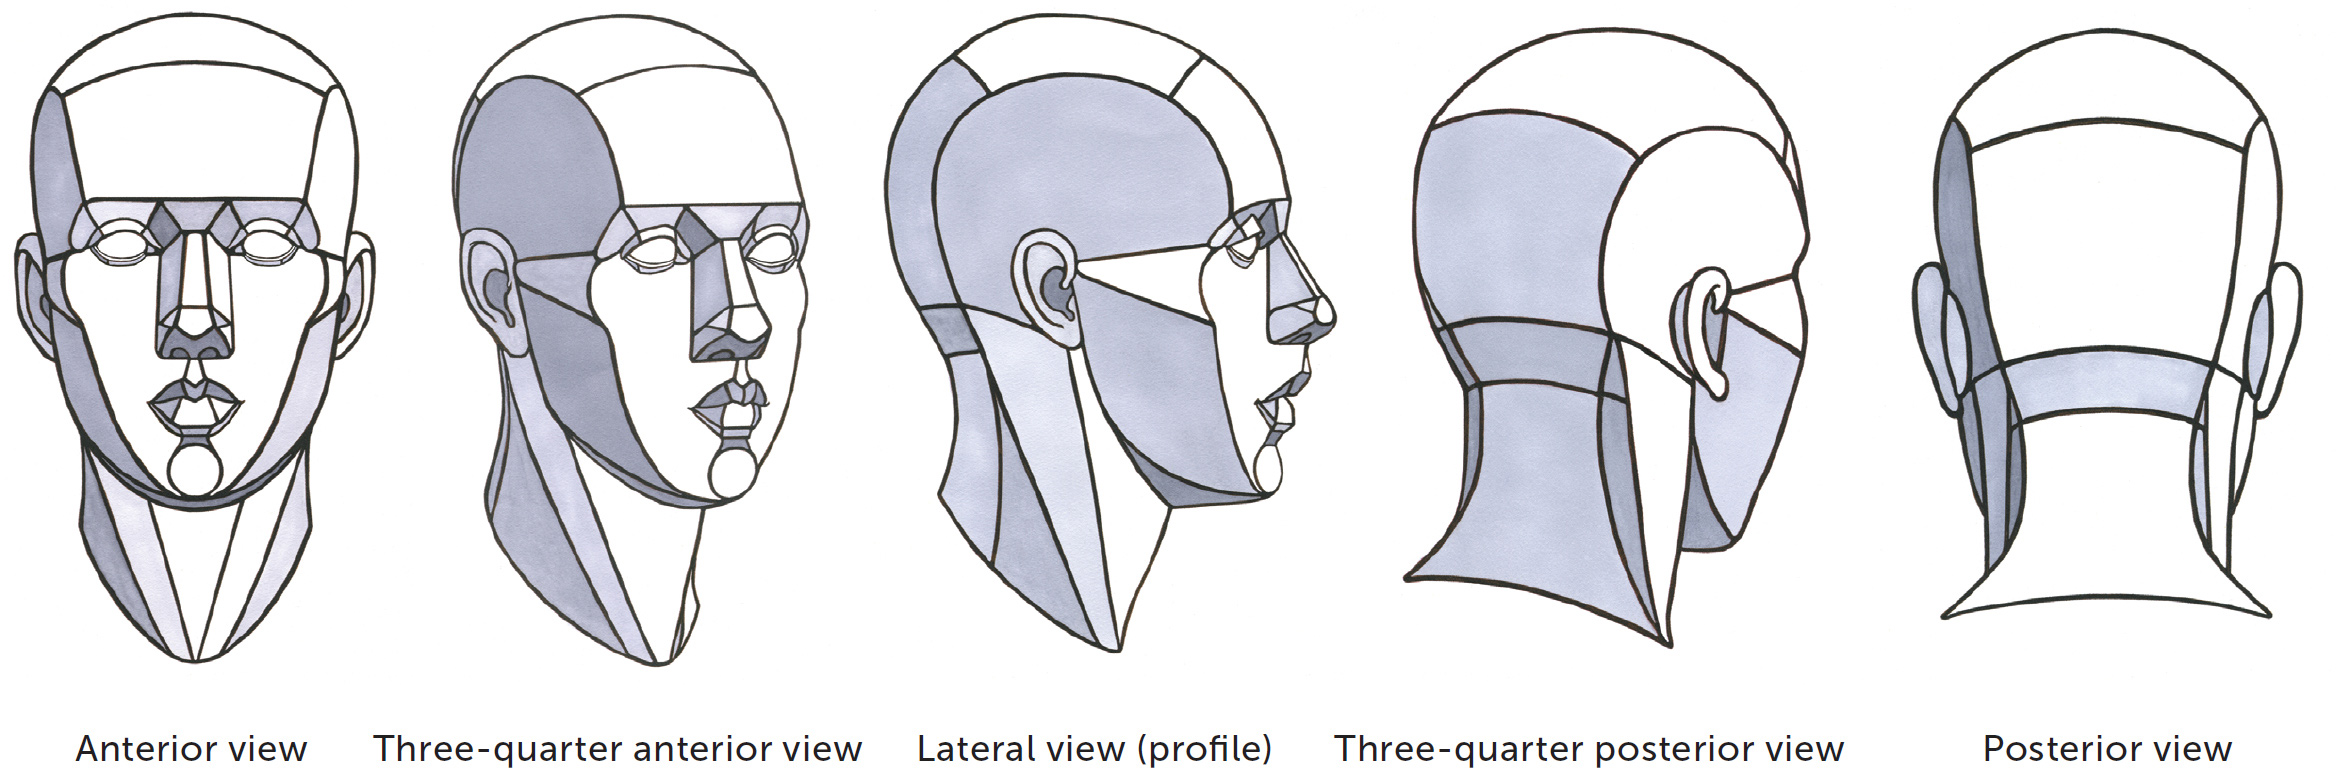
The complexity of the planes of the face is of particular interest to many artists. There are just a few areas on the face where bony landmarks are evident: the jawline, cheekbones, bridge of the nose, and the brow line of the forehead. The soft tissues of the face give it an organic quality, without any sharp edges. However, it is possible to take a more geometric approach to depicting the face, giving sharper definition to corners and angles. This purposely modifies the forms into “chiseled” shapes, making it easier to see the transitions between the forms in an obvious, direct way. The drawing below shows the head conceived in this geometric way from five different views.
You can make use of the knowledge gained by breaking the head into its constituent planes when doing life studies. For example, the drawing Study of a Bearded Man, gains force and character through the many gradations indicating transitions between top, front, side, and bottom planes.
STUDY OF A BEARDED MAN
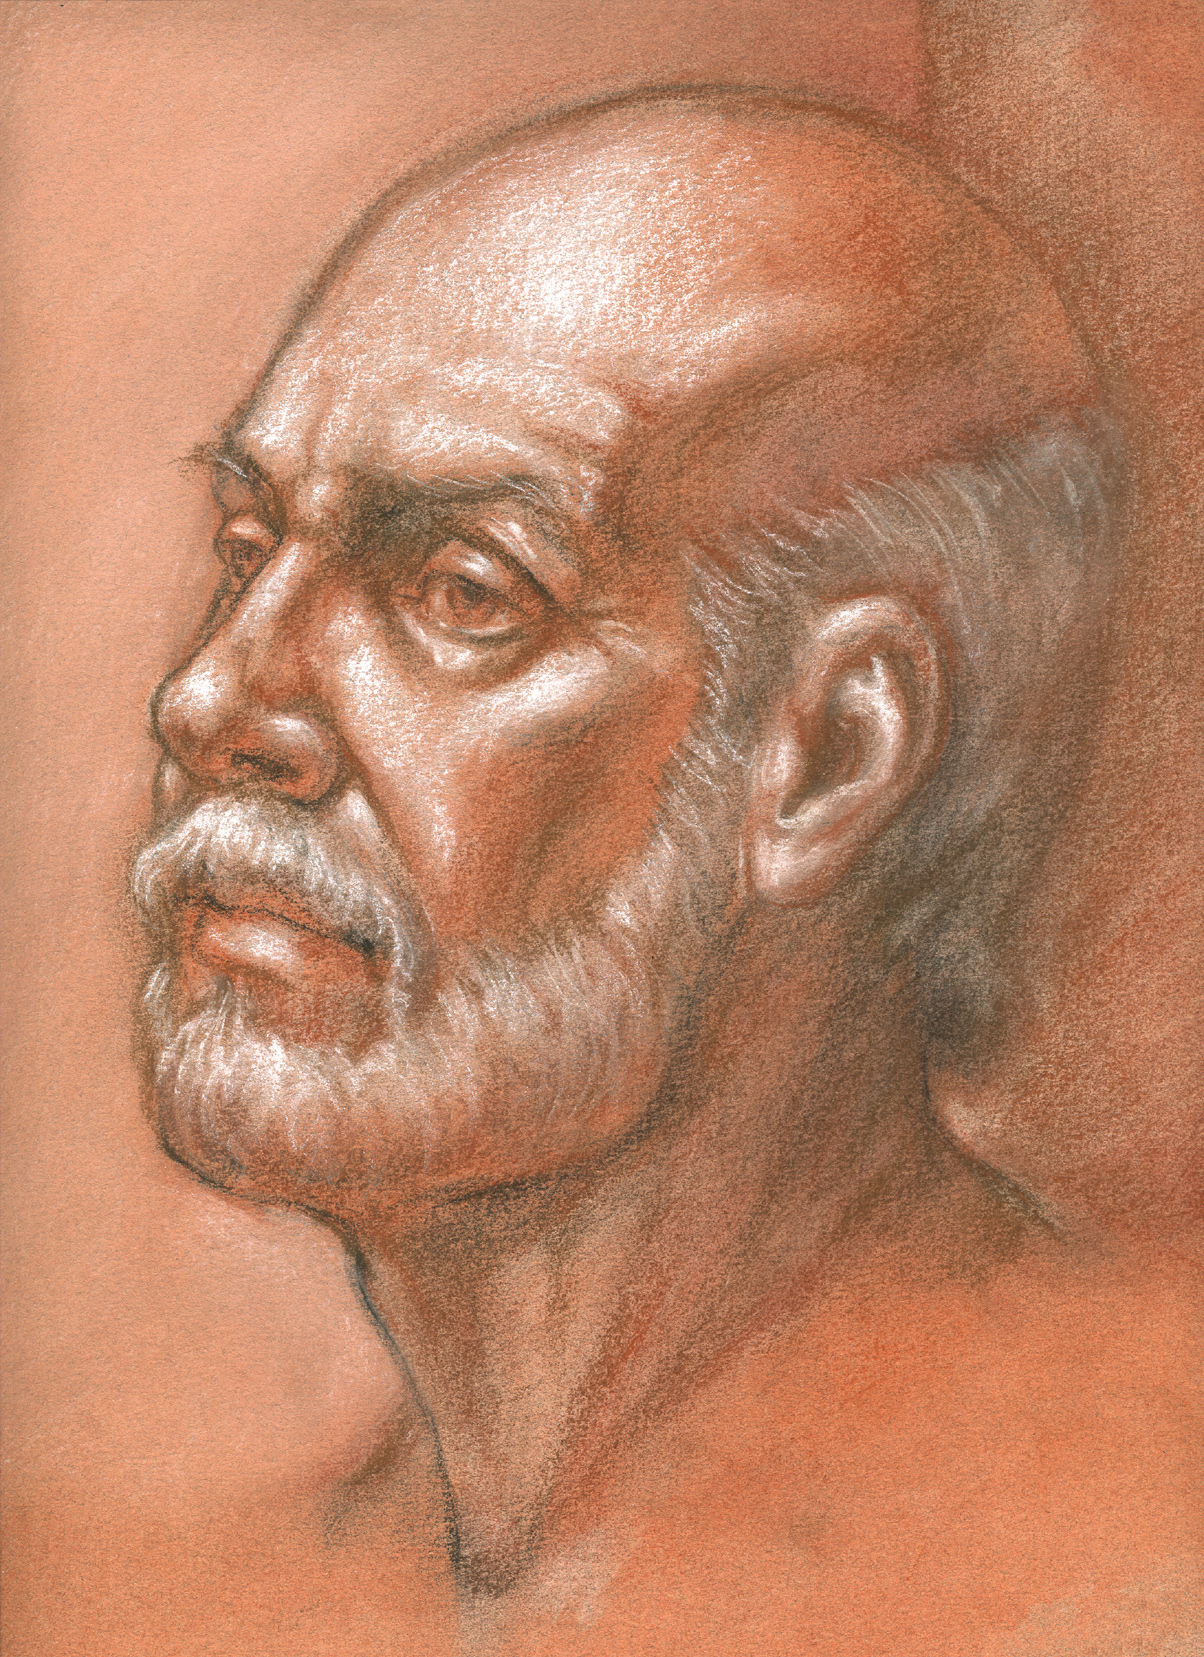
Black and sanguine Conté crayon and white chalk on toned paper prepared with sanguine pastel dust.
Doing studies based on sculptures is one way to practice drawing the planes of the head. For this purpose, sculptures made of marble or another kind of stone are better than bronze sculptures, because the planes are easier to see as a series of value changes. Ancient Roman sculptors were particularly skilled at doing marble portraits that emphasize the planes of their subjects’ faces. My Sketchbook Studies of Roman Portraits, is based on a few such sculpted heads. The white chalk used in these sketches highlights the basic front planes of the face.
SKETCHBOOK STUDIES OF ROMAN PORTRAITS
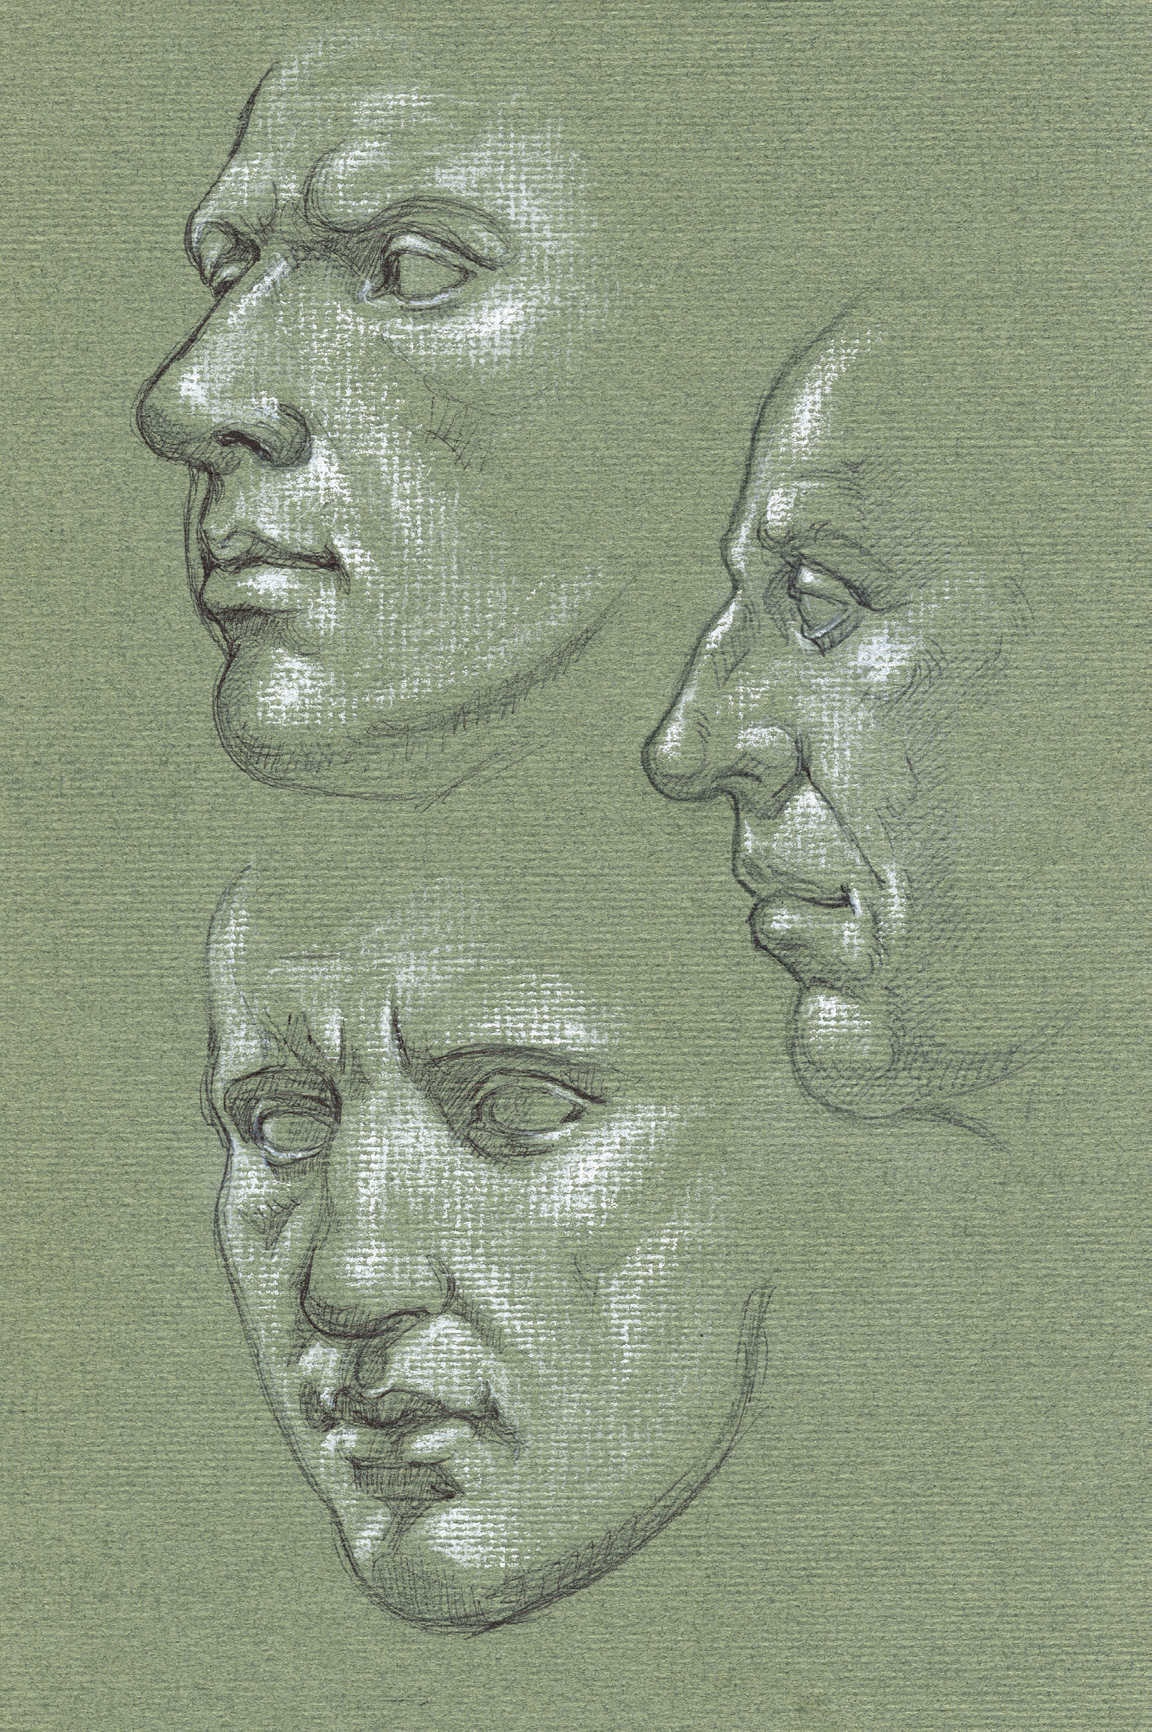
Ballpoint pen and white chalk on toned paper.
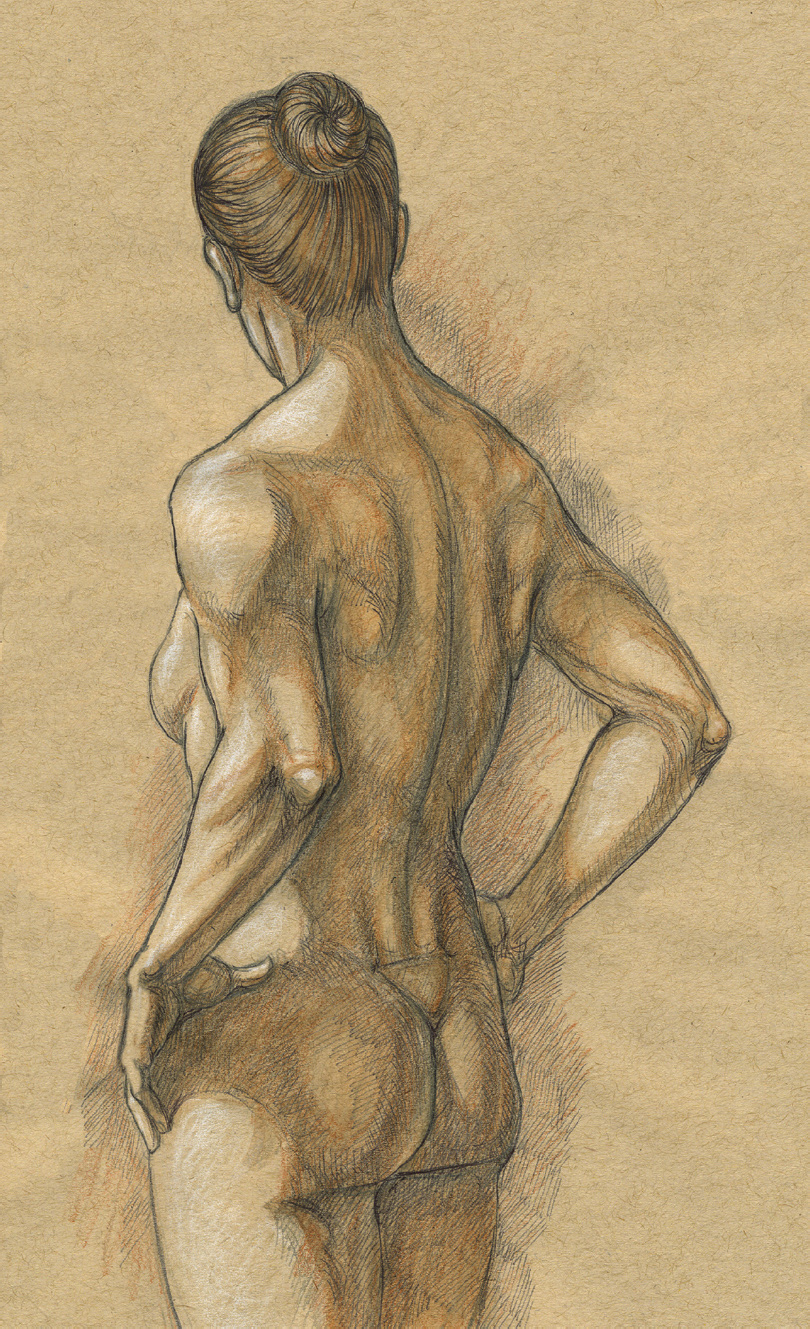
TWO-MINUTE GESTURE DRAWING OF A FEMALE FIGURE, BACK VIEW
Black Conté crayon and brown pastel stick on white paper.