The Handy Chemistry Answer Book (2014)
CHEMISTRY EXPERIMENTS YOU CAN DO AT HOME
You’ll probably be interested to know that there are a good number of chemistry experiments that you can perform right in your own home! While we can’t teach every principle in this book with experiments that you can do with household items, we will do our best to illustrate some of the basic principles (mostly those relevant to basic chemistry lab work) with items you may already have in your kitchen.
How can I carry out a chromatography experiment at home?
Chemistry principles encountered in this experiment:
· Extraction
· Filtration
· Chromatography
Materials you’ll need:
· Rubbing alcohol (250 mL)
· Small jars with lids (baby food jars work well)
· Tree or plant leaves (5 will do)
· Coffee filters
· Pan containing hot water
· Kitchen utensils
The procedure:
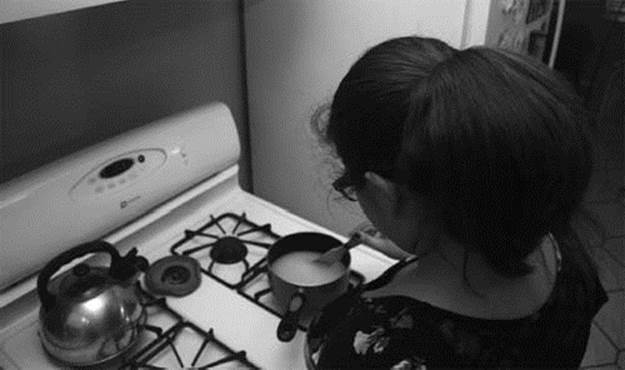
1. Tear a few leaves up into small pieces, and place the pieces from each leaf into their own small jar.
2. Add a small amount of rubbing alcohol to each, such that the leaves are just covered by the rubbing alcohol.
3. Place the lids on the jars, and then place them in the hot water for 30 minutes, replacing the water with fresh hot water if it cools. Swirl the alcohol in the jars every 5 to 10 minutes.
4. By the end of 30 minutes, the pigments from the leaves will dissolve, and the alcohol solutions should appear colored. The alcohol serves as a solvent for extracting the pigments in the leaves.
5. Cut long strips of coffee filter paper, remove the tops from the jars, and place one into each jar, with one end in the alcohol, and the other end outside the jar.
6. The pigments will move up the paper different amounts, according to their size. You should be able to see this separation as different-colored regions on the paper. Note that this process is a bit different from some of the separations we described in “The Modern Chemical Lab” based on polarity or other chemical properties. Unlike chromatography on silica gel, the paper is not strongly polar and thus does not interact as strongly with the polar pigment molecules.
7. Remove the strips of paper and allow them to dry. By comparing the relative distances the compounds travelled (technical term: retention factor) of the different compounds with one another, you should be able to identify whether the different leaves contained the same pigments. You can also try to make your alcohol solutions from other pigments, such as those in inks, foods, or drink.
8. Try to design a hypothesis you can test using this experiment, such as whether or not the leaves of different plants contain the same pigments, or whether different markers or pens contain the same inks.
How can I make slime?
Chemistry principles encountered in this experiment:
· Hydrogen bonding
· Synthesis
· Polymer chemistry
· Cross-linking
Materials you’ll need:
· Water
· Elmer’s glue (about 4 oz. or 120 mL)
· Borax powder (4–5 tablespoons)
· Bowl
· Measuring cup
· Small jar (doesn’t need to have a cover)
· Spoon or stirring device
· Food coloring (optional)

The key ingredients in making slime are glue and Borax powder. The oxygen atoms in the polymers found in the glue will then link with the hydrogen in the borax. (Photo by Jim Fordyce.)
The procedure:
1. Pour about 4 oz. of white glue into the jar. The glue contains several components, including the polymers polyvinyl acetate and polyvinyl alcohol (see “Polymer Chemistry”). Polyvinyl acetate contains oxygen atoms that can serve as hydrogen bond acceptors, and polyvinyl alcohol contains hydroxyl groups that can serve as either hydrogen bond donors or acceptors.
2. Add ½ a cup (4 oz. or 120 mL) of water, and stir it in until it mixes with the glue. Note that there is already some water in the glue, and we are just adding more.
3. (Optional) add food coloring to the mixture to give your slime some color.
4. In the bowl, mix 1 cup (8 oz. or 240 mL) of water with 4 or 5 tablespoons of the borax powder. Stir this well. Here we are preparing a solution of borax so that we can add it to the mixture of glue and water in a more uniform fashion.
5. While mixing, slowly add the glue and water mixture to the solution of borax.
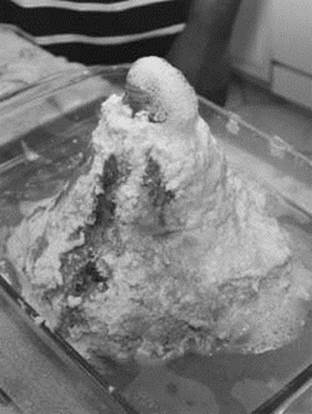
6. As you mix, you should observe the slime forming. Pick it up with your hands and knead it until it seems fairly dry. There will still be extra water left behind in the bowl; that’s nothing to worry about. The borax serves to cross-link the polymers by forming hydrogen bonds with the oxygen atoms of the polymers in the glue. These interactions can readily rearrange to form new hydrogen bond donor-acceptor pairs with different oxygen and hydrogen atoms, which is what makes the glue so stretchy and readily deformed.
When you are done with it, you can store the slime in a plastic bag in the refrigerator.
You can play with the amount of borax added to the glue and water mix to give you the consistency you want. Add food coloring, too, to give your slime an even cooler look! (Photo by Jim Fordyce.)
How can I test the hardness of objects around my house?
Chemistry principles encountered in this experiment:
· Hardness
· Materials science
Materials you’ll need:
Collect several materials of known hardness, examples include (numbers are based on the Mohs scale):
· Fingernail (2.5)
· Penny (3)
· Glass (typically 5.5-6.5)
· Quartz (7)
· Steel (typically 6.5-7.5)
· Sapphire (9)
You can also look for additional items from the list provided at the end of this experiment, or search online for additional objects that have been ranked on Mohs scale of hardness. Of course, you can also choose item of unknown hardness and determine their hardness in this experiment!
The procedure:
1. Locate a specimen whose hardness you want to test. Note that you will be attempting to scratch the object, so don’t choose anything too valuable or anything you don’t want scratched!
2. Select an object of known hardness from those you gathered, and try to scratch the surface of your sample by pressing it with a tip or edge of the object of known hardness. For example, let’s say you wanted to test a piece of wood. You could try to scratch it with a piece of quartz by pressing the edge of the quartz into the wood.
3. Inspect your sample to see if you have made a scratch in it. You may need to feel the surface of the object with your finger to check thoroughly. If your object was softer than the sample of known hardness, there will be a scratch. If it was harder, then there will not be a scratch. Repeat the test a couple of times to verify the result.
4. Continue performing the scratch test with various objects of known hardness, until you find two adjacent objects on your list, such as a fingernail (2.5) and a penny (3), in between which the hardness of your sample rests. You will know you’ve found this pair of objects on your list when the harder object of the pair does scratch your sample, while the softer one does not.
5. Once you have found this place on the list, you can assert that the hardness of your unknown must lie between that of the two objects of known hardness on the list. For example, if a penny (3) scratches your object, and a fingernail (2.5) does not, your object must have a hardness between 2.5 and 3.
Additional Mohs hardness rankings:
· Talc (1)
· Gypsum (2)
· Calcite (3)
· Fluorite (4)
· Platinum or iron (4.5)
· Apatite (5)
· Orthoclase (6)
· Quartz (7)
· Garnet (7.5)
· Hardened steel, topaz, emerald (8)
· Corundum (9)
· Diamond (10)
How can I use chemistry to make dull pennies shiny?
Chemistry principles encountered in this experiment:
· Surface chemistry
· Oxidation reactions
Materials you’ll need:
· A handful of dull pennies (10 will do)
· 1 teaspoon table salt (sodium chloride)
· ¼ cup white vinegar (acetic acid solution)
· a small, non-metallic bowl
· water
· paper towels or napkins
The procedure:
1. Pour ¼ of a cup of vinegar and 1 teaspoon of table salt into the bowl.
2. Stir the mixture until the salt is completely dissolved.
3. Try first dipping one penny into the solution for about 15 seconds and remove it. Do you notice a change in the part that you dipped into the solution?
4. Place the remaining pennies into the solution. You will likely notice a visible reaction as the pennies are placed in the solution. The reason pennies eventually begin to appear dull is that the copper surface reacts with oxygen in the air to create a layer of copper oxide. In this experiment, the vinegar and salt will react with the copper oxide and remove it, which will leave a layer of the original shiny copper exposed on the surface.
5. Allow the pennies to remain in the solution for several minutes. If necessary, try to move the coins around so as to expose both sides of each coin to the solution. If possible, flip the coins over after a couple of minutes.
6. Drain the solution and rinse the coins with clean water. They should now look clean and shiny!
Copper pennies turn dull because they oxidize over time. A mixture of vinegar and salt reacts with the copper oxide to clean the pennies and make them shiny again. (Photo by Jim Fordyce.)
How can I make black snake fireworks from items around my house?
(Note: this experiment involves fire and flammable materials, so adult supervision is required. Also, check your local laws before attempting this experiment.)
Chemistry principles encountered in this experiment:
· Chemical reactions
· Combustion reactions
Materials you’ll need:
· Sand (about 2 cups)
· Lighter fluid (a small bottle of about 100 milliliters)
· Baking soda (1 tablespoon)
· Sugar (4 tablespoons)
· Cup or bowl
· An outdoor location where you can light the black snake firework safely without damaging anything
The procedure:
1. In a cup or bowl, mix 4 tablespoons of sugar with 1 tablespoon of baking soda.
2. Use the sand to form a pile (in your chosen safe outdoor location), and then create a depression in the middle of the sand. This depression is where you will ignite the black snake firework.
3. Pour a small amount of lighter fluid onto the sand to wet it. Try this experiment first with a very small amount of lighter fluid, and, if necessary, repeat the experiment with incrementally larger amounts. It’s better to start too small than too big.
4. Pour your mixture of sugar and baking soda into the wetted depression in the sand. You don’t have to use it all at once—feel free to experiment with different quantities of the baking soda and sugar mixture.
5. Carefully ignite the lighter fluid with a match and stand back. You should see the mixture create long snakes of black ash! The burning sugar and baking soda form sodium carbonate, water vapor, and carbon dioxide gas. The ash in the snake is composed of carbonate and burnt carbon.
How can I make invisible ink?
Chemistry principles encountered in this experiment:
· Evaporation
· Combustion reactions
· Acid/base reactions
Materials you’ll need:
· Cotton swab or paint brush
· Heat source (can be a light bulb)
· Measuring cup
· Paper
· Baking Soda
· Water
· Grape Juice (optional)
After dissolving baking soda in some water, you can use it like ink to draw a message onto a piece of paper. Once it dries, it will be invisible to the eye. (Photo by Jim Fordyce.)
Make your message visible again by carefully heating the paper over a flame. The baking soda will brown before the paper does, making your message visible. You can achieve the same effect by brushing grape juice over the paper. (Photo by Jim Fordyce.)
The procedure:
1. To prepare the ink, just mix equal volumes of water and baking soda and stir well.
2. Take a cotton swab, paint brush, toothpick (or something similar) and write a message on a piece of white paper using the water and baking soda mixture you have prepared.
3. Allow the “ink” time to dry. The water will soak into the paper and eventually evaporate, but the baking soda will not evaporate and it will be left behind.
4. To read your invisible message there are a couple of options. One is that you can hold the paper to a heat source, such as a light bulb or gentle flame (don’t burn the paper!) This should cause the baking soda on the paper to turn brown, revealing your message! The baking soda burns faster than the paper, which is why it turns brown before the paper does.
5. Another option is to spread purple grape juice, over the paper (you can use a paint brush to do this). The message should appear in a different color/shade compared to the rest of the paper. This works because an acid in the grape juice reacts with the sodium bicarbonate that you used to write your message.
How can I observe layers of immiscible liquids?
Chemistry principles encountered in this experiment:
· Density
· Miscibility
· Polarity
Materials you’ll need*:
· Honey
· Pancake syrup
· Liquid dish soap
· Water
· Vegetable or cooking oil
· Rubbing alcohol
· Lamp oil
· A tall glass of water or other container
· (Optional) food coloring to improve visibility
*Note: for this experiment, it is not necessary to have every material listed.
The procedure:
1. Pour the densest liquid into the glass first. Note that the liquids above are listed from most dense to least dense. Try to avoid letting the liquid run down the sides of the glass.
2. Gently pour the second liquid on top of the first. One way to pour it a little more slowly is to pour the liquid over another object such as a butter knife or the back side of a spoon. Allow each layer of liquid to settle for at least a few seconds before adding the next liquid. You’ll notice that, instead of mixing, the liquids tend to stay in separate layers. The reason for this is that they are immiscible, which means that it is more thermodynamically favorable for the liquids to stay separated in layers and to form an interface than it is for them to mix together. Whether or not two liquids will be miscible is dictated by the details of the entropic and enthalpic factors associated with the mixing or separation of the two liquids in question. This is often directly related to whether or not the compounds have similar polarity. For example, we know water is a very polar substance, while vegetable oil is composed of primarily long, non-polar hydrocarbon chains. These do not interact favorably with one another, and prefer to stay in separate layers.
3. Continue pouring the third, fourth, etc. liquids on top of each other in order of decreasing density (you can just follow order of your liquids in the list above). As you pour in the successive liquids, they should continue to form separate layers. The densest liquids are affected the most by gravity, so these tend to stay below the less dense liquids. These liquids are not miscible, so they do not mix together to form a single solution. In truth, if you wait long enough, some of these liquids will mix together, but it will take a while.
4. That’s it! You should now see a series of separate liquid layers in your container.
How can I make a volcano from vinegar and baking soda?
Chemistry principles encountered in this experiment:
· Chemical reactions
· Gases
Materials you’ll need:
· Vinegar
· Baking soda (2 tablespoons)
· Large bowl
· Baking pan
· Flour (6 cups)
· Cooking oil (4 tablespoons)
· Salt (2 cups)
· Plastic bottle
· Dishwashing soap
· Red or orange food coloring (or any color, really)
· Water
A lot of the ingredients in this experiment are mixed together in a large bowl simply to build your volcano structure. If you like, you could achieve the same thing by using clay. (Photo by Jim Fordyce.)
After pouring some baking soda, soap, and some coloring into your volcano, slowly add vinegar and stand back to watch the show! (Photo by Jim Fordyce.)
The procedure:
1. This is a classic chemistry experiment that you might have done before in school. In a large bowl, first mix 6 cups of flour, 2 cups of salt, 4 tablespoons of cooking oil, and 2 cups of water. Mix these ingredients until they are firm. These ingredients are not involved in the chemical reaction that will make your volcano erupt, but rather this mixture will serve as the “rock” that forms the structure of your volcano.
2. Place the plastic bottle standing vertically in the pan. Use your hands to shape the “rock” material from the first step into a cone shape around the top of the bottle. Be careful not to cover the top of the bottle.
3. Fill the bottle most of the way with water, leaving enough space to add a few ounces of baking soda and vinegar.
4. Add a few drops of dishwashing soap to the bottle. This is not part of the chemical reaction that will take place inside the bottle, but bubbles from the soap will help to catch the gas evolved during the reaction between the vinegar and baking soda.
5. Add 2 tablespoons of baking soda into the bottle.
6. Finally, slowly (or quickly, if you want a really crazy volcano) add vinegar to the bottle, and prepare to witness the eruption! Be careful though—you should avoid getting this mixture in your eyes, or anyone else’s, and this combination can make a spectacular mess in your kitchen. The chemical reaction takes place between the baking soda (sodium bicarbonate, or NaHCO3) and vinegar (dilute acetic acid, or CH3CO2H) to release carbon dioxide gas, which is what causes the volcano to erupt. The relevant chemical equation is:
NaHCO3 + CH3COOH CH3COONa + CO2 + H2O
How can I observe the effects of electrostatic forces using household objects?
Chemistry principles encountered in this experiment:
· Electric charge
· Electrostatic forces
Materials you’ll need:
· Nylon hair comb (or a latex balloon)
· A water faucet
The procedure:
1. Comb your hair with a nylon comb. If you don’t have a comb, you can also rub your head with an inflated latex balloon instead. As you rub the comb or balloon to your head, it builds up an electric charge on the object due to the movement of electrons between the object and your head.
2. Go to the faucet and turn it on so that a narrow stream of water flows out. Try to make the stream as thin as possible, while still maintaining a steady, smooth flow of water.
3. With the water running, move the comb or balloon close to the stream of water, but be careful not to actually let the comb or balloon touch the water. As it gets close, the stream of water should be deflected toward the comb or balloon. This is because the charge in the object (comb or balloon) induces an opposite charge in the nearby water, and the object and water then experience an attractive electrostatic interaction (opposites attract).
4. You can experiment with how the amount of deflection varies with the size of the stream of water from the faucet. You can also compare the ability of various objects (different combs, balloons, or different objects altogether), or vary the amount of time you rub the object in your hair.
How can I study the effects of acids and bases on sliced fruit “getting old” and turning brown?
Chemistry principles encountered in this experiment:
· Acids and bases
· Biochemical/enzymatic reactions
Materials you’ll need:
· An apple (other fruits like bananas, pears, or peaches will also work)
· Five clear plastic cups
· Vinegar
· Lemon juice
· Baking soda
· Water
· Milk of magnesia
· Measuring cups
The procedure:
1. Prepare aqueous solutions of milk of magnesia and baking soda. The amount of water you use isn’t particularly important (feel free to test various concentrations if you’d like). The key aspects are that the baking soda dissolves completely and that the milk of magnesia solution becomes less viscous or thick.
2. Slice your apple (or other fruit of choice) into five pieces. If you have decided to test multiple concentrations of baking soda or milk of magnesia solutions, adjust the number of fruit slices accordingly.
3. Label the cups as follows: vinegar, lemon juice, baking soda solution, milk of magnesia solution, and pure water.
4. Place one slice of fruit in each cup.
5. Add about ° of a cup of the appropriate solution to each of the cups you have labeled. The fruit should not be completely submerged in the solutions, but make sure each slice of fruit gets completely coated with the solution. The vinegar and lemon juice solutions serve as acidic solutions (of acetic and citric acids, respectively). The baking soda and milk of magnesia solutions serve as basic solutions (of sodium bicarbonate and magnesium hydroxide, respectively), while the water serves as a neutral control solution.
6. Write down your observations regarding the physical appearance of each piece of fruit at this time. If you have a camera handy, it might be useful to take a picture of your fruit samples for comparison to the final results.
7. Allow the fruit to sit for one day, and then come back and record your observations again. If you took a picture on the first day, you can compare the current appearance of the fruits to your photograph. Apples and fruits turn brown when an enzyme called tyrosinase (refer back to “Chemistry in the Kitchen”) carries out a chemical reaction in the presence of oxygen and phenol containing compounds. How do the acidic or basic solutions affect the browning of the fruit? Since we know that the browning of the fruits is caused by an enzymatic reaction involving tyrosinase, what do the results suggest about the effects of acids and bases on the rate of the reaction involving tyrosinase? Do both acidic solutions affect the rate of browning similarly? How about both basic solutions? Do you think the changes you observe are due to changes in pH, or the specific chemical involved? Think also about what other experiments you might try to investigate further.
How can I show my friends a magic trick using pepper?
Chemistry principles encountered in this experiment:
· Polarity
· Surface tension
Materials you’ll need:
· A shaker or small packet of black pepper
· Dishwashing soap (a few drops)
· Bowl
· Water (a bowl full)

On the left, a finger dipped in water without soap has no effect, but when you put a little dish soap on your finger (right) and put it in the water, the soap spreads out, lowering the water’s surface tension and pushing the pepper away. (Photo by Jim Fordyce.)
The procedure:
1. Begin by filling the bowl with water.
2. Then pour black pepper onto the water to form a thin layer of pepper across its surface.
3. As a control experiment, try dipping your finger below the surface of the water. Nothing too interesting should happen at this time.
4. Now rub a small amount of dishwashing soap on your finger and dip it in the water again. This time, you should see the pepper move away from your finger and toward the edges of the bowl. The non-polar soap molecules don’t want to dissolve beneath the surface of the water, and thus they spread across the surface of the water quickly, which lowers its surface tension. Whereas water typically bulges a bit above its surface due to its relatively high surface tension, the water spreads out when its surface tension is lowered. This causes the water to spread out as the soap moves over it, and the pepper is carried away from your finger in the process.
5. Now that you understand the basics of this trick, you can perform it for your friends. Ask a friend to dip their finger in the water and to try to concentrate on trying to make the pepper move away from their finger. When they cannot make it happen, you can step in and use your (already soapy) finger to easily move the pepper away!
How can I make “hot ice” (sodium acetate)?
Chemistry principles encountered in this experiment:
· Chemical reactions
· Solubility
· Crystallization and recrystallization
· Colligative properties
Materials you’ll need:
· Pan with cover
· Microwave or stovetop
· Vinegar (1 liter)
· Baking soda (4 tablespoons)
· Dish
The procedure:
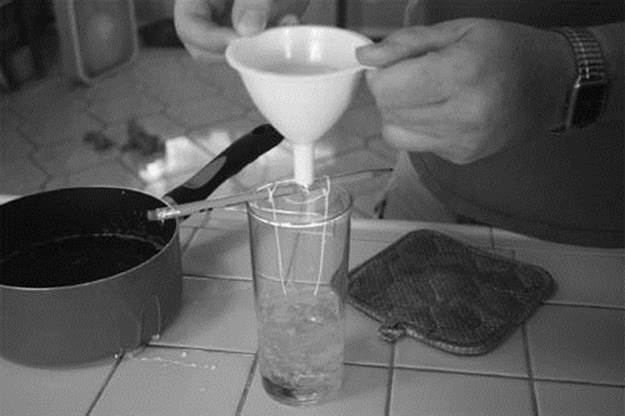
1. Pour the vinegar into a pan, and very slowly (a little bit at a time) add the baking soda. As you may already know, this reaction will produce large amounts of bubbles (carbon dioxide gas), so you’ll need to add this very slowly. This reaction will produce a solution of sodium acetate in water. Sodium acetate is produced according to the chemical equation:
Na+ [HCO3]− + CH3 – COOH CH3 – COO−Na+ + H2O + CO2
2. Bring the solution to a boil. Allow the solution to continue to boil until a skin or film begins to form on the surface of the solution. This will require heating for a significant amount of time (perhaps, up to an hour), until a large fraction of the water from the vinegar has evaporated. Our goal here is to form a very concentrated hot solution of sodium acetate. You’ll recall from our discussion of colligative properties that the solubility of a solute is higher at higher temperatures. As we reduce the volume of the water, the sodium acetate will not evaporate, and we will be left with a concentrated solution at high temperature.
3. When you notice a film start to form on the surface, remove the pan from the heat, and cover it to prevent further evaporation. Place it on the countertop or in the refrigerator to cool. If you see any crystals begin to form, add a small amount of additional vinegar (or, if you are out of vinegar, use water) and stir the solution so that they dissolve.
4. You now have a supercooled solution of sodium acetate that can crystallize out of solution readily if a crystallization nucleus is present.
5. You can now slowly pour the first few drops of the cooled solution onto a dish, and it should begin to crystallize rapidly. If it doesn’t, try dragging a fork or knife along the dish to make a tiny scratch, or give the liquid a moment to evaporate a little so that the sodium acetate begins to crystallize before you begin to pour. As you continue to pour, the liquid should continue to crystallize as it contacts the crystals already formed on the dish. This is similar in spirit to how purification takes place during a recrystallization (see “The Modern Chemical Lab”). If you feel the crystals, they will be warm to the touch, since the crystallization is an exothermic process (it gives off heat). This is why it’s called “hot ice,” but now you know it isn’t really ice—it’s sodium acetate—and you know how to make it.
How can I make a pH indicator at home?
Chemistry principles encountered in this experiment:
· Extractions
· Acid/base chemistry
· Chemical indicators
· Solubility and temperature
Materials you’ll need:
· Several leaves of red cabbage
· Blender
· One coffee filter
· Large jar
· Glasses or clear cups
· Water
· Stovetop or microwave
· Pot or pan
You only need some (not necessarily all) of the following ingredients:
· Baking soda (1–2 tsp)
· Lemon juice (1–2 tsp)
· Vinegar (1–2 tsp)
· Ammonia (1 oz of household variety—like what you use for cleaning)
· Antacids (1 tablet; Alka-Seltzer® works)
The procedure:
1. Cut about 2 cups of cabbage and place it in a blender.
2. Boil water in a pot, and then add boiling water to the cabbage in the blender. Turn on the blender and blend for about 10 minutes. The hot water will extract a pigment called an anthocyanin from the red cabbage (along with other components). Recall that solubility tends to increase at higher temperatures. Anthocyanins are molecules that will change color depending on the pH of the solution—this will serve as our indicator.
3. Filter the plant material out by pouring the solution through a coffee filter and into a large jar. The liquid you obtain should be red/blue/purple in appearance. The exact color you observe will depend on the pH of the water you are looking at, which may be influenced by factors like the ion concentration in your tap water and the other plant components that remain in the solution.
4. Pour the solution into various glasses or clear cups. These will be your individual test “beakers” where you can test the pH of various substances.
5. Try adding other substances to your solutions and observe how the color changes as they are added. Note that the amount of solution you add to each glass/cup will influence the amount of each test substance (e.g. lemon juice) you need to add to see a color change. For reference, the list below tells you how the color of your anthocyanin indicator solution should change with pH.
|
Approx. pH |
color |
|
2 |
red |
|
4 |
purple |
|
6 |
violet |
|
8 |
blue |
|
10 |
blue-green |
|
12 |
yellow-green |
How can I make a lava lamp at home?
Note: OK, so we’ll disclose up front that this experiment won’t actually make a lamp. It will make a device with bubbles that rise and fall just like a lava lamp, but you’ll need a flashlight or other light source if you want it to be illuminated.
Chemistry principles encountered in this experiment:
· Chemical reactions
· Density
· Miscibility
· Gases
Materials you’ll need:
· Vegetable oil (20 oz.)
· Plastic soda bottle (20 oz. or 1 liter)
· Water (1 tablespoon)
· Alka-Seltzer®
· Food coloring
The procedure:
1. Begin by filling the plastic bottle almost full with vegetable oil.
2. Add a few drops of food coloring to 1 tablespoon of water, and then add this to the plastic bottle’s contents. You’ll notice that the oil and water are not miscible, which is what will allow us to make bubbles within the oil. The water sinks to the bottom of the bottle, since it is more dense than the oil.
3. Ground up an Alka-Seltzer® tablet and add the pieces/powder to the bottle, and then seal the cap. When the chemicals in the table dissolve and react, carbon dioxide gas bubbles will be formed (see equation below), which will lower the overall density of the water bubbles, allowing them to rise to the top of the bottle. When they reach the top, they will leave the water bubbles and join the small amount of air at the top of the bottle. At this point, the water bubbles will again be denser than the oil, so they will sink back to the bottom of the bottle. This process will repeat until all of the Alka-Seltzer® has been reacted.
4. You should see colored bubbles move throughout the bottle, similar to a lava lamp. You can also add another Alka-Seltzer® after the reaction has finished.
Blobs of colored water rise and fall within an oily solution after you add Alka-Seltzer® (Photo by Jim Fordyce.)
How it works:
The chemical reaction of Alka-Seltzer® with citric acid to release carbon dioxide is described by the following equation:
C6H8O7 (aq) + 3NaHCO3 (aq) 3H2O (l) + 3CO2 (g) + Na3C6H5O7 (aq)
How can I suck an egg into a bottle?
Chemistry principles encountered in this experiment:
· Combustion
· Pressure
· Ideal gas laws
Materials you’ll need:
· Hard-boiled egg
· Bottle or flask with an opening slightly smaller than the egg’s diameter
· Paper (a sheet of computer paper or newspaper will do)
· Matches
The procedure:
Note: this experiment involves fire and flammable materials, so adult supervision is a must!
1. Peel the hard-boiled egg.
2. Tear off a piece of paper that can easily fit into the bottle, and carefully light it on fire and drop it into the bottle.
3. Quickly place the egg on top of the bottle, covering the opening.
4. The flame will burn, heating the air inside the bottle. This causes the air to expand, and some of it will push past the egg to escape from the bottle. Recall from our discussion of the ideal gas law that, for a fixed number of particles and volume, the pressure inside the bottle should increase linearly with increases in temperature. The increased pressure is what pushes the air out, and you may even see the egg shake a little as the air escapes. Then the egg will come to rest, covering the opening.
5. Eventually, the fire will burn up all of the paper, or all of the oxygen inside the bottle (whichever comes first), and then the air in the bottle will begin to cool. As it cools, the volume it occupies will decrease, lowering the pressure inside the bottle relative to that outside the bottle. The higher pressure outside the bottle is what pushes the egg through the opening and into the bottle.
6. You can get the egg back out by tilting the bottle upside down and blowing air into the bottle, and then allowing the egg to cover the opening before removing your mouth. Thus you can use the same principle regarding equilibration between high and low pressures to force the egg out.
How can I extract iron from oatmeal or breakfast cereal?
Chemistry principles encountered in this experiment:
· Magnetism
· Food chemistry/nutrients
· Extraction
Materials you’ll need:
OATMEAL EXPERIMENT
· Iron fortified instant oatmeal packet (check the label to ensure iron content)
· Magnet (it’s easiest to see the iron if you can find a magnet that is coated or painted white or another light color)
· Plastic bag or bowl
BREAKFAST CEREAL EXPERIMENT
· Magnet—for this experiment you will want a magnet you can use to stir a liquid (it’s easiest to see the iron if you can find a magnet that is coated or painted white or another light color)
· Plastic bag
· Water
· Large glass jar or beaker
The procedure:
OATMEAL EXPERIMENT
1. Open the oatmeal packet and empty it into the plastic bag or bowl.
2. Stir the oatmeal with the magnet. You should see small amounts of grey or brown metal collect on the outside of the magnet. This is iron! Iron is commonly added as a mineral supplement to breakfast cereals and other foods. Now you can see that the iron that goes into your diet is the same element that you find in objects made of iron metal (just in much smaller quantities and pieces). Recall that iron is attracted to magnets due to the fact that it is a ferromagnetic material (see “Atoms and Molecules”).
BREAKFAST CEREAL EXPERIMENT
1. Pour 1 or 2 cups of breakfast cereal into a plastic bag.
2. Crush the cereal inside the bag using your hands.
3. Pour about 1 liter of water into the jar or beaker, and add the crushed cereal from the bag to the water. The water will help to extract the iron from the crushed cereal. Whereas the iron bits were looser in the dry oatmeal sample, they tend to be stuck within pieces of cereal, which is why you need to mechanically crush the cereal and use the water to help extract it; the magnetic interaction wouldn’t be strong enough to pull the iron out of the cereal on its own. In a chemistry lab, acids would often be used to help extract metals from a sample, but will work fine for our purposes here.
4. Use the magnet to stir the crushed cereal for about 15 minutes. When you remove the magnet from the water, you should see iron filings collected on the magnet.
How can I grow crystals of rock candy?
Chemistry principles encountered in this experiment:
· Crystallization and recrystallization
· Solubility
Materials you’ll need:
· Sugar (3 cups)
· Water
· Glass jar
· A pencil
· String (cotton; 15 cm will do)
The first step in making rock candy is dissolving sugar in water and boiling it slowly on a stove top. You will then need to wait while it cools. Putting the mixture in the refrigerator can speed up the cooling process. (Photo by Jim Fordyce.)
Tie a string or strings to a pencil and dangle the string in the sugar solution. Gradually, crystals will form to make the candy. (Photo by Jim Fordyce.)
· Pan (for boiling water)
· Microwave or stovetop
· (Optional) food coloring
· (Optional) flavoring extracts
The procedure:
1. Begin by stirring 3 cups of sugar and 1 cup of water into a pan.
2. While stirring frequently, heat the mixture to a gentle boil. The goal is to just barely get the mixture to its boiling point, and then stop the heating (we don’t want to evaporate off too much of the water). Then remove the solution from the heat source.
3. If you want to add food coloring or flavoring, now is a good time to do so. Either way, the candy is made of sugar, so it will still taste fine.
4. Cool the pot containing the solution in the refrigerator until its just below room temperature. In the meantime, tie the cotton string to the pencil, and place the pencil atop the jar, allowing the string to dangle down without touching the bottom. You may need to trim the string such that it doesn’t touch the bottom of the jar.
5. You may wish to tie a lifesaver candy or other weight to the end of your string to hold it taut.
6. Wet the string and dip it in a little bit of crystalline sugar (not the sugar you just mixed with water and heated). These sugar crystals will serve as the nucleating sites on which the rock candy from your sugar solution will crystalize.
7. Pour the cool sugar solution into the jar, and hang the pencil and string into the solution.
8. Cover the jar with aluminum foil, a paper towel, or anything else, such that it will not be disturbed.
9. The crystals will take several days, or possibly as long as a week, to grow. Sugar from the solution will continue to crystalize onto the growing crystals on the string. You can check on the crystals occasionally, but you should not bump, tilt, turn, shake, or move the jar, if possible. The crystals will grow larger if you leave them undisturbed. Once they are done growing, remove your string, and your rock candy is ready to eat!
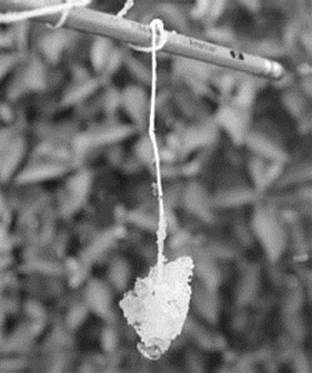
Crystals will slowly form around the string. Be patient, this process can take several days. (Photo by Jim Fordyce.)
How can I make Jell-O® that glows under a black light?
Chemistry principles encountered in this experiment:
· Fluorescence
· Gels
· Cross-linking
Materials you’ll need:
· Jell-O® or gelatin powder
· 1 cup of tonic water
· 1 cup of water
· Stovetop or microwave
· Large bowl
· Pot (for heating on stovetop)
· A black light source (see “Physical and Theoretical Chemistry” to review how black lights work)
The procedure:
1. Heat one cup of water to a boil.
2. Mix the Jell-O® and the hot water into the bowl, and stir the powder in until it dissolves. The hot water helps the gelatin to dissolve and disperse evenly throughout the solution. Gelatin is a form of collagen (See “Chemistry in the Kitchen”), and when it cools, the Jell-O® will reform cross-links between the collagen strands, which is what traps the water inside to create a gel. You’ll recall that a gel is solid material that consists of a bonded network of long strand molecules that contain significant amounts of molecules that would otherwise behave as a liquid trapped within the solid network.
3. Add in one cup of tonic water, stir the solution well, and then place it in the refrigerator for about four hours. The tonic water contains a molecule called quinine that will fluoresce a bright blue color when excited with the appropriate wavelengths of light, which can be provided by the black light. Recall that fluorescence takes place when a molecule absorbs light at one wavelength, relaxes to release a fraction of that energy, and then emits a photon at a longer wavelength (lower energy) than that which was absorbed. Black lights provide light that is at slightly shorter wavelengths (higher energies) than light in the visible spectrum, so it can often excite molecules that will fluoresce in the visible region of the spectrum.
4. When the Jell-O® is finished hardening, take a look at it under the black light. It should glow blue! This is due to the fluorescence of the quinine from the tonic water. This blue glowing color comes from the fluorescence of the quinine molecules, so it will not be affected significantly by the flavor or color of Jell-O® that you decided to use.
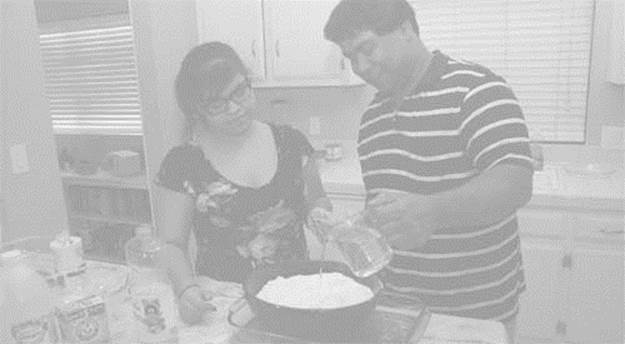
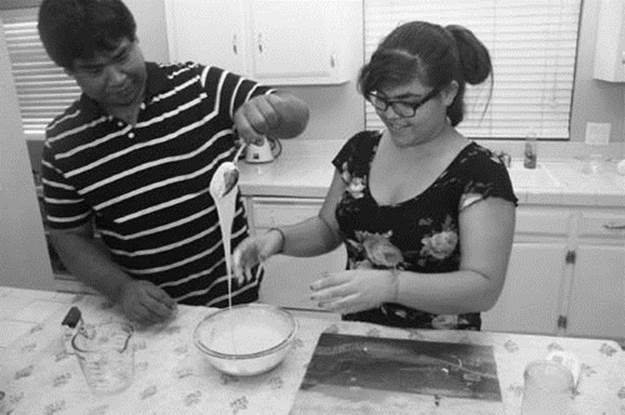
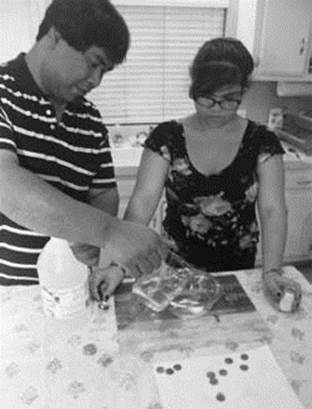
How can I make glue from milk?
Chemistry principles encountered in this experiment:
· Solubility
· Precipitation
· Filtration
Materials you’ll need:
· Hot water (from the tap is fine)
· Room temperature water
· 1 tablespoon of vinegar
· ½ teaspoon baking soda
· Coffee filter
· Cup
· Spoon
· Small bowl
· tablespoons powdered milk
The procedure:
1. Dissolve 2 tablespoons of powdered milk in 1/4 cup of hot tap water.
2. Mix in 1 tablespoon of vinegar and stir the solution well. Recall that household vinegar is a dilute aqueous solution of acetic acid. At this point the milk should begin to form little blobs of insoluble material (curd). These are a substance called casein, which are a class of proteins found in milk. Proteins are typically soluble in water and aqueous environments, but the acetic acid from the vinegar causes the casein to no longer be soluble in this solution.
3. Position a coffee filter on top of a cup and pour the solution through the filter to collect the curd. To further dry the curd, try to use the filter to squeeze out any remaining liquid.
4. Dispose of the liquid in the cup, dry the inside of the cup, and then transfer the curd from the filter into the now dry cup.
5. Break the curd into smaller chunks using a spoon. This will help it to mix more readily with the ingredients you will add next.
6. Add 1 teaspoon of hot water, and ¼ of a teaspoon of baking soda to the cup containing the chopped-up curd. The mixture may foam a little from the reaction of the baking soda with the remaining vinegar, producing carbon dioxide gas.
7. Stir this mixture, which should eventually become smooth and liquid-like. You may need to add a little more water or baking soda to reach a smooth, even consistency.
8. Now you have your glue! You can use it just like you would any other glue, though you should test it out first to make sure it’s working well before you use it for that science fair project you’re finishing up.
How can I make a cloud form in a bottle?
Note: this experiment involves fire and flammable materials, adult supervision is a must.
Chemistry principles encountered in this experiment:
· Ideal gas law
· Phase changes
· Droplet formation
Materials you’ll need:
· 20 ounce or 1 liter plastic soda bottle
· Warm water (1-2 oz.)
· Matches
Using adult supervision, insert a lit match into a bottle with just a little warm water in it. After some smoke has collected in the bottle, screw on the cap and watch clouds form—the result of water condensing around the tiny particles that make up the smoke. (Photo by Jim Fordyce.)
The procedure:
1. Add warm water to the soda bottle until the bottom is just barely covered with water.
2. With the bottle tipped so that you don’t burn yourself, ignite a match and insert the burning end of the match into the bottle. Allow the bottle to fill up with smoke.
3. When the bottle is fairly filled with smoke, or when the match goes out, remove the match and screw the cap on to close the bottle. Clouds will form when water vapor forms small-but-visible droplets around particles in the air. In this experiment, the smoke will provide these particles around which the water can form small droplets.
4. With the bottle closed, squeeze it several times. You should see a cloud form! When you squeeze the bottle, the temperature of the gas inside may temporarily increase, but the temperature will quickly equilibrate with the surroundings (recall the ideal gas law we discussed in “Atoms and Molecules,” PV = NkbT). When you release the squeezed bottle, the temperature inside decreases, cooling the water vapor and helping it to liquefy into droplets on the particles provided by the smoke. This is very similar to how real clouds are formed in the atmosphere!
How can I make a miniature rocket from a film canister?
Chemistry principles encountered in this experiment:
· Gases and pressure
· Chemical reactions
Materials you’ll need:
· An empty, plastic 35mm film canister (which are getting more and more rare these days!) If you cannot locate one of these, you could try using any other small, lightweight, plastic container with a lid that easily pops on or off.
· An Alka-Seltzer® or other antacid tablet
· Water
The procedure:
This experiment should be performed outdoors in an open area.
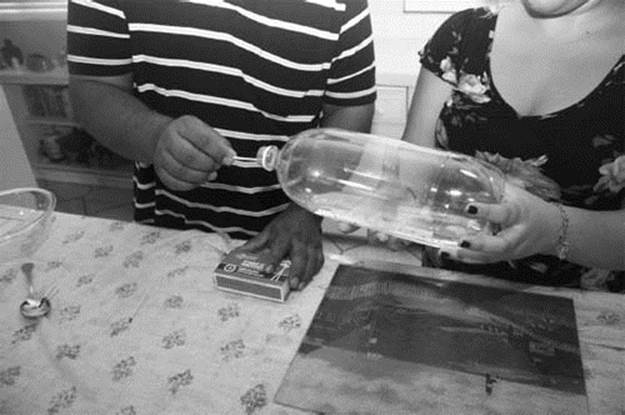
1. Add about one teaspoon of water to the film canister, and leave the lid open.
2. Break the antacid tablet in half and get ready to add it to the container.
3. This step requires you to be quick. Drop the broken antacid tablet into the container, then quickly close the lid and place the canister on the ground with the cap side down. Stand back a good distance, and wait for the rocket to launch. The Alka-Seltzer® will react with the water in a reaction that produces carbon dioxide gas. The pressure of this gas will build and build until it exerts a force so great that it will blast the canister off of the cap, shooting the canister into the air.
4. After about 10 to 15 seconds, the canister will launch into the air!
5. Try repeating this experiment using different ratios of Alka-Seltzer® to water, or using canisters of different types or sizes. You might also compare different brands of antacid tablets, or different methods for crushing the tablet before you add it to the canister. Compete with your friends to see who can make the rocket that shoots the highest!
How can I inflate a balloon using yeast?
Chemistry principles encountered in this experiment:
· Biochemical/enzymatic reactions
· Gases
Materials you’ll need:
· Yeast (5-10 grams powder yeast)
· A small plastic bottle (preferably about 16 oz. or smaller)
· One teaspoon of sugar
· A balloon
· Warm water
The procedure:
1. Add enough water to a small plastic bottle to fill it up about 1 inch. The water needs to be warm for the yeast to do its job.
2. Add about 5-10 grams of yeast (one small packet will do) to the bottle, and mix it around well. Yeast is made of fungal microorganisms that will become active when placed in the warm water.
3. Add a teaspoon of sugar to the water. The sugar serves as the food for the yeast microorganisms. They are going to consume it and produce carbon dioxide gas as a byproduct.
4. Wrap the balloon around the open end of the bottle. You may wish to use tape or a tight rubber band to prevent gas from escaping. Let the yeast do their job for about 20 minutes, and the yeast should soon produce enough carbon dioxide gas to start filling up the balloon. This is the same thing that happens when you use yeast to bake bread! The little holes you see in the bread are from the yeast releasing carbon dioxide as it rises.
5. Try repeating the experiment using different amounts of water, sugar, and yeast, and observe the rate at which the balloon inflates. One hypothesis you might test is whether the concentration of sugar in the water affects the rate of carbon dioxide product. You might also try varying the amount of yeast you use. Pay attention to both the rate at which the balloon inflates, and the final volume of gas it reaches.
How can I make a chicken bone flexible?
Chemistry principles encountered in this experiment:
· Solubility in weak acids
Materials you’ll need:
· A jar
· Vinegar (enough to fill the jar)
· A chicken bone (one from a drumstick works best)
The procedure:
1. Obtain a chicken bone, and clean it well. Rinse it with water and remove any remaining skin or meat from the bone.
2. Before you soften the bone, try bending it to make sure it is rigid. Don’t break it, but test that it is indeed hard.
3. Fill up the jar with vinegar, and drop your clean bone inside.
4. Cover the jar (just so that your whole house doesn’t start smelling like vinegar) and let it sit for about 3 days. Recall that vinegar is a dilute aqueous solution of acetic acid, which is a weak acid. Over a few days, the acetic acid helps to dissolve the calcium in the chicken bone. Since the calcium plays a key role in keeping bones hard, the bone will soften once the calcium is dissolved.
5. Remove the bone, rinse it off with water, and now try bending it again. It should be noticeably more flexible than before. Now you can see that without enough calcium, your bones will not stay strong! This might also provide a good indication of why it’s a good idea to brush your teeth; if you leave behind any foods capable of dissolving calcium still on your teeth, your teeth may lose some of their calcium and begin to become weak.
How can I grow a large crystal?
Chemistry principles encountered in this experiment:
· Crystallization
· Solubility
Materials you’ll need:
· Hot water (from the tap is fine)
· About 2.5 tablespoons of alum (this is typically found with the spices in the grocery store; it is an ingredient used to make pickles crisp; its chemical formula is KAl(SO4)2
· 12 H2O)
· Nylon fishing line or thread (about 15 cm)
· A pencil or ruler
· 2 jars
· Spoon
· Coffee filter or paper towels
The procedure:
1. Pour ½ a cup of hot water into a jar.
2. Add a little bit of alum to the water and stir it in. Try to do this before the water cools down too much. As you’ll recall, we can expect the alum to be more soluble at higher temperatures. We want to create a saturated solution of alum, but we also want to make sure that all of it dissolves. Continue adding alum until it will not dissolve anymore, and then you can add a little bit more hot water to get the last bit of alum to dissolve.
3. Cover the jar with a coffee filter or paper towel and let it sit overnight.
4. The next day, pour the liquid into a second jar. There should be small crystals left in the bottom of the first jar. The process of pouring the liquid off of the top of the solid crystals is known as “decanting.” The crystals left behind will serve as the seed crystals to grow a larger crystal of alum.
5. Pick out the largest crystal, or one with a nice shape that you like. Tie the fishing line or thread around the crystal, and tie the other end of the line to a pencil, ruler, or other long flat object. Adjust the length of the string such that you can use the pencil or ruler to dangle your crystal from the top of the second jar (the one that now contains the liquid) into the liquid without it touching the bottom.
6. Once your crystal is hanging into the solution, all you have to do is sit back and wait for it to grow. This might take several days. If you notice small crystals growing on the sides or bottom of the jar, it would be a good idea to transfer the solution and your single growing crystal into another jar to prevent the alum in solution from crystallizing into several different crystals (this will ensure that you get a nice big crystal). You can feel free to transfer jars as many times as necessary to continue growing your large crystal.