High School Geometry Unlocked (2016)
Chapter 3. Similarity
GOALS
By the end of this chapter, you will be able to:
•Understand and perform dilations of figures, including figures in the coordinate plane
•Identify similar triangles using the SSS, AAA, and SAS similarity postulates
Lesson 3.1. Dilations
In this lesson, we will review another type of image transformation—dilation. A dilated image is the same shape as the pre-image, but is a different size. In other words, dilation stretches or shrinks the original figure. Additionally, the image and pre-image are similar but not congruent.
In order to perform a dilation of a figure, we need to know the scale factor and the center of dilation. The scale factor is the ratio of the corresponding segment lengths of the two figures, and the center of dilation is the point of reference used to orient the figure. Additionally, if you pick any point in the dilated image, you’ll be able to draw a straight line through that point, its corresponding pre-image point, and the center of dilation.
Each point in the dilated image is collinear with its corresponding pre-image point and the center of dilation.

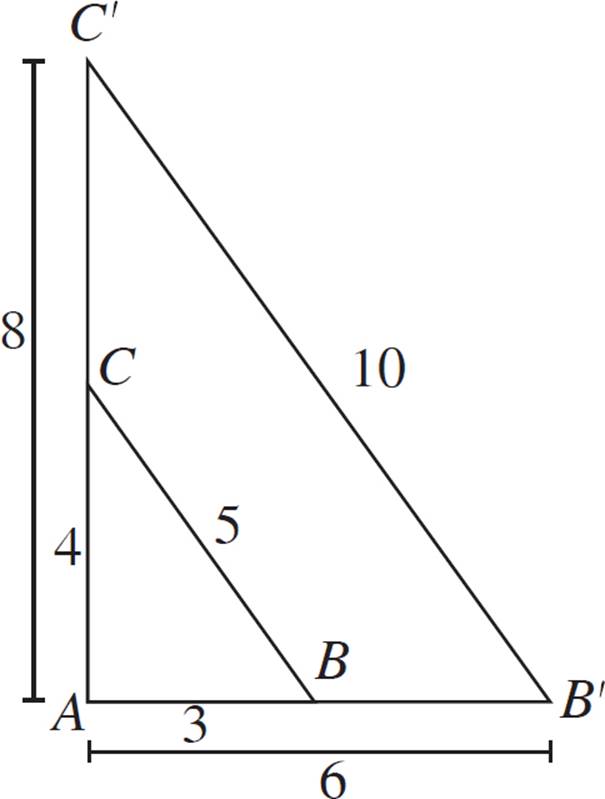
In the figure above, triangle ABC is dilated with a scale factor of 2 and the center of dilation is at vertex A.
Since the scale factor is 2, that means that the ratio of corresponding segment lengths is 1:2. In other words, the larger triangle has lengths two times greater than the smaller triangle. Therefore, the larger triangle has side lengths of 6, 8, and 10—corresponding with the smaller side lengths of 3, 4, and 5, respectively.
The center of dilation is how we position the vertices of the dilated figure. For each point in the image, the center of dilation is collinear with the image point as well as its corresponding pre-image point. In Example 1, the center of dilation was given as vertexA. We have two sets of collinear vertices: points A, B, and B′ are collinear, and points A, C, and C′ are also collinear.
If a figure has more vertices, we’ll most likely use the ratio of some of the diagonals for reference, rather than using only the side lengths.


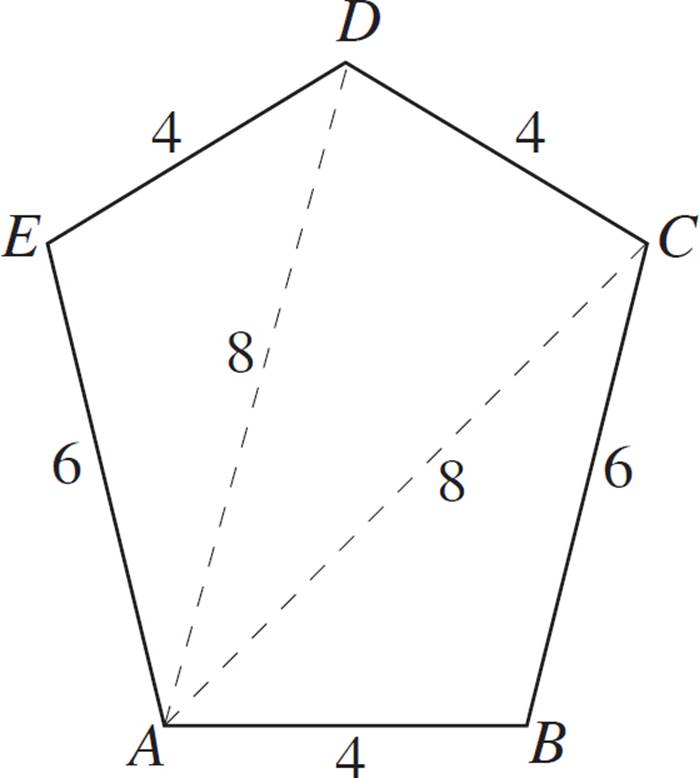
Construct a dilated version of pentagon ABCDE, with scale factor of 1.5 and a center of dilation at vertex A.
Supplies
Access your student
tools to download
larger, printable
versions of the images
in this section.
If the scale factor is 1.5, then each segment in the dilated figure will be 1.5 times the length of the corresponding segment in the pre-image. Therefore, the segments will have the following lengths:
|
Pre-Image (length) |
Image (length) |
|
AB (4) |
AB′ (6) |
|
BC (6) |
B′C′ (9) |
|
CD (4) |
C′D′ (6) |
|
DE (4) |
D′E′ (6) |
|
EA (6) |
E′A (9) |
|
AC (8) |
AC′ (12) |
|
AD (8) |
AD′ (12) |
We’re halfway there! But, how do we position the vertices in the dilated image? Recall that each point in the dilated image must be collinear with its corresponding pre-image point, as well as the center of dilation (in this case, vertex A). So, next, we’ll just need to extend each of the sides and diagonals that connect to vertex A.
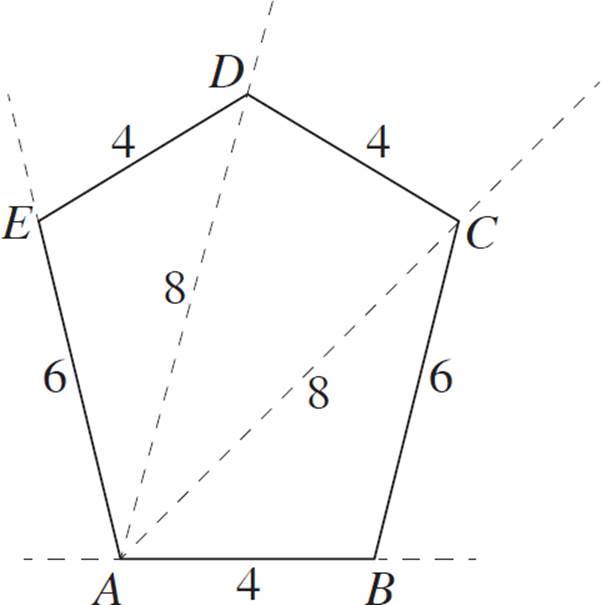
You would then measure each segment so that it matches the lengths shown in the table above. Since this is an example exercise, a scale version of the image is shown here:
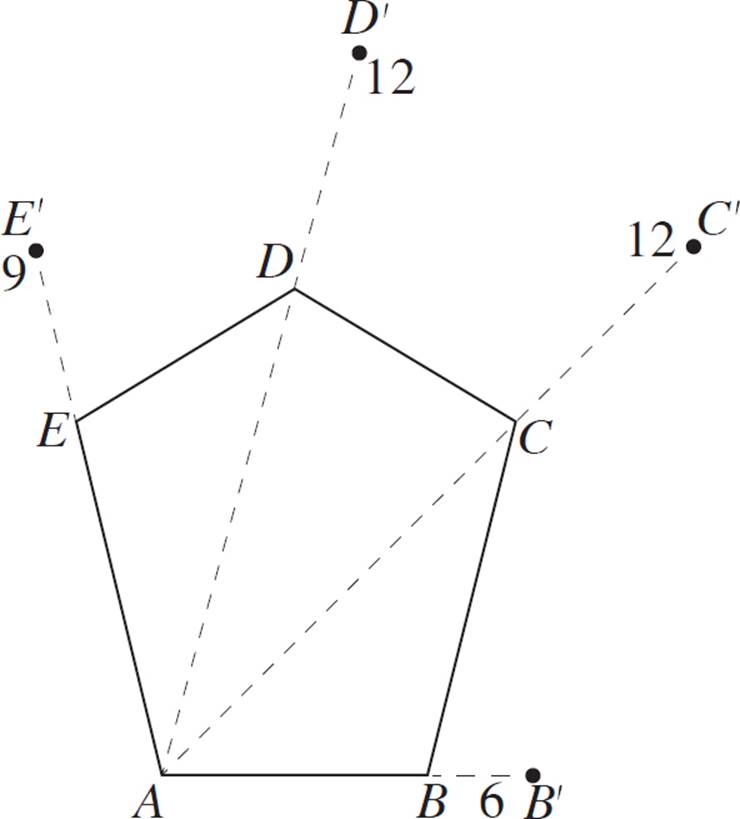
Finally, connect the new vertices to form a pentagon.


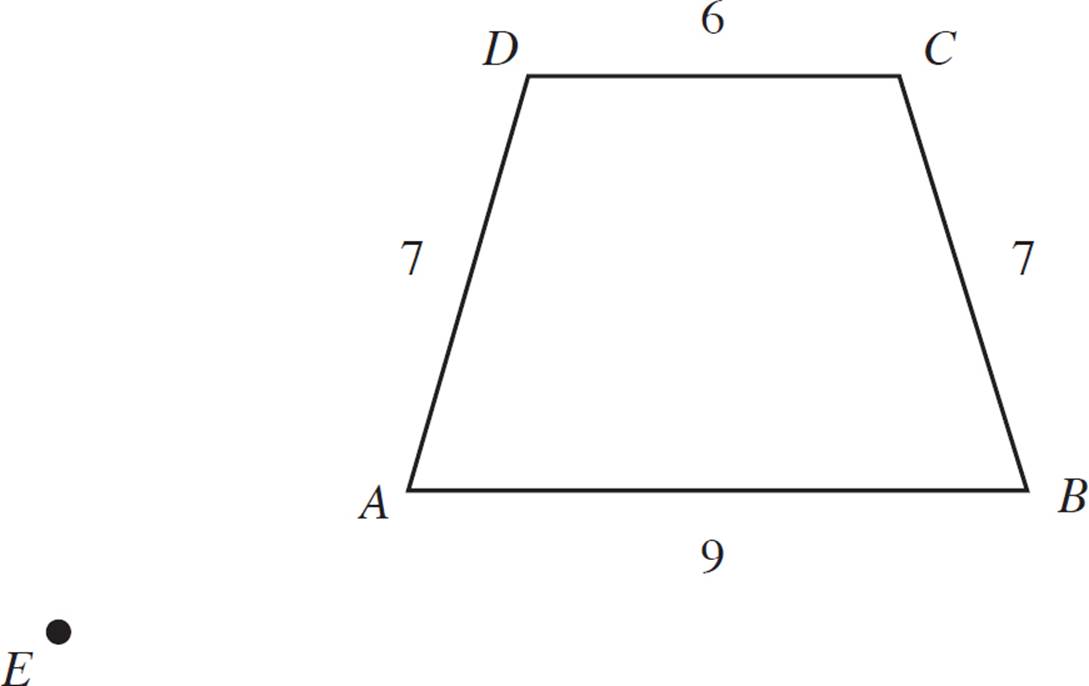
Construct a dilated version of quadrilateral ABCD, with scale factor 2 and center of dilation E.
This example is different, because the center of dilation is not one of the vertices. Thus, the given side lengths don’t help us all that much, because we need to position the dilated figure with respect to point E. Nevertheless, the process is quite similar to the previous exercise, with one important change: You’re going to measure the distance from each vertex to point E, and apply the scale ratio to those measurements.
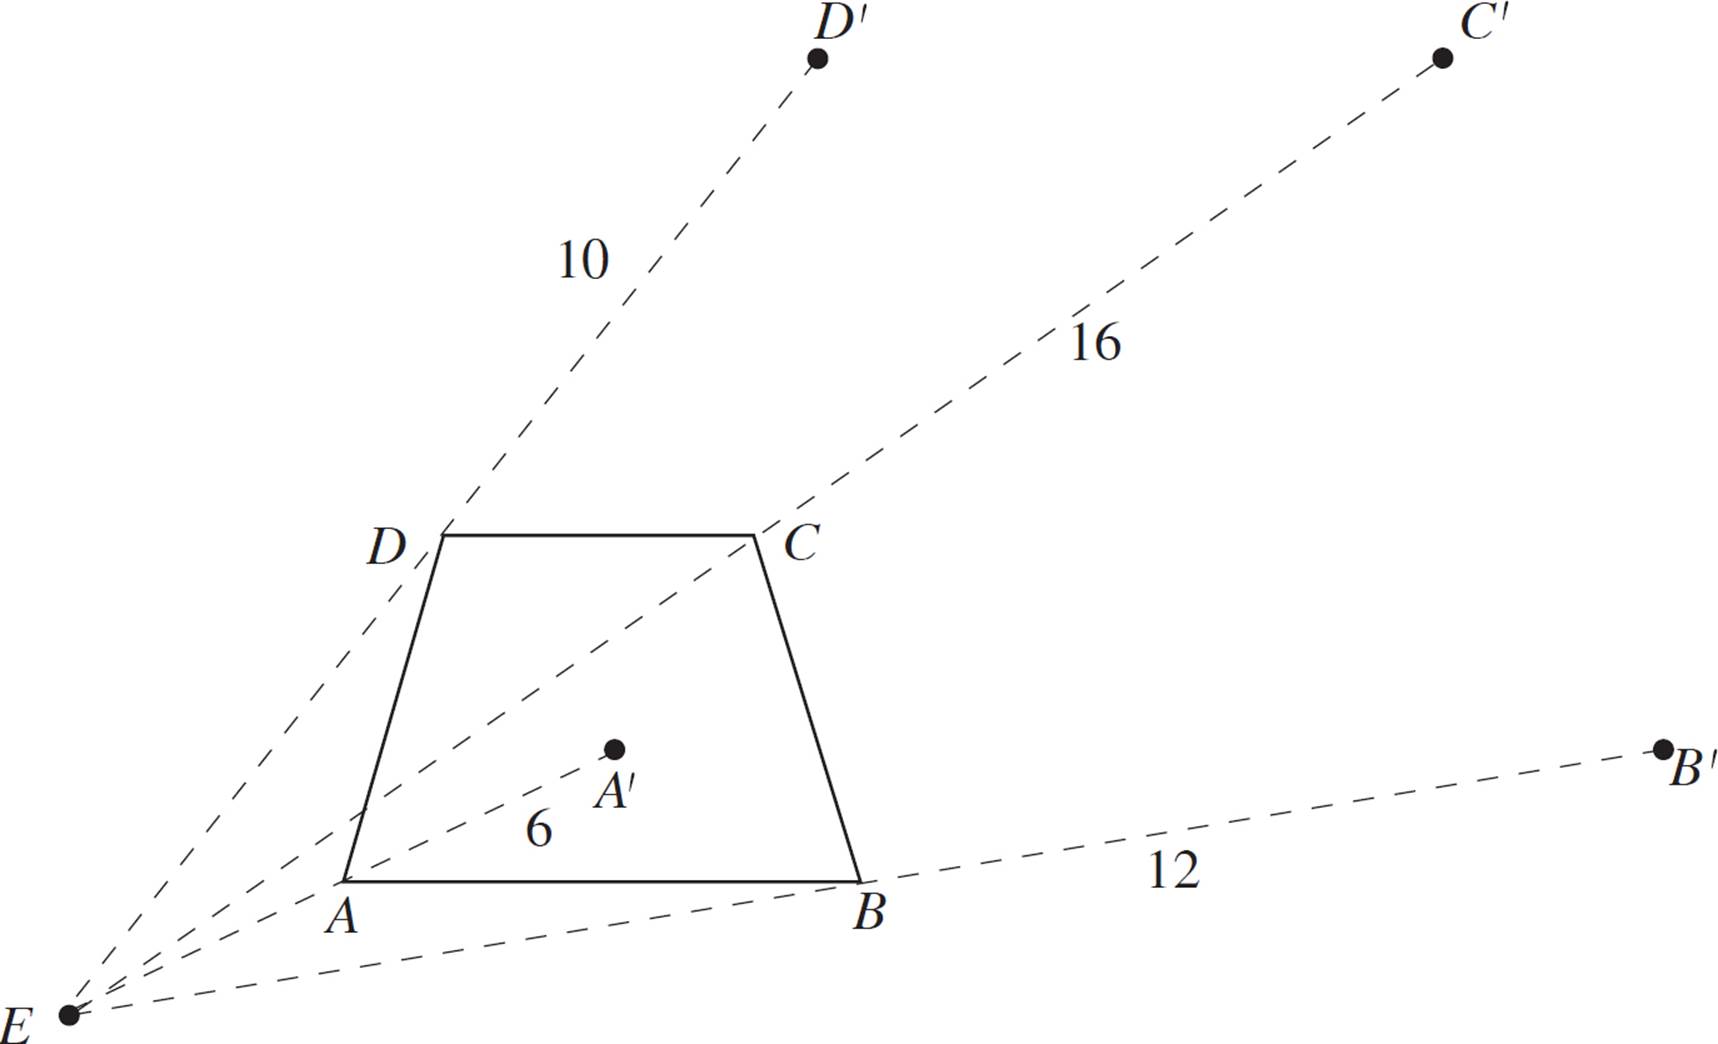
First, draw a line from point E through each vertex. Then, measure the distance formed by each of these pairs of points (EA, EB, EC, and ED). Since this is an example exercise, we’ll provide the “given” distances as follows:

Next, extend these segments (EA, EB, EC, and ED) to 2x their length. Remember to start each measurement from point E. Label the new endpoints A′, B′, C’, and D′.
Finally, connect the four new points to form a quadrilateral.
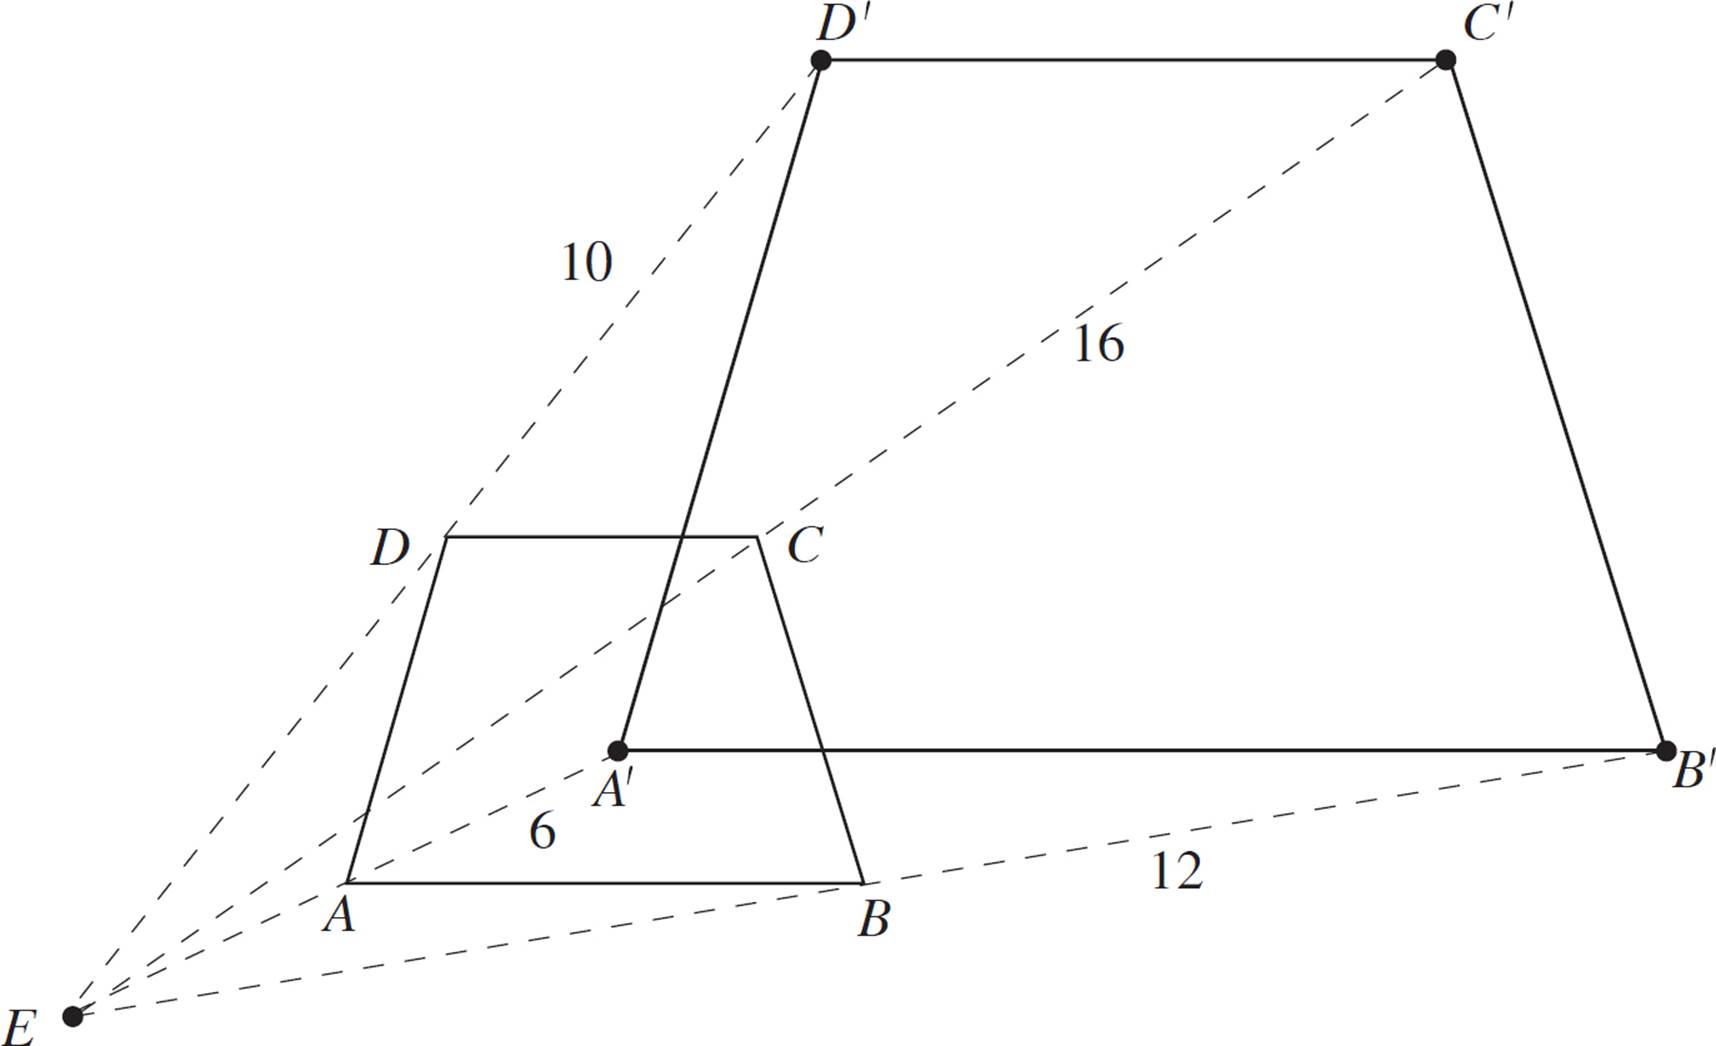


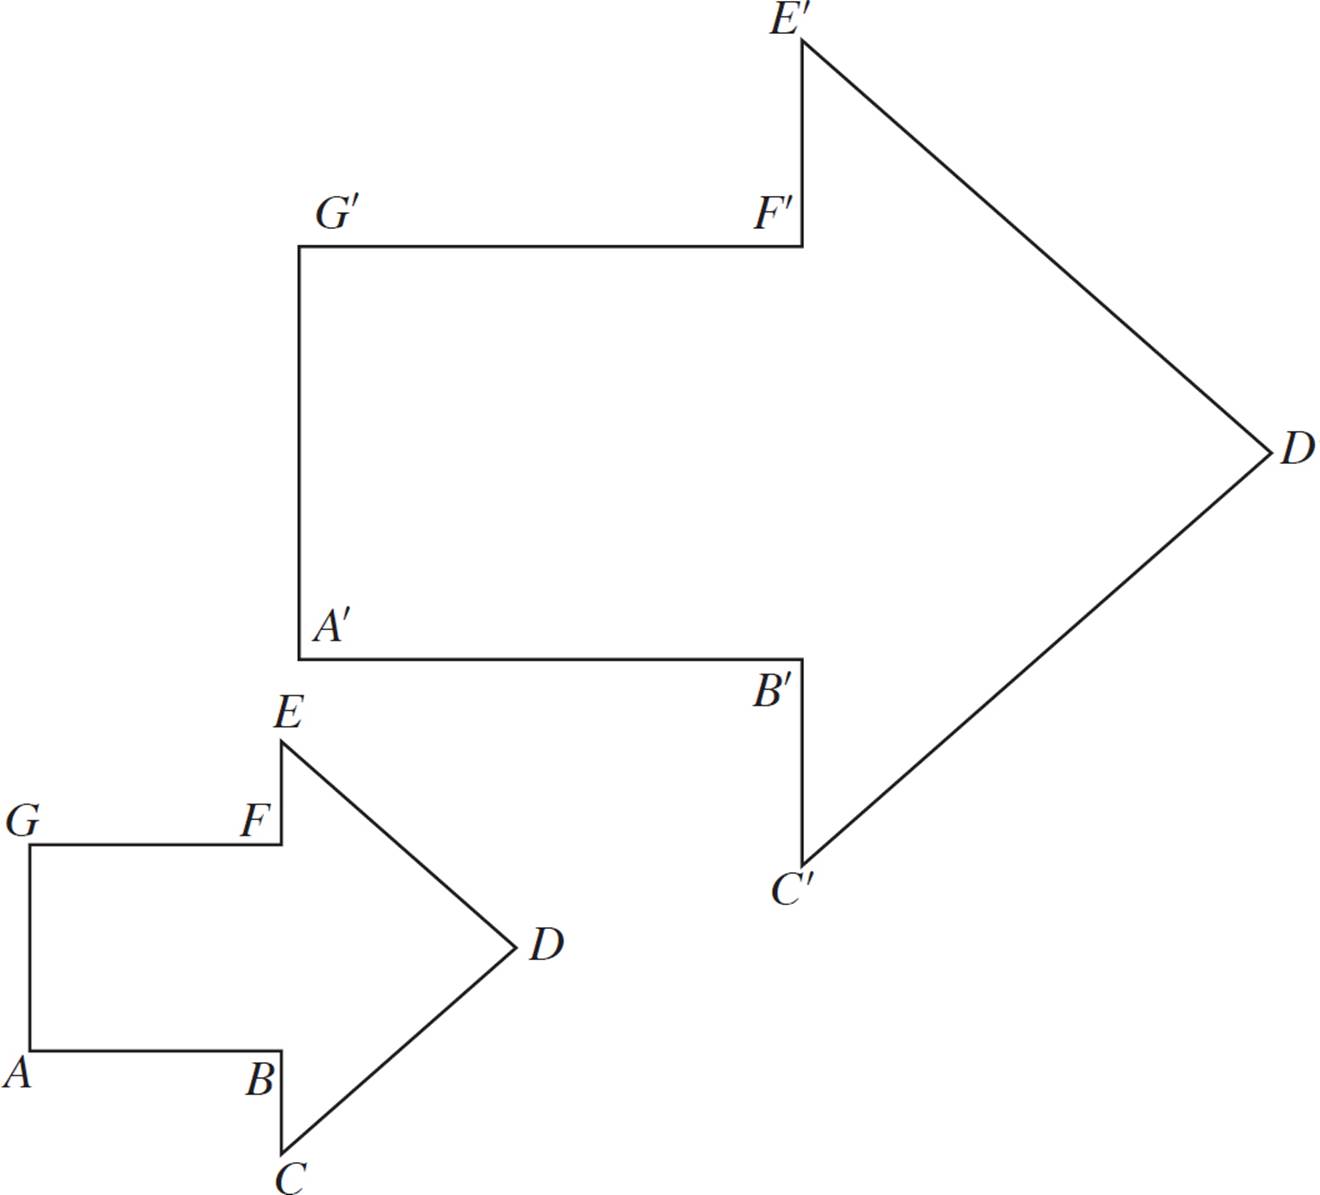
Figure ABCDEFG above is dilated with a scale factor of 2. Find the center of dilation.
In this example, you’re asked to find the center of dilation. This process is actually quite simple—it just involves drawing some straight lines, and you won’t need to measure.
First, choose a pair of corresponding points, for instance, A and A′. Draw a long, straight line through these points. (Hint: The center of dilation is sort of to the left of point A, so extend the line plenty in that direction.)
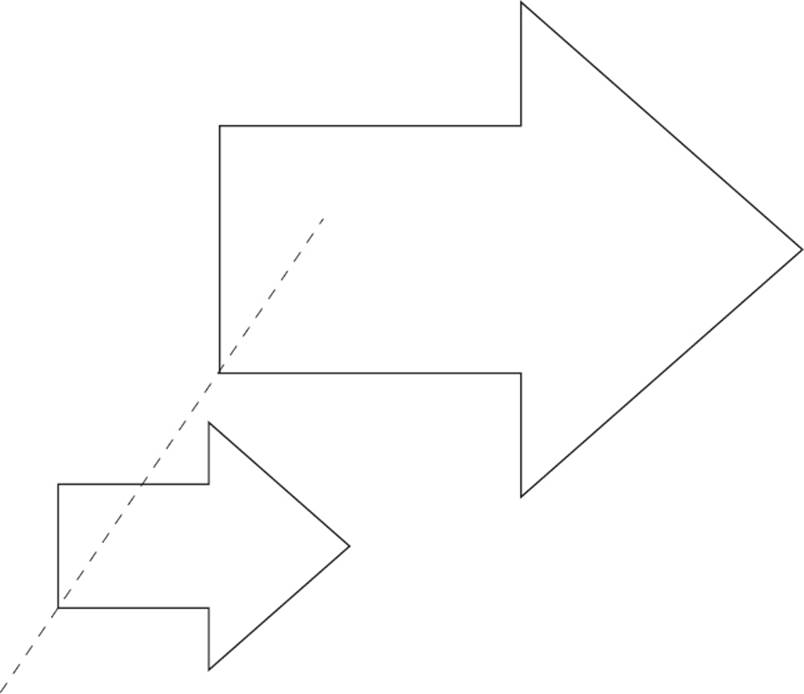
Do the same thing with a different pair of corresponding points, for instance, B and B′. Draw a long, straight line through these points.
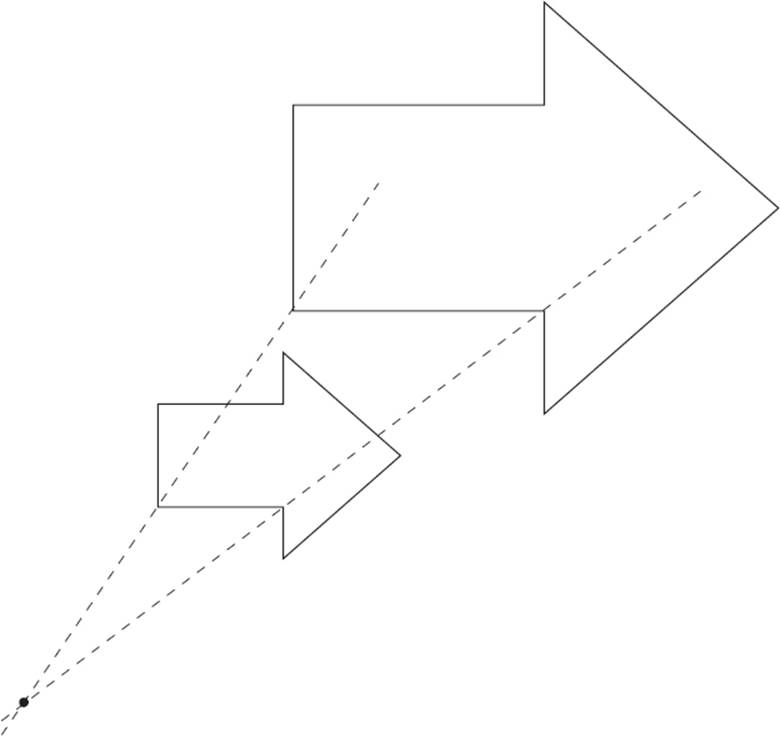
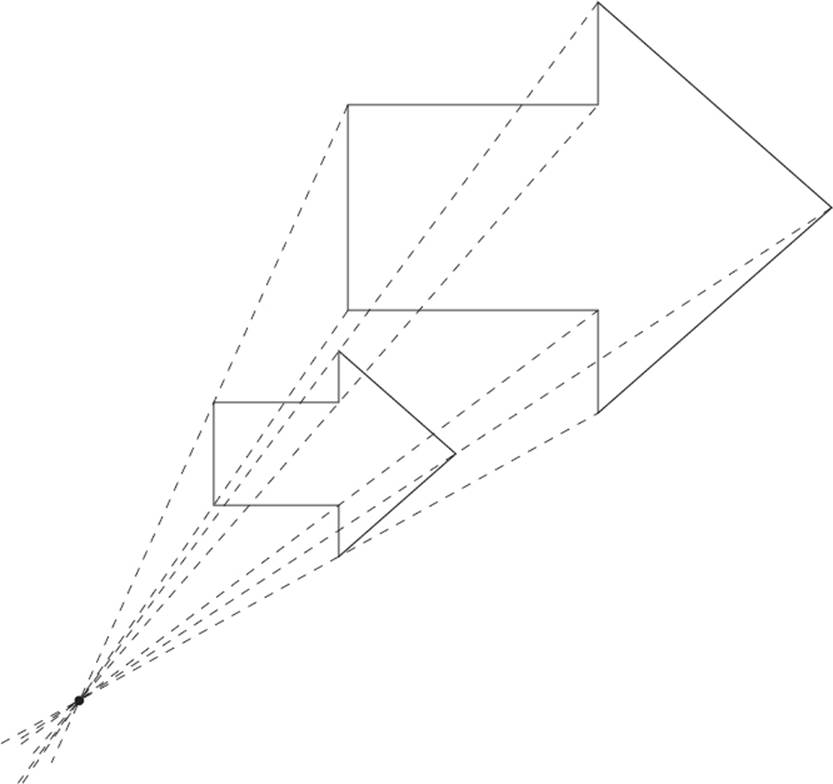
Where these two lines intersect is the center of dilation.
You only need to draw two lines, but it doesn’t hurt to add the remaining lines to check your work.

DILATIONS IN THE COORDINATE PLANE
If the center of dilation is the origin (point 0, 0), you’ll apply the scale factor multiple to each reference point in the figure. For example, if the scale factor is 4, then point (2, 3) would be dilated to (8, 12).


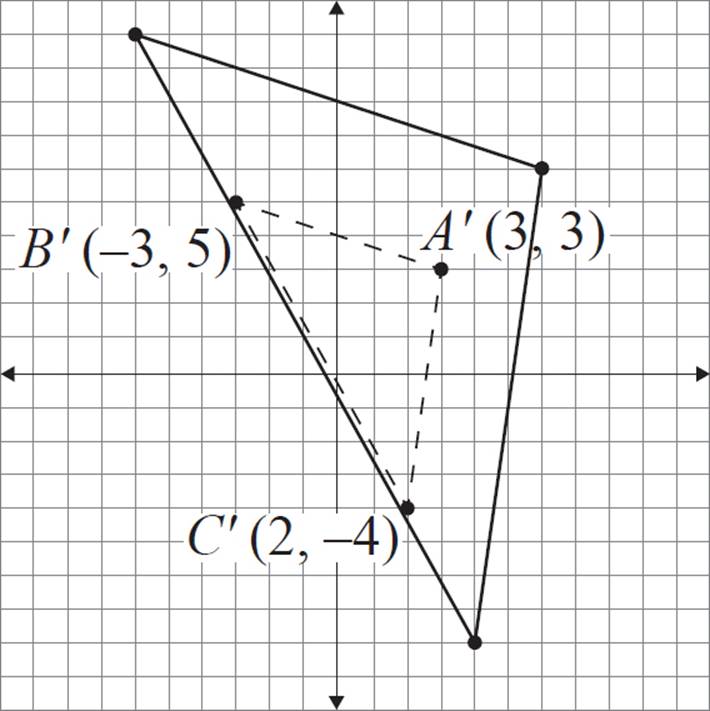
Construct a dilated version of triangle ABC with a scale factor of ![]() and the center of dilation at (0, 0).
and the center of dilation at (0, 0).
When the center of dilation is at the origin, all you need to do is multiply each coordinate by the scale factor  . Complete this process for each of the three vertices, and find the image coordinates as follows:
|
Pre-Image |
Image |
|
A (6, 6) |
A′ (3, 3) |
|
B (−6, 10) |
B′ (−3, 5) |
|
C (4, −8) |
C′ (2, −4) |
Finally, plot the three points and then connect the three vertices to form a triangle.


Construct a dilated version of triangle ABC with a scale factor of ![]() and the center of dilation at (−2, −4).
and the center of dilation at (−2, −4).
If the center of dilation is not at the origin, then you’ll use the same process that we reviewed earlier in this chapter—applying the scale factor multiple to the distance from the center of dilation. This is a little easier than it might sound!
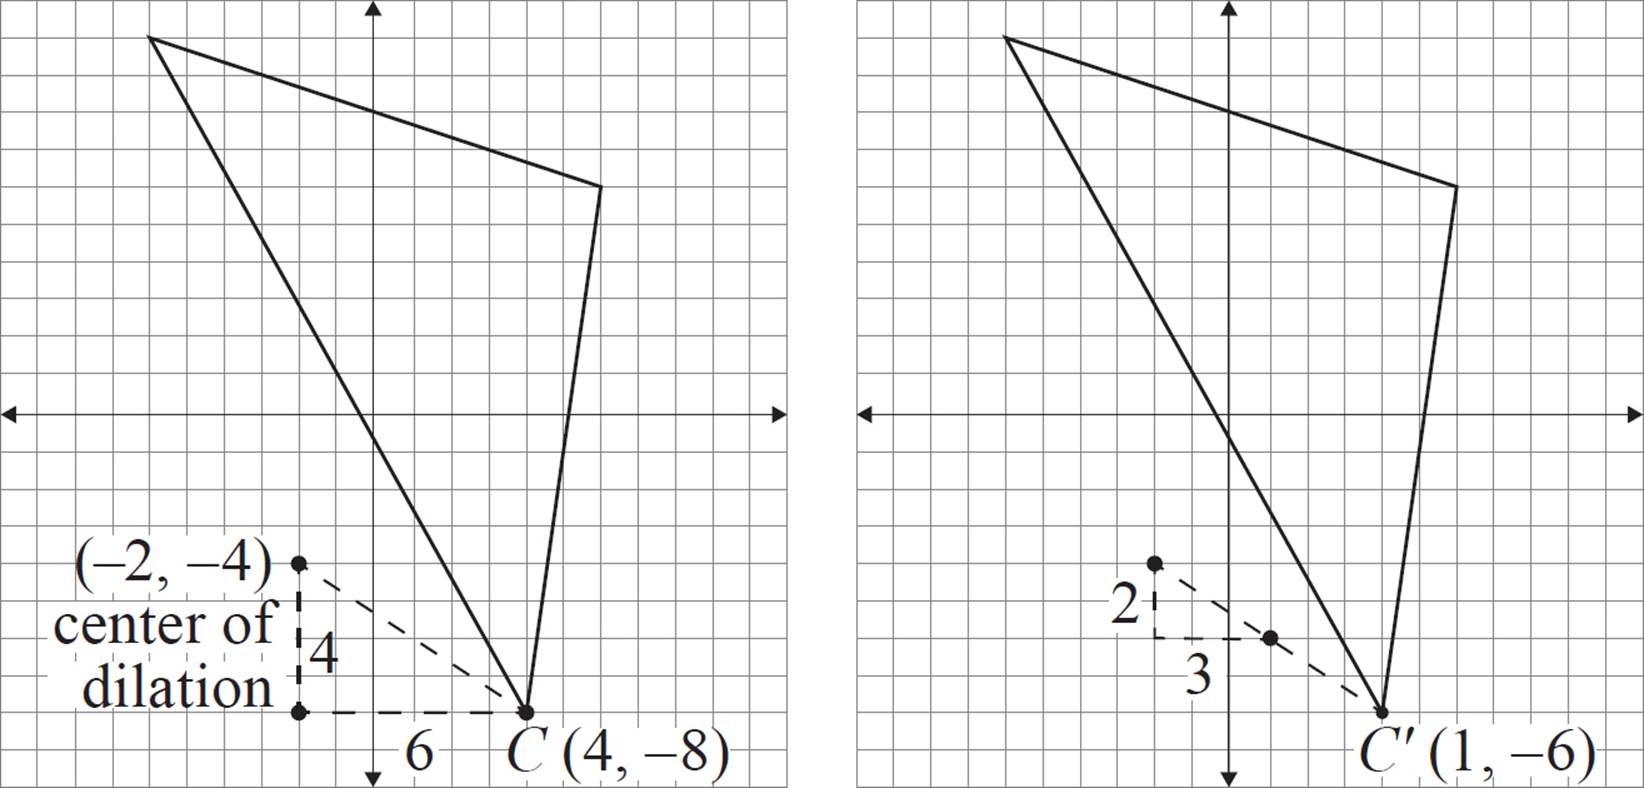
Method 1—Counting
Let’s begin with vertex A (6, 6). We can apply the same process as we did with non-coordinate dilation, extending lines from the center of dilation and measuring the distance.
Draw a line from the center of dilation and through coordinate A. Of course, the distance wasn’t given here, so we’ll have to find it. The good news is that we won’t need to use Distance Formula or anything overly complicated—we’ll just focus on the horizontal and vertical difference between the points. By counting, we can see that coordinate A is 8 horizontal units and 10 vertical units from the center of dilation.
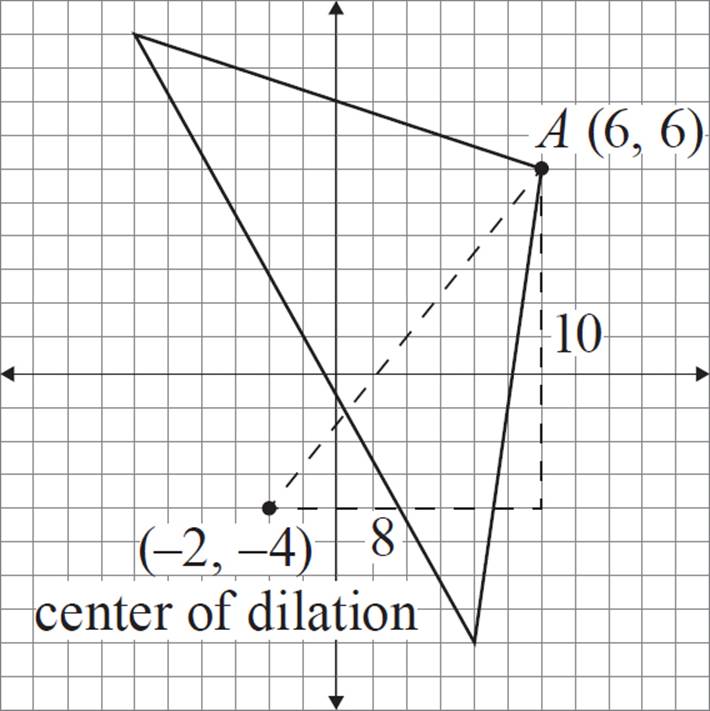
The scale factor for this exercise is ![]() . That means that the dilated image of A (labeled A′ in the figure below) should be 4 horizontal units and 5 vertical units (in the same direction) from the center of dilation. In other words, the distance between A′ and (−2, −4) is
. That means that the dilated image of A (labeled A′ in the figure below) should be 4 horizontal units and 5 vertical units (in the same direction) from the center of dilation. In other words, the distance between A′ and (−2, −4) is ![]() the distance between A and (−2, −4). The coordinate A′ is located at (2, 1).
the distance between A and (−2, −4). The coordinate A′ is located at (2, 1).
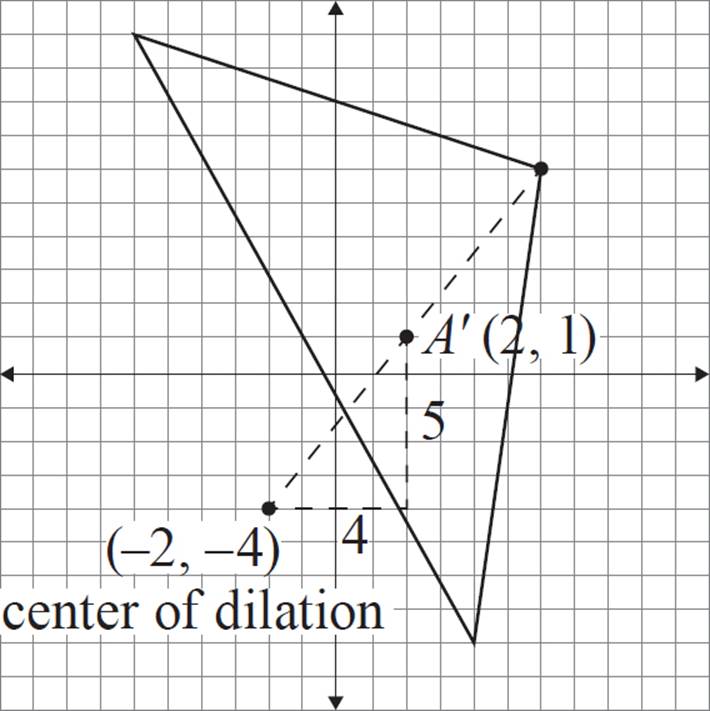
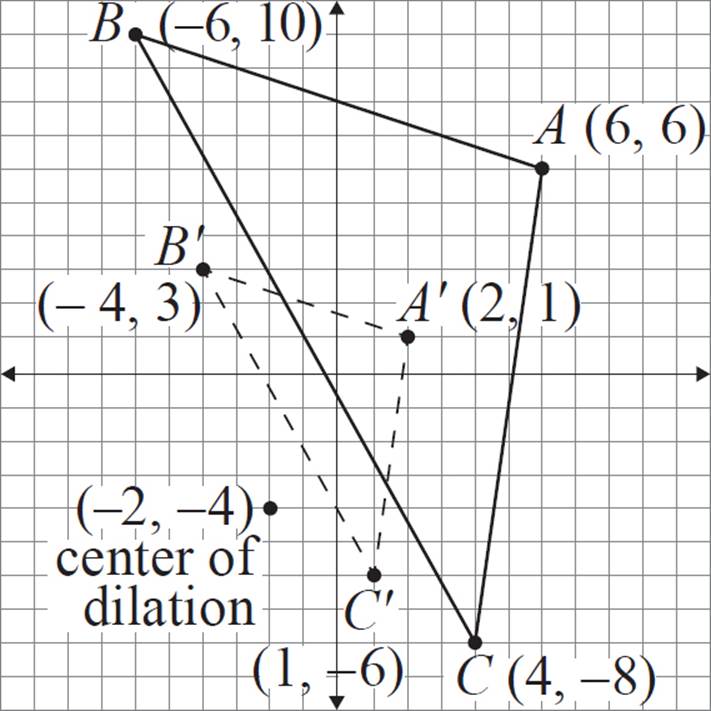
Repeat this process for coordinates B and C.
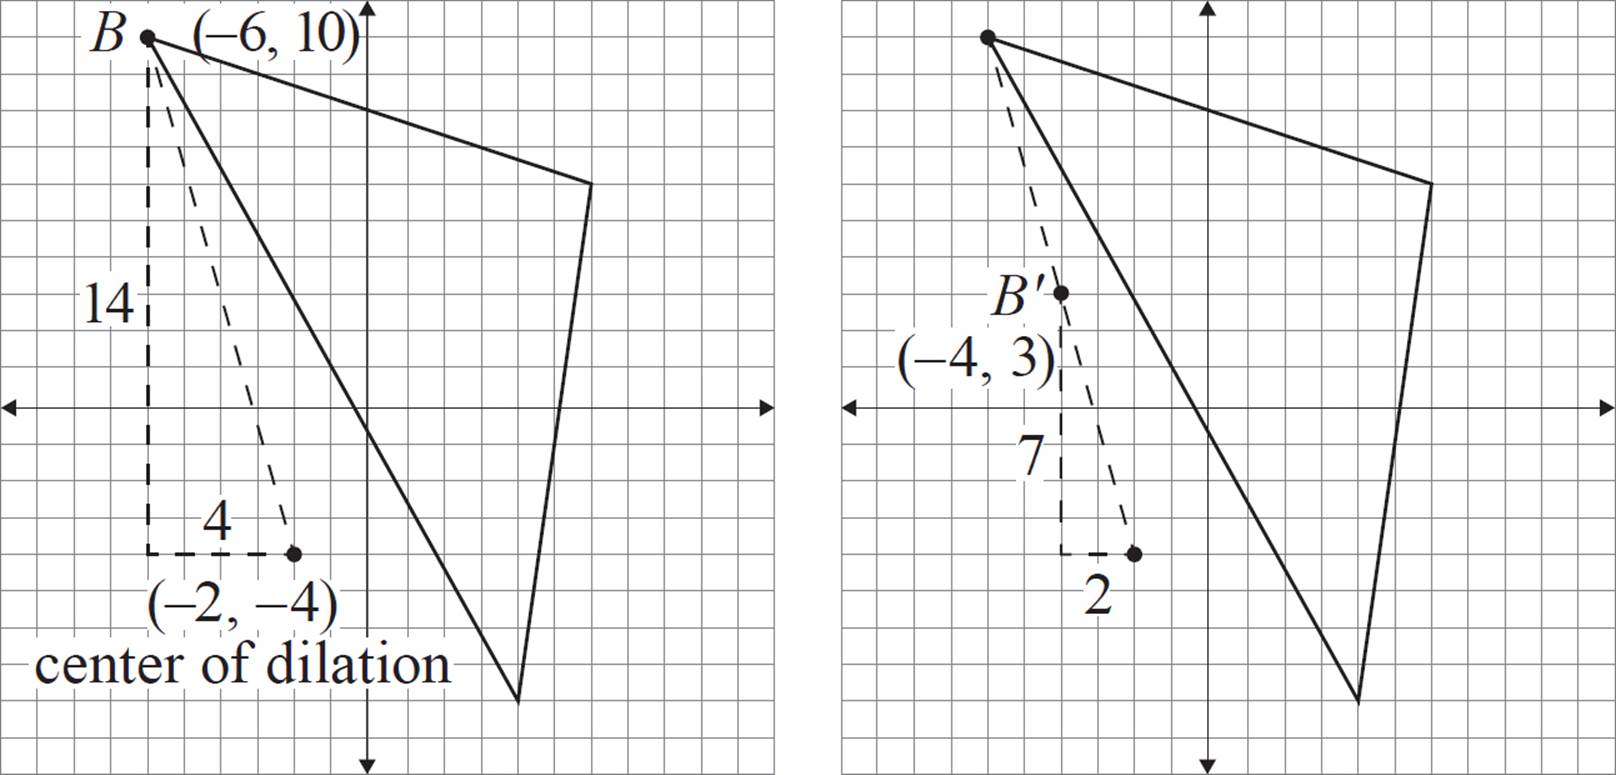
Finally, connect the vertices to form a triangle.
Method 2—Arithmetic

Construct a dilated version of triangle ABC with a scale factor of ![]() and the center of dilation at (−2, −4).
and the center of dilation at (−2, −4).
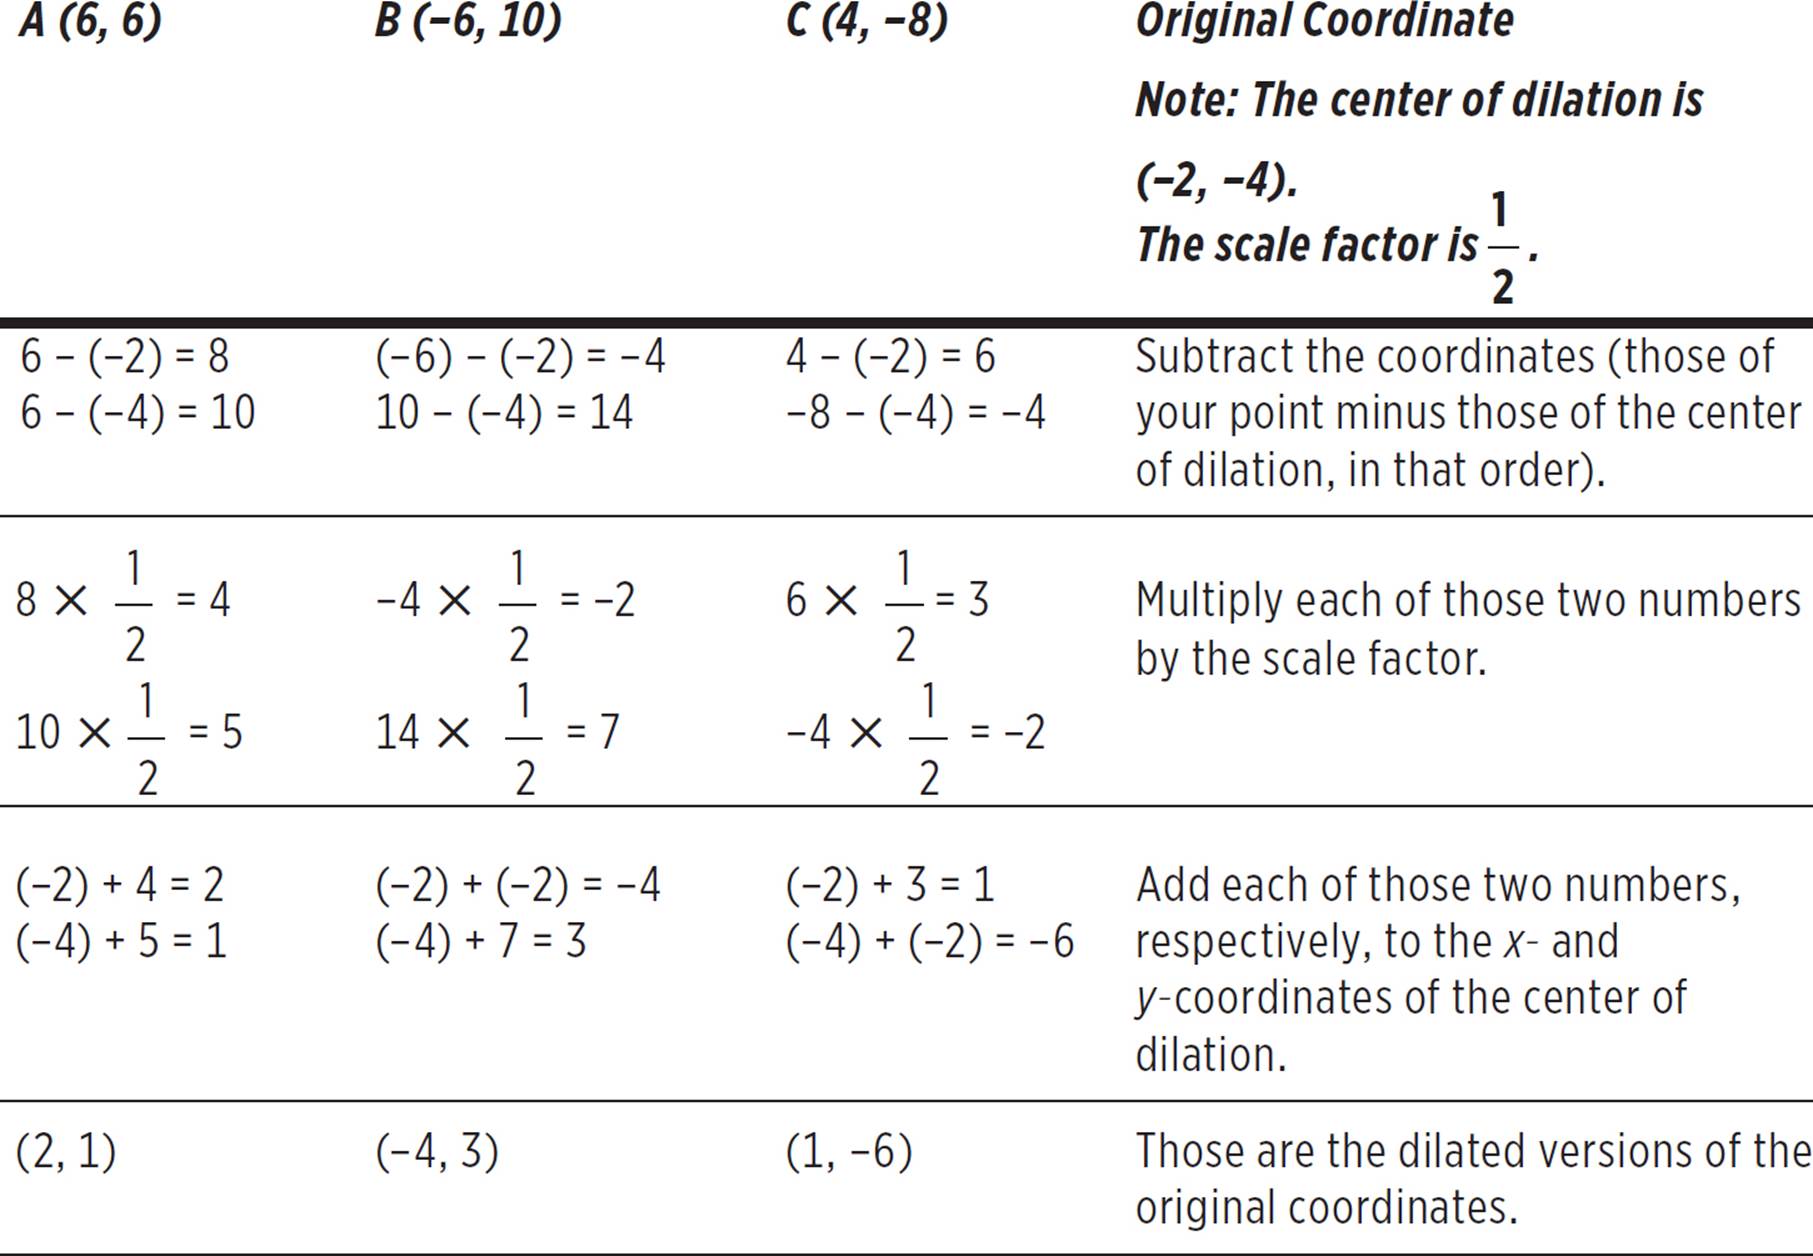
We can also complete this process arithmetically, instead of drawing and counting.
Let’s begin with coordinate A. We’re going to focus on the distance between A and the center of dilation (−2, −4).
Subtract the coordinates of (−2, −4) from the coordinates of (6, 6). You should always subtract in that order—your reference point minus the center of dilation—so that you have the correct signs.
|
6 − (−2) = 8 |
Subtract the x-coordinates. |
|
6 − (−4) = 10 |
Subtract the y-coordinates. |
Multiply each of those two numbers by the scale factor  .
.
|
8 ✕ |
|
10 ✕ |
Add each of those two numbers, respectively, to the x- and y-coordinates of the center of dilation.
(−2) + 4 = 2
(−4) + 5 = 1
These are the coordinates for the dilated version of point A.
Point A′ is at (2, 1).
Apply the same process to the other two vertices.
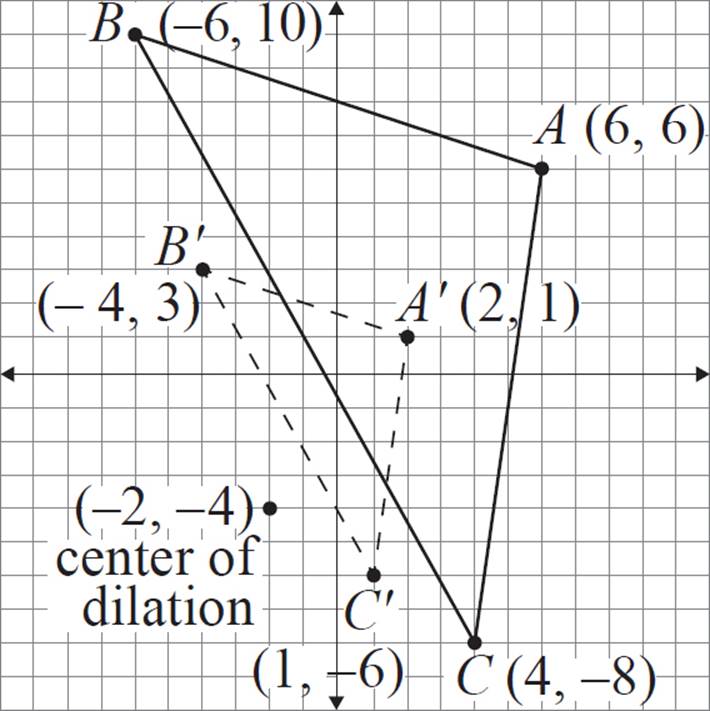
Finally, plot the vertices and complete the triangle.


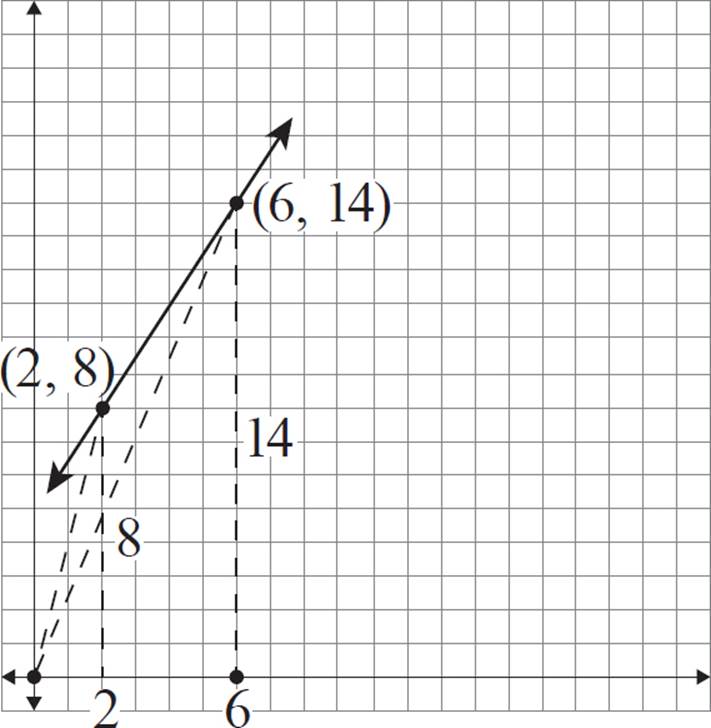
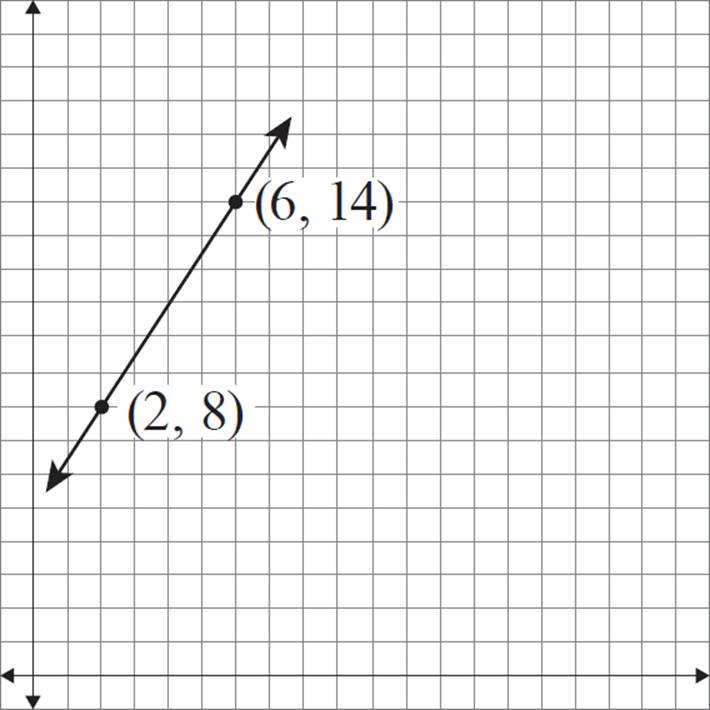
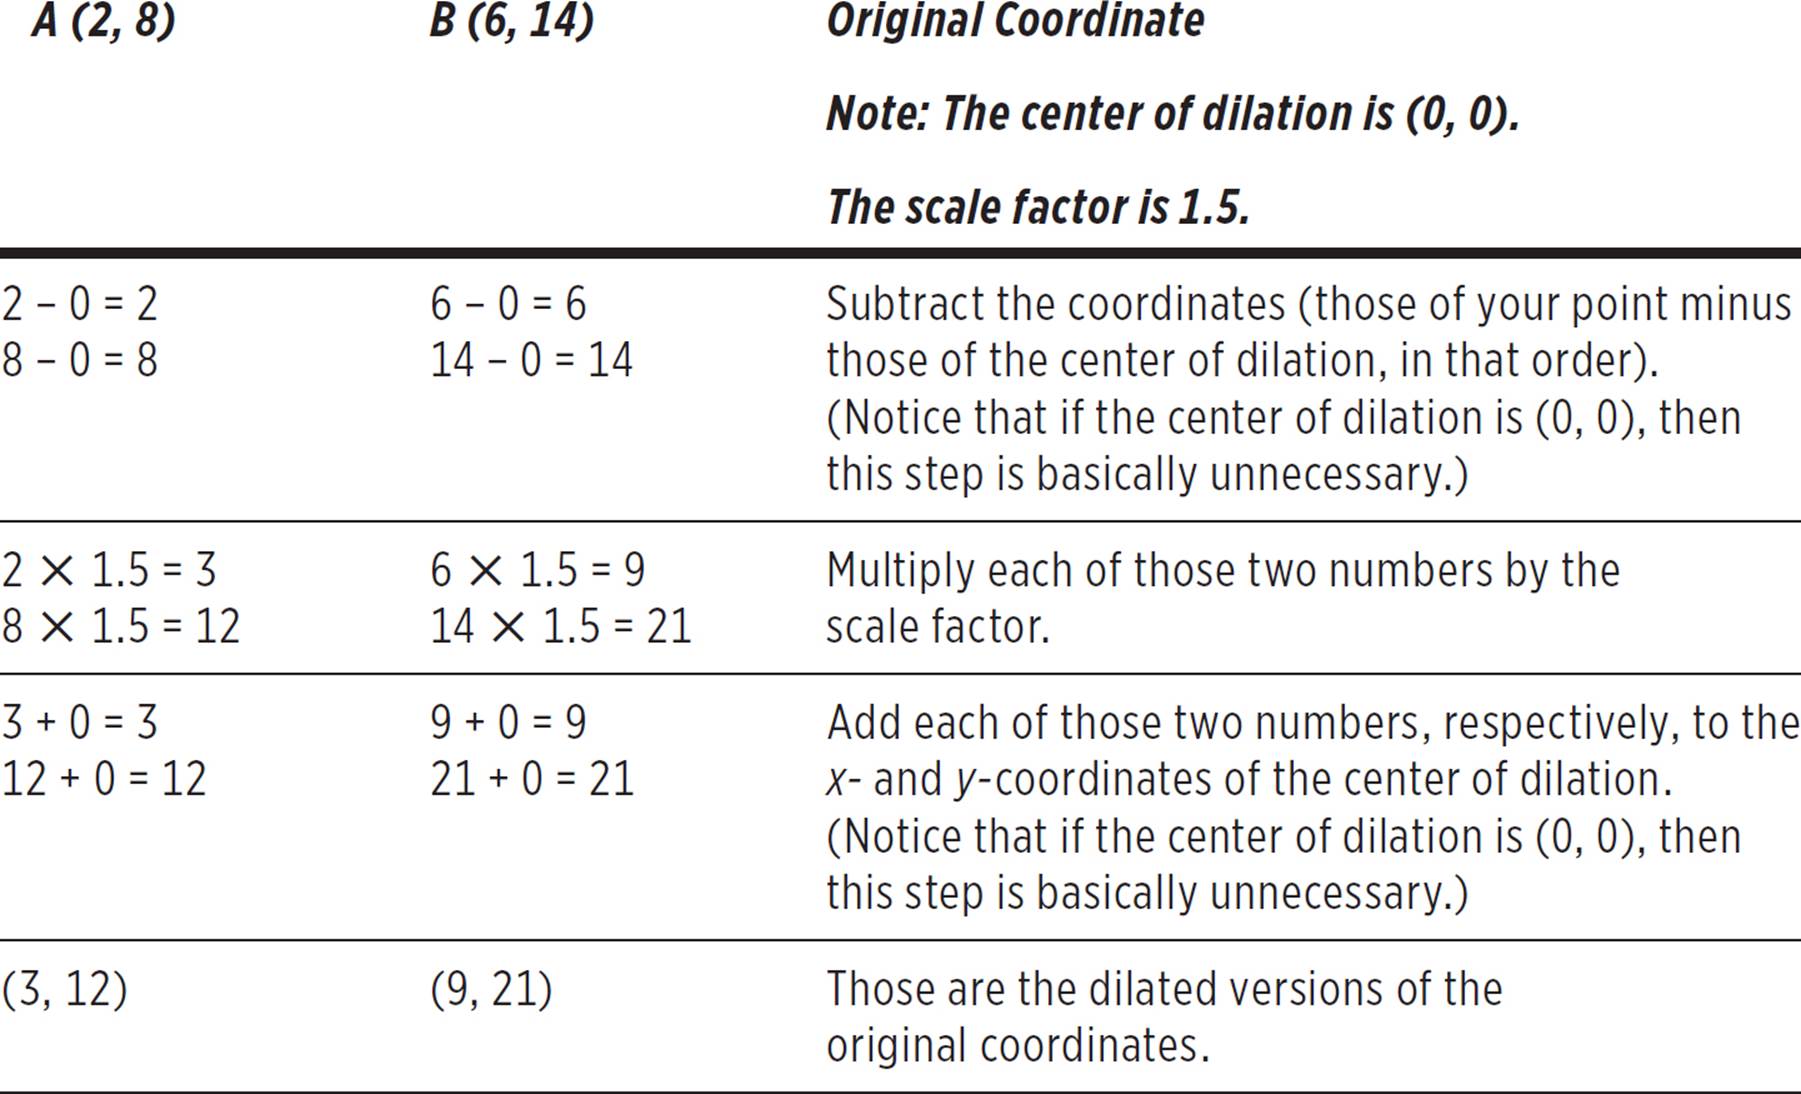
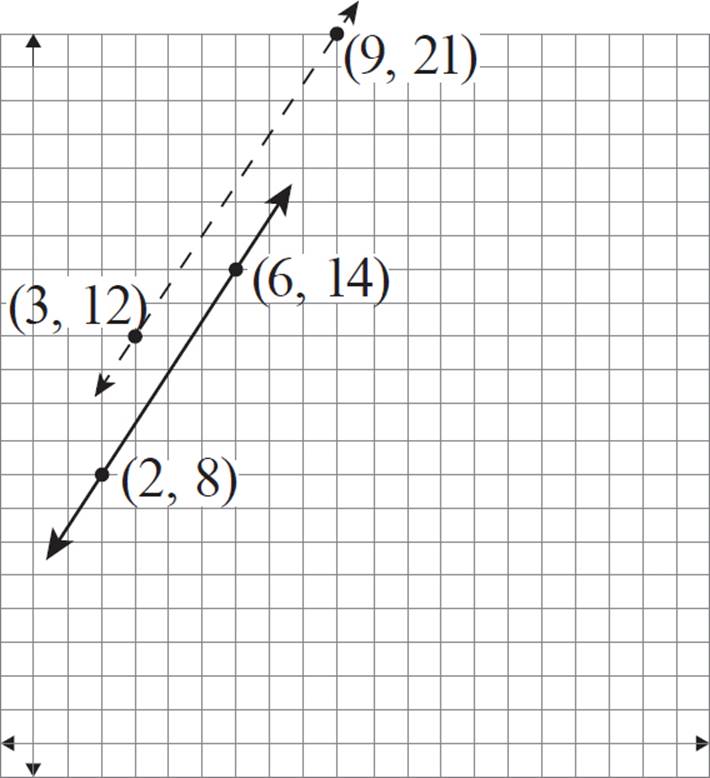
Construct a dilated version of line 1 with a scale factor of 1.5 and the center of dilation at (0, 0).
Method 1—Counting
To form a line, you just need two points. In general, you can choose any two points from the line to work with. In this example, two coordinates are provided, so that makes things easier.
To perform the dilation on these two points, follow the same steps as those in the previous exercise. For point (2, 8), the x-coordinate is 2 units away from the center of dilation, and the y-coordinate is 8 units away from the center of dilation.
For coordinate (6, 14), the x-coordinate is 6 units away from the center of dilation, and the y-coordinate is 14 units away from the center of dilation.
If two points are
not provided in the
figure, then perhaps
an equation for the
line will be provided.
In that case, plug in
two different values
for x, and solve for
the corresponding
y-coordinates.
The scale factor for this dilation is 1.5. Therefore, the dilated version of (2, 8) should be 3 horizontal units and 12 vertical units from the center of dilation.
The dilated version of (6, 14) should be 9 horizontal units and 21 vertical units from the center of dilation.
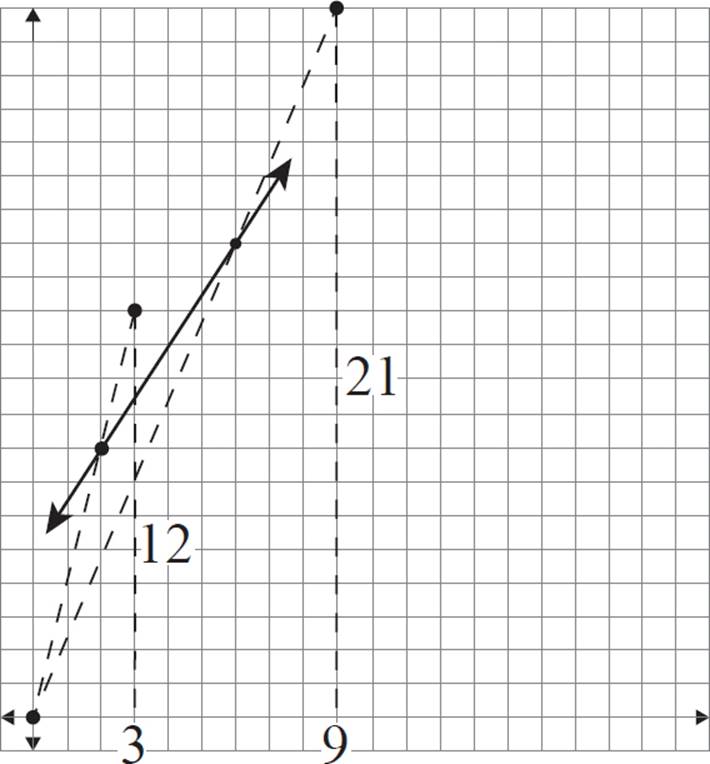
This places the new coordinates at (3, 12) and (9, 21), respectively.
Finally, connect these new coordinates to form a line.
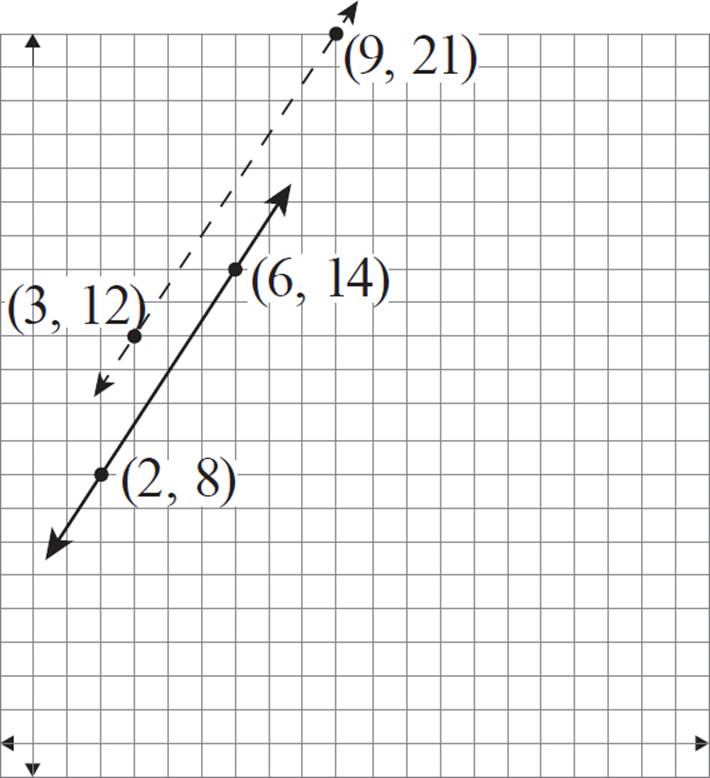
You may notice that these lines appear to be parallel to each other. In fact, this will always be true when performing a dilation of a line!
Dilation of Lines
A dilated version of a line will always be parallel to the original line.
Exception: If the center of dilation is a point on the line, then the dilation will leave the line unchanged.
Method 2—Arithmetic
Here is the arithmetic solution for Example 7.
Construct a dilated version of line 1 with a scale factor of 1.5 and the center of dilation at (0, 0).
Finally, plot the new coordinates and connect them to form a line.


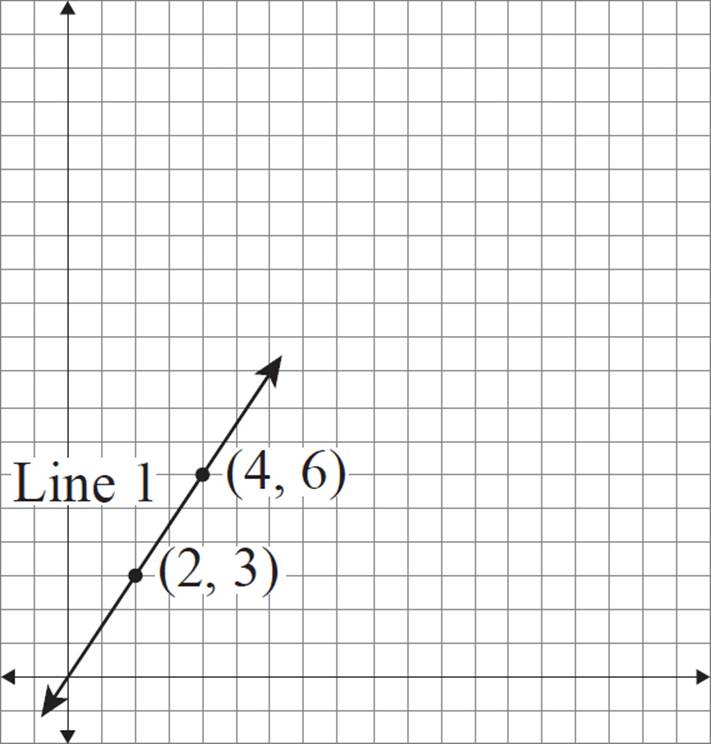
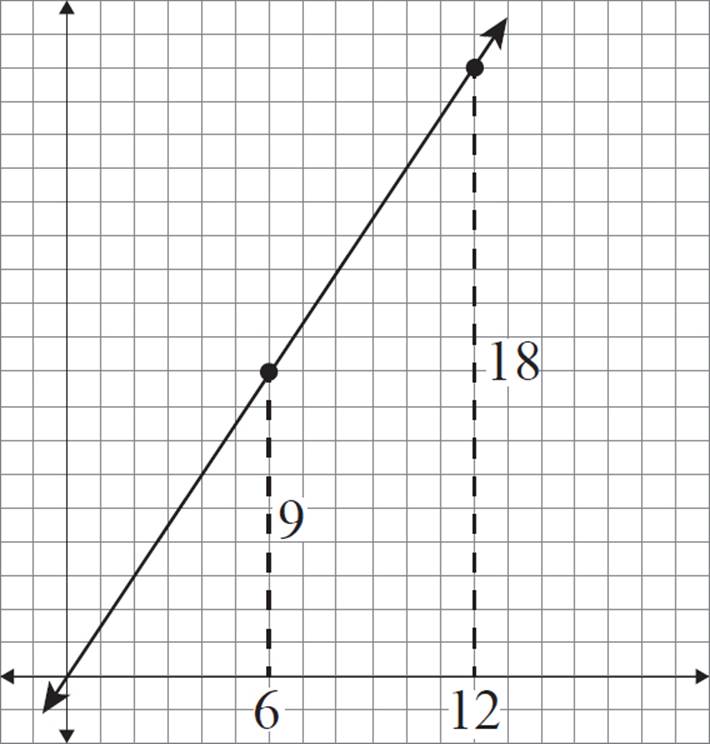
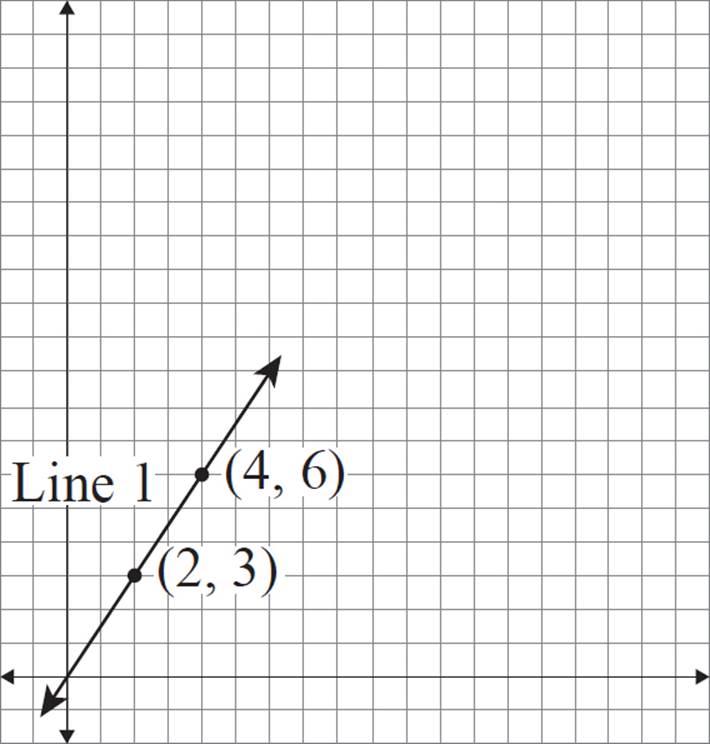
Construct a dilated version of line 1 with a scale factor of 3 and the center of dilation at (0, 0).
Method 1—Counting
You may notice that the center of dilation (0, 0) is a point that lies on our original line. As mentioned previously, this will mean that the dilation leaves the line unchanged! Let’s complete this dilation to see it in action.
To perform the dilation on these two points, follow the same steps as in the previous exercise. For point (2, 3), the x-coordinate is 2 units away from the center of dilation, and the y-coordinate is 3 units away from the center of dilation.
For coordinate (4, 6), the x-coordinate is 4 units away from the center of dilation, and the y-coordinate is 6 units away from the center of dilation.
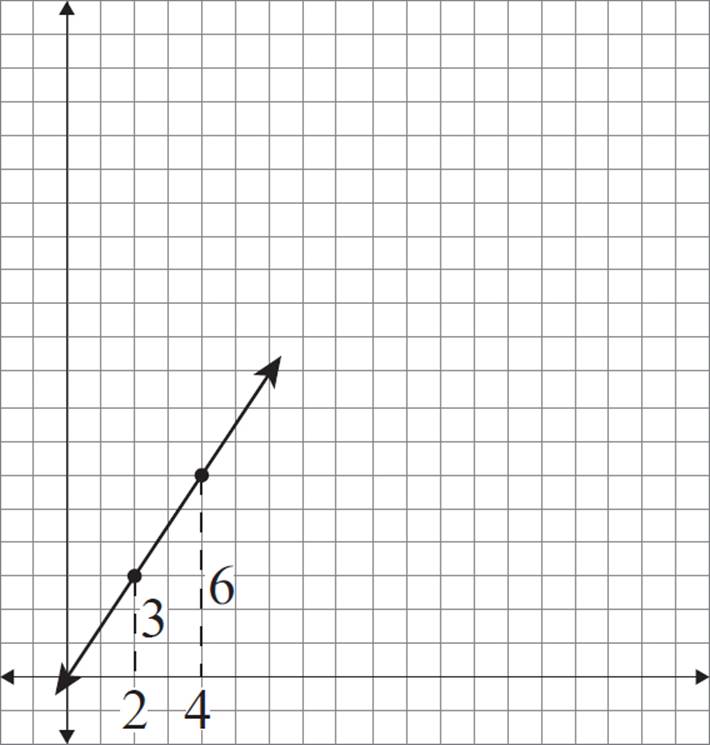
The scale factor for this dilation is 3. Therefore, the dilated version of (2, 3) should be 6 horizontal units and 9 vertical units from the center of dilation.
The dilated version of (4, 6) should be 12 horizontal units and 18 vertical units from the center of dilation.
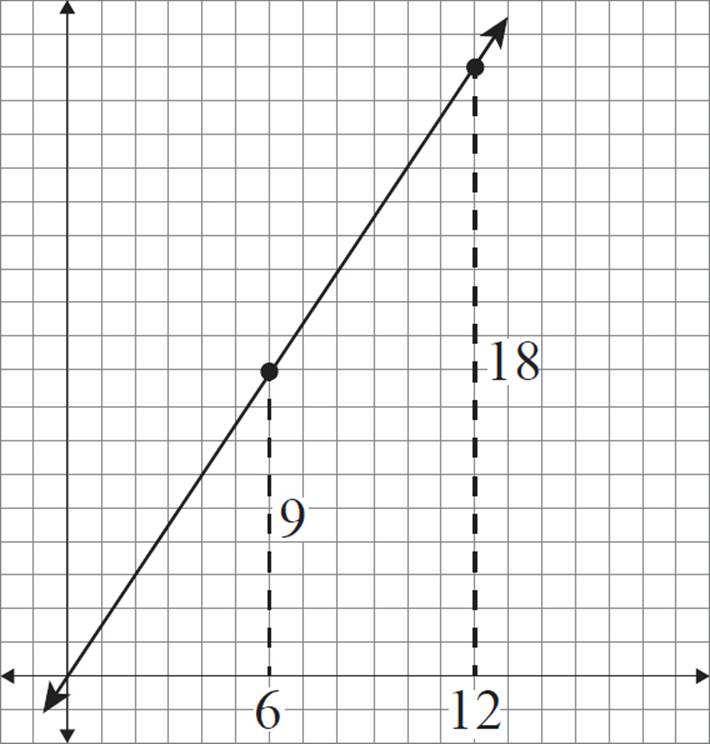
This places the new coordinates at (6, 9) and (12, 18), respectively.
Notice that these new coordinates lie on the original line.
If the center of dilation is a point on the line, then the dilation will leave the line unchanged. In other words, the dilation of any point on that line will always produce a point that already exists on the original line.
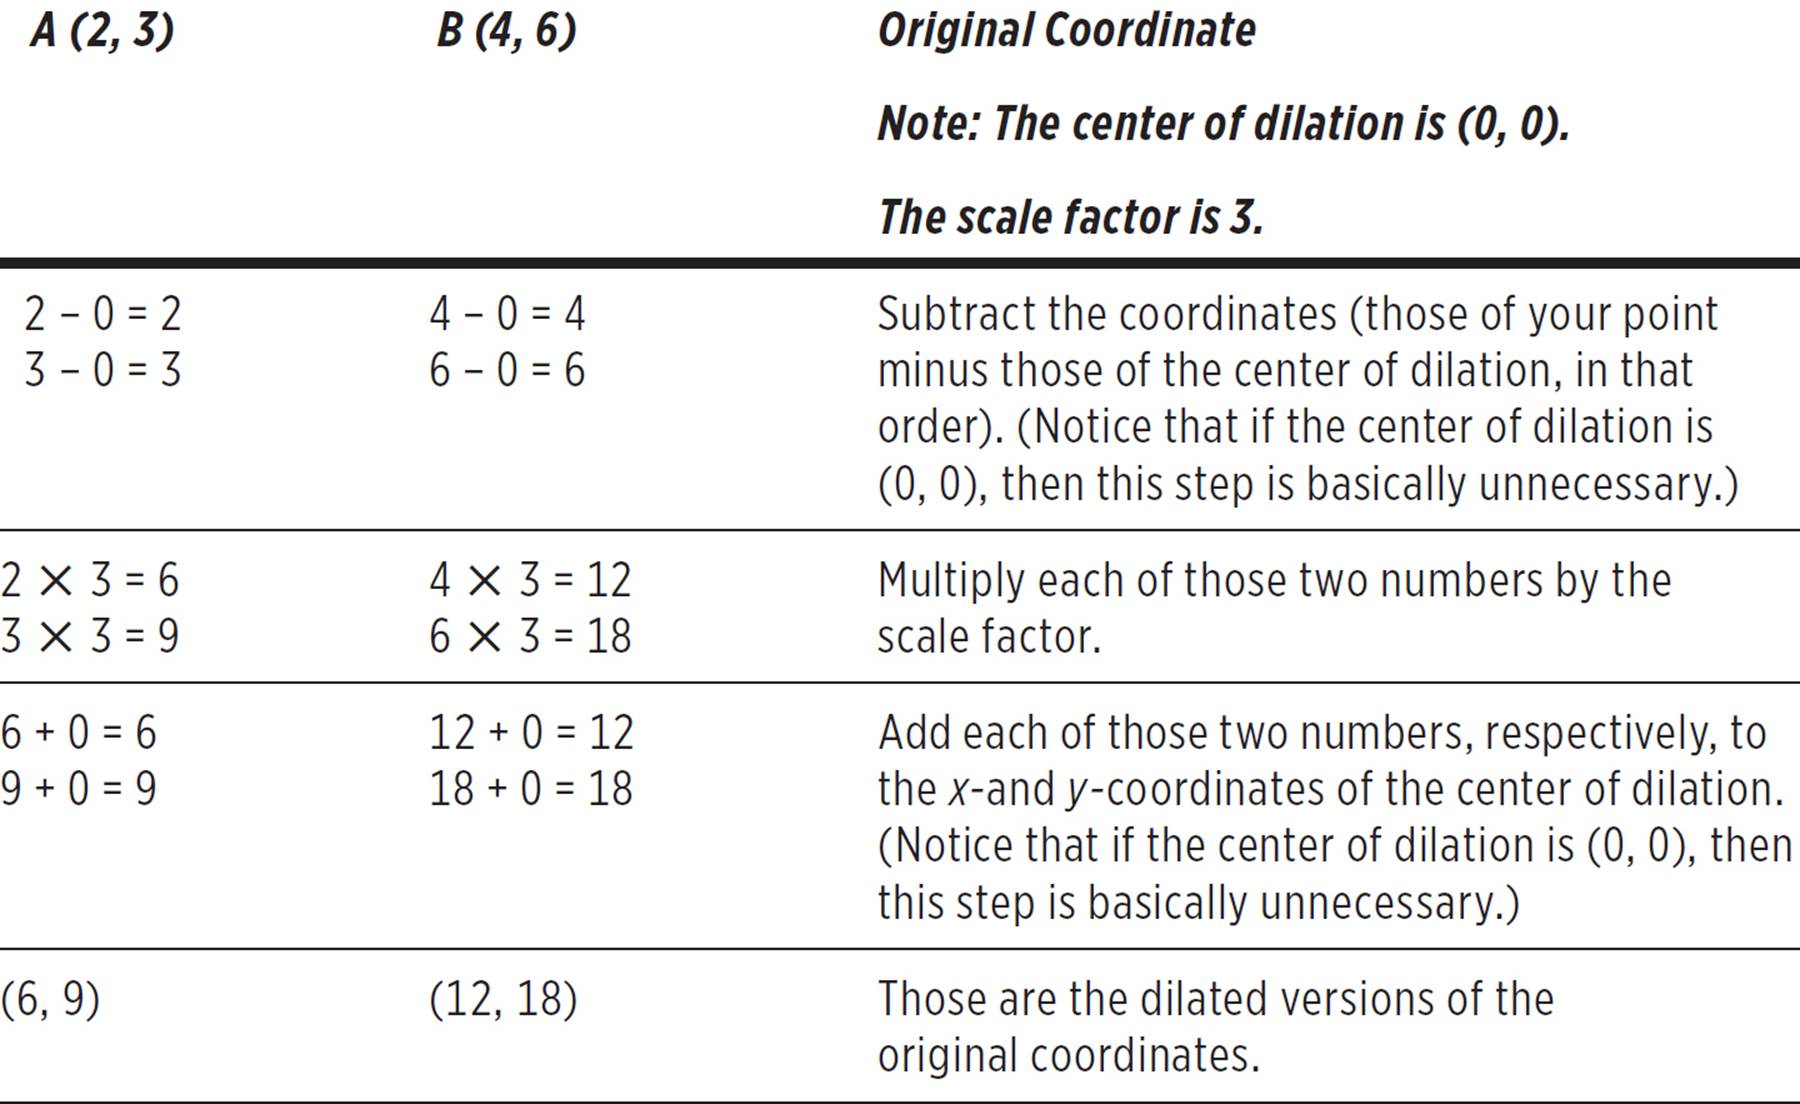
Method 2—Arithmetic
Construct a dilated version of line 1 with a scale factor of 1.5 and the center of dilation at (0, 0).
Here is the arithmetic solution for Example 8.
Finally, plot the new coordinates and connect them to form a line.