Make: The Annotated Build-It-Yourself Science Laboratory (2015)
Part I. Chemistry
Chapter 1. General Laboratory Equipment
Science Laboratory Workbench
Purpose: This is a simple science all-purpose worktable that can be easily built in any home or schoolroom. The laboratory contains a power supply, sink, and water source.
Material: Old table (or you may build one), 1” × 12” boards for shelves, two gallon jugs or large oil cans, glass tubing, rubber tubing, a bucket, and a funnel.
What to Do: Any old table can be converted into a science workbench. Cover the table with oilcloth1 (tack or glue down) or a piece of ⅛” masonite (cost about $5.00). Cut a hole just a little smaller than the diameter of a gallon jug in the top of the table as shown. This is for your sink. Cut the bottom 3” off the jug with your bottle cutter. Smooth the edges with a file or emery paper (see “Bottle Cutter”). Insert a #6½ one-hole stopper2 into the neck of the bottle. Connect a rubber hose to the stopper with a short piece of glass tubing. This is your drain hose, and it should run into a bucket.
The wash bottle serves as a supply of water. The supply of water is controlled by a clothespin that serves as a stopcock, as shown on the next page.
Make your shelves and place them on top of the table. Nail them to the table through the side strips at the bottom. The shelves should have a plywood or masonite backing. The shelves should be spaced to store your science equipment, so plan the sizes with this in mind. You can store your chemicals and glass tubing in the drawer if your table has one. If not, plan your shelves so you don’t waste space and yet can store materials safely.
Mount your power supply (see “AC or DC Power Supply”) under the table with the wires coming through holes in the table. Attach your Fahnestock clips3 to the top of the table. From here you can tap off either direct or alternating current.
Your worktable should be placed so you can plug your power supply into a regular outlet plug.
Figure 1-1. Shelving: Above is a possible arrangement of shelves for your worktable. You can build the shelves with 1” × 12” pine boards as shown in the drawing.
Gravity Wash Bottle
Purpose: This provides a steady supply of water, and the container can be easily refilled.
Material: Gallon jug, #6½ stopper (two-hole), glass tubing, plastic funnel, rubber tubing, and a clothespin.
What to Do: Insert your funnel and glass tubing through one hole in the stopper (see “Thistle Tube”). Bend the other piece of tubing in your alcohol burner. Insert the long end through the rubber stopper. Slip a piece of rubber tubing over the glass tubing and use a clothespin to stop the flow of water.
Operation of Equipment: Place the bottle in position. Fill the bottle through the funnel. Suck on the end of the rubber tubing to start the water flowing (siphon) and then clamp the tubing with a clothespin. You can also start the water to flow by blowing into the funnel. The bottle should be placed so the hose is directly over the gallon jug sink.
Modern Safety Practice
Never “prime” (start) a siphon by mouth on anything that you do not actually intend to drink. You can easily end up with a mouthful! See “Modern Safety Practice” for more about the hazards of using your mouth in the laboratory and “Wash Bottle” for a solution that doesn’t require you to blow into the funnel.
Light Bulb Chemistry Flask
Purpose: To make a glass flask that can be heated and can be used with stoppers.
Material: Burned-out light bulb4 of any size or shape.
Helpful Hints for Building: Bend back the soft metal tip on the end of the bulb with a pair of pliers or your fingernail. Twist the metal piece so that it breaks off. You will see a hole in the top of the bulb. Use a pointed file or a small screwdriver to break the black material around the hole. A pair of diagonal pliers can be used to break the black substance away. After the black material is broken into pieces, turn the bulb over and shake it. Stick a file through the hole and break the wire holding the filament or center part in the bulb. Shake this out. If you have bent the edge of the top of your flask, you can make it round again by turning it on the end of any piece of round wood such as a broom handle.
Operation of Equipment: If the light bulb is round on the bottom, use a coffee can tripod (see “Tripod and Adjustable Rings”) to support the bulb. The heated flask may be handled by a pair of tongs (see “Ring Support for Support Stand and Test Tube Holder”). The stoppers may be purchased from any scientific supply house or can be made by drilling corks (see “X Connector”).
Safety Tips
1. Be careful the black material in the neck of the bulb does not fly out.
2. Be careful not to work so fast that you break the bulb. Don’t shove the file through the bottom of the bulb.
3. Do not try to use a fluorescent bulb. The material inside is harmful.
Modern Safety Practice
See Note 2 in Appendix E for safety guidelines when working with glass. Chiefly, wear safety glasses and take care to avoid cutting yourself with pieces of glass that may break.
Can You Work Like a Scientist?
1. What is the black material? Can you test it to see if it is an electrical conductor?
2. Is the metal tip at the top of the bulb made out of iron? How can you test this?
3. What is the difference between a bulb that is burned out and one that is not? Try both types and see.
4. What does a fluorescent bulb have in it that makes it different from a regular bulb? Do not try to open a fluorescent bulb.
5. Is there a type of bulb that has a wide neck? Look at floor lamp bulbs and large bulbs that are used to light classrooms and gymnasiums.
6. Could you use a soda straw as glass tubing for your flask? If you didn’t have a stopper, how would you seal the opening in the flask?
Cutting Glass Tubing
Purpose: Glass tubing comes in lengths of four feet from scientific supply houses or in longer lengths from neon sign companies. Ordinary glass tubing costs about $1 - $2 a foot. It is very helpful to be able to cut tubing to the exact length needed.
Materials: Glass tubing (any length) and a file.
What to Do: Place the piece of glass tubing on a smooth surface. Draw the sharp edge of the file across the tubing at the place you want broken. Just one firm stroke in one direction will do. Then place your thumb on the opposite side of the tubing from the mark. Press with your thumbs, and the tubing should snap easily.
Operation of Equipment: Dip the tubing in soapy water before trying to insert it into a tight hole in a rubber stopper. If you have drilled holes in a cork for your rubber stopper, seal the holes around the tubing with wax (either from a candle or paraffin).
Modern Safety Practice
See Note 2 in Appendix E for safety guidelines when working with glass.
Bending Glass Tubing
Purpose: Many experiments call for glass tubing bent in different shapes. To buy such bent tubing is very expensive. Tubing can be bent with any good source of heat such as a bunsen burner, propane torch, or alcohol lamp.
Materials: Glass tubing, source of heat (alcohol lamp, propane torch, or bunsen burner). Most alcohol lamps take much longer to bend tubing than do the other two heat sources. A propane torch is not expensive and is of great help in a science laboratory.
What to Do: Turn the heat up quite high on your torch or burner. Turn the piece of glass tubing in the flame. Slowly bring the tubing nearer the tip of the flame. As the glass heats, it bends easily. Bend the tubing to the shape you want, and then hold it in position away from the flame until the glass cools enough to set (about 10 seconds5). In order to bend perfect curves, it is necessary to put an attachment on the burner so that the flame will reach two or three inches of the tubing at the same time.
Safety Tips
1. Be very careful of the open flame. Make sure the torch is firmly supported.
2. Don’t touch the part of the tubing that was heated. Glass will retain heat for many minutes.
Modern Safety Practice
In addition to working with room temperature glass (Note 2 in Appendix E), this project also involves open flames and hot glass.
See Note 3 in Appendix E for basic safety practice when working with open flames.
See Note 4 in Appendix E for basic safety practice when working with hot glass.
Graduated Cylinder and Chemistry Flask
Purpose: A graduated cylinder6 is used to measure accurately amounts of a liquid. It has many purposes in chemistry, such as measuring amounts of chemicals and figuring volumes of solids, such as rocks.
Materials: Baby bottle7 or other straight-sided bottle, medicine dropper with measuring marks.
What to Do: The baby bottle is a wonderful source of science equipment. It is calibrated in cubic centimeters and also in ounces. The standard size is 240 cc. It can be heated with the alcohol burner, and when used with a size #6½ stopper, it makes an excellent flask. Also, because of its shape, it makes a very good test tube.
You can make your own graduated cylinder by using a narrow straight-sided bottle and a medicine dropper. Place a piece of tape down one side of the bottle. The medicine dropper is figured in cubic centimeters. Fill your bottle with water by using the medicine dropper. Add up the number of cc’s as you go along and mark these on the piece of tape you are using for a scale.
Can You Work Like a Scientist?
1. Fill your graduated cylinder half full. Note the reading on your scale. Now drop a small rock into the bottle. Is the level of water higher or lower? What did you add to the water besides the rock?
2. If all you did was add the rock to the water, could you find the volume (how much space it fills) of the rock from the height of the water in the graduated cylinder?
3. Take rocks of almost the same size. Can you predict accurately which is larger? Measure them in the graduated cylinder. Were you right in your prediction?
4. Can you get two rocks that weigh the same? (Use your gram scale.) Will two rocks that weigh the same always have the same volume?
5. If a rock weighed 10 grams and its volume measured in your graduated cylinder 50 cc, what is its weight per cc? Could you change this fraction into a decimal?
6. Try other types of rocks and figure their weight per cubic centimeter. Do the same kinds of rocks always have the same weight per cubic centimeter?
7. Could you test rocks and classify them as to type by finding their weight per cubic centimeter?
8. How does temperature affect the rate of evaporation? Can you use your graduated cylinder to measure this?
9. How could you find the volume of some object that cannot be placed in water?
10.By using glass tubing, a two-hole rubber stopper, and your graduated cylinder, could you measure the pressure of gases such as the pressure of air in a balloon?
Alcohol Burner
Purpose: To provide a safe source of dependable heat for most experiments and heat for bending and sealing glass tubing.
Materials: Small bottle with a metal lid (ink, salad dressing, or similar bottle) and a piece of clothesline rope8 about 4 inches long.
What to Do: Punch a small hole in the lid of the jar. The hole should be small enough that you have to force the end of the clothesline rope through the hole. Force the rope through the top side of the lid. Have about ½” of rope stick through the hole. Fill the bottle with alcohol and screw on the lid.
Operation of Equipment: The best source of fluid for your burner is rubbing alcohol which is found in most homes and drugstores.9 For school use, the alcohol used in the duplicator (ditto machine) found in the school office10 is an excellent fuel. The clothesline rope should be the type that has many soft cotton fibers on the inside. To start your burner, turn the bottle upside down until the part of the wick outside the bottle is moist. Light the burner with a match.
Safety Tips
1. It is dangerous to light the burner if the wick does not fit tightly in the hole.
2. Matches should not be used without proper instruction by parents or teacher. Younger students should NEVER use them unless an adult is present.
3. Don’t get alcohol on the outside of the bottle, for when you light the wick, this alcohol will burn.
4. Be careful of clothes and your skin when working with this heat source.
5. Never have paper and dry rags near the flame.
6. Don’t spill alcohol on the floor. Alcohol will discolor floor tile.
Modern Safety Practice
1. Read Note 3 in Appendix E about working with open flames.
2. Take very seriously the risk of alcohol burning on your skin or clothing. Do not lift or tilt an alcohol burner once it is lit.
3. Have a plan for putting out the burner before you light it. The flame can generally be blown out, but you may want a candle snuffer on hand as well.
Can You Work Like a Scientist?
1. What happens if you place a few drops of water in a jar lid and let these drops set for a few hours? Could you time about how long it takes for the water to evaporate?
2. What happens if you place the same amount of alcohol in the jar lid?
3. Wet the back of your hand with water. Now blow over the surface. Do the same with alcohol. What is the difference?
4. What would happen to your alcohol if you let your burner sit for a few days?
5. Could you use another lid to solve this problem?
6. Fill a bottle with water. Place an empty jar alongside. Place one end of a piece of cloth in the bottle with water and the other end in the empty bottle. Make sure the cloth touches the bottoms of the jars. Let this set overnight. What happens? Does this explain how the alcohol burner works?
7. Cut the end of a daffodil stem. Place the stem in colored water. Use food coloring or ink. Let the flower soak in the water for several days. Is this the way plants and trees get water from the soil?
Broad Flame Alcohol Burner
Purpose: This alcohol burner provides a broad flame with more heat so that glass tubing can be bent easily into all shapes. This flame enables students to do their own glass blowing.
Materials: Wide-mouth pint jar and lid, two wicks about 5” long (clothesline rope11 with soft cotton inside).
What to Do: Punch two holes in the lid about one inch apart. These holes should be just a little smaller than the rope wick in diameter. Put the wicks through the holes as shown with about an inch of wick sticking out. Fill your burner with rubbing alcohol or ditto fluid. Screw on the lid.
Operation of Equipment: Let the alcohol climb the rope wick (capillary action). Bend the wicks together so they will make one broad flame and light them with a match. Hold your glass tubing in the flame, and when it becomes soft, bend it gradually into any shape.
Modern Safety Practice
Read the safety notes on the alcohol burner in the previous section; they all apply equally well here.
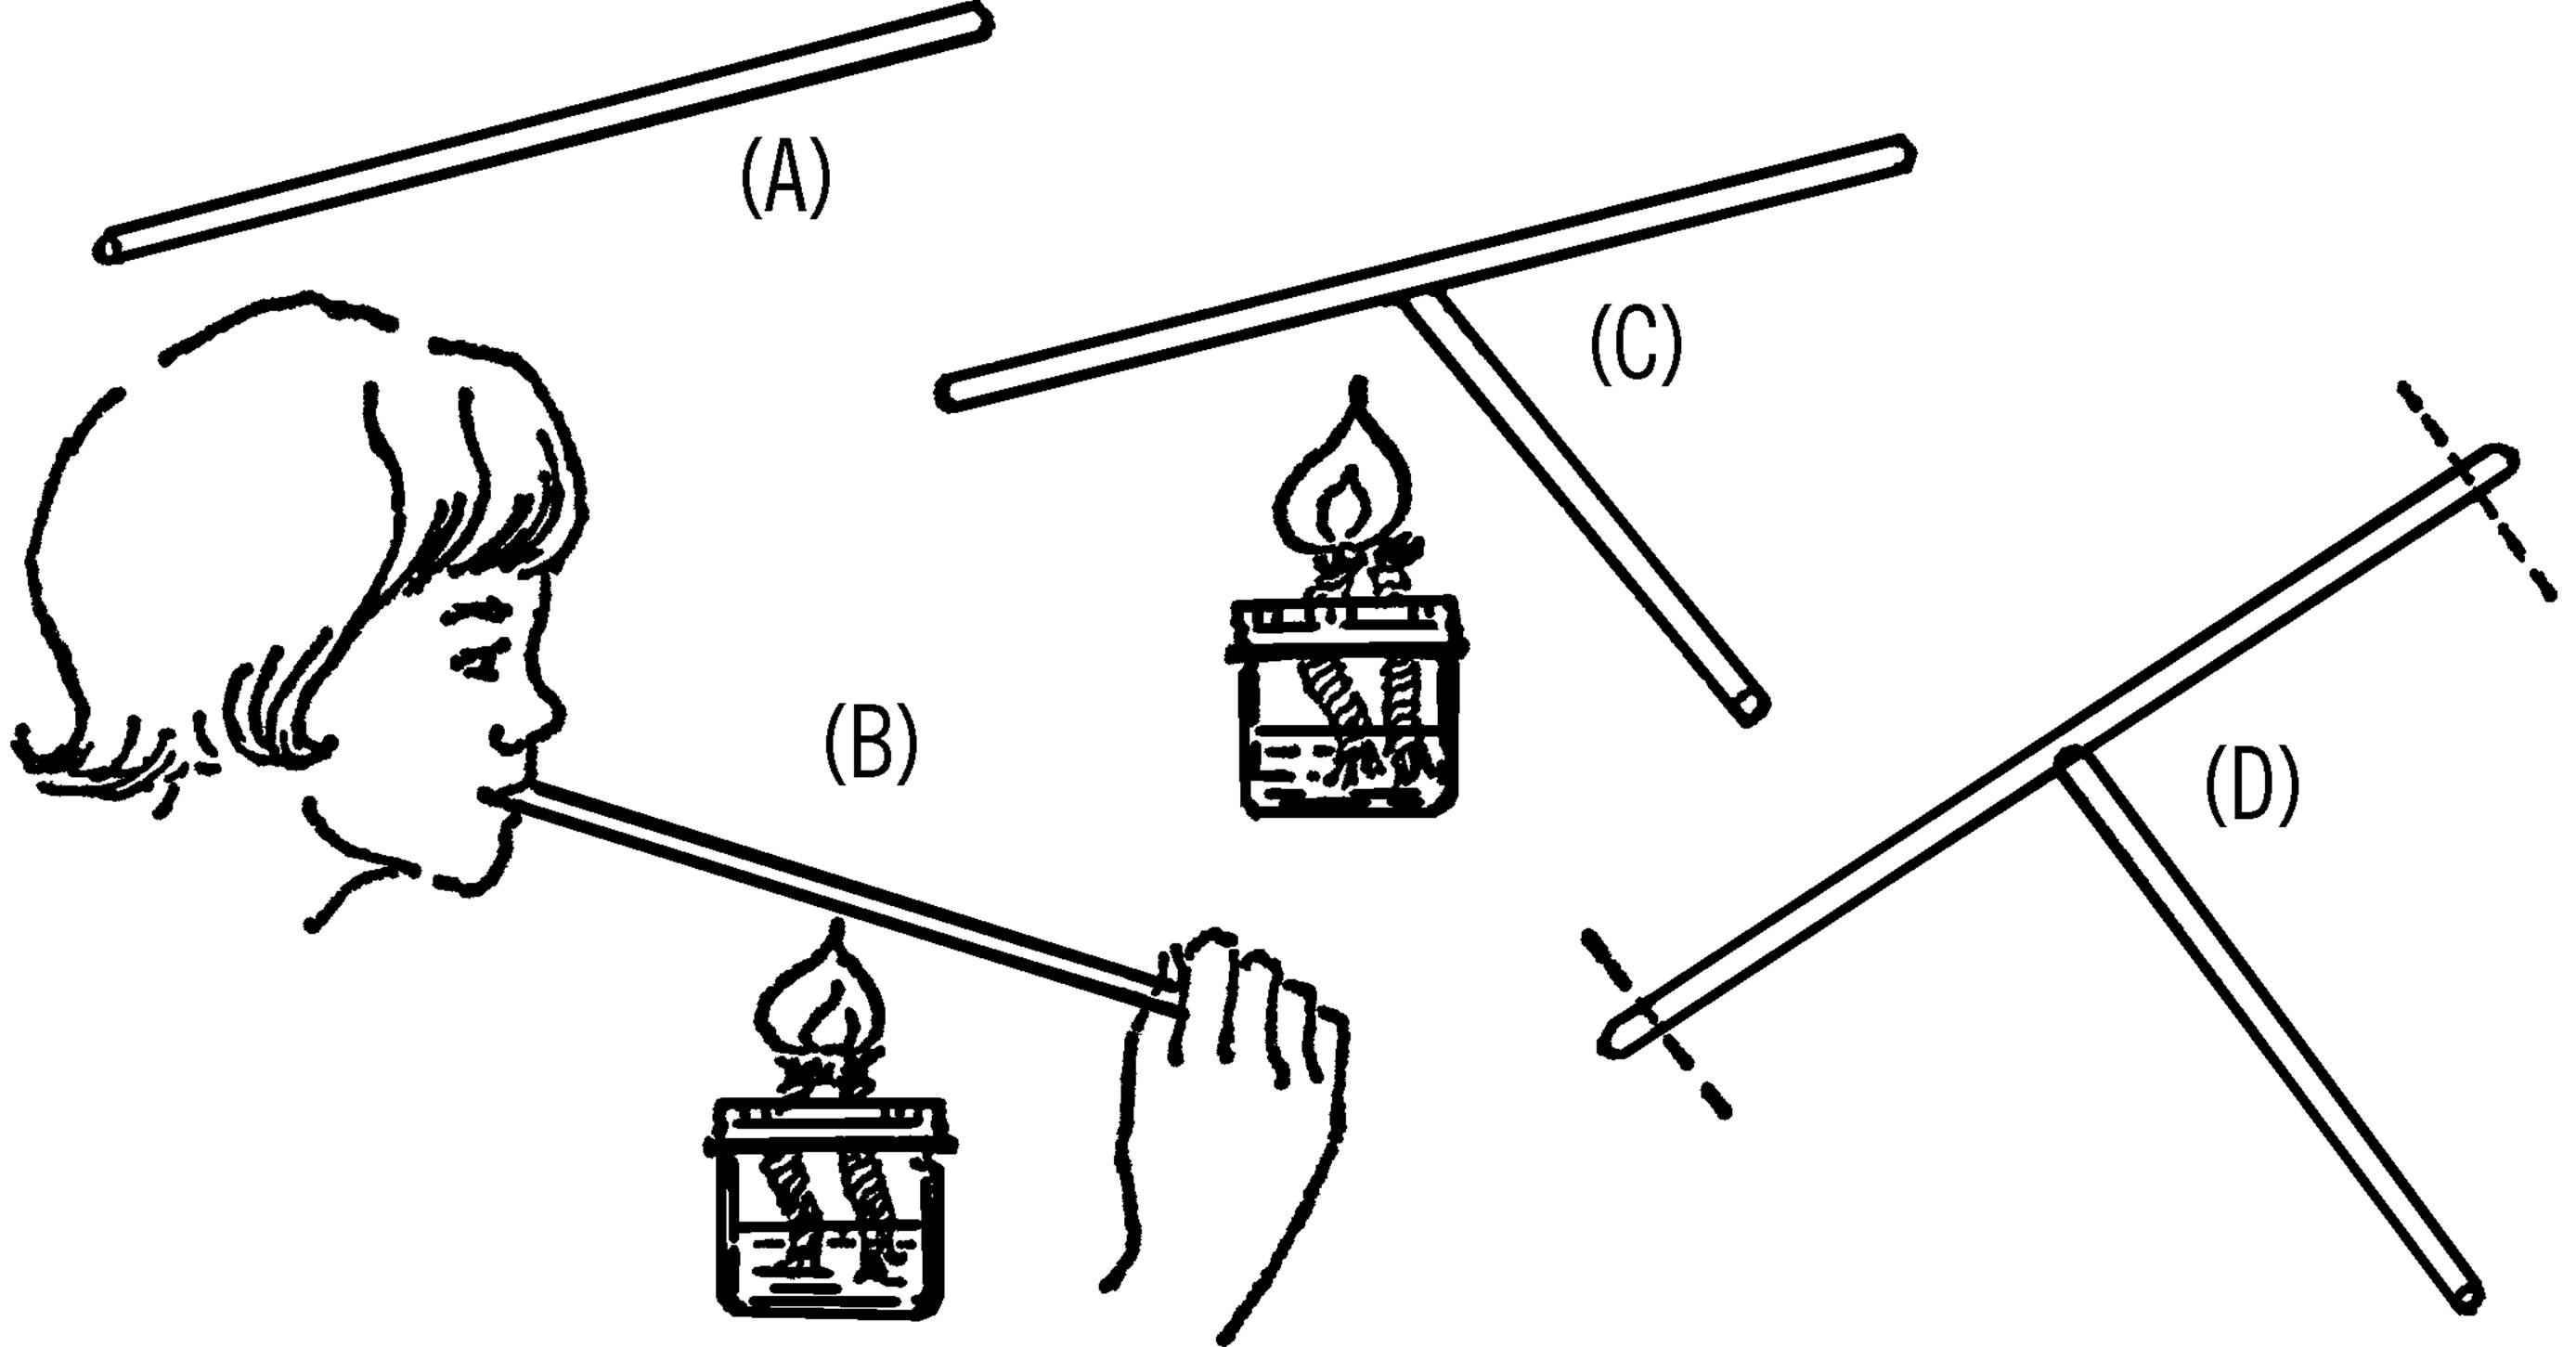
Pipette
Purpose: A pipette is used to pick out from a culture and other liquids small plants, insects, and micro-organisms. The pipette is used in chemistry to select and move small amounts of liquid chemicals as well as pick out solid materials from a liquid.
What to Do: Heat the glass tubing over the alcohol burner. When the glass is soft, pull and stretch it. Break it in the middle once cool.
Operation of Equipment: Hold your thumb over the large end of the tube. Move the small end of the tube over the object you want to remove from the water. Lift your thumb off. The liquid will rush into the tube. You can control the amount with your thumb. Why does the liquid go up the tube?
Modern Safety Practice
1. This project involves cutting (cold) glass, open flames, and hot glass. Follow the safety guidelines in Note 2, Note 3, and Note 4 of Appendix E, respectively.
2. The back edge of of your pipette (where you put your thumb) may be sharp. You can correct this by heating the back end over the flame until the glass there softens and then allow it to cool.
Mouth Pipette
Purpose: The mouth pipette serves the same purpose as the hand pipette except that the amount of liquid is controlled by a rubber tube in your mouth instead of by your thumb. You have better control with the mouth pipette.
What to Do: Make your pipette the same as above. Attach a piece of rubber tubing to the large end of the glass tubing. In order to use, hold your tongue over the end of the rubber. When you have located your micro-organism, remove your tongue from the opening. You may bring liquid into the tube with a slight sucking.
Modern Safety Practice
While pipetting by mouth was once a very normal and accepted method of manipulating fluids in a laboratory environment—even toxic chemicals and infectious biological samples—it is now considered to be extremely dangerous. It should come as no surprise whatsoever that pipetting by mouth has been the leading cause of poisonings, burns, and infections in any laboratory where it was allowed to take place.
As a firm rule, never pipette anything by mouth that you do not actually intend to drink. Rather than trying this with a biological sample, instead try mouth pipetting with a glass of milk or juice at dinner time (hopefully, when no one is looking).
How could you use a similar technique to manipulate fluids, but without risk of accidentally ingesting the sample? What kinds of tools and instruments already use this same principle to provide a bit of suction to move fluids, but without involving your mouth?
Blowtorch Type of Alcohol Burner
Purpose: This type of burner provides a broad flame with a large amount of heat. It is very useful for glass blowing.
What to Do: Make a broad flame alcohol burner. Use your burner to make a long pipette by stretching the glass tubing.
Operation of Equipment: Start your broad flame burner. Hold the glass tubing in your mouth. Have the small end of the tubing near the flame. Blow with a steady pressure. The stream of air will turn your burner into a blowtorch.
Safety Tips
1. Don’t touch hot glass. It burns. Glass takes a long time to cool.
2. Don’t inhale on the glass tubing. You will suck up hot gas.
Modern Safety Practice
As a baseline, re-read the safety notes in “Alcohol Burner”.
The risk of inhaling hot gas in this case is real; you will need to inhale regularly after blowing on the flame, so make sure that you are not inhaling through the tube! You can put more distance between yourself and the flame by blowing into a length of rubber between you and the glass tubing. Use a glass or plastic mouthpiece that is attached to “your” end of the tubing. This kind of extension is often used by professional glassblowers.
Can You Work Like a Scientist?
1. What part of the flame is the hottest? How can you test this?
2. Why does the fine pipette tube work better than just a plain piece of glass tubing?
3. Can you think of a way you can have a steady source of air without blowing? Such a thing would be a compressor.
4. A clothespin fastened to the side of the jar with a rubber band can serve as a holder for your glass tubing. You can blow through a piece of rubber tubing attached to the glass tubing.
Large Pipette-Glass Blowing
Purpose: With this pipette you can move a large amount of water from a large container. You can select the water from any part of the liquid. You can use the glass-blowing ideas to make many different pieces of glassware.
Material: Glass tubing about two feet long (less if you desire).
What to Do: Heat the middle of the glass tubing with your broad flame burner. Be sure to turn the tubing as you heat it. Remove the tubing from the flame and hold your finger over the end. Blow into the tubing. The glass should bulge out at the spot that is heated. Heat the tube again near one end. Pull the heated end into a fine tube. Break the tube at this spot after the glass has cooled.
Operation of Equipment: Hold the pipette in the liquid. Keep your thumb over the end. To fill, remove your thumb. Blow on one end to empty.12
Modern Safety Practice
1. This project involves cutting (cold) glass, open flames, and hot glass. Follow the safety guidelines in Note 2, Note 3, and Note 4 of Appendix E, respectively.
Can You Work Like a Scientist?
1. Try blowing other pieces of equipment. Remember… don’t inhale or touch the hot glass.
2. Can you find out how glass bottles are made?
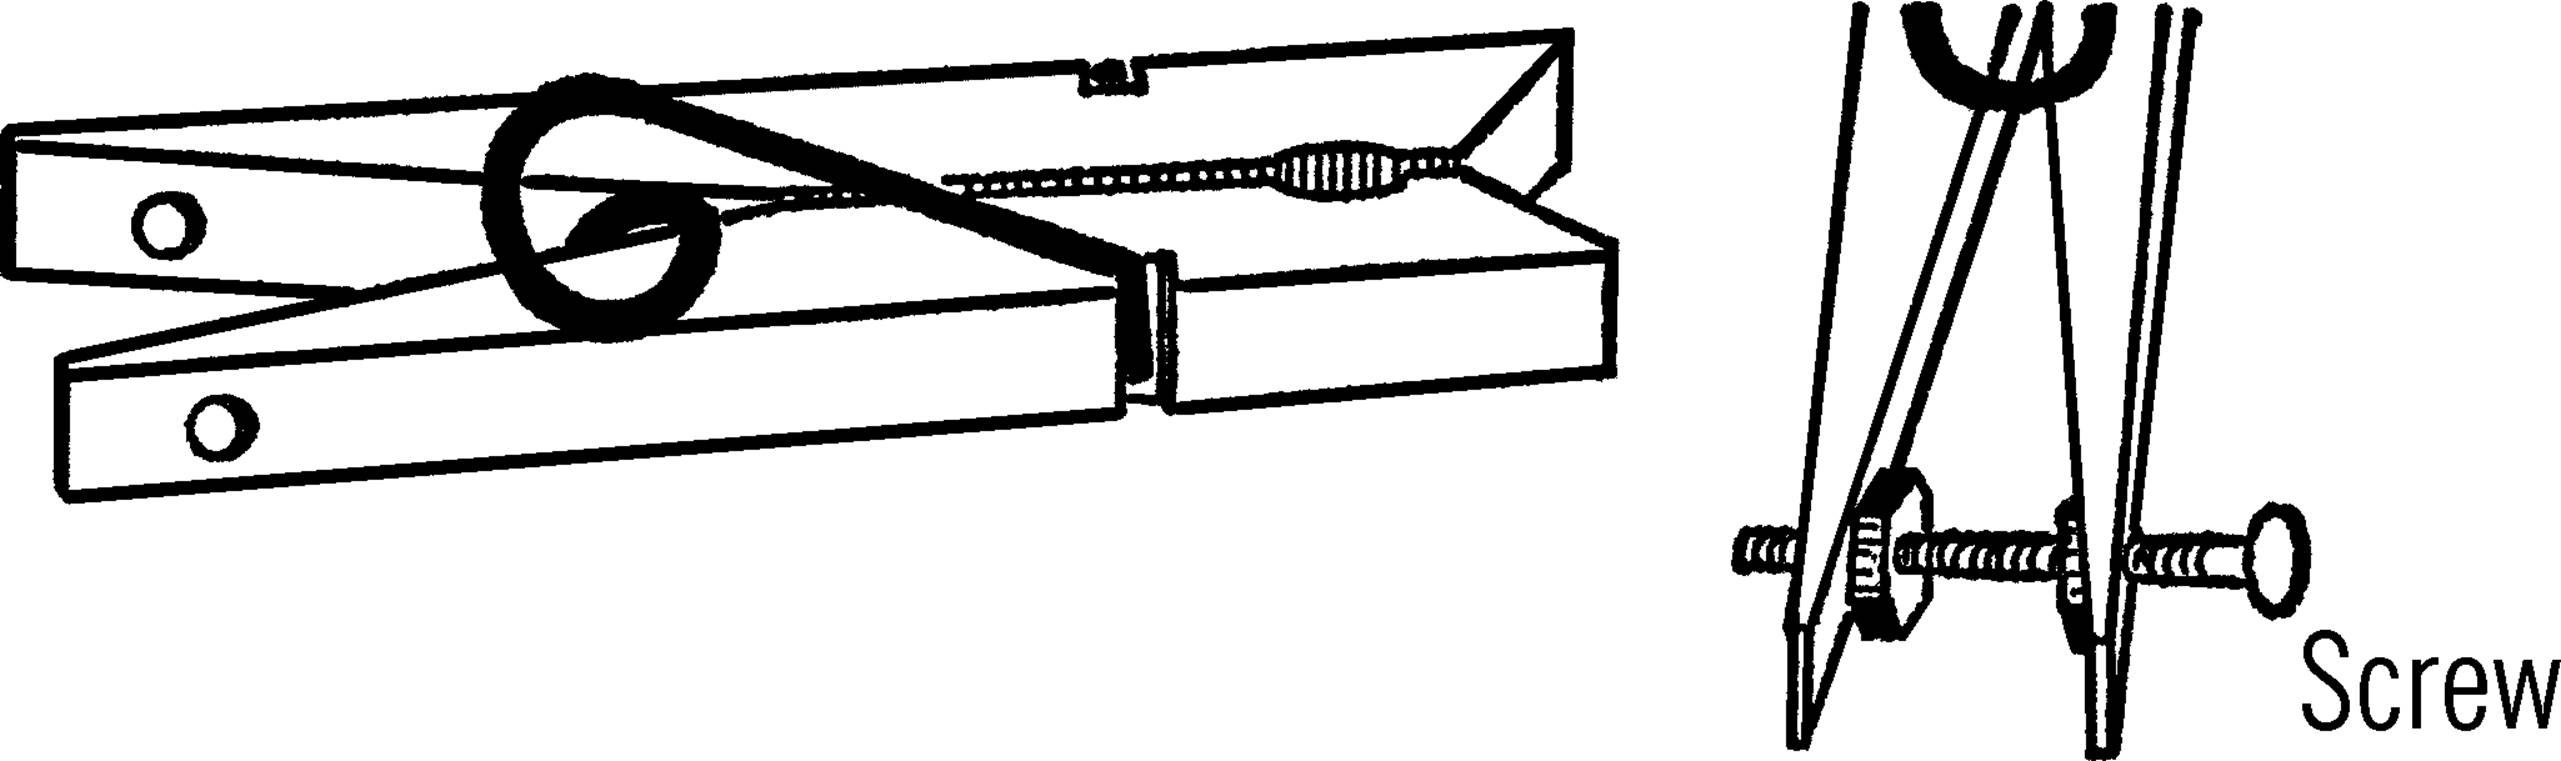
Burette Clamp and Test Tube Holder
Purpose: This clamp is used in chemistry. It is attached to a ring stand by one clamp while a second clamp is used to hold a test tube or other small objects.
Materials: Two snap clothespins, tape.
What to Do: Slide one leg of a clothespin into the wire clamp of the second clothespin. Fasten them together by wrapping with tape. One leg of the second pin slides into the end of the curtain rod ring stand13. When the free leg of the first pin is pressed, the clamp opens for a test tube or other small object. This clamp will also hold slides, cardboard, and diffraction gratings. The clamp by itself is a good test tube holder.
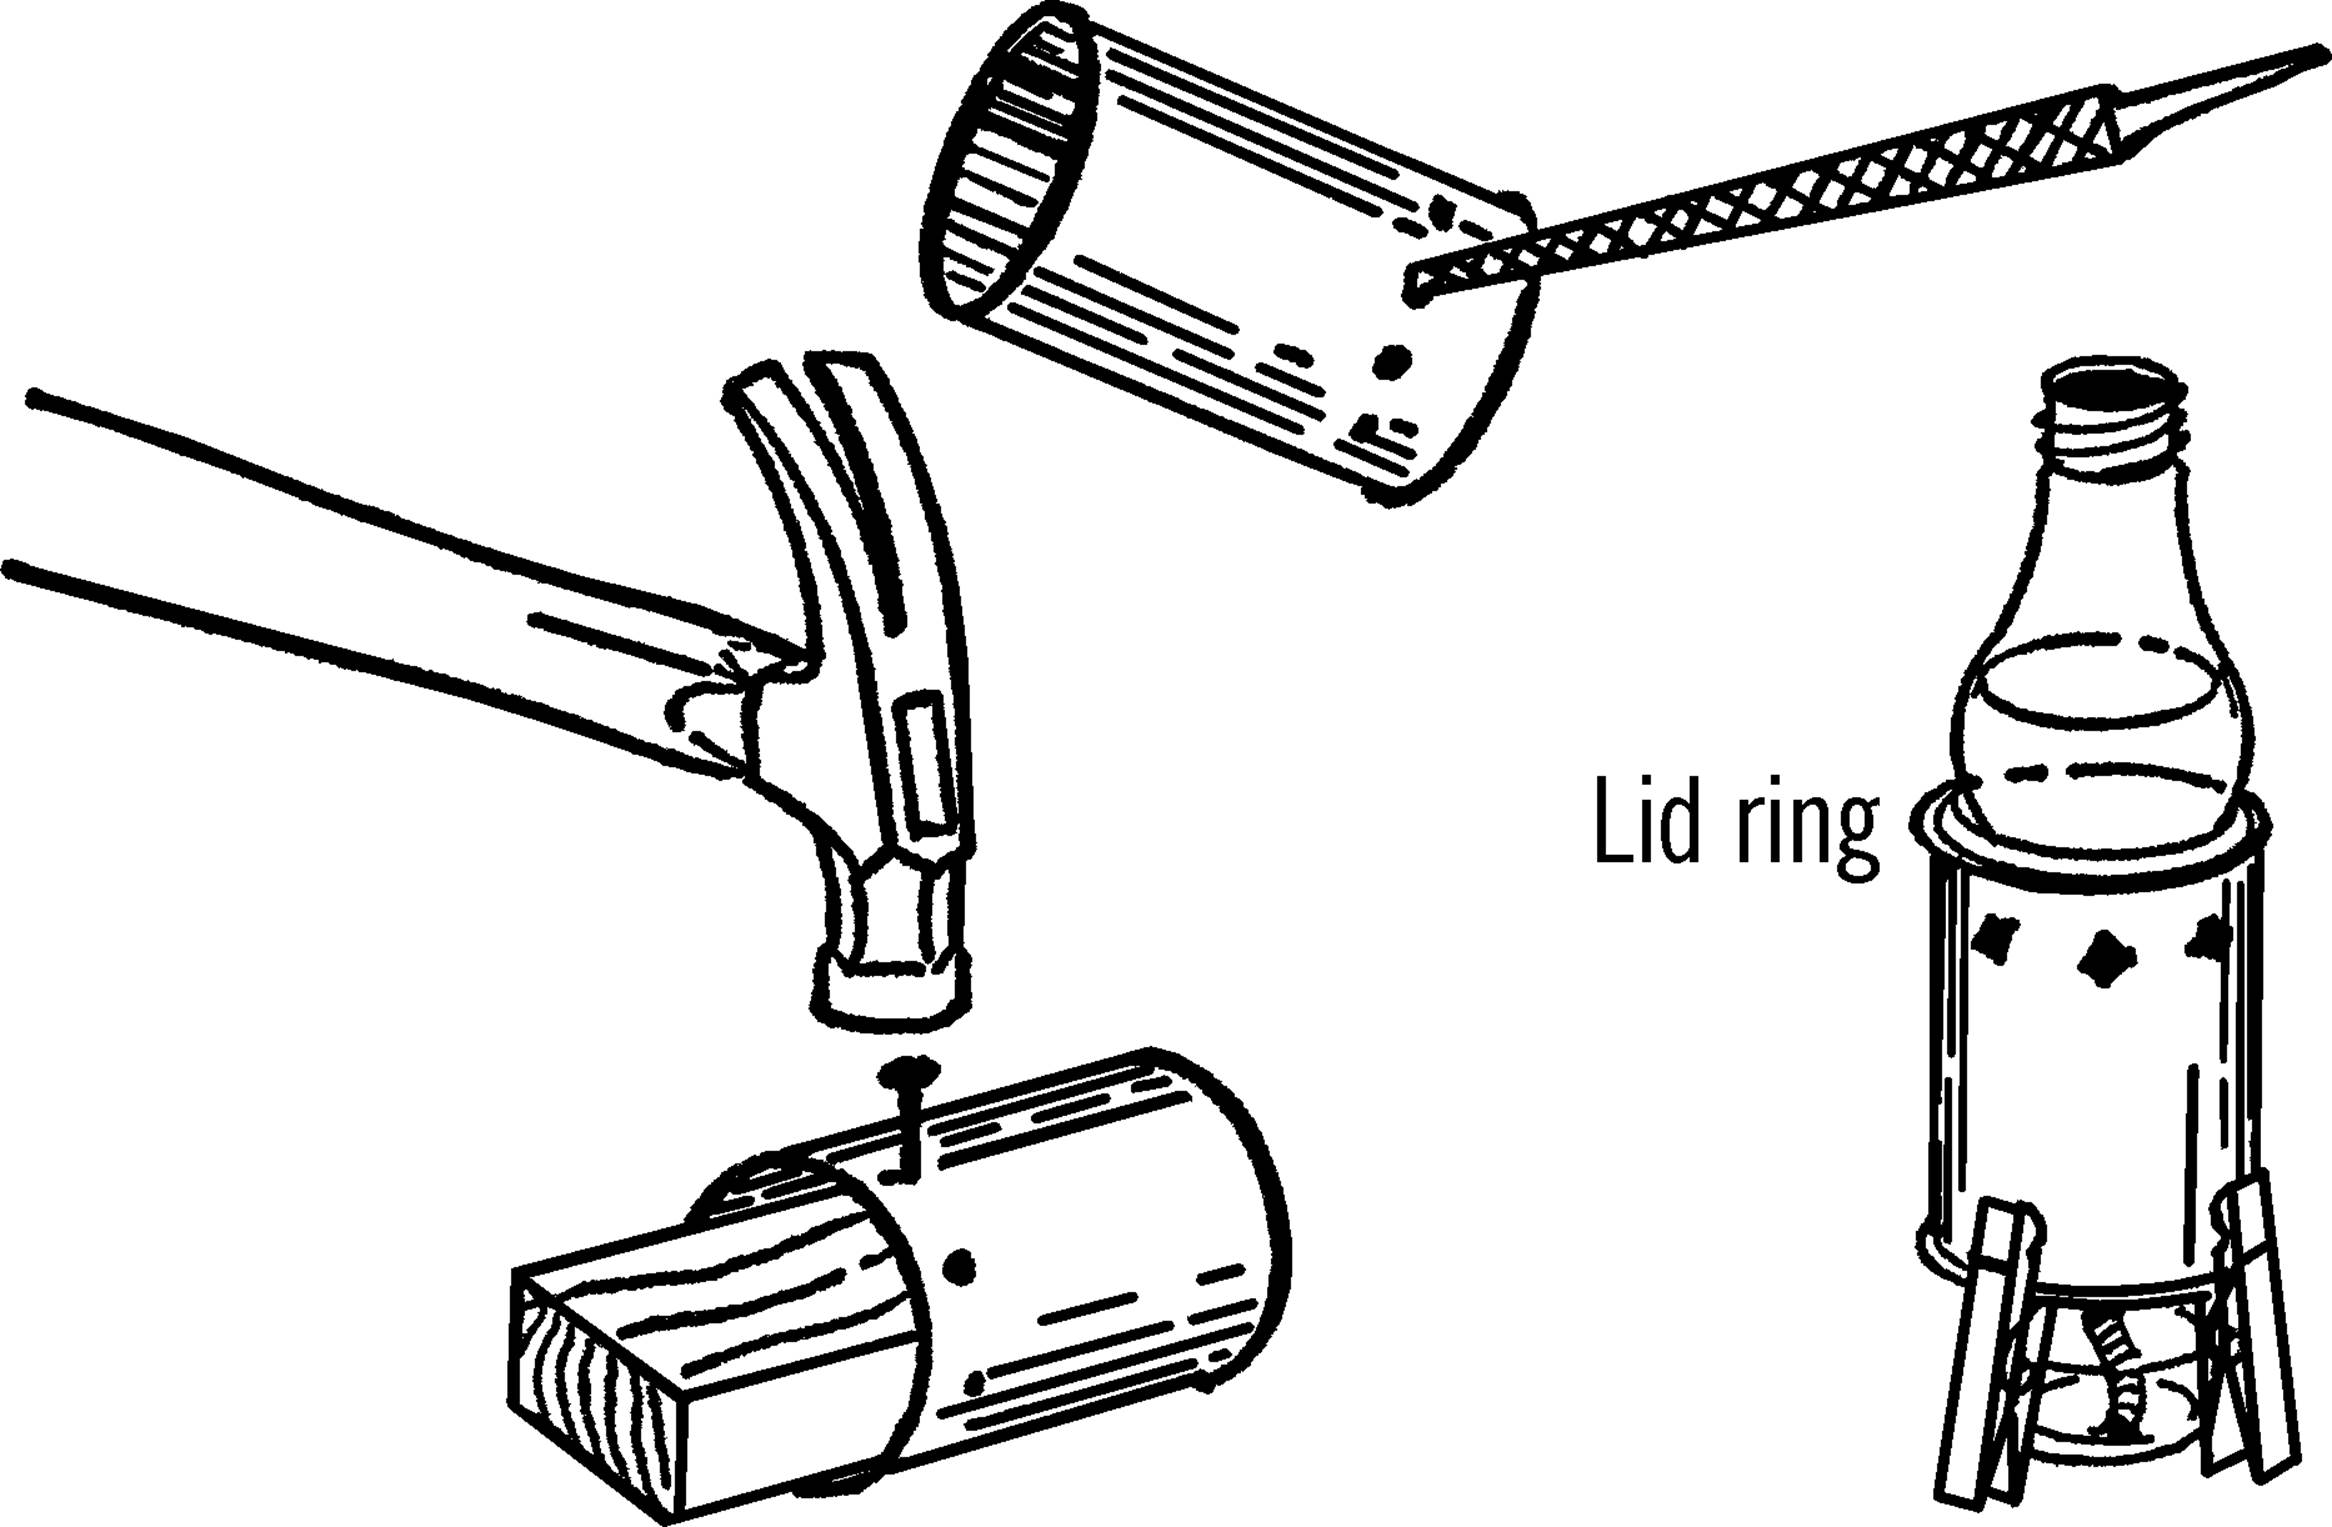
Mason Jar Chemistry Flask
Purpose: Mason jars are made of Pyrex glass and can be heated over alcohol burners. They make an excellent large-size flask. The normal sizes of quart, pint, and half-pint offer a good range for all purposes. They have a second advantage in that they are easier to clean than regular flasks.
Materials: Jar lid for mason jar, drill or short piece of pipe (¾” or 1”×3”), file.
What to Do: Drill a hole in the center of the jar lid large enough for a rubber stopper. This could be through the regular canning lid or through a mayonnaise lid.14 In either case, drill from the outside in order to keep the outside smooth. If you don’t have the right size drill, use a short piece of ¾” or 1” pipe. File or grind one end of the pipe until it is quite sharp. Place the jar lid on a solid piece of wood and cut the hole by pounding the pipe with a hammer as shown.
Modern Safety Practice
1. Wear safety glasses and watch your fingers when using the tools.
2. The edges of the holes that you cut may be quite sharp. Use your file to smooth them.
Operation of Equipment: In order to use a mason jar for a flask, tighten the lid on the jar. Insert the rubber stopper.
Funnel
Purpose: A funnel is used for pouring mixtures and for many science experiments.
Material: Top of a gallon jug or the top of any bottle that has a small opening.
What to Do: Cut off the top of the jug with the nichrome wire bottle cutter (“Bottle Cutter”). Smooth with wet or dry emery paper under water. You can make a smaller opening by using a rubber stopper and a piece of glass tubing.
String Filter
Purpose: To filter a liquid without filter paper.
Materials: Two-foot length of cotton rope, two bottles.
What to Do: Place the bottles as shown. Put one end of the rope in the liquid to be filtered. Put the other end in the collecting bottle. This process will take several hours. Why does the liquid climb the rope?
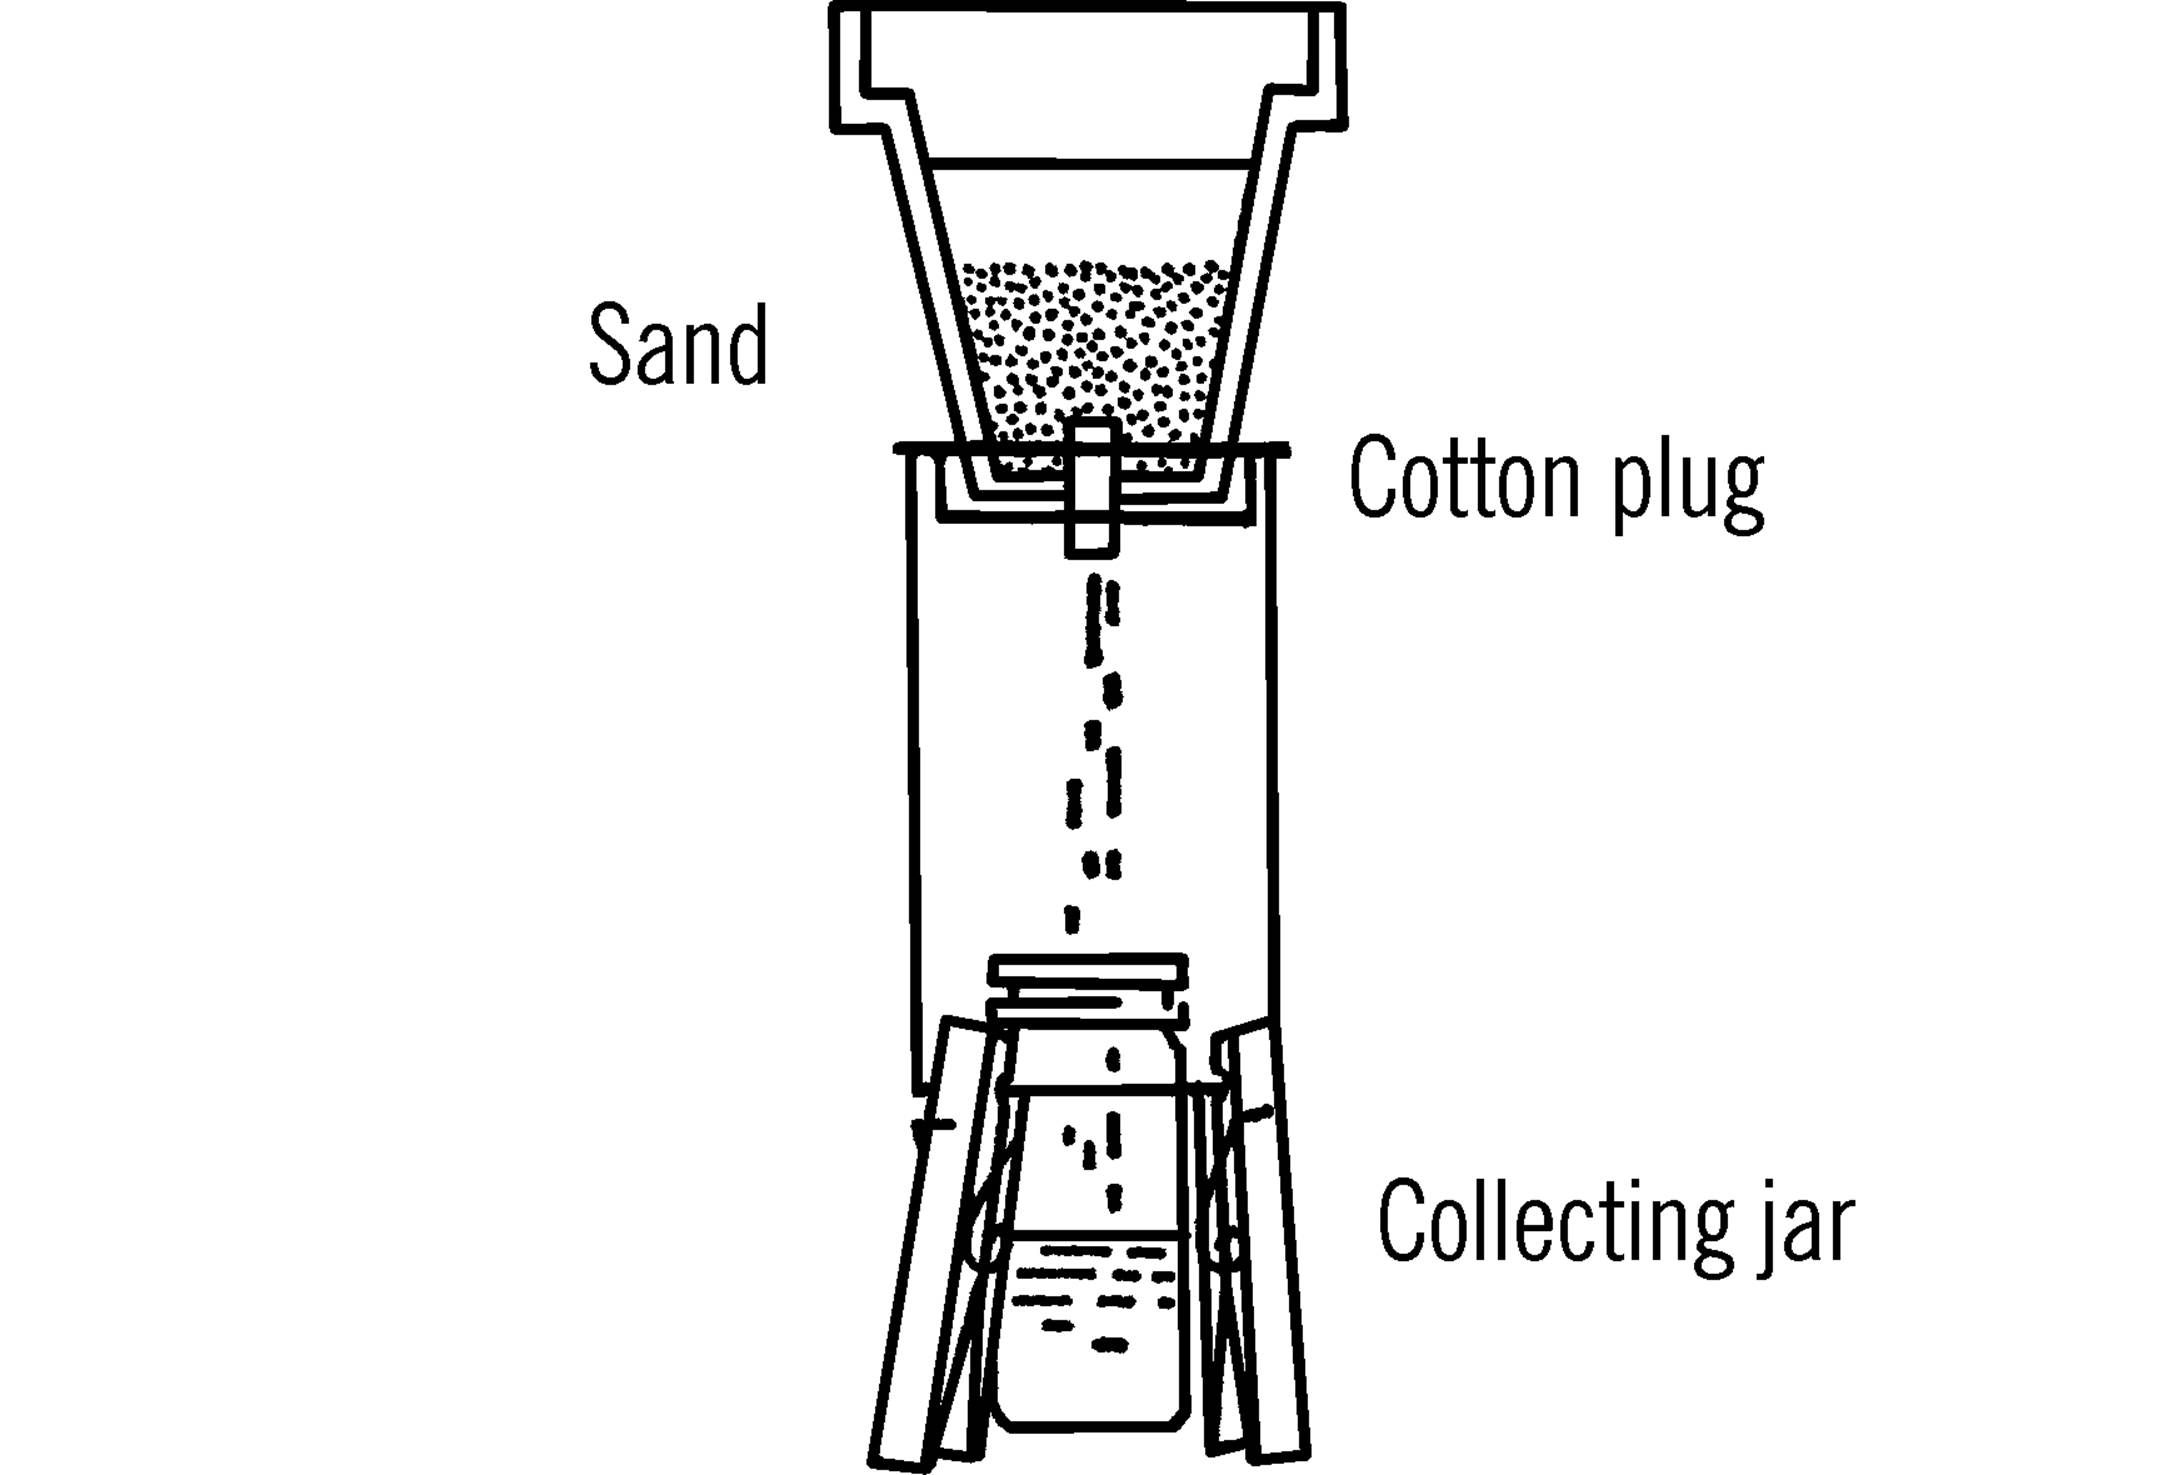
Plant Pot Filter
Purpose: To strain or filter out materials from a liquid.
Materials: Clay planter pot, sand, cotton plug.
What to Do: Place a cotton plug in the bottom of the pot. Use a few inches of sand in the bottom. Set the pot over the tin can tripod.15 Use a collection bottle underneath the cotton plug.
Can You Work Like a Scientist?
1. Filters strain out bits of materials suspended in liquids. Try to make such suspensions with liquids and chemicals or other materials. Try your filters out and see if you can strain out the bits of materials in the liquid.
2. Could you make a filter out of your gallon jug funnel?
3. Could you make a gravel, sand, and soil filter by putting small amounts of these in the small-necked bottle funnel and using a cotton plug?
Tripod and Adjustable Rings
Purpose: The tripod is used to hold chemistry flasks or bottles while they are heated by a gas or alcohol burner. The adjustable rings are used to adapt the diameter (distance across opening) to the size of the bottle or flask.
Materials: Tin cans (sizes 300 and 303),16 Kerr screw lid rings (wide mouth, standard, and “63” [small] sizes17).
What to Do: Cut the top and bottom off the cans with a can opener. Place the can on a block of wood as shown and punch holes with a large nail about one inch from one end of the can. You should have at least six. Then take a screwdriver or file and enlarge the holes. Be sure to drive the nails in from the outside of the can as shown.
Operation of Equipment: The large ring fits the larger 303 can. The standard ring just fits the size 300 can. (It can slip partly into the can.) The “63” size ring will fit into the standard ring for small bottles. The tin can tripod fits over the alcohol burner. A burner made out of a small bottle is best. The sides of the tin can should be raised by three clothespins as shown. The tip of the wick should be at least two inches below the top of the can. The tin can tripod works perfectly for light bulb flask. The small size bulb fits in the 300 size can. The larger 150 watt bulbs fit the 303 size can and rings. A pound coffee can makes an excellent large tripod.
Safety Tips
1. Always be careful when using the alcohol burner.
2. Remove the wrapper from the can so the paper won’t catch on fire.
3. Don’t touch the tin can tripod while heating with the burner. The can is very hot. However, the bottom of the can is usually only warm.
4. Use a hot-pad holder or a heavy rag to remove the flask or object from the tripod. Don’t touch the bottle until it cools. You may want to use tweezers. The baby bottle tweezers sold at most variety stores are ideal.18
Modern Safety Practice
1. When hammering the nails and enlarging the holes, be sure to wear safety glasses and be careful with the tools. Deburr (smooth out) all of the cut metal surfaces to avoid sharp edges.
2. Since wooden clothespins could potentially catch fire, be sure that you are working on a non-flammable surface, and be doubly careful about other flammable materials in your vicinity. Can you design an alternate version made from non-flammable materials, perhaps from steel wire?
Can You Work Like a Scientist?
1. Try not punching holes in the can and see what happens.
2. Turn the can over and put the holes at the bottom. What happens?
3. Hold a match near the holes and at the bottom of the can. Can you tell in which direction the air is moving?
4. Why is the can warmer at the top than at the bottom?
5. Put a little water in the bottom of the bulb. Look through the bottom of the bulb directly up at a light. Is this a type of lens?
Support Stand
Purpose: The support stand is used to support test tubes or flasks for many experiments.
Materials: Curtain rod,19 block of wood for base, block of wood for support.
What to Do: Shorten the curtain rods by cutting off part of the straight section with a hack saw. The remaining rods should each be about a foot long. Slide the two pieces together. Turn the rods over and slide them so they are just joined. Take a hammer and a nail and punch a dimple in the metal from the inside. Don’t go all the way through. Now slide the two rods together half an inch at a time. Each time lightly tap the same hole on the inside rod. You should have only one dimple on the inside rod and many on the outside. Support the stand by nailing one end to the base and using a block of wood for an upright support.
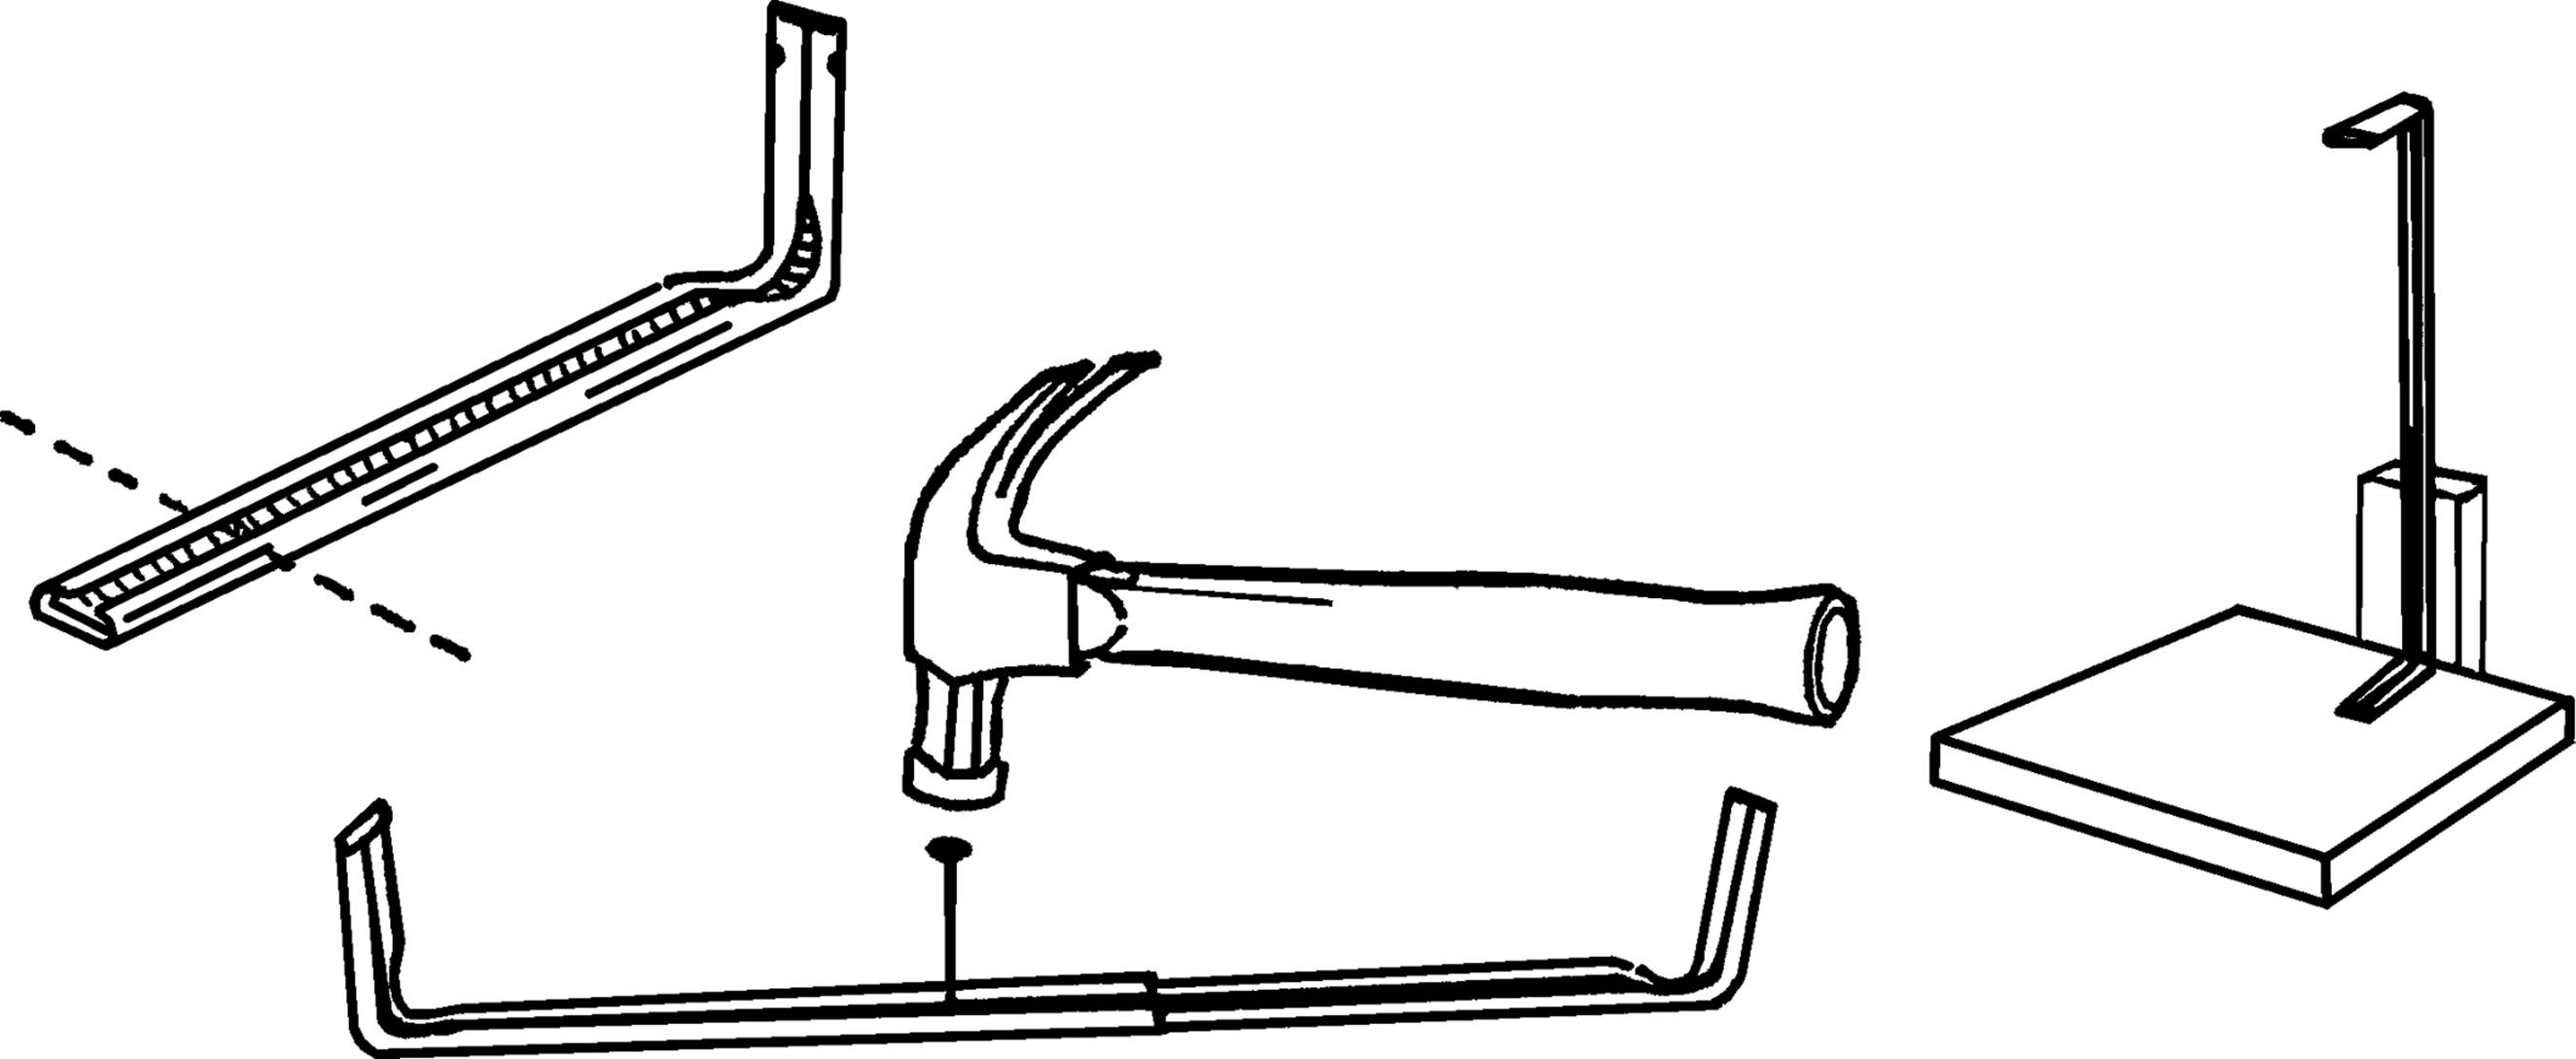
Operation of Equipment: In order to increase the height of the support stand, pull the rods apart until the dimples in each rod match at the desired height. Fasten the flask or test tube to the stand by means of a clamp as described below.
Modern Safety Practice
Wear safety glasses and be careful with sharp edges.
Ring Support for Support Stand and Test Tube Holder
Purpose: The ring support is used to hold flasks and test tubes. It is attached to the support stand and adjusts on the stand for the desired height.
Materials: Coat hanger20, pliers.
What to Do: Cut the end off the coat hanger. The piece should be about four inches long. Bend the end with a pair of pliers so it is about the same shape and size of the object (light bulb flask, etc.) to be held. The two end pieces should be spread as shown.
Operation of Equipment: Slip the flask into your clamp. Squeeze the ends of the support clamp together and insert into the end of the curtain rod support stand. The clamp used by itself is a test tube holder.
Bottle Etcher
Purpose: The bottle etcher works with your nichrome wire bottle cutter. It etches, or scratches, a straight mark all the way around the bottle or gallon jug so that the bottle or jug will break in a smooth and even manner.
Materials: Glass cutter (costs about 3 dollars in a hardware store), wood to make the base as shown, and two wood screws.
What to Do: Nail the two supporting pieces of wood, about 4½” wide, to the base. Cut a notch about ⅛” wide and ½” deep in one of the supporting pieces. Tip: the width of a power saw blade is about the right size. This notch should be about 6½” above the base. Insert the end of your glass cutter as shown. Hold the glass cutter in place by a strip of wood or metal and two screws.
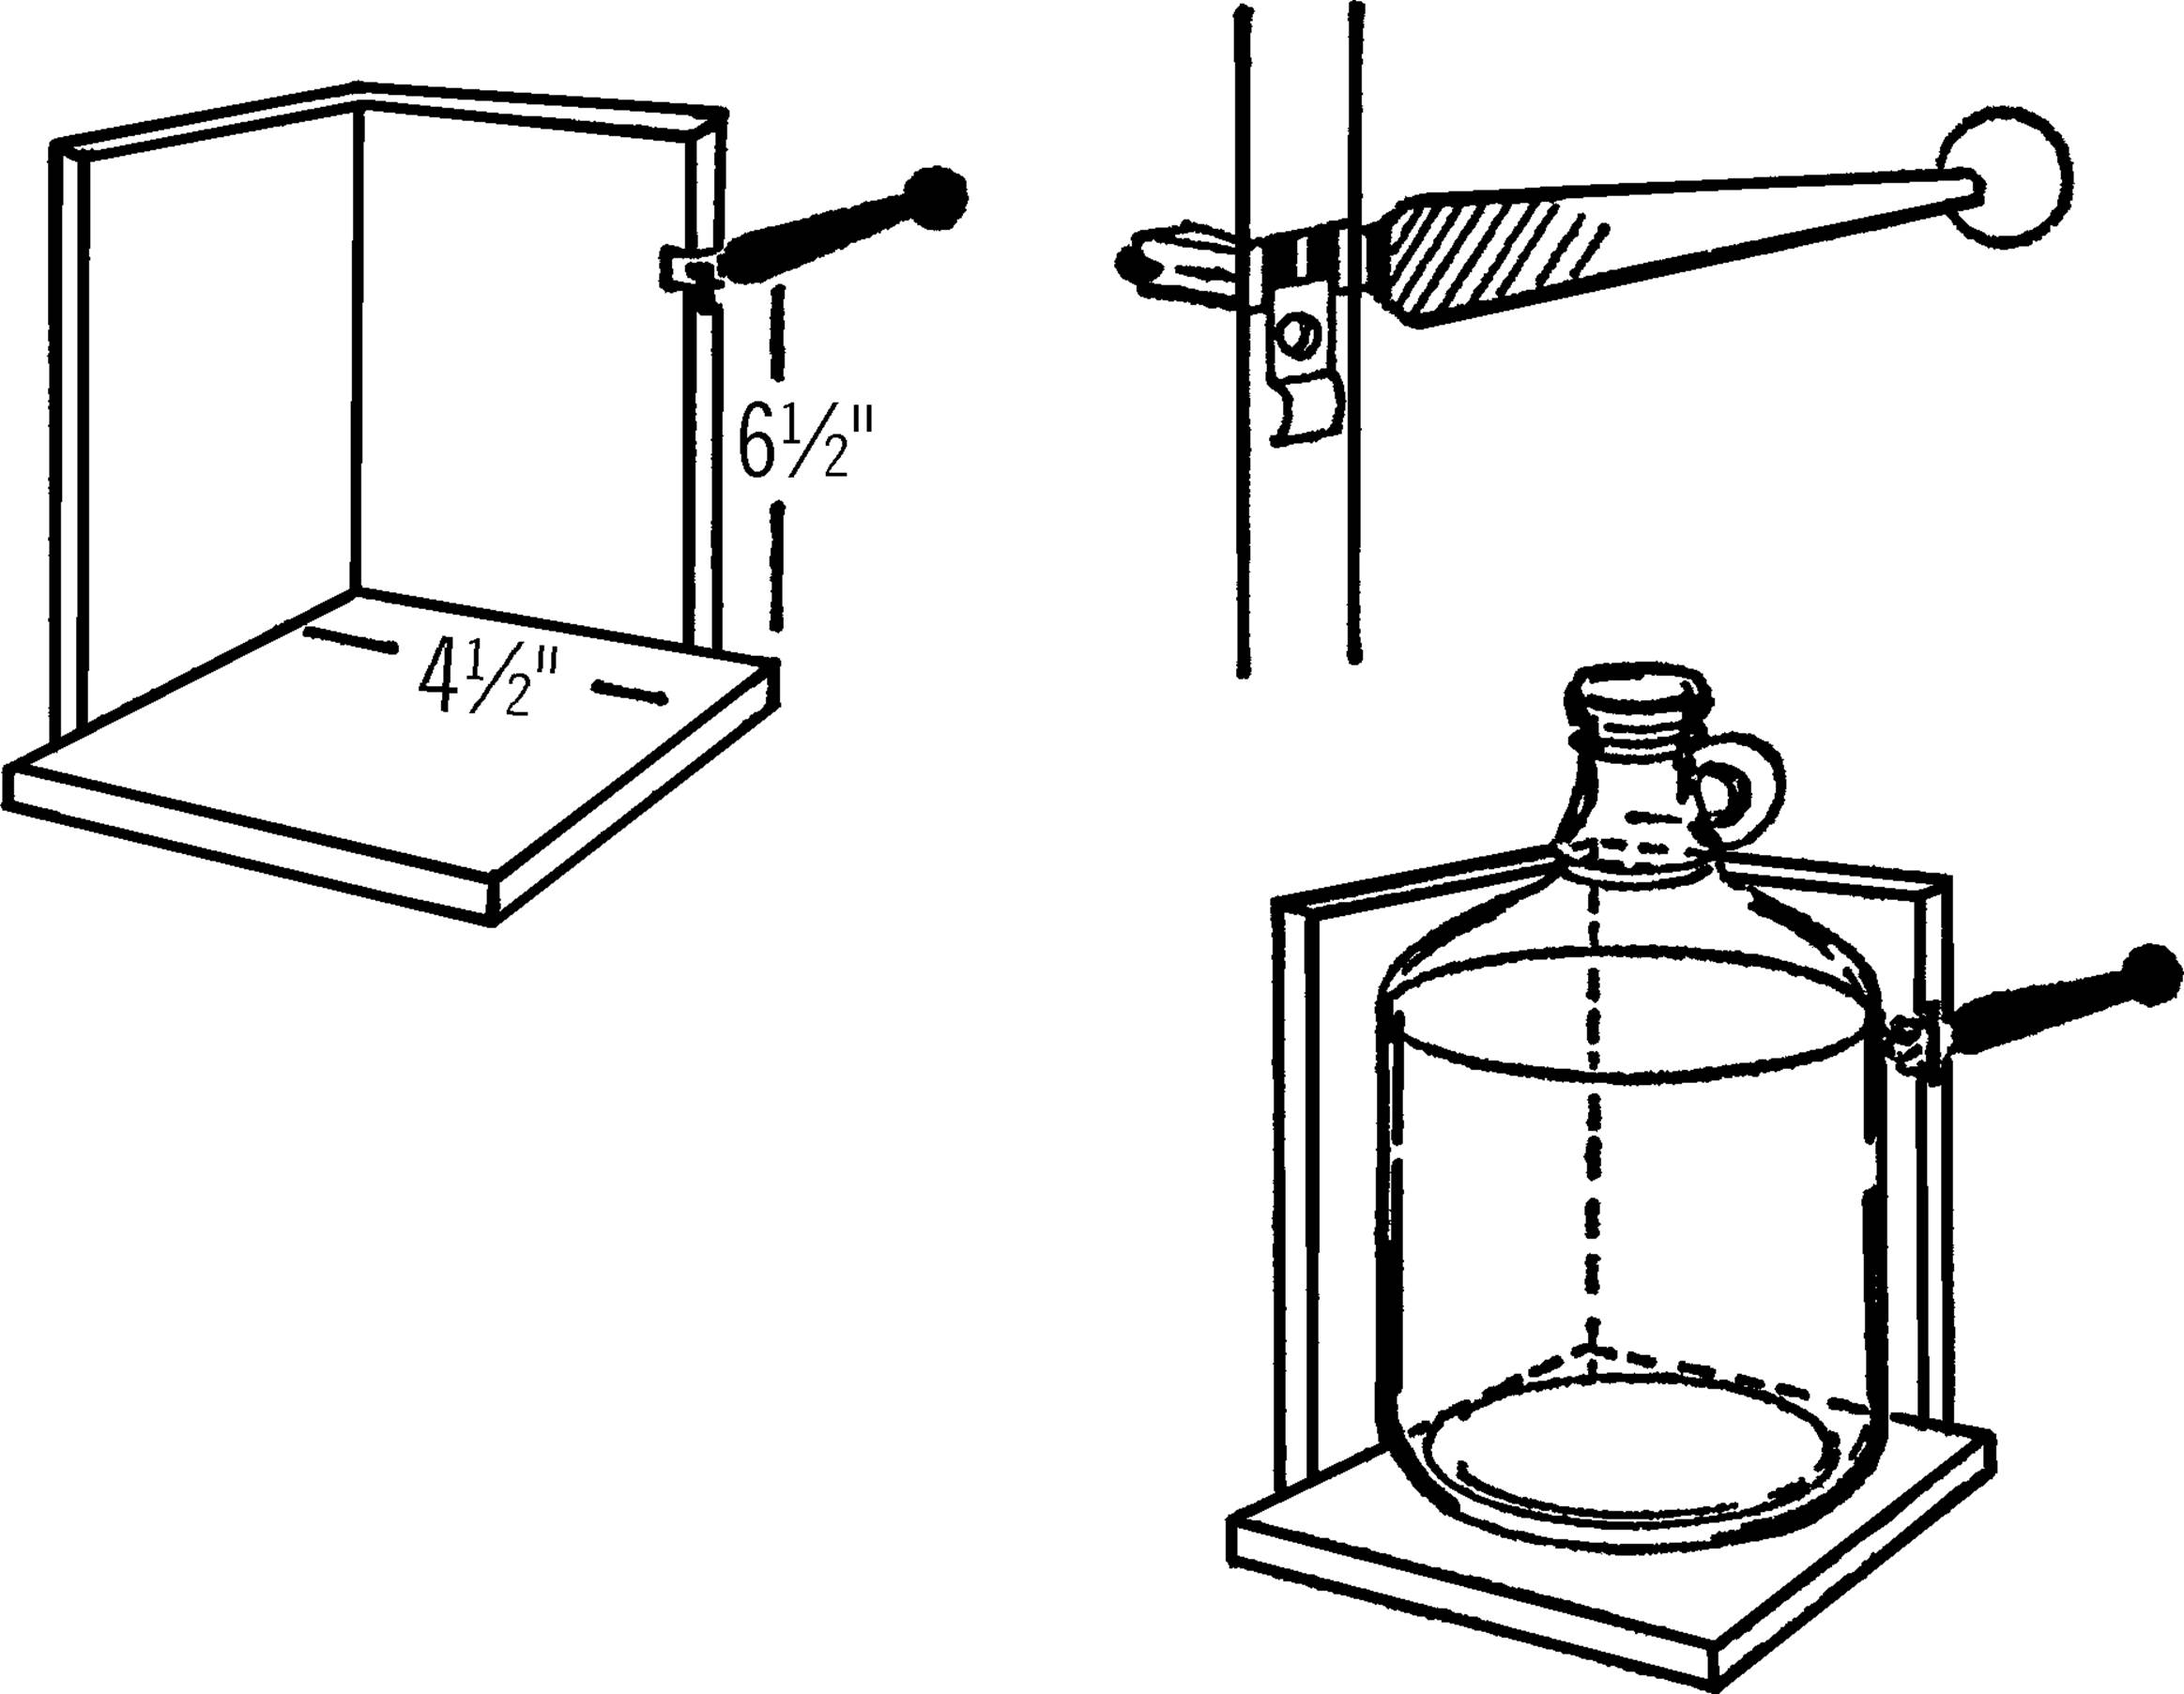
Operation of Equipment: After removing the label, hold the jug firmly against the supporting piece and the base and slowly turn it. The cutter will make a firm scratch on the jug all the way around. Don’t go over the scratch mark again as this dulls the cutter. Always turn the bottle counterclockwise so you don’t dull the cutter. Now cut the jug with your nichrome wire cutter.
Modern Safety Practice
See Note 2 in Appendix E for safety guidelines when etching and cutting glass.
Can You Work Like a Scientist?
You can use your bottle etcher to cut gallon jugs at any height. The bottom makes excellent shallow dishes. Can you think of a way to change the height of the cutter without removing it from the board?
Glass Cutter
Purpose: Your glass cutter will cut old panes of glass to any desired size. From this glass you can make any number of pieces of science equipment.
Materials: Glass cutter, plastic ruler, and pane of glass.
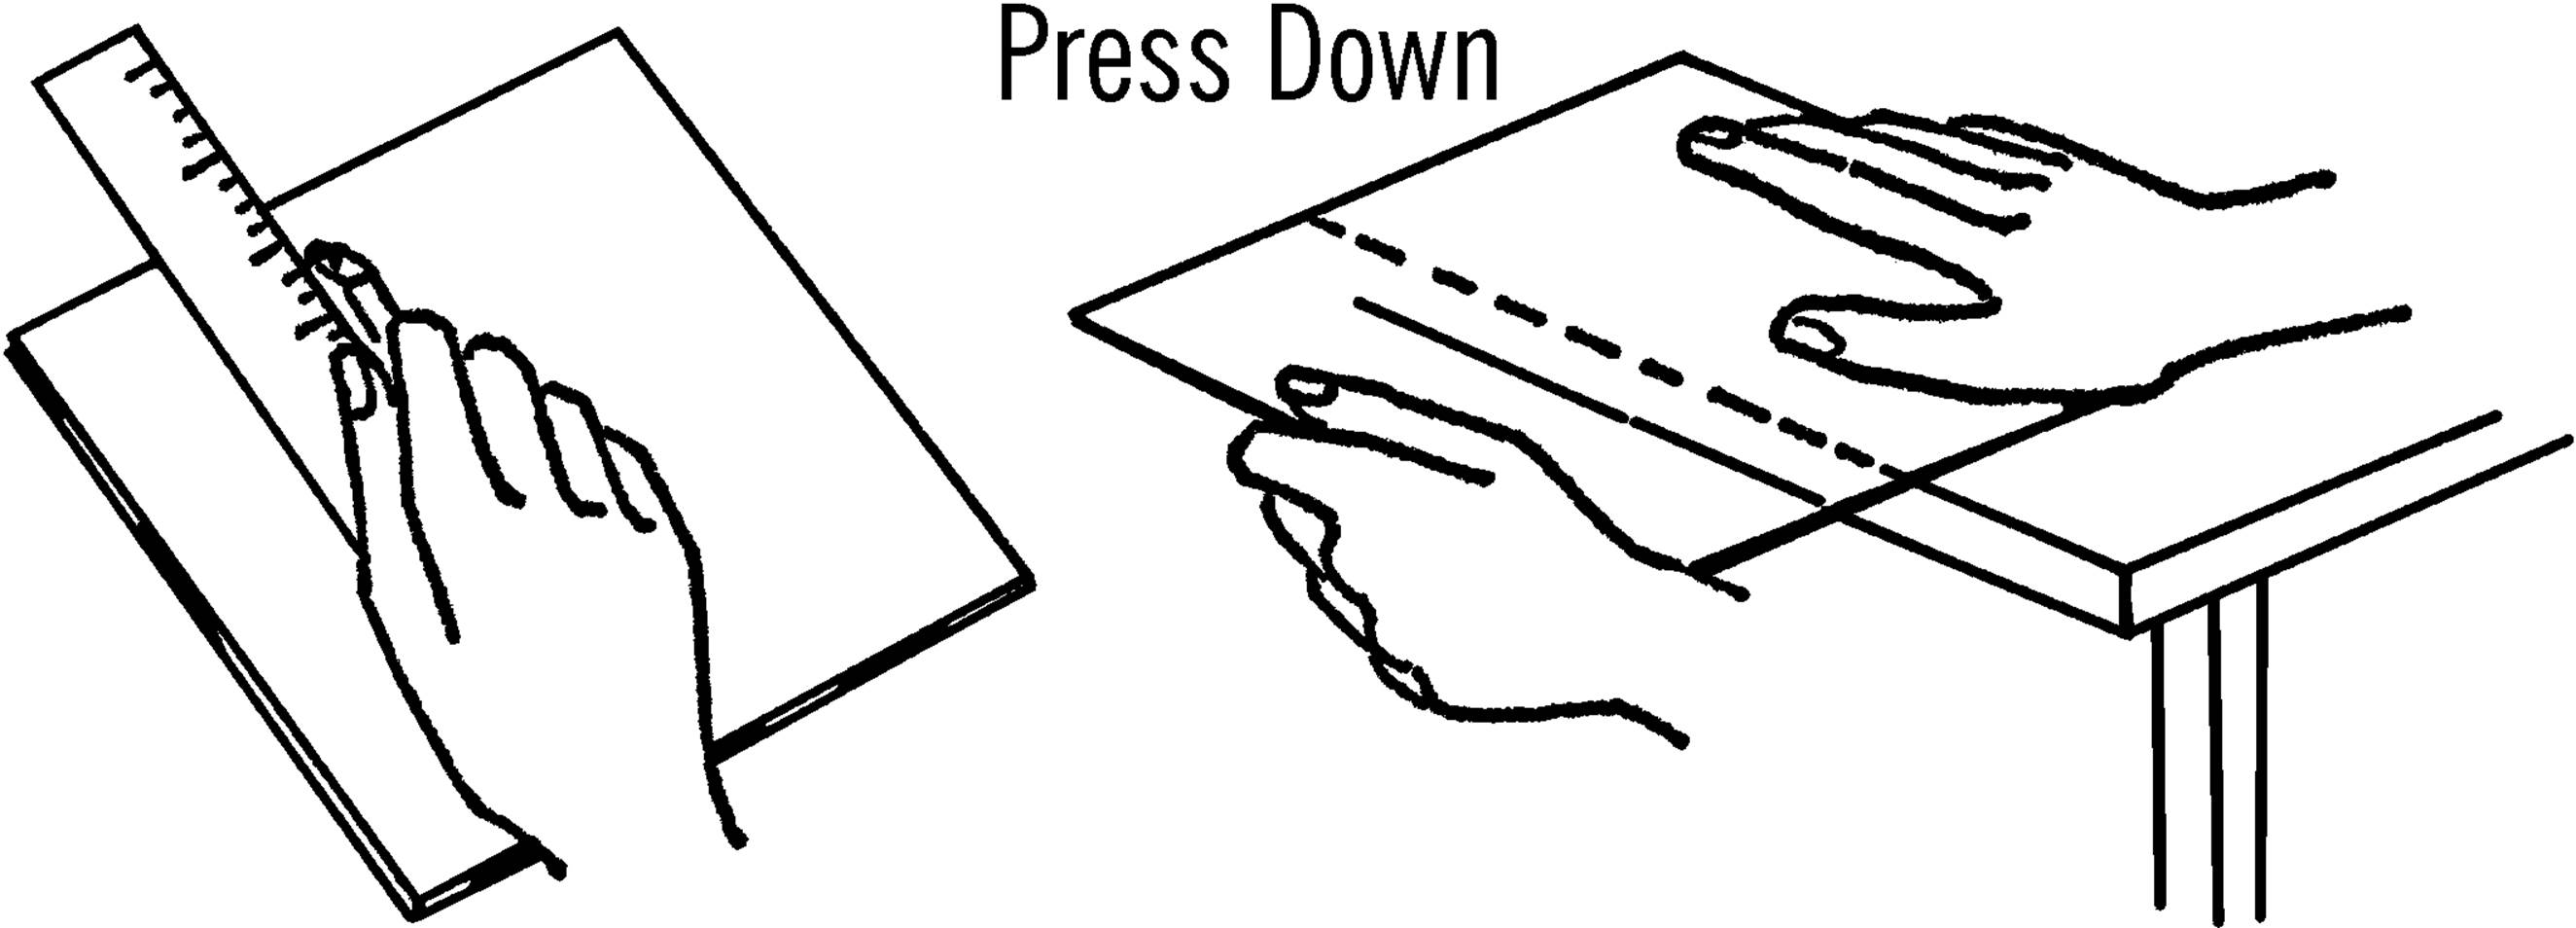
What to Do: Lay the glass on some newspaper on a smooth table. Lay your ruler on the glass where you want to cut it. Draw the glass cutter toward you, using the ruler as a straight edge. Make one firm hard line. Don’t go back and forth, as it dulls the cutter. Place the cut mark over the edge of the table with the mark up. Hold the glass down firmly and press. The glass should break on the mark. In case the glass is very thick, tap it gently with the ball at the other end of the cutter. This should help the glass break along the line. Any spots that don’t break smoothly can be broken off by using the notch on the glass cutter. You can smooth the edges to a fine finish by using wet or dry emery paper. Place the glass in a bucket of water and rub the edges with the emery paper. The water keeps the glass from flying.
Modern Safety Practice
The edges of a pane of glass—before and after you cut it—are very sharp. Handle with extreme caution. Use tough (welding or gardening) gloves to protect your hands when handling large or heavy pieces.
See Note 2 in Appendix E for additional safety guidelines.
Bottle Cutter
Purpose: The bottle cutter is a valuable tool in your science laboratory. It can be used to cut the tops or bottoms off any size bottle. Many pieces of equipment can then be made from the parts of the bottle or jar.
Materials: Wood to make U-shaped frame as shown in drawing, two bolts with nuts and washers, piece of nichrome wire (size 20)21 about 18 inches in length, and a six-foot extension cord. Nichrome wire may be purchased from any electrical shop or supply house.
What to Do: Build the U-frame. Drill two holes for the bolts as shown. Put the bolts through the holes, twist the ends of the nichrome wire around the heads of the bolts, then tighten the nuts. Connect one wire of the extension cord to the bolt. The other end of the cord connects on the salt water rheostat (see “Salt Water Rheostat”).
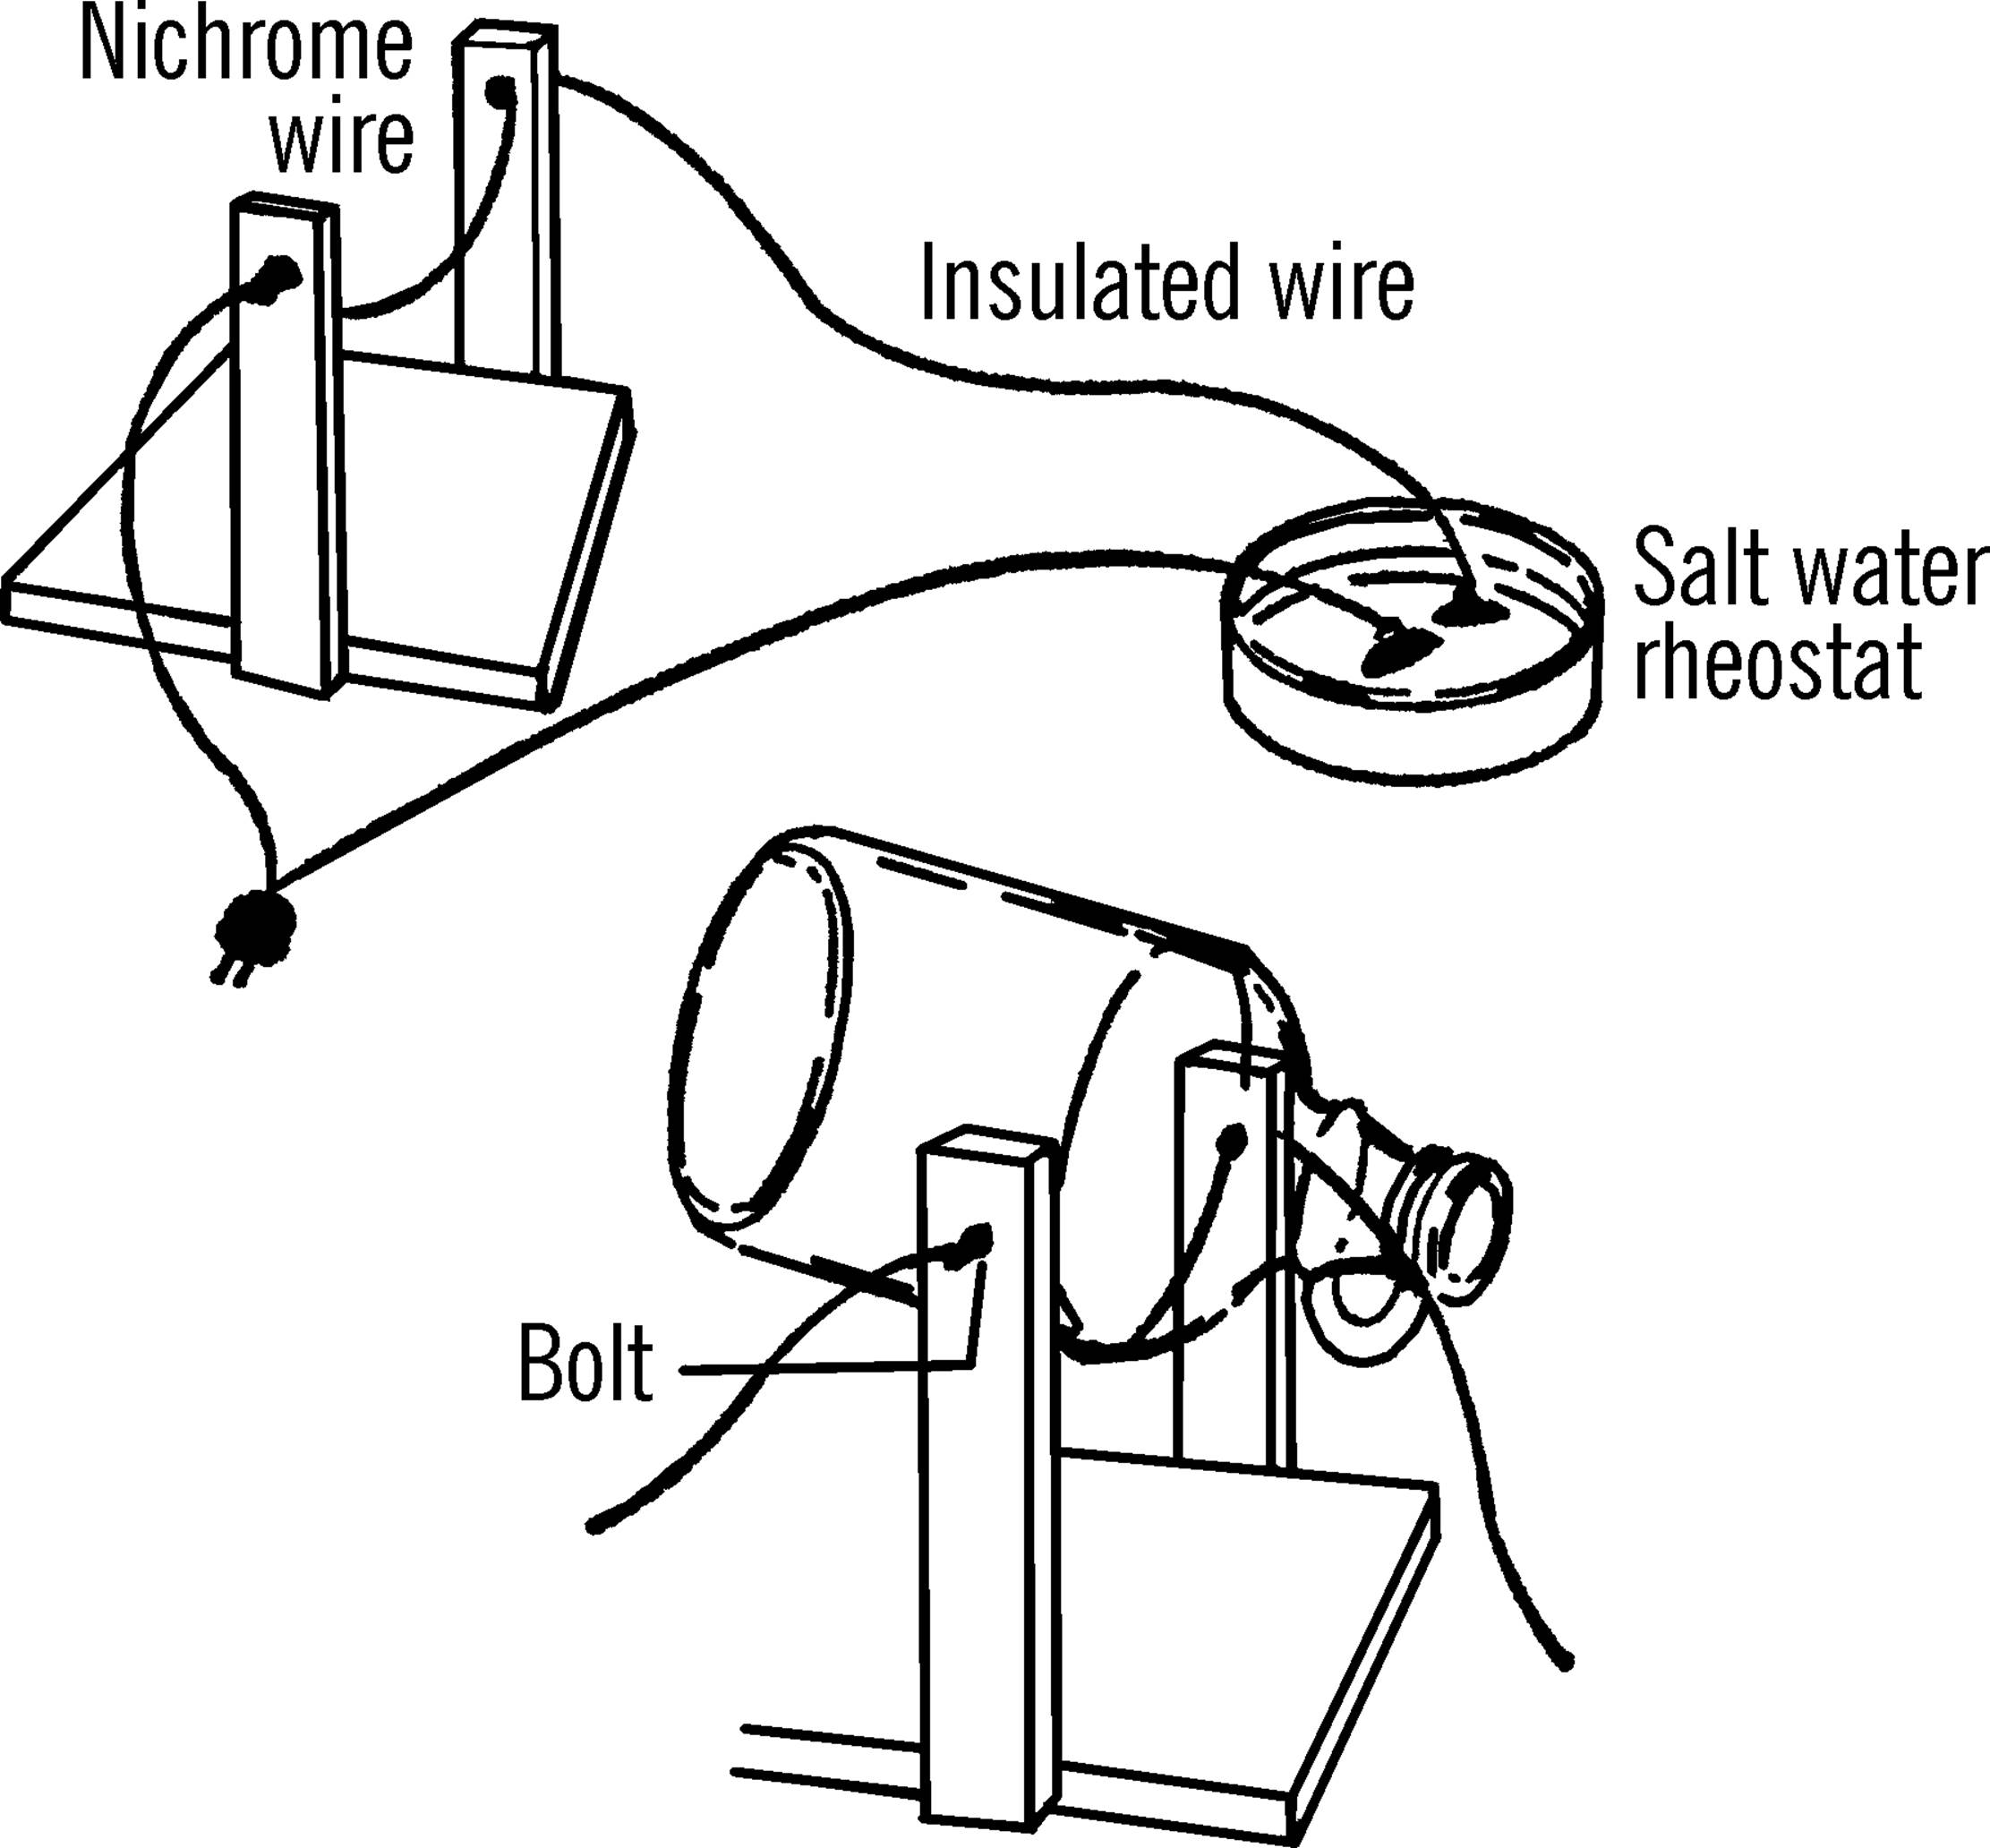
Operation of Equipment: After the bottle is scratched (etched by glass cutter—see “Glass Cutter”), plug in the cutter and then add salt to the water in the rheostat. Slowly move the two wires in the rheostat closer together until the nichrome wire glows brightly. Your cutter is now ready. Hold the bottle as shown so that it touches the wire along the scratched line. Turn the bottle slowly as the glass pings. The top or bottom should come off in less than a minute. Smooth the edge by rubbing it with wet or dry emery paper under water.
Safety Tips
1. Don’t touch the hot nichrome wire.
2. Don’t touch the bare wires in the rheostat. You will get a severe shock.
3. Younger students: don’t try your bottle cutter out unless your teacher or parents are with you.
4. Be careful not to cut yourself on the glass. Be sure to smooth the edge under water.
Modern Safety Practice
This type of bottle cutter can be a highly effective tool. It also presents very real hazards that you need to take seriously and be prepared for.
1. Strictly heed the warnings about touching the exposed wiring: a shock from mains power (AKA line voltage or household wiring) is potentially lethal. Read Note 10 in Appendix E for safety practice around it.
2. The red-hot nichrome wire is capable of causing severe burns or starting a fire. Follow the same set of fire-safety procedures that you would around an open flame (Note 3 in Appendix E).
3. You will also be working with hot (and cold) glass. Hot glass can easily burn you, and cold glass can shatter or cut you. See Note 2 and Note 4 in Appendix E.
4. The salt water rheostat presents its own unique hazards that you need to read about in the next project (see “Modern Safety Practice”). If you plan to cut bottles on a regular basis, it would be prudent to consider a safer and more permanent solution, such as the “isolated variac” described there.
Can You Work Like a Scientist?
1. Why did you use nichrome wire? Try other wire to see what will happen. Be careful in doing this.
2. Why did you use a salt water rheostat? Why didn’t you connect up the cutter directly with house current? Be careful here. Your wire may snap.
3. Why did you put salt in the rheostat?
4. What else might work in the rheostat besides salt? How about milk?
5. What would happen if the two wires in the rheostat touched?
6. What causes the water to get hot when electricity passes through it?
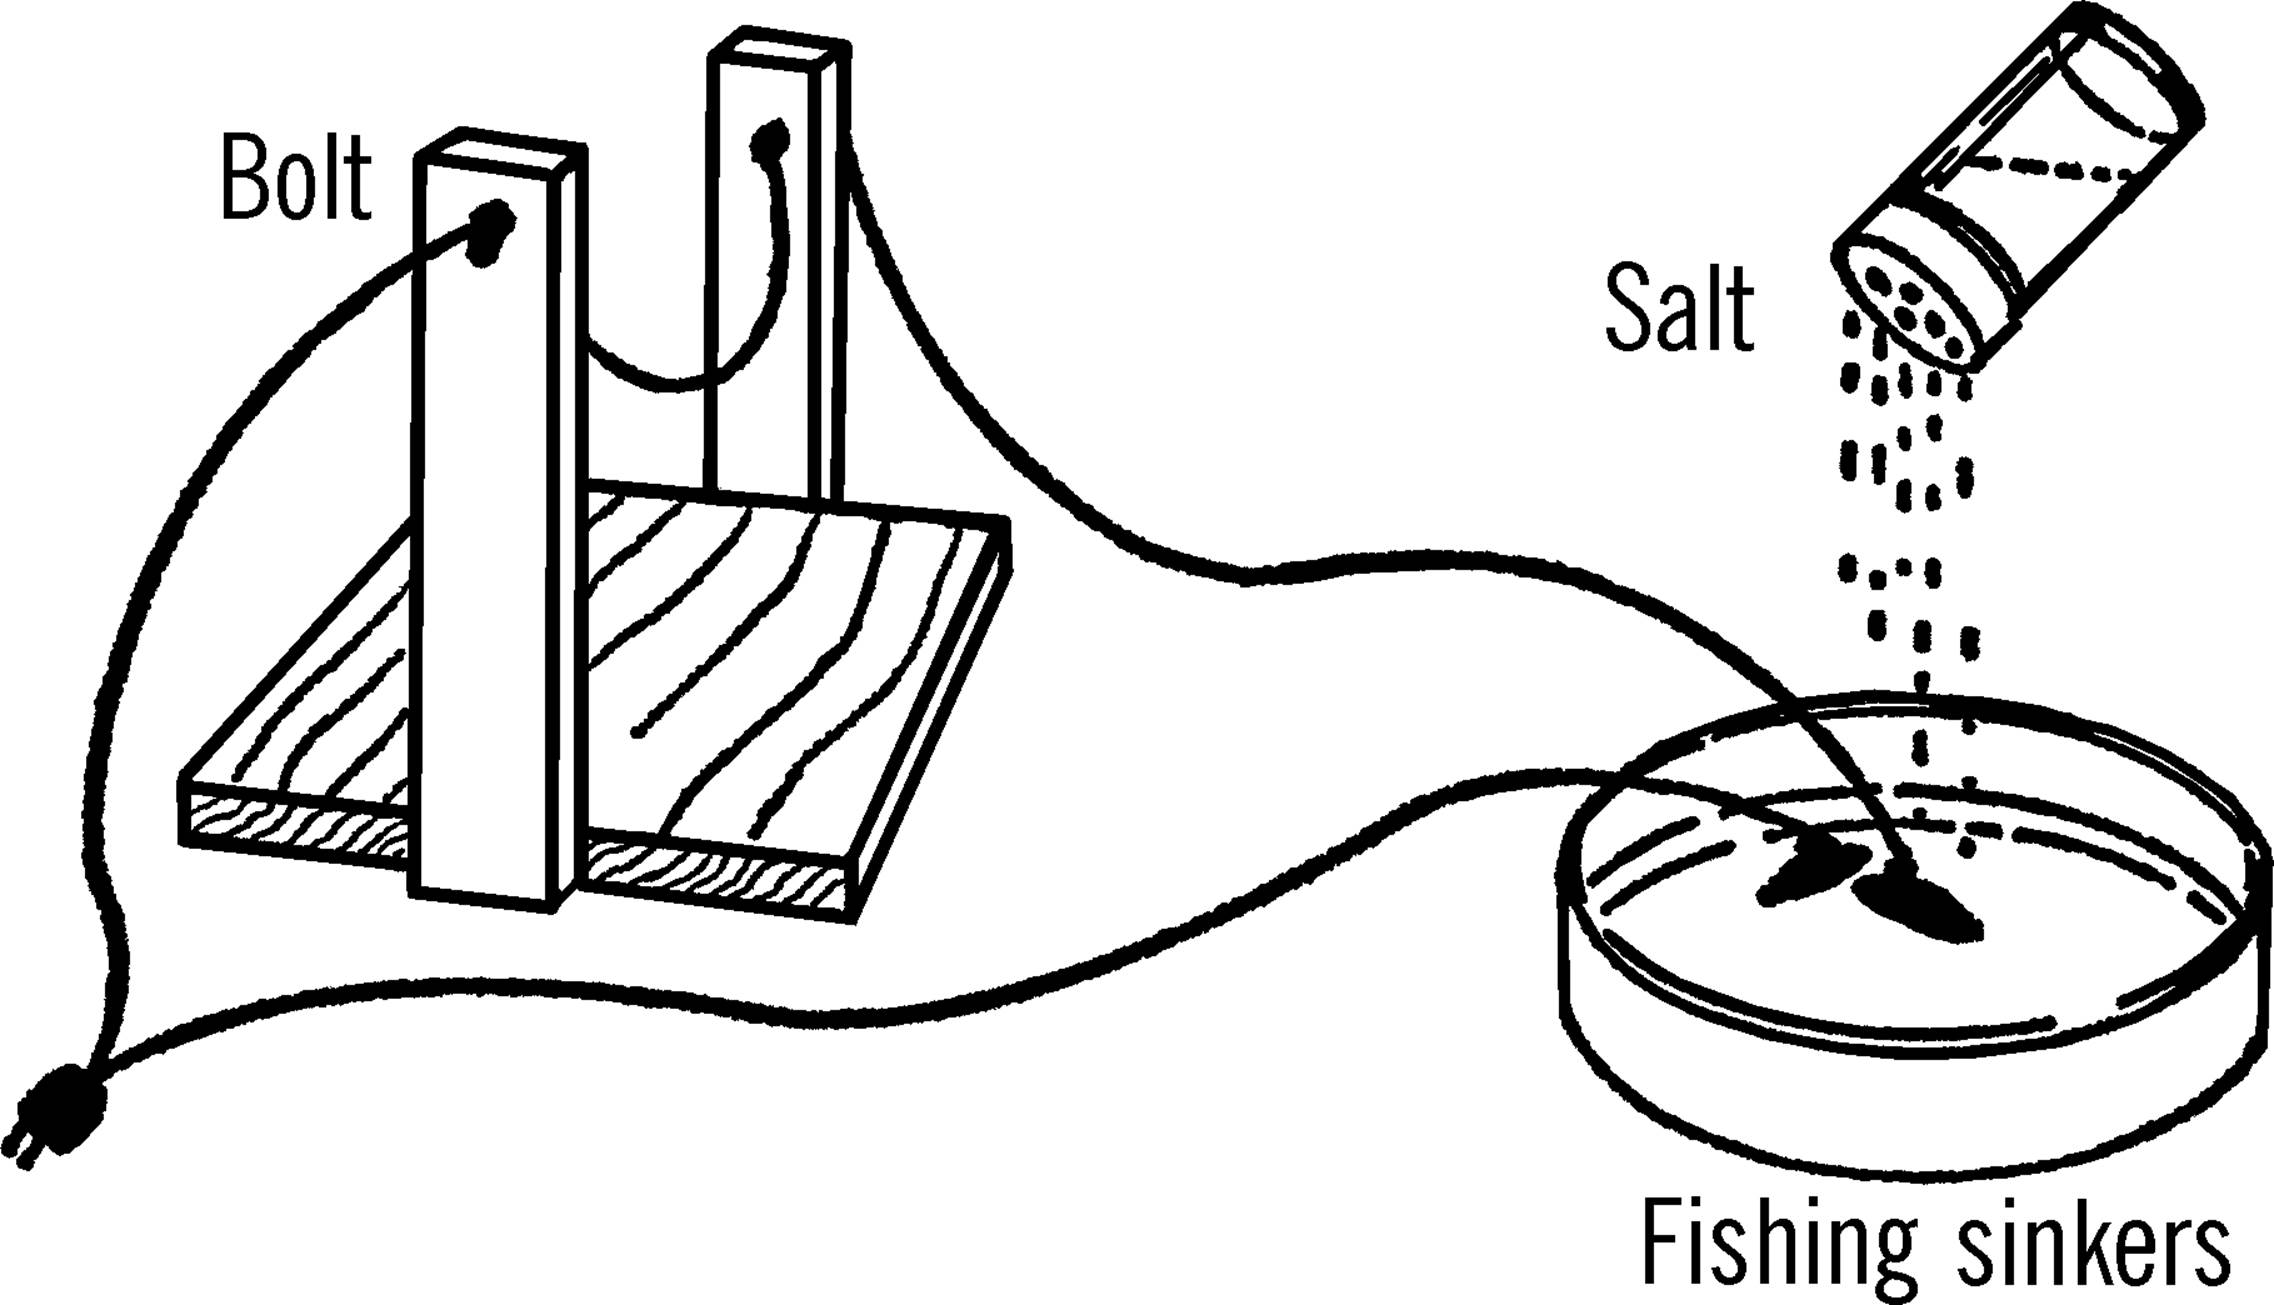
Salt Water Rheostat
Purpose: A rheostat changes the resistance to the flow of electricity and thus controls the amount of electricity. The salt water rheostat is a convenient way of reducing the normal house current (117 volts) to a much smaller current to operate such equipment as the bottle cutter and the carbon arc furnace.22
Materials: Pyrex pie dish or gallon jug aquarium, two fishing sinkers, extension cord, salt.
What to Do: Cut the socket end off the extension cord. Divide the wires. Remove the insulation from the end of each wire. One wire goes directly to such equipment as a bottle cutter. A wire then goes from the piece of electrical equipment to one of the fishing sinkers. The sinker is placed in the dish, and the dish is filled with water. The electricity passes through the water to the second fishing sinker. A wire is then attached to the second sinker, and the wire goes back to the plug.
Safety Tips
1. The water and the dish get quite hot. Place a plywood board under the hot dish so that the dish won’t burn the counter.
2. Don’t touch bare wires. Don’t reach into the water or in any way touch the sinkers. You will receive an electrical shock.
3. Never work with electricity near a sink or water pipe. A wet basement floor is just as bad. When there is a direct path through you to ground, electricity can travel through your body, causing a severe shock.23
4. Young experimenters: Never work with the rheostat unless your parents or teacher are present and give you permission.
Modern Safety Practice
A salt water rheostat is a classic and functional type of variable resistor. While it is possible to build and use the salt water rheostat safely, it does leave a lot of wiring exposed at line voltage, not to mention a bowl of salt water that can be knocked over. There is no room for error; mistakes with mains voltage can be deadly. Read Note 10 in Appendix E for safety practice around exposed wiring.
There is some value in (carefully) building and testing the salt water rheostat for its own sake, but there is less value in actually using it as part of other projects. For example, if you are building the carbon arc furnace or a bottle cutter, it is likely wiser not to have the added complication of the rheostat’s exposed wiring.
In most modern applications of this sort (where you desire a variable amount of voltage from the wall plug), a neatly packaged variable autotransformer or “variac” is the right tool for the job. From a safety standpoint, it is also highly desirable to use an isolation transformer to “dereference” the AC with respect to ground. The best of both worlds is an isolated variable ac power supply or “isolated variac,” which combines the two elements, usually along with a fuse (for additional protection). Perhaps it goes without saying, but if you do wish to build and test the salt water rheostat, the safest way to do so would be to power it through an isolated variac.
Operation of Equipment: Wire the bottle cutter or carbon arc as shown. Fill the dish with water. Plug the rheostat into house current. You will notice that plain water doesn’t carry electricity very well. Slowly add salt to the liquid and move the fishing sinkers about two inches apart. CAUTION: Do NOT touch the bare wires or the sinkers. Touch only the insulated wires. As you add salt, you will notice the water start to bubble as the electricity moves through the water. The salt is dissolving into the water, and the salt water is becoming electrically charged (ions are formed). The more salt that is dissolved, the more ions to carry the electricity. Now to vary the electricity, move the sinkers either farther apart or closer together. CAUTION: Do NOT let the two sinkers touch. This is a direct short, and the full voltage will go through your piece of equipment and burn it out.
Carbon Arc Furnace
Purpose: The arc furnace is a source of brilliant light and produces a very high temperature at the tips of the carbon rod. The temperature is so great that you can melt some metals.
Materials: Wood as shown, a brick, a clay flower pot, two old flashlight batteries,24 a round curtain rod, and an extension cord.
What to Do: Cut open an old flashlight battery. Cut off both ends with a hack saw. The paste inside contains acid, so wash thoroughly and don’t get any on your clothes or in your eyes.25 There is a black rod in the center of the battery. This is a carbon rod. You need two of these rods.
Build a wooden frame as shown. Drill a hole in each upright just large enough for the round curtain rod. The holes should be high enough to strike the middle of the clay pot when the pot is sitting on the brick. Cut the curtain rod in half. Insert a carbon rod in one end of each half of the curtain rod. The ends of the curtain rods should be crushed with a pair of pliers so firm contact is made with the carbon rods. The curtain rods are then slipped through the uprights. Work a hole in each side of the clay pot with a screwdriver or file. The holes should be large enough for the curtain rod sections. Now slip the carbon rods through the holes and into the pot. Wire as shown. Be sure to tape the curtain rods near the uprights.
Operation of Equipment: Check your wiring completely before you plug in the extension cord. Be sure your carbon arc furnace goes through a rheostat.26 Do not look directly at the ends of the carbon rods. The light might blind you. Use a good pair of dark glasses when working with your arc furnace.27 The rods should be spaced so they are separated by about a quarter of an inch. Move (bend) the uprights together. When the rods touch, sparks will fly. Slowly move the rods away from each other, and you can strike a good arc. If you cover your pot, you have a furnace. In order to melt metals, say, a nail, either place directly in the arc, or place in a ceramic dish in the furnace. You can operate the arc furnace without the pot. However, no one in the room should look at the arc.
Safety Tips
1. Don’t touch the curtain rods while the furnace is plugged in. Always take care when working with the salt water rheostat.
2. Younger students: never use the arc furnace unless your teacher or parent is present and gives permission. Never work near water pipes, a sink, or on a damp basement floor.
3. Protect your eyes by wearing dark glasses and touch only wood—NOT the rods, pot, wire, curtain rods, or salt water rheostat.
Modern Safety Practice
With the exception of having blinding light and an electric arc instead of hot glass and a red-hot wire, the hazards presented in this project are essentially the same as in the bottle cutter project. The safety guidance there (“Modern Safety Practice”) about wires, fire safety, having another person present, and working with the rheostat still applies.
It is imperative to protect your eyes from the bright-as-the-sun light emitted by the carbon arc. Neither dark sunglasses nor most welding helmets are sufficient protection; you need a welding shade designed specifically for carbon arcs; what is called a “#14” or darker shade. Note 13 in Appendix E discusses eye safety when directly looking at the sun (which is equally demanding) and some alternative types of solar filters.
Adjustable Glass Bottle Etcher
Purpose: To make a bottle etcher that will fit any size bottle.
Materials: Glass cutter, wood for base, two pieces of ¾” plywood for side pieces.
What to Do: Cut ⅛” notches along the edge of one of the side pieces. The notches should be about ¼” deep. These notches can be cut with a hand saw, but a power saw is ideal. The width of the blade of a power saw is just the right width for the notches.
Nail the two side pieces to the base in the form of a V. The glass cutter is then inserted into the proper slot according to the size of the bottle. The cutter should just touch the side of the bottle when the bottle is held firmly against the wood sides. The cutter can be held in position by a short piece of metal, such as tin. The metal is fastened over the cutter and held in place by screws.
Operation of Equipment: Place the bottle firmly against the wood sides and turn the bottle steadily. The cutter will etch a straight line around the bottle. The height of the cut can be varied by placing blocks of wood underneath the bottle. The bottle is cut by placing the scratch or etch mark over a hot nichrome wire (see “Bottle Cutter”).
Added Suggestion: A second type of adjustable bottle cutter can be made by making a series of bottle cutter boards. The width of the side pieces should vary, thus allowing smaller bottles to be cut. The height can again be varied by using blocks of wood. You can use the same base, and place different width side pieces around the four corners of the base.
Modern Safety Practice
See Note 2 in Appendix E for safety guidelines when etching and cutting glass.
Test Tubes
Purpose: A test tube is used for carrying on chemical experiments, growing bacteria and simple plants, air and water experiments, and experiments with heat. The tube should be made of material that can be heated.
Materials: Burned-out light bulbs (the clear type is best).
Helpful Hints for Building: Remove the element from inside the bulb. (See “Light Bulb Chemistry Flask”.)
Additional Suggestions: Plastic toothbrush containers, olive or cherry bottles, and perfume vials can serve as test tubes. However, they cannot be heated. Baby bottles28 are a good substitute for test tubes and they can be heated! Regular test tubes can be bought at any scientific supply house for about fifty cents each. Stoppers can be made from corks by drilling holes or may be bought for about one dollar each.
Test Tube Racks
Purpose: The rack is used to hold unused test tubes or to hold groups of test tubes for experiments, such as growing molds.
Materials: A piece of 2×4 for type A, or pieces of wood for type B. In both cases a drill is needed that is a little larger than the tube.
Helpful Hints for Building: For type A, drill holes in a block of 2×4. If you feel the holes should be deeper, nail two 2×4’s together. For type B, nail the boards together as shown and then drill the holes through the top board and almost through the bottom board.

Can You Work Like a Scientist?
Can you make a test tube holder for light bulb test tubes? Remember the rack should be able to hold both empty and full light bulb test tubes.
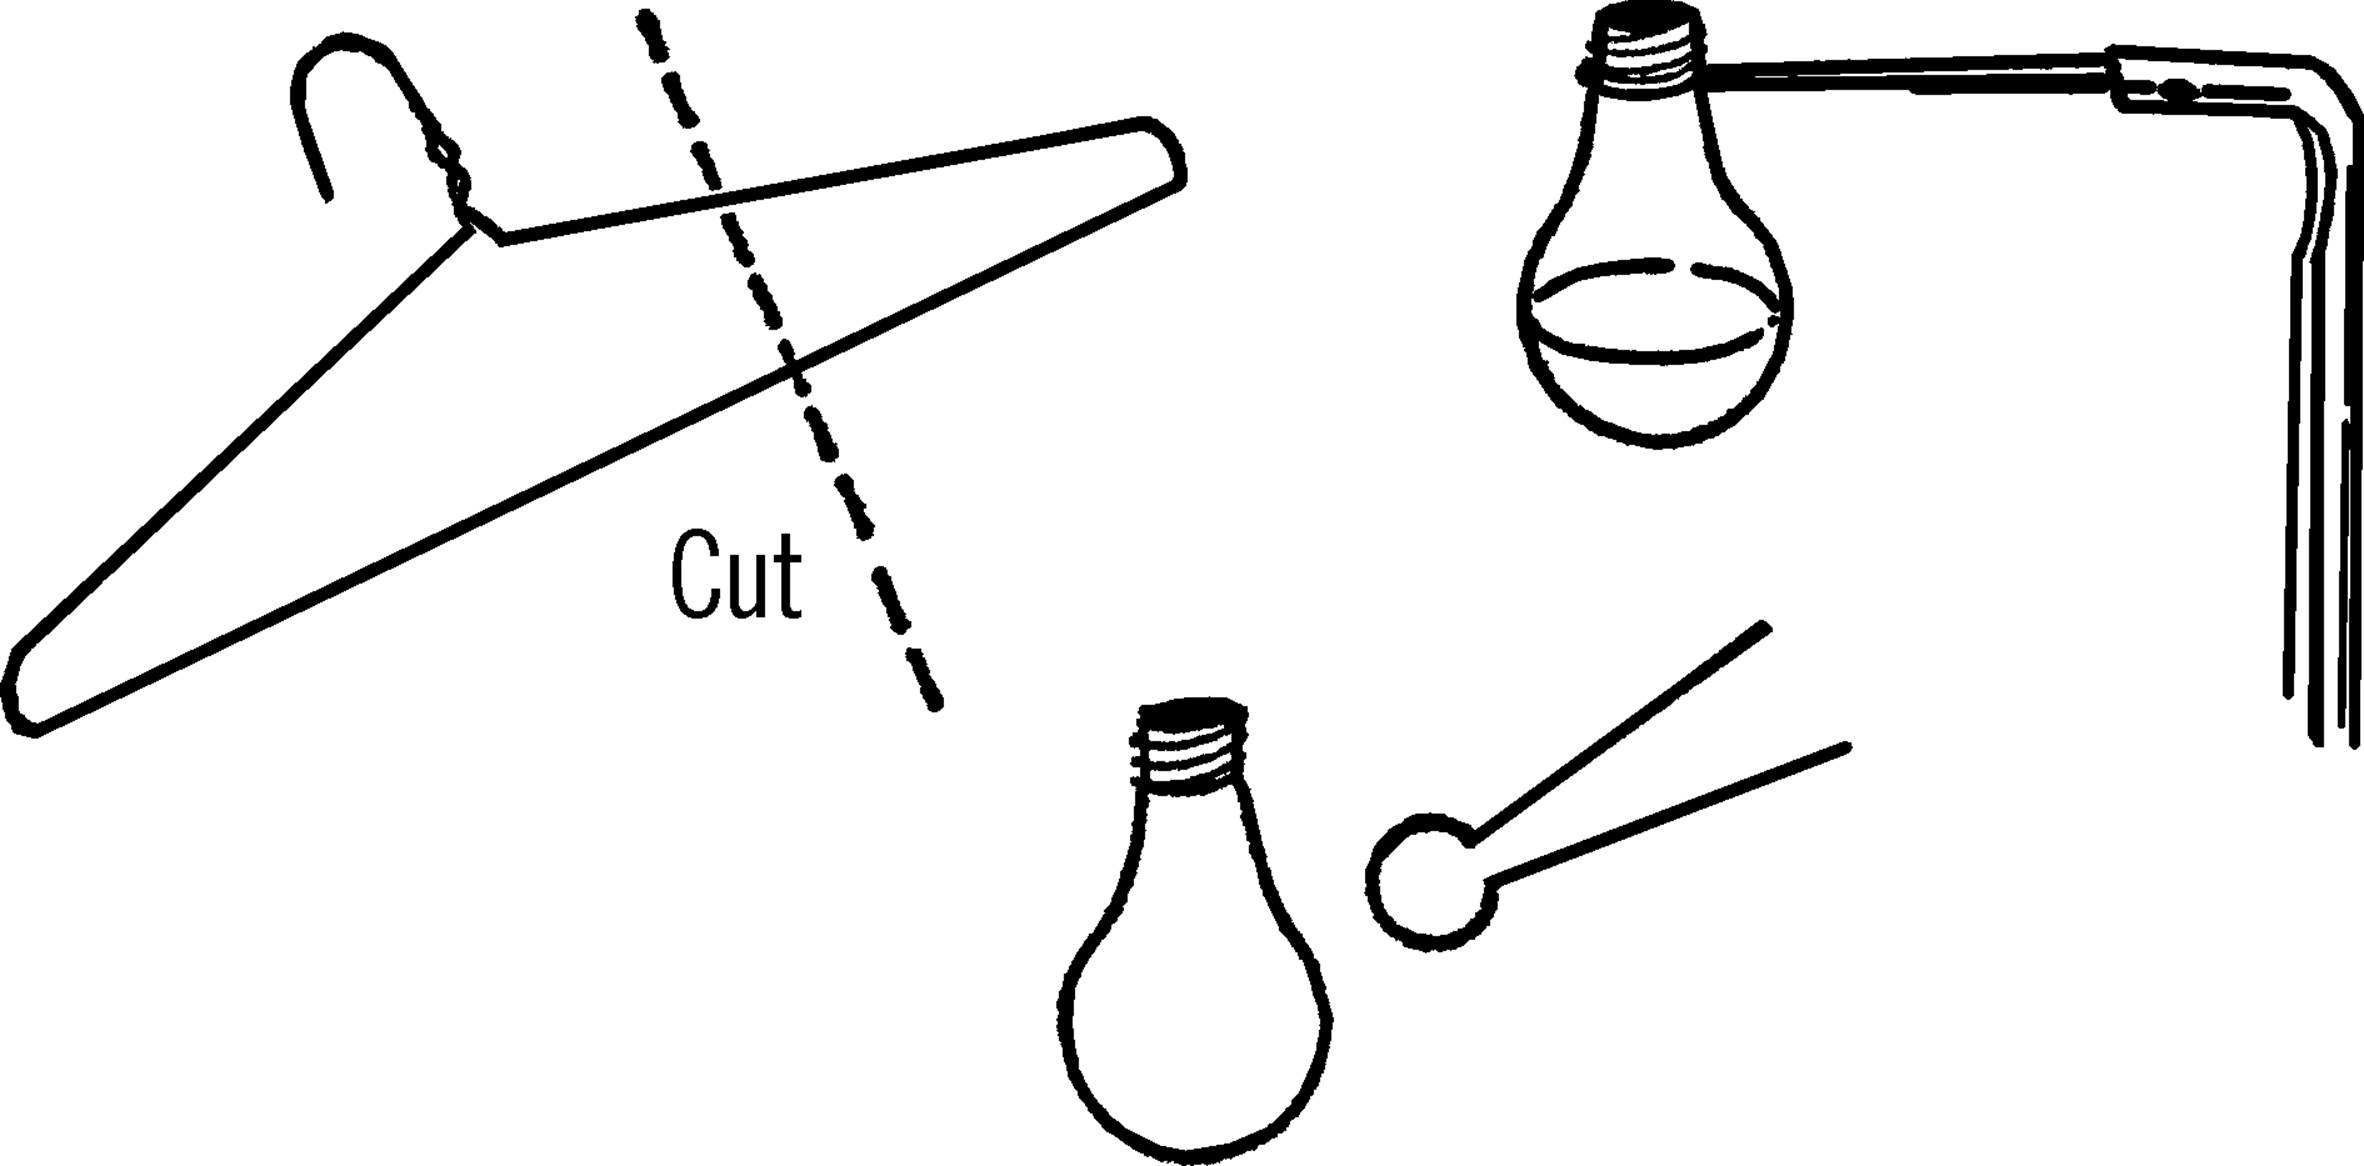
Retort and Liebig Condenser
Purpose: A retort is used for distilling water and other liquids. “Distilling” is heating a liquid until it boils and changes into vapor. Then the vapor condenses (cools and turns back into liquid) and is collected. This process is a means of separating (decomposing) substances by heat.
Materials: Two-hole size #1 rubber stopper, burned-out 150-watt light bulb, and a piece of glass tubing about 16 to 24 inches long.
What to Do: Take the inside out of the light bulb (see “Light Bulb Chemistry Flask”). Bend one end of the glass tubing with your alcohol burner. Cut the bend off by using the edge of your file (see “Cutting Glass Tubing”). This piece needs to be only two or three inches long. Bend the rest of the glass tubing as shown. Insert both pieces into the light bulb with the short piece pointing up when the light bulb is lying on its side. Slip a small piece of rubber tubing over the open end. Clamp the tubing with a clothespin or a plug made from glass tubing.
Operation of Equipment: Place the size 303 tripod over the alcohol burner. Put some water or other liquid in the light bulb. Insert the rubber stopper. Set the light bulb on the tripod so that it leans to the side as shown. The glass tubing should rest inside a large bowl or gallon jug aquarium (see “Aquarium”). The bowl or aquarium is filled with cold water. A collecting graduated cylinder (baby bottle) can be used to measure the amount collected. If you want to fill the retort while heating the liquid, remove the clothespin clamp or plug and add the liquid either by a funnel or a siphon connected onto the hose by a piece of glass tubing.
Safety Tips
1. Steam burns like hot water. You are using both when you distill water.
Modern Safety Practice
Read Note 2, Note 3, and Note 4 in Appendix E for safety practice when cutting glass, working with open flames, and working with hot glass, respectively.
Can You Work Like a Scientist?
1. Why do you run the glass tubing through cold water? Why does the vapor turn back to a liquid? What happens to the water in the aquarium after you have used the retort for a while? Can you change the water with a siphon?
2. Can you distill muddy water? How about salt water? What effect does placing ice cubes in the aquarium water have on the rate of collecting?
3. Place food coloring or ink in the water in the bowl. Does the color go with the vapor?
4. Try distilling other liquids, such as milk, sugar water, or a mixture of salad oil and water. Which wiIl distill first? Can you separate these two liquids by regulating the temperature?
5. Mix different chemicals in the water. Can you regain the chemicals by distilling? Do any of the chemicals evaporate before the water boils?
6. Can you think of any way to take the temperature of the water in the light bulb? If you could, you could tell the temperature at which the different substances boil and evaporate.
Distillation Condenser
Purpose: A distillation condenser is used in the process of heating a liquid, changing it into a vapor, cooling the vapor, and changing the vapor back into a liquid.
Materials: Two cans as shown, two rubber stoppers (one-hole, size #1), glass tubing, rubber tubing, 6” piece of copper tubing, alcohol burner, bottle.
What to Do: Bend a short piece of glass tubing and insert into a rubber stopper (A). Attach to the glass tubing a piece of rubber tubing. Cut the bottom out of can (B). Turn the can over and insert a rubber stopper from the inside of the can. Attached to the rubber stopper should be a piece of glass tubing on the inside of the can and a short piece of glass tubing pulled into a nozzle and inserted into the rubber stopper from the outside of the can.
A short piece of copper tubing is used in the can to condense the vapor. The copper tubing is connected to can (A) by the long piece of rubber tubing. It is connected to the stopper in can (B) by a short piece of rubber tubing.
Operation of Equipment: The liquid to be distilled is placed in can (A). The rubber stopper is inserted in the can. As the liquid is heated by an alcohol burner, the vapor rises and goes through the rubber tubing into can (B). The liquid in can (B) plus the ice cubes cool the copper tubing. As the vapor passes through the copper tubing it condenses and drips through the glass nozzle into a collecting bottle.
Modern Safety Practice
1. Follow the safety guidance given previously when bending the glass tubing (“Bending Glass Tubing”).
2. In operation, this project uses an open flame. See Note 3 in Appendix E for basic safety practice.
3. If distilling flammable liquids, consider using a heat source other than an open flame. Do you have access to a hot plate that could do the job?
Can You Work Like a Scientist?
A mixture of dry ice and alcohol produces an extremely low temperature.29 What gases could you condense at this temperature? What changes might you have to make in your setup?
Clothes Hanger Chemistry Stands—Filter Paper
Purpose: Chemistry stands are used to support various pieces of laboratory equipment during chemistry and other experiments.
Materials: Clothes hangers,30 electrician side-cutting pliers, and a second pair of pliers.
What to Do: Cut the hooks off the clothes hangers. Shape the hangers to form the stands shown below.
Operation of Equipment: A screen can be placed over the tripod stand (A). An object can be heated by placing it on the screen with an alcohol burner under the screen.
The support stand (B) is used primarily to support funnels and similarly shaped pieces of glassware. The funnel is used in a process known as filtration. A paper towel makes a good substitute for filter paper.31 Fold a piece of towel as shown. Place the towel into the funnel and pour the liquid into the funnel. The clear liquid can be collected in a baby bottle. This cleared liquid is called “filtrate.”
Modern Safety Practice
When using side cutting pliers to cut wire, small bits of wire can go flying off at high speeds. Wear safety glasses with side protection, and make sure that everyone else in the vicinity is wearing a set as well.
Graduated Beaker
Purpose: A beaker is used for mixing chemicals. It has a pouring lip and should be made of material that can be heated.
Material: A beaker can be made by cutting a bottle. A simple beaker is a wide-mouth one-pint mason jar. A better substitute for the beaker is the one- or two-cup measuring cup made out of pyrex with a pouring lip. Measuring cups are marked in ounces and in fractions of a cup.
Stirring Rod
Purpose: This is used to stir chemicals in beakers or flasks. The rod is usually made of glass so that it is not affected by acids. The rod can also be used for static electricity experiments.
Material: Piece of glass tubing about 12 inches long.
What to Do: Heat one end of the glass tube in the flame of an alcohol burner. Turn the tubing slowly until the glass flows and seals the hole. Allow the tubing to cool and then seal the other end.

Modern Safety Practice
This project involves cutting (cold) glass, open flames, and hot glass. Follow the guidelines in Note 2, Note 3, and Note 4 of Appendix E, respectively.
Petri Dish
Purpose: This is a small shallow dish used for growing cultures of bacteria or simple one-celled animals such as paramecia.32
Materials: Small round bottles, and glass bottle cutter already described.
What to Do: Etch (scratch) the bottle with your glass cutter. Cut the bottom of the bottle off with the nichrome wire and the salt water rheostat. Smooth the glass with wet or dry emery paper.
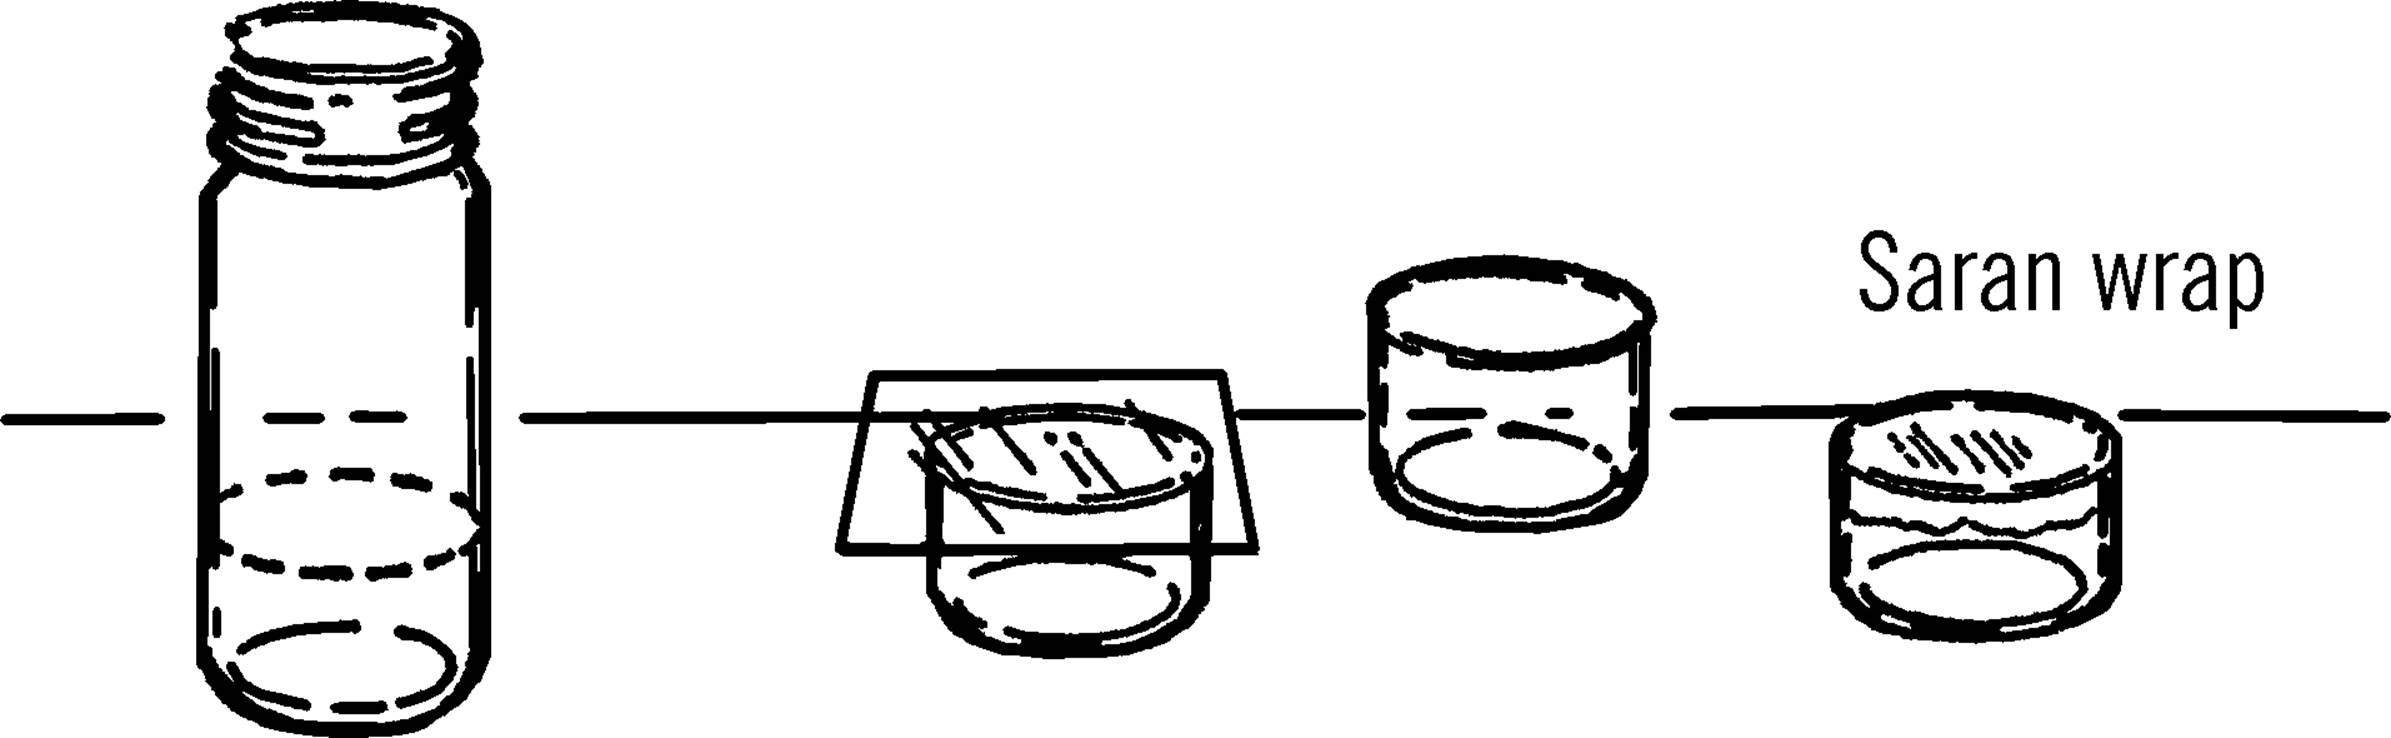
Operation of Equipment: Place a few kernels of wheat in your Petri dish. Add distilled water. You may either distill your own water with your light bulb retort and glass condenser, or you may collect rain water. The important thing is that the water does not contain chlorine.33 Cover the dish and let it stand in a warm place for about one or two weeks. A good cover can be made by cutting a piece of glass with your glass cutter or by using Saran Wrap. A regular saucer or jar lid is also satisfactory. After two weeks there should be a large number of bacteria and some small micro-organisms. If you put a few drops of any culture in this dish of bacteria, they will feed and reproduce. Another method is to use bits of hay or lettuce in place of the wheat kernels. Try all methods and compare your results.
Measuring Spoon

Purpose: The spoon is used to measure out chemicals. A plastic spoon set from the variety store is a good substitute for chemical measuring spoons, and much less expensive.
Acid Bottle

Purpose: Acids can only be kept in glass containers.
Materials: Ideal acid bottles are vitamin or nose drop bottles.34 They have a medicine dropper built in the lid. Be sure to label bottles.
Wash Bottle
Purpose: The wash bottle is valuable as a ready source of water. It is very necessary in a room or laboratory that does not have running water.
Materials: Gallon jug, 2-hole #7 rubber stopper, glass tubing, and rubber tubing.
What to Do: Bend a piece of glass tubing to the shape shown. The tubing should be long enough to reach down to the bottom of the jug. Rubber tubing should be connected to a very short piece of glass tubing.
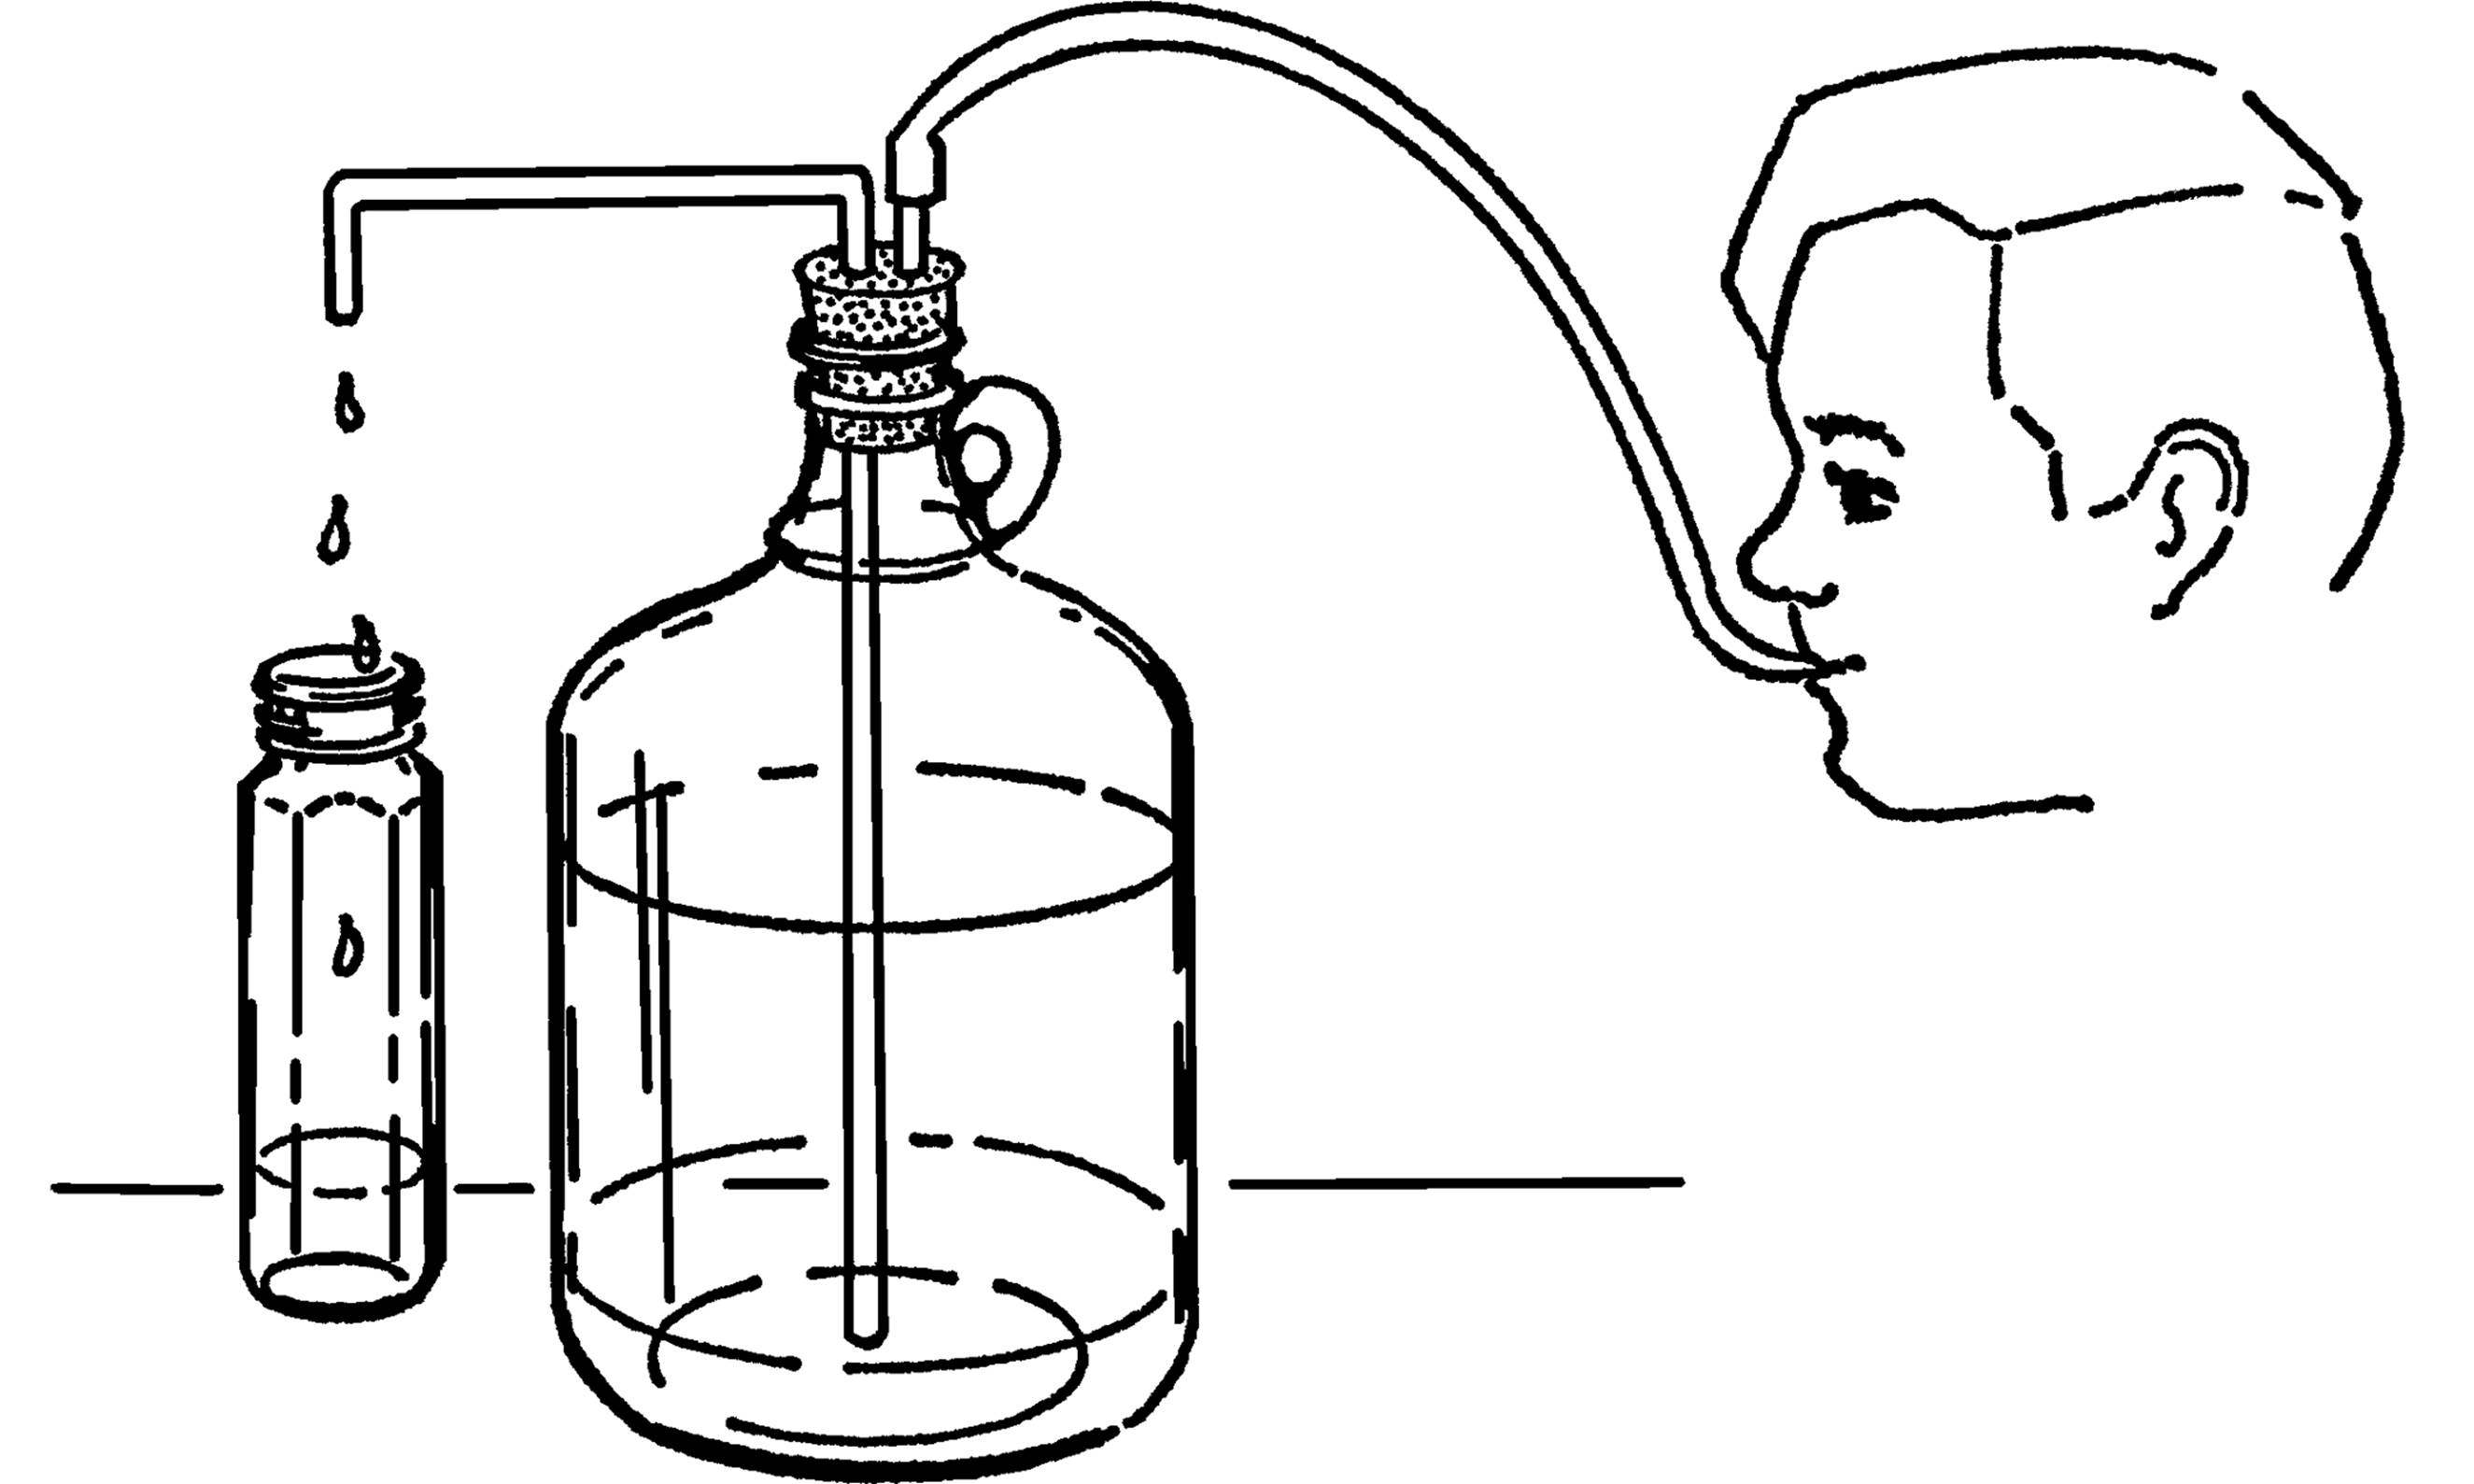
Operation of Equipment: Fill the jug almost full of water. Insert the rubber stopper. The glass tubing is the faucet. It can be directly over a bowl or plastic dishpan. In order to get water, blow into the rubber tubing. The air is compressed and pushes on the water. The water is pushed up the glass tubing and out.35
Can You Work Like a Scientist?
1. Can you design a wash bottle that works on a siphon and uses a clothespin as a pinch clamp to shut off the water?
2. Would a small hand pump work for your air supply? Can you design a better air supply?
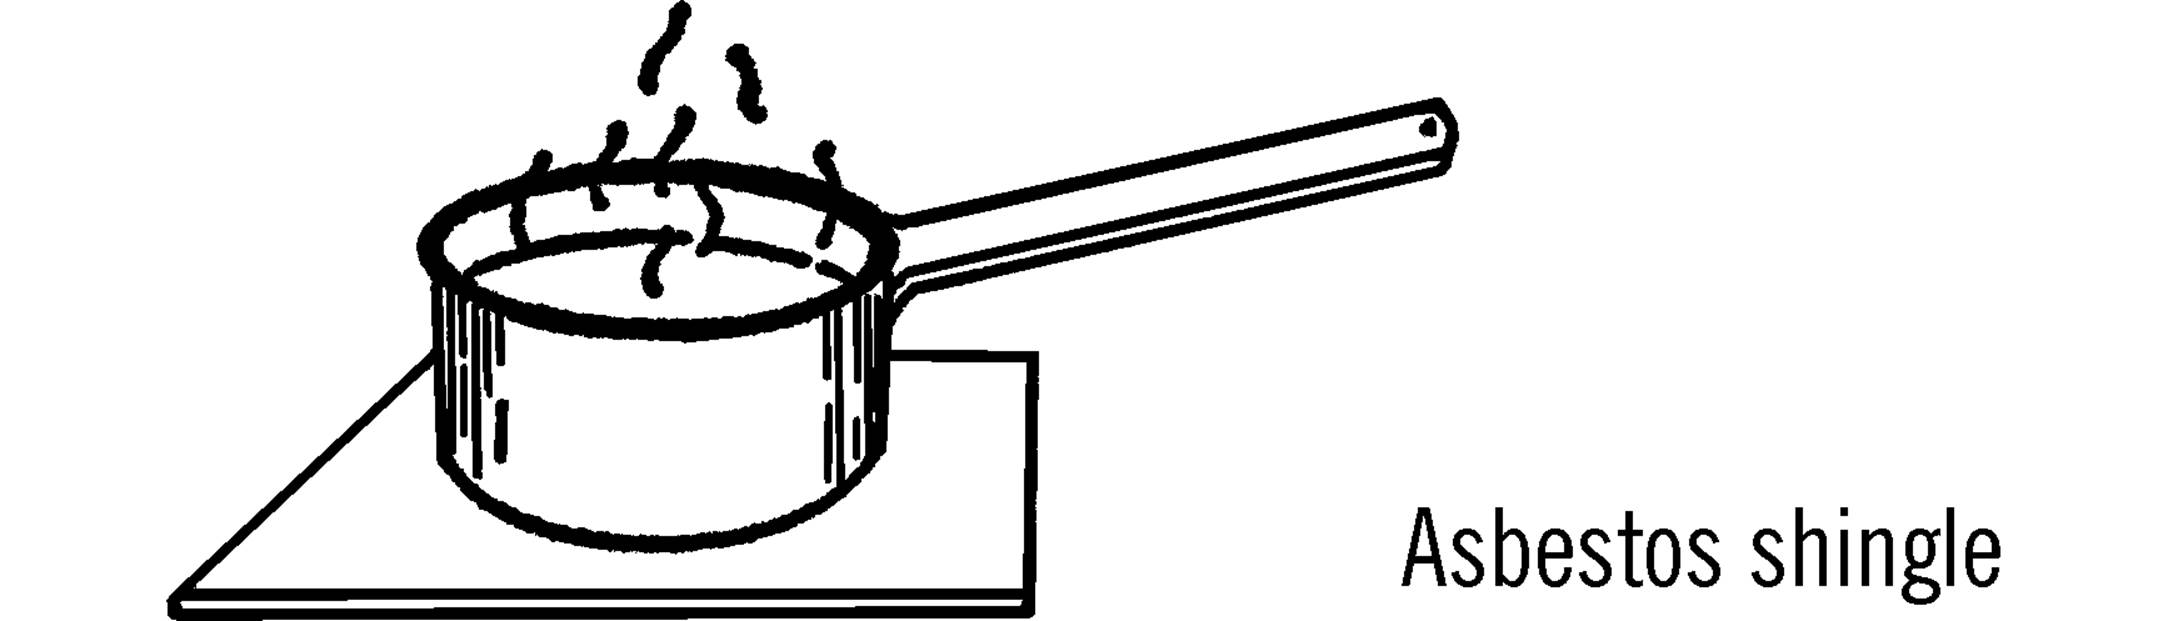
Asbestos Board
Purpose: Asbestos will not burn. Hot bottles or pans can be placed on an asbestos board to prevent burning of a desk or counter top.
Material: An asbestos shingle can be obtained from almost any lumber store. Usually a student can get one without cost.
Modern Safety Practice
This one is simple: Don’t use asbestos. Asbestos is a natural mineral fiber that happens to (1) be fireproof and (2) cause various lung diseases including cancer. For the latter reason, you won’t actually find an asbestos shingle at a modern lumber store.
To prevent heat damage to your lab bench, obtain a common kitchen trivet (cork, metal, silicone, or ceramic) from a hardware, kitchen, or home improvement store.
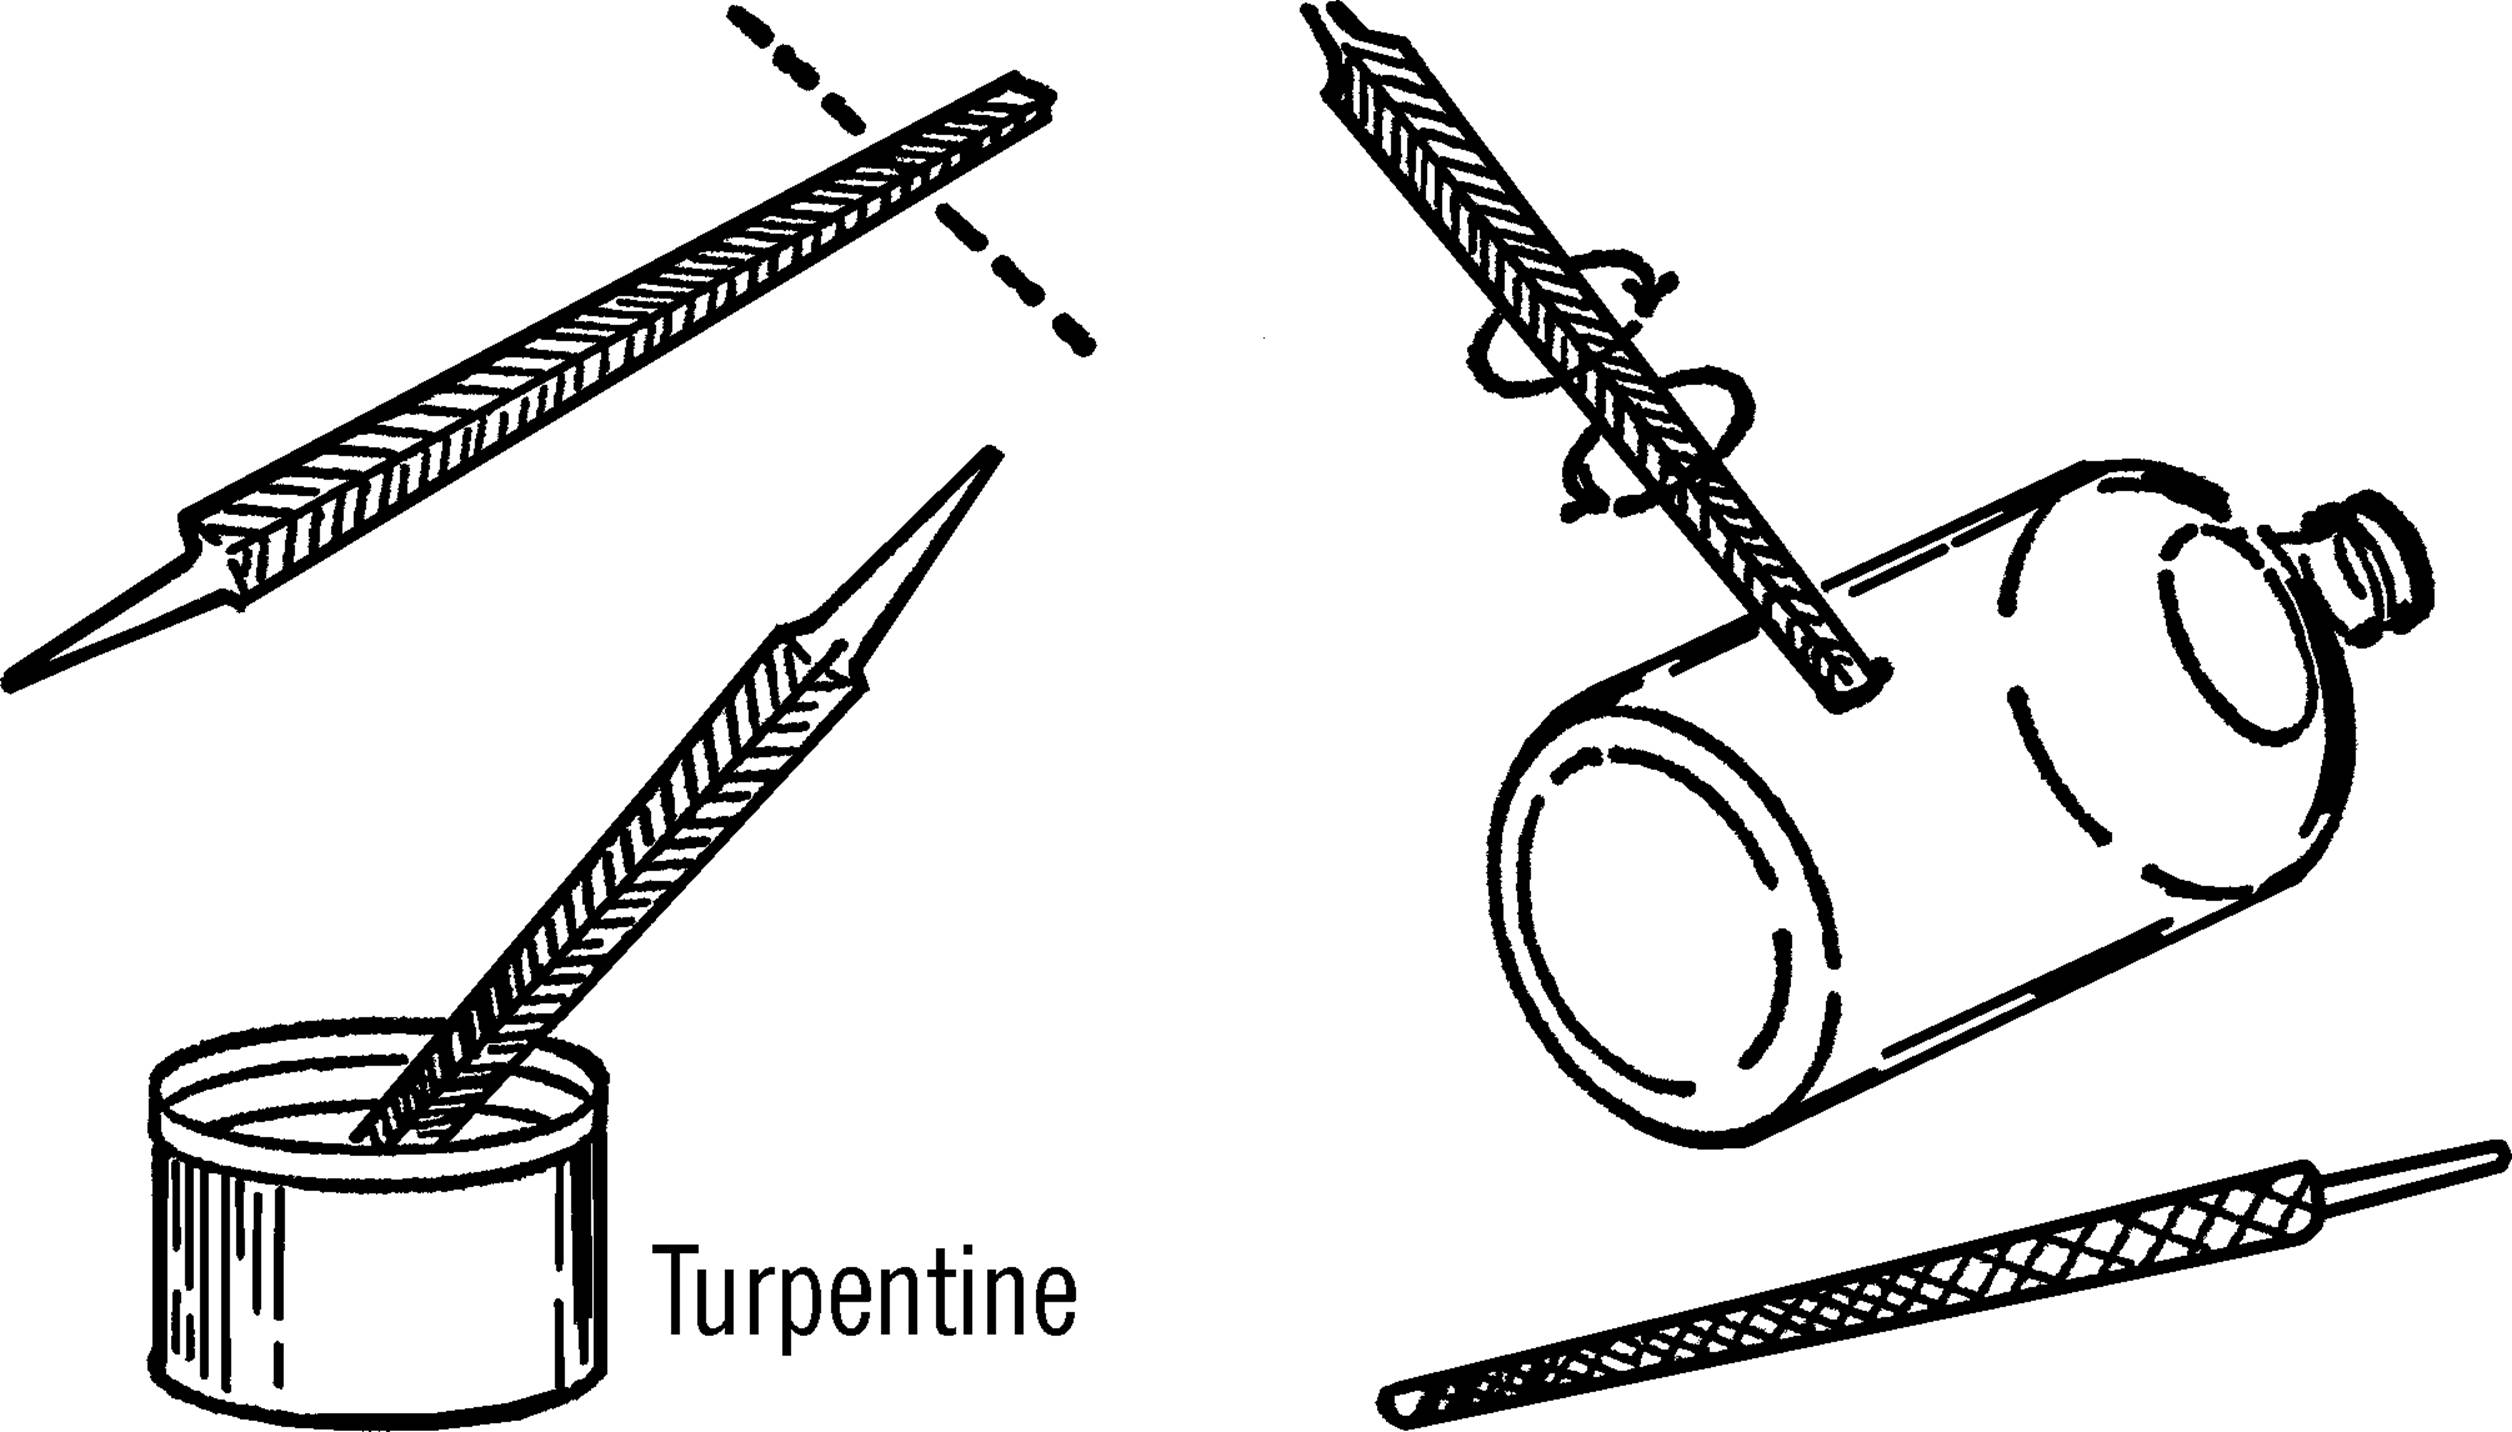
Drilling Glass
Purpose: Many pieces of equipment may require the drilling of a hole in a glass bottle. Uses include cloud chambers, wash bottles, electrical wires in bottles, etc.
Materials: Triangular file, turpentine, bottle, and rat-tail file.
What to Do: Break off the tip end of a file (about one inch). The jagged end of the file serves as a cutting tool. One of the triangular points is placed against the glass, and the tool is rotated as pressure is applied with the thumb. After starting the hole, dip the point of the file in turpentine. Then place the tip of the file in the hole and work in a circular motion. Keep dipping the cutting edge of the file in turpentine. The turpentine turns the glass powder into a cutting paste and also cools the glass. If the file stops cutting, use the second edge of the triangular file. When the point comes through the glass, use a thin rat-tail (round) file to increase the size of the hole to the desired size. Be sure to dip the file in turpentine before using.
Operation of Equipment: Seal the hole with sealing wax if you are just going to insert an electrical wire. If you want to insert glass tubing, slip rubber tubing over the glass tubing and force the rubber tubing into the hole. A vacuum cement can be used if the container is to be used under a vacuum.
Can You Work Like a Scientist?
Can you make a gravity wash bottle from a gallon jug?
Modern Safety Practice
1. Read Note 2 in Appendix E about safety when working with glass.
2. When using turpentine, avoid breathing its fumes, getting it on your skin, or getting it in your eyes. Work in an area with good ventilation. Wear eye protection (also because you are working with glass). Nitrile rubber gloves can protect your skin from turpentine.
Litmus Paper
Purpose: Litmus paper is used to tell if a liquid is an acid, base, or salt.
Materials: Red flower petals (for example, red rose, hydrangea, or hibiscus petals), purple cabbage leaves, water, paper,36 and a pan.
What to Do: In order to make a red litmus liquid, boil flower petals in water until most of the water evaporates and the color is very strong. Dip pieces of paper into the liquid and dry. These colored strips of paper serve as red litmus paper.37
Blue litmus paper is made in the same way except you use purple cabbage leaves instead of flower petals. The dry colored paper is called an indicator.38
Can You Work Like a Scientist?
1. Does vinegar turn blue litmus paper red or red litmus paper blue? Vinegar is an acid.
2. What effect does a base like baking soda water have on litmus paper?
Sensitive Gram Scale
Purpose: A gram scale is an accurate weighing device. This one can measure weight changes as small as 1/100 of a gram.
Materials: Yardstick (free39 at many lumber yards and hardware stores), two glasses or jars, broom straw, small piece of tin40 or cardboard for slider, three thumbtacks, a finishing nail, and two pieces of paper 4” square (you may use two cone-shaped paper cups instead).
What to Do: Drive the nail through the middle of the yardstick. The hole should be about one-fourth of an inch from the top edge as shown. Make two paper cones and tack one at each end of the yardstick. Place the two glasses about one inch apart and balance the yardstick by letting the nail ends rest on the edge of the glasses. Glue or Scotch tape the straw perpendicular to the ruler, as shown. Now balance the scale by using the third tack. Move the tack along the lighter end until you find the place the scale just balances. Cut a narrow piece of tin or cardboard and bend it so it slips over the yardstick and will slide easily. Slide this to the middle of the yardstick and balance again with the tack.
Operation of Equipment: Place the object to be weighed in the paper cone at the opposite end of the yardstick from the slider. In order to be exact, weigh one square inch of newspaper first. Fold the paper and drop it in the cone. One square inch of newspaper weighs .033 of a gram. Move your slider along the other end of the yardstick until the yardstick balances. You can tell because your indicator, the broom straw, will be straight up and down. Now mark on the yardstick the spot of the slider as .033 of a gram. Take three square inches of paper and do the same. This time mark the spot for 1/10 of a gram. Continue to do this until the slide is all the way out to the end of the yardstick. To weigh objects heavier than this, use a standard weight in the cone on the slider side. Place the unknown object in the other cone. Add standard weights until the scale almost balances. Then move the slide until it exactly balances. To find the total weight, add your standard weights together, plus the mark shown by the slide. Some objects are suggested for use as standard weights. Using these, and remembering that each square inch of newspaper weighs .033 of a gram, you should be able to make your own set.
Metric Weights
Purpose: A set of weights will enable you to weigh accurately objects of almost any weight on your balance or beam scale.
Materials: Newspaper, pins, paper clips, dime, penny, quarter, half dollar, and a nickel. Aluminum foil paper is also helpful.
What to Do: A square inch of newspaper weighs about .033 of a gram. A common pin made of steel weighs .075 of a gram. From these, see if you can find the weights of the other objects listed by using your gram balance scale. A piece of newspaper ten inches by ten inches weighs 3.3 grams. By trimming your newspaper, you can make any desired weight. Fold your paper weight when you place it in the paper cone.
List of Known Weights: In order that you may check for accuracy, the following are the weights of objects as measured on a druggist’s delicate gram scale:41
|
Newspaper (1 sq. inch) |
0.033 of a gram |
|
Common pin |
0.075 g |
|
Paper clip |
0.75 or ¾ of a gram |
|
Dime |
2.268 g |
|
Penny |
2.500 g |
|
Nickel |
5.000 g |
|
Quarter |
5.670 g |
|
Half Dollar |
11.340 g |
|
Dollar (gold tone) |
8.1 g |
From this list you can make your own weights by balancing the above against rocks or aluminum foil folded into a ball.
Can You Work Like a Scientist?
1. Do Canadian and American nickels weigh the same? Are they made of the same material? Test with a magnet. Remember, a magnet attracts nickel.
2. Do rocks of the same size have the same weight?
3. What happens if you place the nail through the yardstick on the nine-inch mark? How much more weight must be placed in the cup to balance the scale? If the cup is too small, could you hang things from a tack if you balanced it with another tack on the other end of the scale?
4. Do things weigh as much in water as in air? Hang an object in the water from string and tack attached to the end of the yardstick.
5. Why do you use a cone to place the weights in-why not just a flat cup? Why do you just fasten the cone from one point with the tack?
6. Do all liquids weigh the same? Could you take an equal amount of each and weigh them? Could you compare how many times heavier one is than another? What effect has the weight on how high a piece of wood or cork floats in the liquid?
7. Can you weigh the amount of air in a balloon? Does air really have weight?
8. If you could fill a balloon with helium or hydrogen gas, could you measure the upward pull with your gram scale?
9. How much water will a sponge hold? Can you weigh this? Can you weigh moist and dry bread? What’s the difference?
10.Can you determine the amount and percentage of water in different vegetables and fruits?
Soda Straw Chemical Balance
Purpose: The chemical balance is used to weigh out accurately small amounts of chemicals for experimental purposes.
Materials: Soda straw, screw, common pin, two glass slides, block of wood as shown, and material for the scale stand as shown.
What to Do: Make the balance stand by fastening the glass microscope slides to a block of wood with a rubber band. Stick the pin through the straw. Screw the wood screw into the end of the straw. Attach a pin hook and a paper container to hold the chemicals being weighed.
Balance the straw and pin on the microscope slides. Move the pin in the straw until the straw almost balances. Then your fine adjustment is made by screwing the wood screw in or out of the end of the straw.
Make a stand to hold a scale. Mark the scale off in grams by using sample known weights in your paper container. A nickel weighs five grams. Cut a piece of tin so that it will balance a nickel on a balance scale. Then cut the strip of tin as shown to make sample weights.
Operation of Equipment: Balance the straw so that when the container is empty, the tip of the straw points to zero on your scale. The one-gram mark on the scale is the place where the tip of the straw points when a one-gram weight is added to the paper container. Make the rest of your scale in a similar manner.
Can You Work Like a Scientist?
See the end of the chapter for suggested experiments.
Bridge for Pneumatic Trough
Purpose: A pneumatic trough is used to collect gases generated in a chemistry experiment. The bridge is used to support the collecting bottle.
Materials: Plastic water tray or gallon jug aquarium (see “Aquarium”), coffee can, tin snips, baby bottle, and rubber tubing.
What to Do: Cut the bottom off the coffee can with a can opener. Cut the side of the can and flatten the tin into a rectangular sheet as shown. Cut a strip about 2½” wide and bend it into the shape shown in the illustration. Drill or punch a hole in the center of the “bridge.” Insert the end of the rubber tubing in the hole. Set the “bridge” into the water tray or gallon jug aquarium jar as shown. Fill the container until the “bridge” is covered with water.
Operation of Equipment: Fill the collecting bottle with water. Slide a piece of cardboard over the top of the bottle and then turn the bottle upside down and lower it over the hole in the bridge. When the opening of the bottle is just under the surface of the water, remove the cardboard. The water should stay in the baby bottle container.
Connect the rubber tubing to any gas generating bottle. As the gas is formed, it travels through the rubber tubing and into the baby bottle. The gas pushes the water out of the baby bottle. After all the water has been pushed out of the collecting bottle, carefully slip a cardboard under the opening and remove the bottle from the pneumatic trough (water tray).
Modern Safety Practice
Use care with the tin snips. The edges on the cut tin can be very sharp. File or sand them down.
Can You Work Like a Scientist?
Fill a baby bottle one-fourth full of hydrogen peroxide (3 % solution). Add a pinch of manganese dioxide (the black powder from the inside of a flashlight battery42). Insert the stopper as shown and collect the gas in the trough. Is the gas oxygen or hydrogen? Can you test the gas with a glowing splint?43
Thistle Tube
Purpose: The thistle tube has many uses. One use is to pour liquids into glass tubing, such as is shown in the hydrogen generator below.
Materials: Plastic funnel, glass tubing that fits tightly into bottom opening of funnel. (The 3” plastic funnel exactly fits over 6 mm glass tubing.)
What to Do: Slip the opening of the plastic funnel over the glass tubing as shown. You can seal the tubing in the hole by melting wax around the glass inside the funnel, but this usually isn’t necessary.
Can You Work Like a Scientist?
1. Hold your finger over the end of the glass tubing. Fill the funnel with water. Does the water come out when you remove your finger?
2. Place a cork in a large jar of water. Place the funnel over the cork. Hold your finger over the end of the glass tubing. Push the funnel down over the cork. Where does the cork float?
3. Could you make a thistle tube by cutting off the top of a bottle, and using a rubber stopper and glass tubing?
Hydrogen Generator
Purpose: This generator produces gases by means of acids working on bits of metal. The gas can be collected in bottles or in balloons as shown.
Materials: Flask (light bulb with large opening or baby bottle with #6½ stopper), thistle tube (as above), two-hole rubber stopper, short piece of rubber tubing, and a clothespin or metal clip for a pinchcock.
What to Do: Set up your generator as shown. The thistle tube can be supported by your curtain rod ring stand. The metal case around old flashlight batteries furnishes a good source of zinc.44 Most acids will work on the zinc metal. Acids such as sulfuric can be purchased from the drugstore.45 When you need to dilute (thin) the acid, pour the acid slowly into the water. Never pour water into acid. The acid will spatter. Wash your hands immediately if you get acid on them.
Operation of Equipment: Drip the acid slowly on the zinc or aluminum foil. Control the amount of gas given off by pinching the rubber tube with a clothespin.
Modern Safety Practice
1. Always wear safety glasses while working with chemicals such as acids. Ideally, also wear nitrile rubber gloves to protect your skin from contact with the acid. Read Note 17 in Appendix E for additional discussion about safety around chemicals.
2. Hydrogen is a flammable gas that can potentially cause explosions. Keep away from open flames and ensure that you have excellent ventilation.
Oxygen Generator
Purpose: This is a simple way to produce oxygen for use in experiments to discover the properties of this gas.
Materials: Hydrogen peroxide (called peroxide) from dime or drug store, manganese dioxide, and a jar with a lid. The manganese dioxide may be gotten from an old flashlight battery. The black paste is part manganese dioxide.
What to Do: Cut open a flashlight battery.46 Add about a spoonful of the black paste to about an inch of peroxide in the jar. Tighten the lid and wait about fifteen minutes.
Operation of Equipment: Remove the lid and place a glowing splint or a burning cigarette into the bottle. The cigarette can be held by a wire.47
Can You Work Like a Scientist?
1. Does the oxygen come from the manganese dioxide or the peroxide?
2. What happens to the splint when you place it in the bottle?
3. Do you get more gas if you shake the bottle?
4. Why do you keep the lid on the bottle?
5. Ask your mother what hydrogen peroxide is used for.48 Try dripping hydrogen peroxide on colored paper.
Modern Safety Practice
Note 17 in Appendix E discusses safety practice around chemicals. Hydrogen is a flammable gas that can potentially cause explosions. As you will be working with flame (possibly, a small explosion!), also read through the Note 3 in Appendix E about fire safety.
Chemical Source of Hydrogen
Purpose: A quick source of hydrogen for experiments.
Materials: Bits of aluminum foil or zinc, a few drops of sulfuric acid (from a storage battery), test tube, and a cork.
What to Do: Draw a little dilute acid out of the storage battery in your car49 with an eye dropper. You should have about an inch of liquid in a test tube. Add a few small pieces of zinc and place the cork in the test tube. Wait about five minutes and then remove the cork and quickly place a lighted match near the end of the tube.
Wrap a handkerchief or towel around the test tube for safety. Don’t point the test tube at anyone.
Modern Safety Practice
Once again, working with chemicals, flames, and hydrogen, read through Note 3 and Note 17 of Appendix E for basic safety practice.
Can You Work Like a Scientist?
1. What effect would heat have on the production of the gas? Watch out for the cork and some liquid flying out of the test tube. Remember, the liquid is an acid.
2. Try the same experiments with other metals and acids. How about vinegar?
Safety Gas Generator
Purpose: This generator is used to generate various gases. Since the acid is kept in one bottle and the metal strips in a second bottle, the action can be controlled by adding small amounts of acid to the metal as desired.
Materials: Two short pieces of rubber tubing, glass tubing as shown in “Bending Glass Tubing”, two rubber stoppers (two-hole, size #6½), and two baby bottles.50
What to Do: Bend the short pieces of glass tubing as shown in the drawing. Use the double wick alcohol burner and follow the directions for bending glass tubing (see “Bending Glass Tubing”). Rub soap on the outside of the pieces of glass tubing before you try to insert the glass tubing into the rubber stopper.
Attach the short pieces of rubber hose as shown. See the directions for making a clamp out of a clothespin (“Adjustable Clamp”).
Operation of Equipment: Place small pieces of gravel in the bottom of the reaction bottle (B). Add strips of metal (zinc, aluminum foil) to this bottle. Be sure to add enough of the metal strips. You cannot add more metal during the reaction.
Fill the acid bottle (A) about half full of an equal mixture of water and acid (hydrochloric or sulfuric). In making the acid mixture, add the acid slowly to the water. Do not pour water into acid.51
Connect up the reaction bottle with a collecting bottle in a water tray. Blow into tube #1. The air forces the acid up the second glass tube and into bottle (B). Gas is formed and goes up and out tube #3. Be sure to clamp tube #2 as soon as you add acid to the metal strips. This keeps the gas from going back into bottle (A).
Add small amounts of acid at a time so you can control the reaction. When you have finished collecting all the gas you wish, place the clamp on rubber tube #3. The gas that builds up in bottle (B) will force the excess acid back into the acid in bottle (A). When the acid no longer touches the metal strips, the reaction stops.
Can You Work Like a Scientist?
Can you use the gas generator to make carbon dioxide gas? Put baking soda in the reaction bottle (B) and vinegar and water in the acid bottle (A).
Modern Safety Practice
Read through and understand guidelines for working with glass, as discussed in “Bending Glass Tubing”, and for working with chemicals, as discussed in Note 17 of Appendix E.
X Connector
Purpose: The X connector is used in experiments requiring two connections to two outlets.
Materials: Cork, short pieces of glass tubing, end of a file or a cork borer.
What to Do: Bore holes through the cork as shown. Insert four short pieces of glass tubing.
T Tube
Purpose: The T tube or T connector can be used in the chest cavity and the water faucet vacuum pump, plus many chemistry experiments requiring two lines to join in one outlet.
Materials: Alcohol burner, two pieces of glass tubing.
What to Do: Seal one end of the glass tubing. Heat the middle of the tubing and when hot, blow on the other end and pop a hole in the tubing. Heat around both this hole and the end of the glass tubing that will be the side arm. Bring these two heated spots together and join firmly. Seal the other end as shown, and then blow gently into the one open end to smooth the joint. Heat the joint and blow gently until the joint is strong and smooth. Cut off the ends that are sealed.
A second way to make a T tube is to drill only one side hole in the cork as mentioned above.
Modern Safety Practice
Follow the safety guidance given previously for working with cold glass, hot glass, and open flames, as given in “Bending Glass Tubing”, as well as Note 2, Note 3, and Note 4 in Appendix E.
Adjustable Clamp
Purpose: This clamp is used to seal rubber tubing completely when working with high pressure.
Materials: Clothespin, small bolt, and two nuts.52
What to Do: Drill two small holes in the legs of the clothespin. Insert the bolt. Place the nuts on as shown. In order to tighten the pinchcock, turn the adjustable nut to force the legs farther apart.
Crystal Coal Garden
Purpose: Nearly all solids are made from crystals. By growing and experimenting with crystals you will get a basic understanding of the world of solids.
Materials: Several pieces of coal or charcoal briquettes, ¼ cup table salt,53 ¼ cup water, ¼ cup laundry bluing, and a tablespoon of ammonia.
What to Do: Place the coal or charcoal in a bowl. Mix the water, ammonia, and table salt into a solution and then pour this solution over the coal or charcoal. You might try putting different coloring materials at various places on top of the coal. Colored ink, food coloring, stains, and Mercurochrome54 are among the coloring liquids you might use. Place the bowl where it will remain undisturbed.
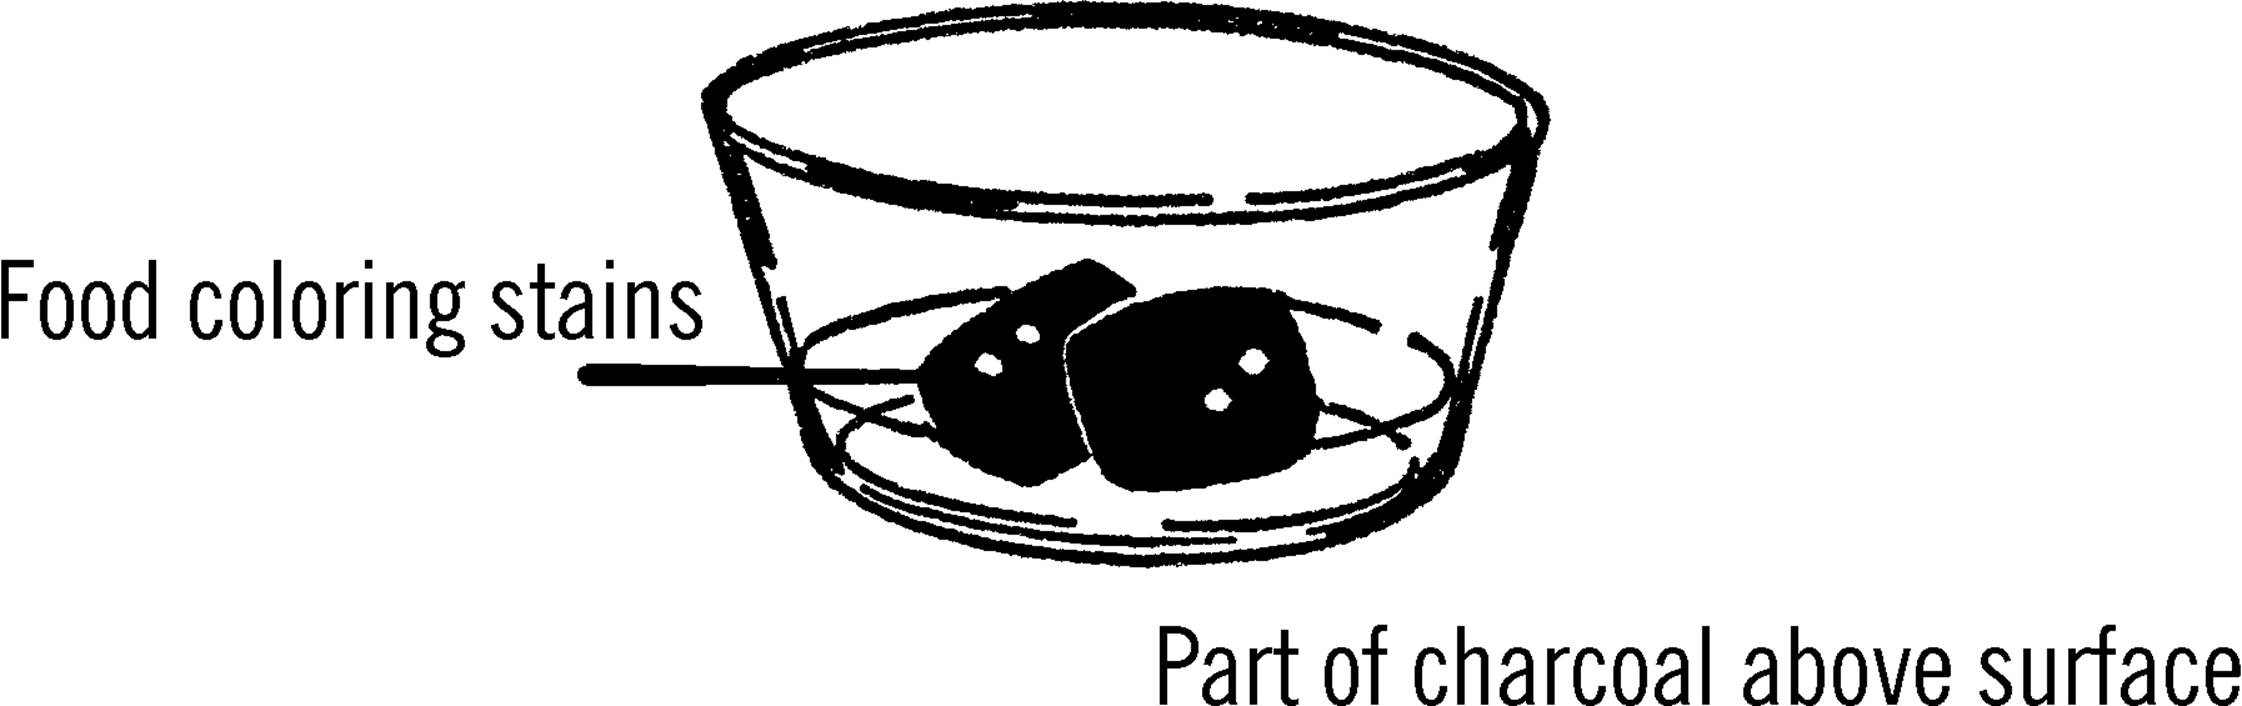
Operation of Equipment: Look at a lump of coal or a briquette with a magnifying glass. Do you notice the many small holes in the surface of the coal? Water is drawn into these holes, and along with the water is the salt you mix in the solution. The water is constantly evaporating, and as it evaporates, salt left behind by the coal or briquette crystallizes on something solid, such as the lump or the side of the bowl. These crystals are not solid, but contain many tiny spaces in them. The water is drawn up through these crystals. Again the water evaporates, depositing new crystals on the old. In this manner the crystals seem to grow and soon fill the entire dish. Your coal garden is made up of salts of sodium chloride (table salt), ammonia, and bluing.
Modern Safety Practice
Read Note 17 in Appendix E about working with chemicals.
Can You Work Like a Scientist?
1. What effect does the temperature of the room have on the rate of growth? Try growing a garden in the refrigerator.
2. What effect does the humidity of the air have on the rate of growth of the crystals? Use your wet and dry bulb thermometer to determine the relative humidity.
3. If the garden is made up of salts of different materials, could you experiment with salts from other materials instead of those you just used in your coal garden?
4. Why does your crystal garden collapse if you attempt to move it?
5. Why should part of your lump of coal or charcoal be above the water? Try a coal garden in which the lump is completely covered.
6. Observe some of the crystals under the microscope or microprojector. Do you notice any particular shape to the salt crystals?
Growing Crystal Candy
Materials: Sugar, water, baby bottle, pencil, string, and paper clips.
What to Do: Pour two cups of water into a small kettle.55 Add as much sugar as will dissolve in the water. Heat the water. As it becomes warmer, you should find that you can dissolve more and more sugar into the water. When the water is boiling, you should be able to dissolve three to three and a half cups of sugar in the two cups of water. Let the solution cool slowly. While it cools, hang a string down into the baby bottle as shown. Use a paper clip for a weight and suspend the string from a toothpick or pencil. Be sure the string and paper clip are very clean.
When the sugar solution has cooled, pour it slowly into the baby bottle. Crystals should start to form on the string in a few hours. If you don’t disturb the bottle, you may get sugar crystals up to one inch on a side.
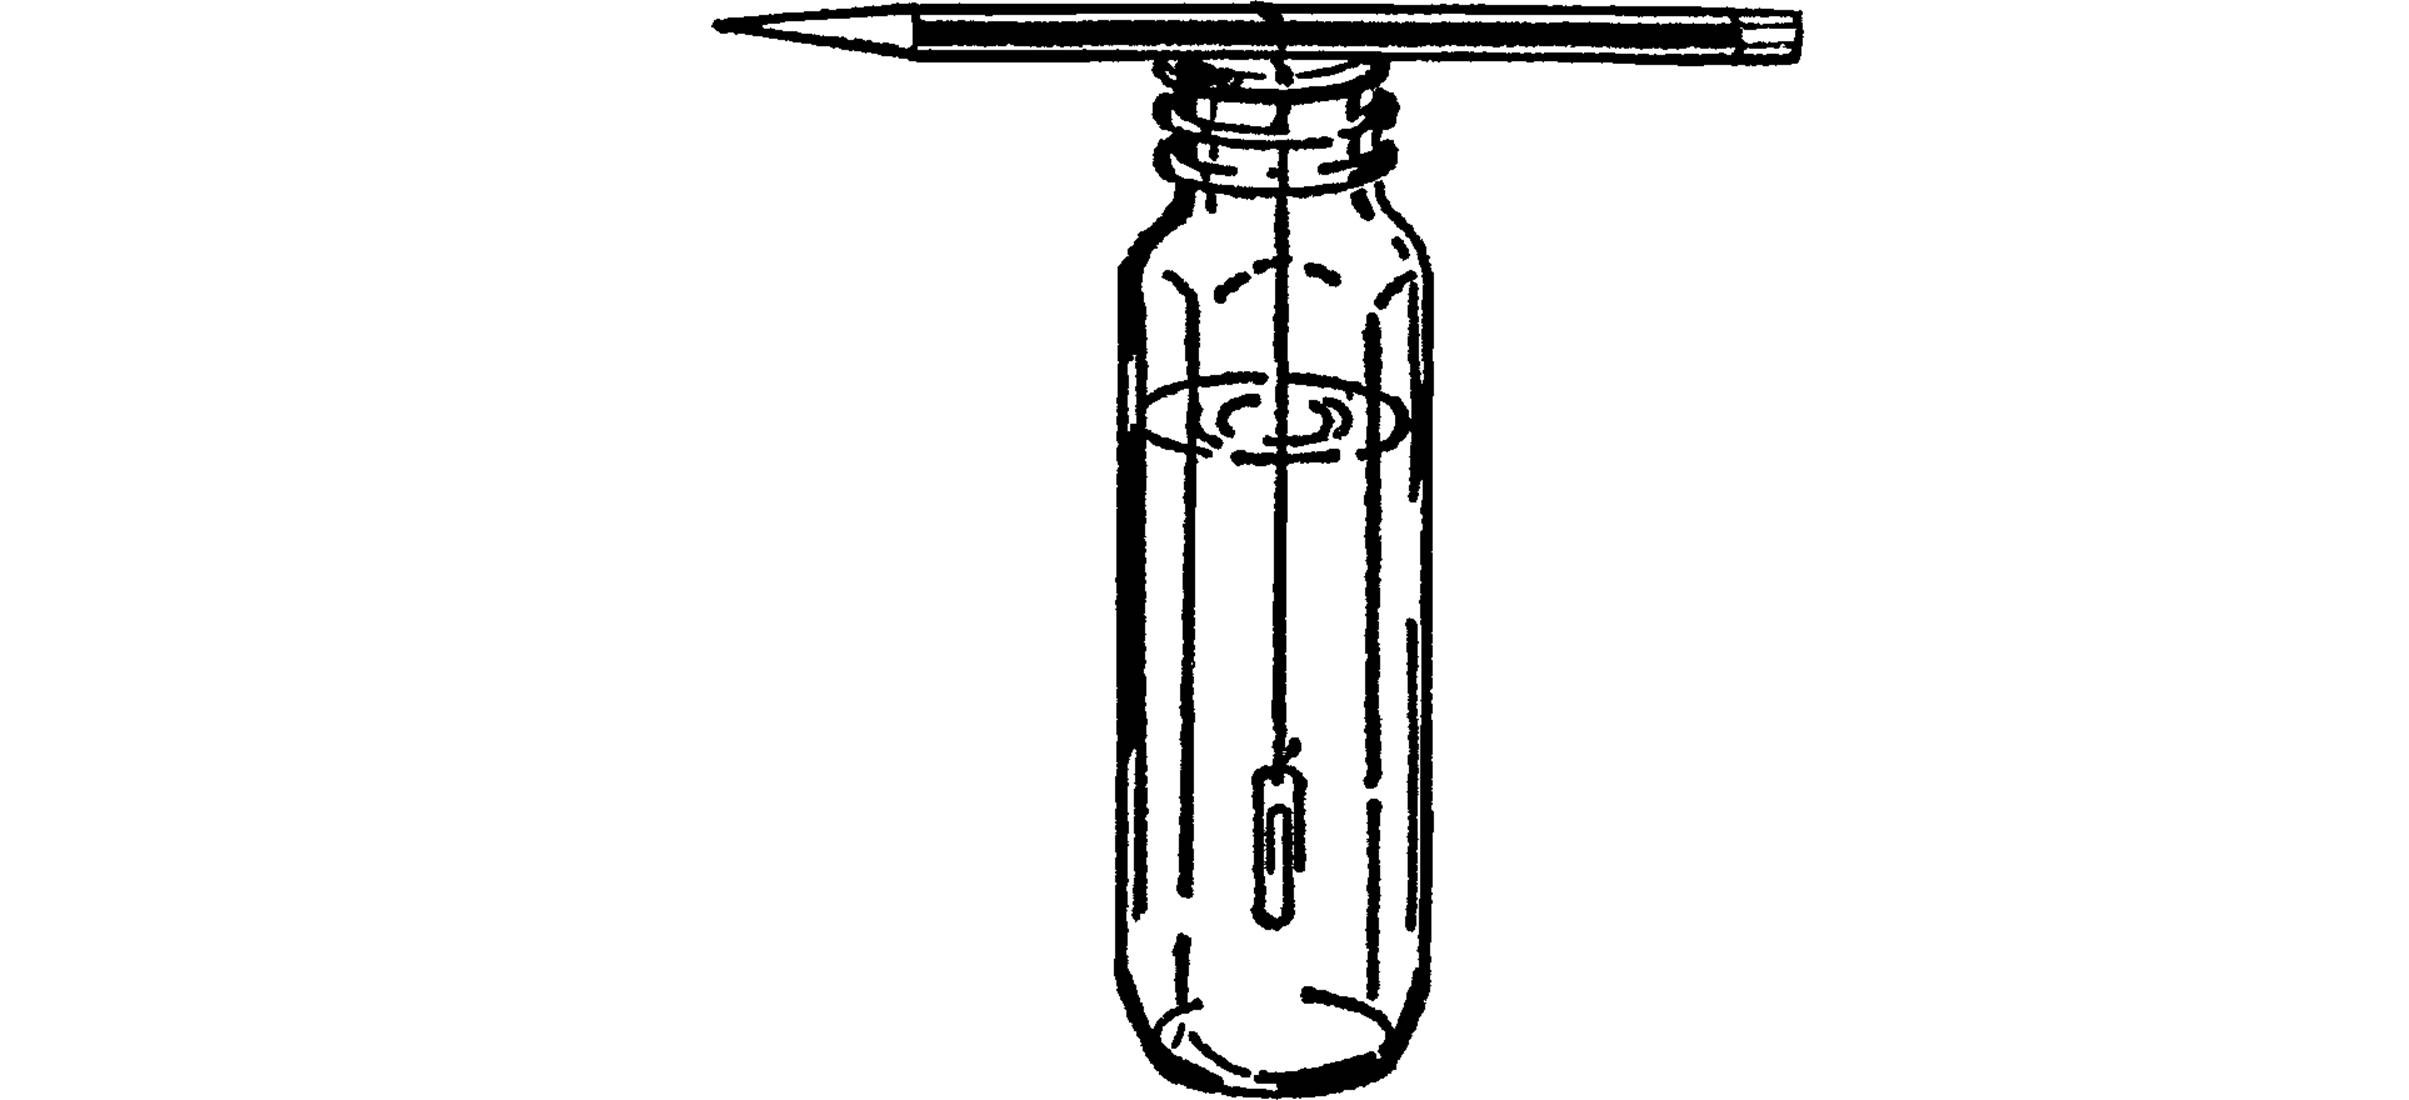
Modern Safety Practice
Note 17 in Appendix E talks about working with chemicals, and (among other things) reminds you to keep food out of your chemical work area, and to keep chemicals out of food prep areas.
Thus, you need to make a choice. To make edible sugar crystal rock candy, do not take it to your chemical work area, but instead perform all of these steps in your kitchen, treating this as a cooking project. To make sugar crystals to study, take the sugar to your lab and treat it as you would any other potentially hazardous chemical.
Can You Work Like a Scientist?
1. Why does hot water dissolve more sugar than cold water? Can you keep a graph of the temperature of the water and compare this with the amount of sugar that will dissolve at this temperature?
2. When you dissolve sugar in water, does the water level rise? If you dissolve two cups of sugar into two cups of water, do you get four cups of solution?
3. Why do the crystals form on the string?
4. What effect does the rate of evaporation have on the formation of the crystals? Cover the jar completely so that no evaporation takes place. Will the crystals still form? You can slow down the evaporation rate by covering the jar with a damp cloth.
5. Can you grow salt crystals the same way you grew sugar crystals?
6. Does the temperature have to be constant in order to grow crystals? Try growing crystals in a temperature that varies or changes quite often.
7. Can you grow both sugar and salt crystals together on the same string?
8. Is water really a solution? Heat water and notice bubbles rising to the surface of the water. Where do these gas bubbles come from?
9. Will sugar dissolve in alcohol? Can you grow sugar crystals in alcohol?56
10.Will water dissolve in alcohol? Will alcohol dissolve in water? What effect has temperature on the amount of one liquid that will dissolve in another liquid?
11.Solubility is the amount of a material that will dissolve in a liquid at a given temperature. Can you plot a curve on a graph for the solubility of various chemicals as the temperature increases from freezing to boiling? Is the solubility curve the same for all chemicals?
Growing Gem Crystals
There are two general ways to grow large single crystals–the sealed jar method and the evaporation method. In both methods, a seed crystal is suspended in a jar containing a solution of a particular salt.
The Sealed Jar Method
The first way to grow crystals is the sealed jar method. Again you hang a seed crystal in the jar by a thread. The solution is made supersaturated by heating and dissolving as much salt material as possible in the liquid. The seed crystal is then placed in this supersaturated solution, and the jar is sealed to keep the water from evaporating. The excess salt will slowly crystallize on the seed and cause the seed to grow. This method is usually the quicker way to grow various crystals.
The growth of large crystals requires a constant temperature and a place where the crystals will not be disturbed.
To prepare a supersaturated solution, heat the liquid and dissolve all of a particular salt possible. Pour the solution into a mason jar. As the solution cools, crystals are deposited at the bottom of the jar. The crystals at the bottom take the solid out of the solution and leave the surrounding liquid less dense. This less dense solution rises and is replaced by the part of the solution containing more solids. These solids are again deposited as the solution seems to stir itself by this action of less dense liquid rising and being replaced by denser material.
It is wise to seed the supersaturated solution after it cools to start this forming of excess crystals on the bottom of the mason jar. You can seed the solution by placing a pinch of the salt used in the jar. The jar should then be sealed, shaken well, and then allowed to stand at the temperature at which you wish to grow the crystal, at least for two days. You should shake the jar twice each day in order for the solution to be well mixed.
When crystals stop being deposited in the bottom of the jar, you know that the solution has reached its saturation point and contains all the crystal it normally can at that particular temperature. Pour off the clear solution into another mason jar and seal the jar. Try to avoid getting any of the crystallized salt from the bottom of the jar into this clear solution. Remove the deposited crystals from the bottom of the jar, dry, and place them back into your supply bottle. The mason jar should then be washed out and dried.
Preparing a Seed Crystal: Pour about an ounce of your saturated solution into a small container and place it where it will be undisturbed. As the liquid slowly evaporates, the solution becomes supersaturated, and crystals form on the bottom of the container. If your solution does not begin depositing crystals, you can seed your solution by adding a small amount of the crystal salt you are using. Examine your container several times a day. When the crystals have grown large enough for easy handling but not so large that they touch each other and interfere with normal growth, remove the best crystals with tweezers. Place the seed crystals on a piece of paper toweling and allow them to dry.
Cut out a cardboard disc just large enough to fit inside the lid of the jar. Punch a hole in the cardboard and fasten the thread to the cardboard. Make a slip knot at the other end of the thread and carefully slip the knot over the largest seed crystal you have grown. The thread should be just long enough to suspend the seed crystal about an inch from the bottom of the jar. You are now ready to grow your “gem crystals.”
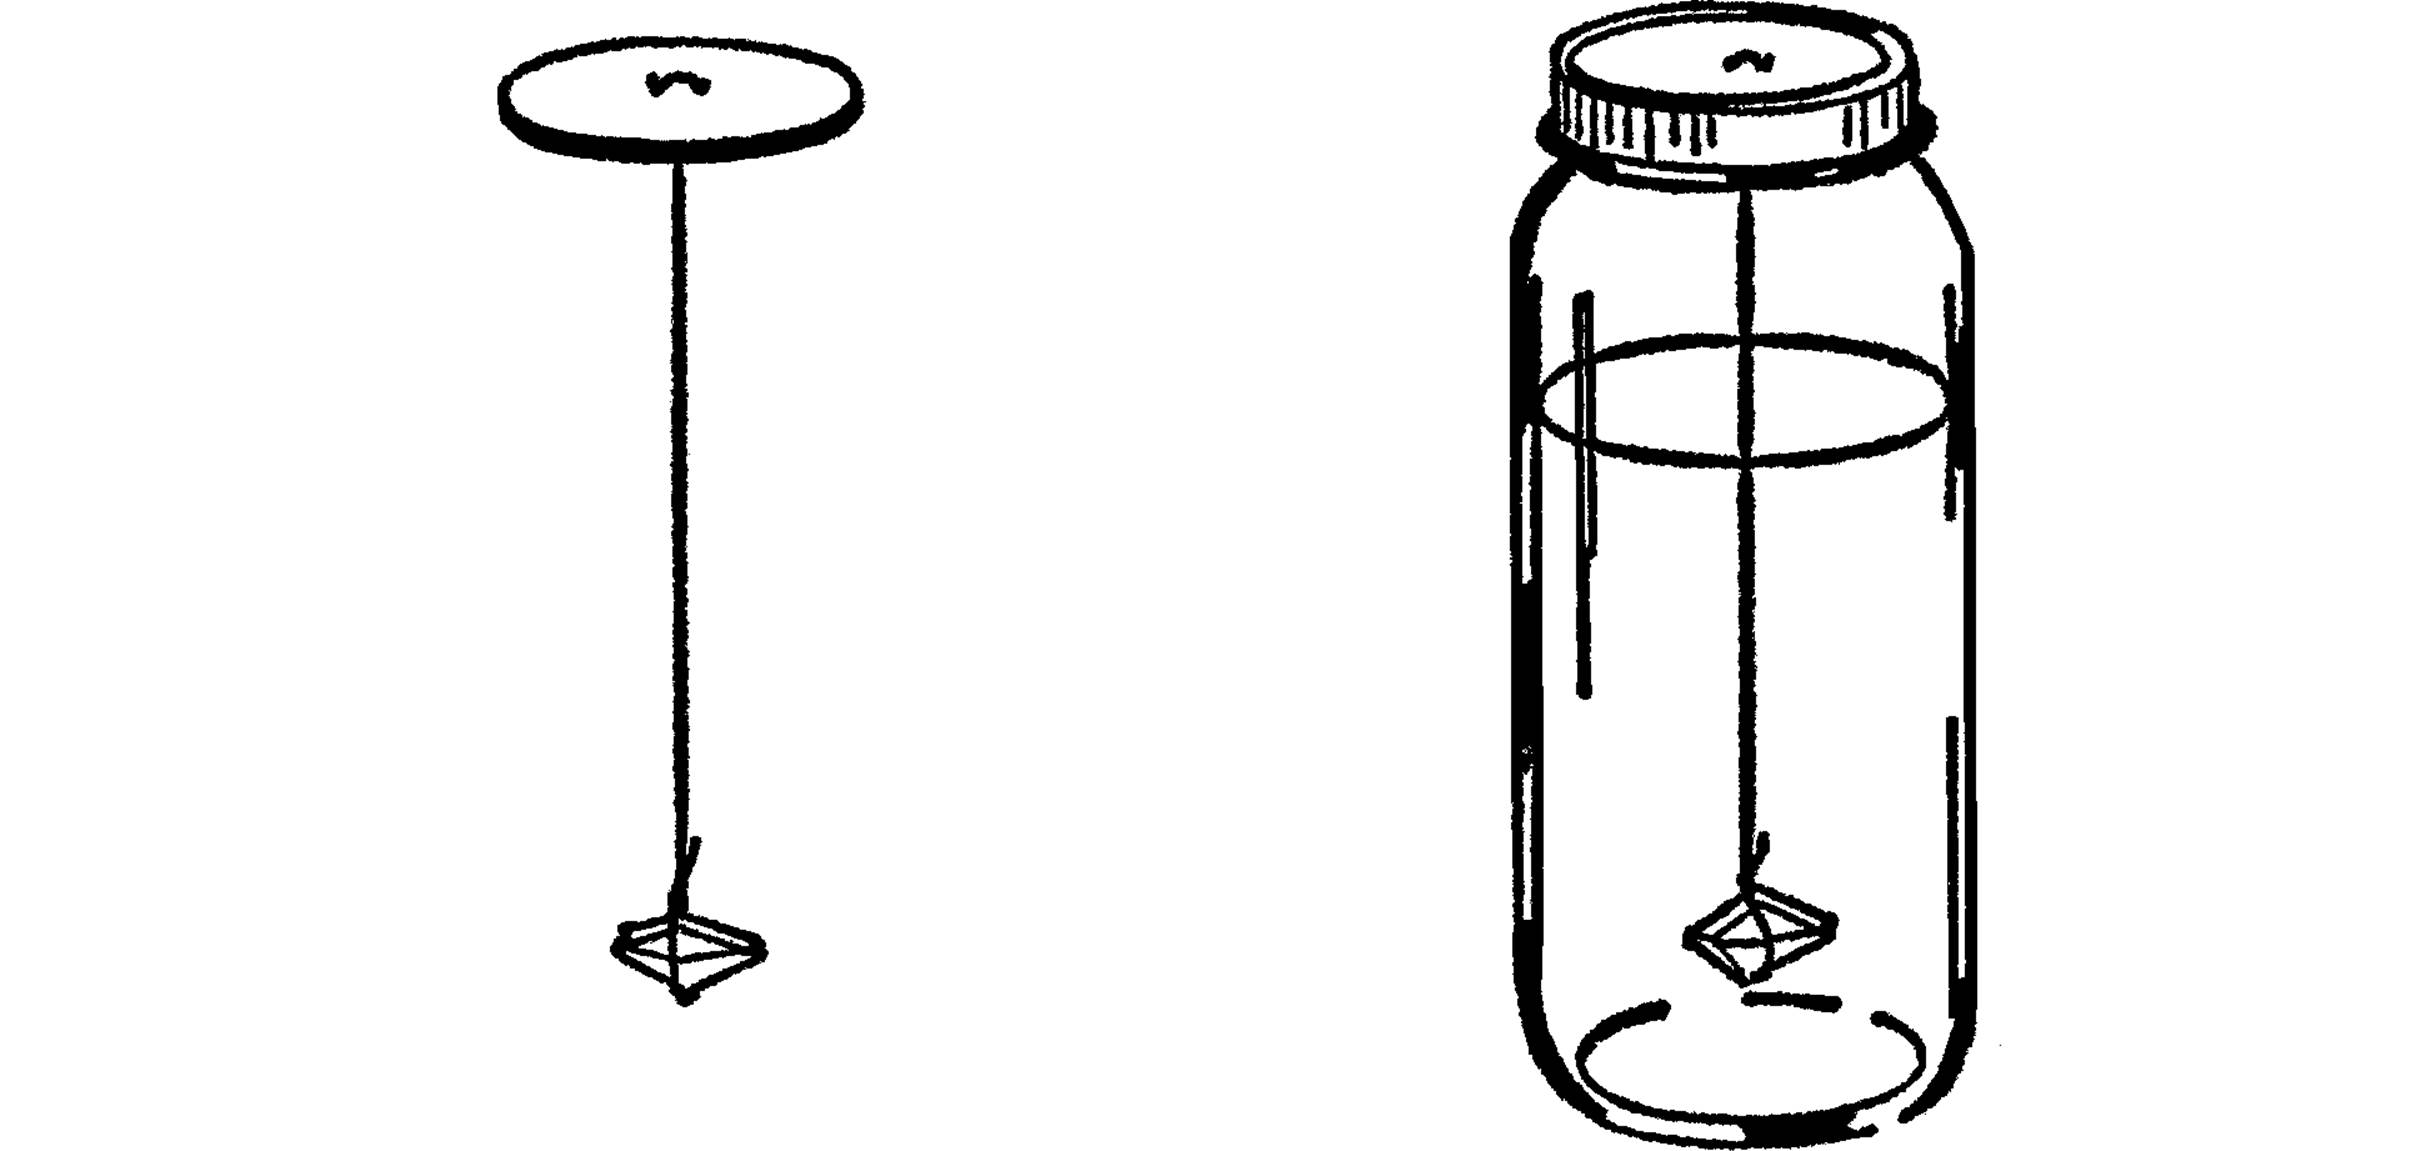
Preparing the Growing Solution: The growing solution is made up of the saturated solution you have saved in the jar and some extra salt crystals you have added to the saturated solution. In each of the formulas given, the A part is the proportion or ratio necessary to make the original supersaturated solution. This is, of course, cooled and poured off as a saturated solution.
The B part of the formula is the amount of salt necessary to add to the saturated solution in order to make the growing solution. A sample formula is given below:
1. To form the supersaturated solution for Rochelle salt, dissolve in the ratio of 130 grams of salt to 100 cc of water.
2. In order to make the growing solution, add 9 grams of Rochelle salt to each original 100 cc of water you used.
For each 100 cc of saturated solution you have saved in the jar, you will use 9 grams of Rochelle salt. If you used 500 cc of water, you would use 45 grams of Rochelle salt to make the growing solution. You add this salt to the top of a double boiler and then pour the saturated solution over it and allow the solution to heat gently until all the crystals are dissolved. This growing solution is then poured into a clean mason jar, sealed, and allowed to cool.
When this growing solution is about 5 °F above the room temperature, suspend the seed crystal with a thread attached to a cardboard disc. The jar should then be sealed by screwing the lid over the cardboard disc.
The seed crystal will first start to dissolve because of the warmer temperature. As the temperature cools, the solution becomes supersaturated, and the crystal grows. You can observe this by watching the currents in the water. If the current is descending, the crystal is dissolving. If the current is rising, salt crystals are being deposited on the seed crystal, and the crystal is growing.
Harvesting Your Crystal Garden: Most crystals will be “grown” in about a week. Remove the crystal and dry it with a soft cloth. Don’t handle the crystal directly as the perspiration from your skin will dissolve some of the crystal. Store the crystal by wrapping it in a cloth and placing it in a sealed jar.
You can use the growing solution over again to grow another crystal. Just add salt equal to the weight of the crystal you have just grown plus the weight of the crystals collected on the bottom of the jar, warm and stir and you have a new growing solution.
Evaporation Method
Purpose: Large crystals can be grown easily by the evaporation method. The crystals are usually not as perfectly formed as in the sealed jar method, but the greater variety of possible crystals and the ease of setting up a crystal-growing tank make this method a favorite for beginners.
Materials: Saucepan to dissolve the chemical, baby bottle, clean string, paper clip, and a piece of cardboard. Any of the materials listed in the next section can be used for crystal growing. This experiment will describe the use of borax in growing borax crystals.
What to Do: Pour one-half cup of water into a baby bottle. Set the bottle into a saucepan containing water. Heat the pan until the water boils. Slowly add borax to the baby bottle until the water will not dissolve any more of the borax. The heated liquid will hold more of the chemical in solution at the boiling point of water than it will at normal room temperatures. We say the liquid is supersaturated.
Tie a paper clip or button on the end of a piece of string and hang it in the baby bottle from a cardboard disc. Several holes should be punched in the disc. Cover the holes in the cardboard with Scotch tape. Do not disturb the crystals by bumping or moving the bottle, which must remain perfectly still in a place where the temperature does not change. Most crystals grow well around room temperature. After one day, the string should be covered with many small crystals.
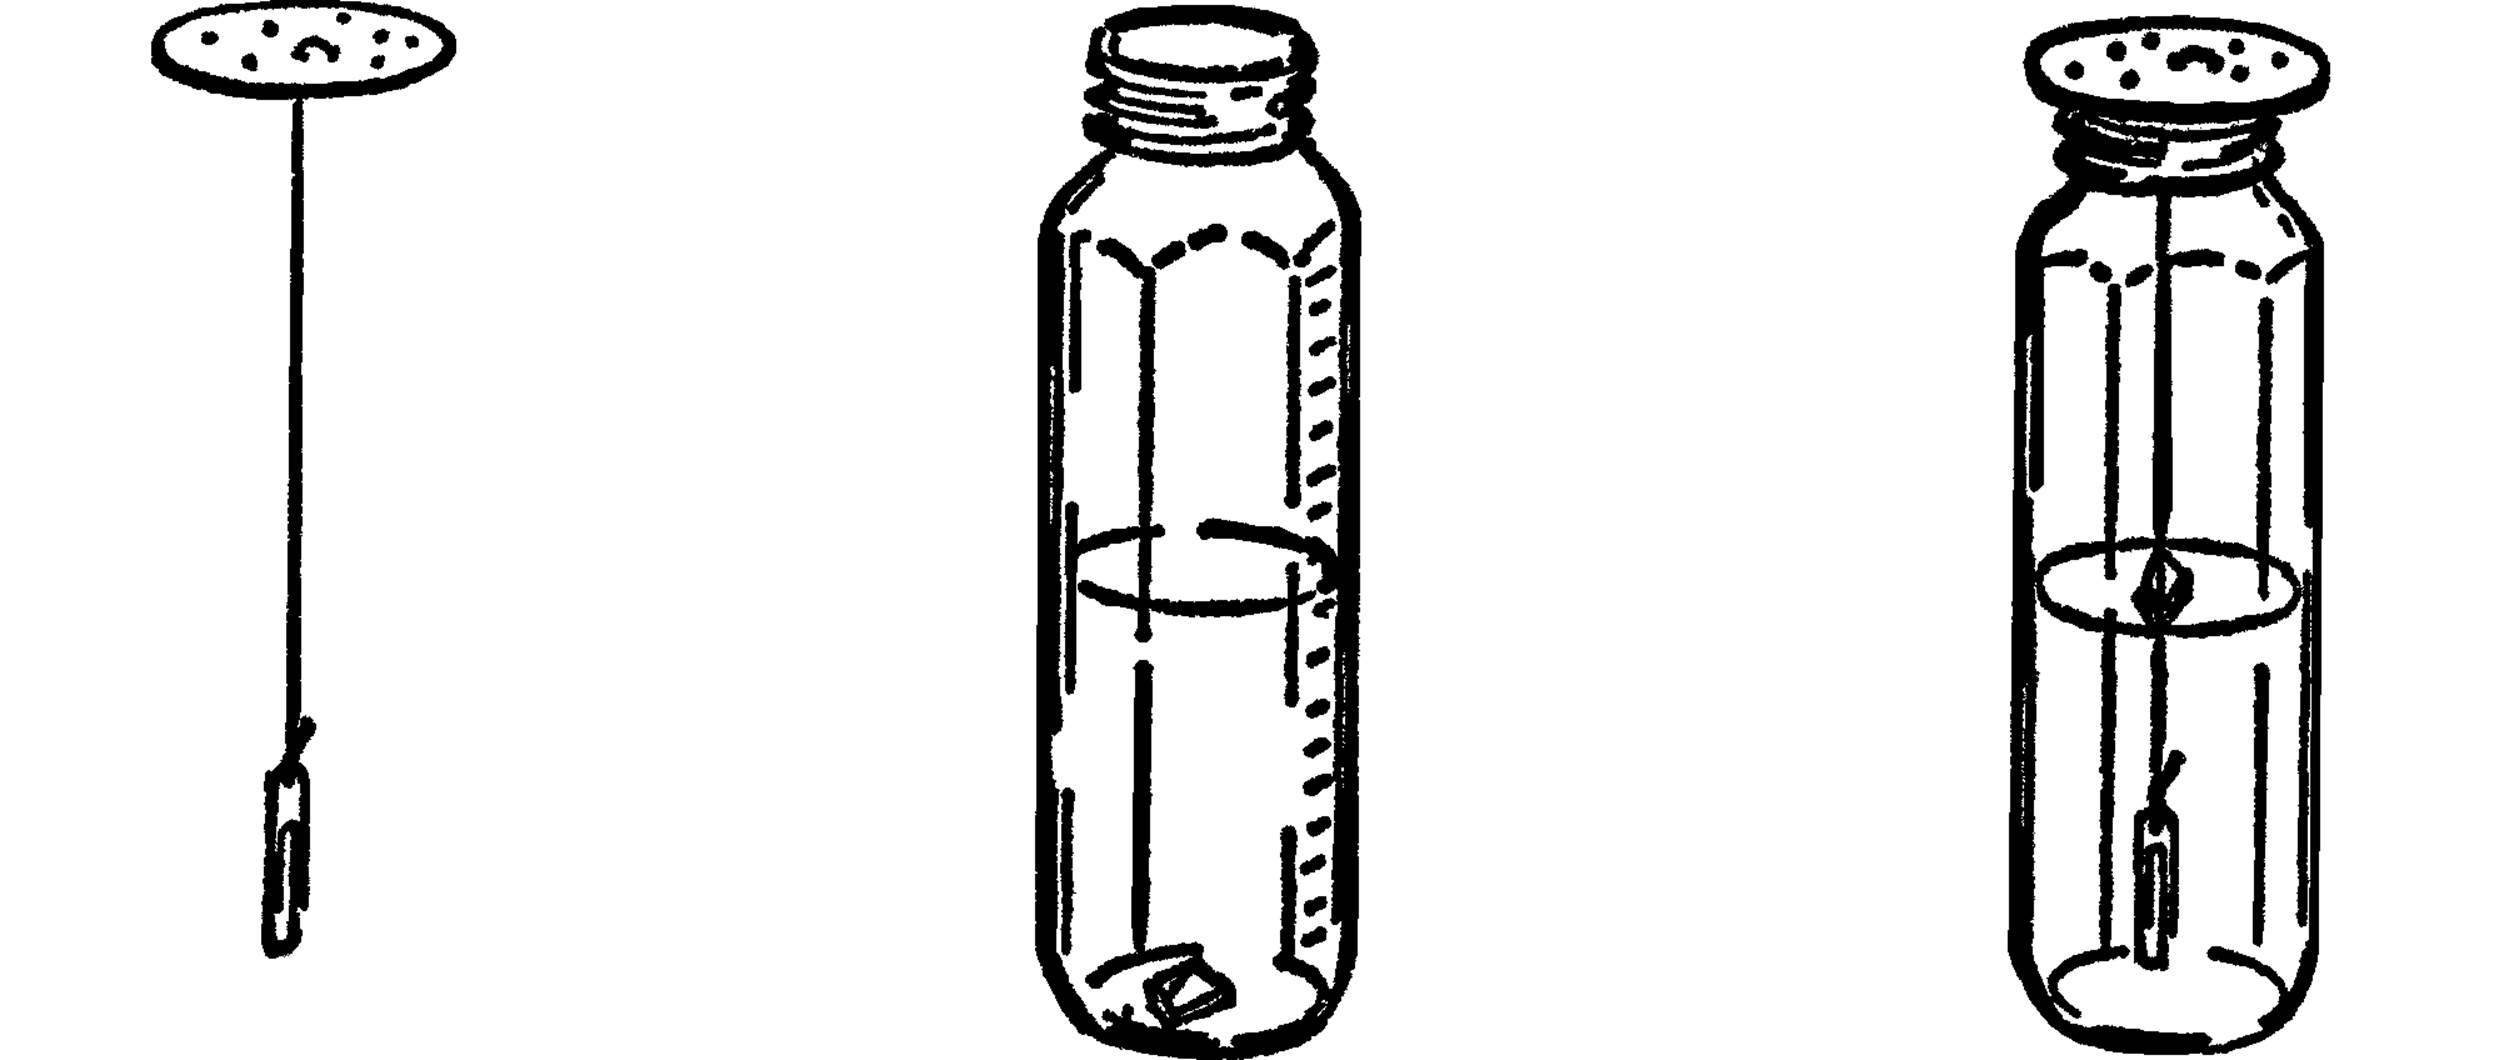
Operation of Equipment: The slower the liquid cools and the slower the water evaporates, the larger the crystals will form on the string. If you want just one large crystal, remove the largest and best formed crystal from the string to use for a seed. Next, reheat the liquid in the baby bottle. Then tie the seed crystal to the string and hang it in the baby bottle or carefully drop the crystal into the bottle. The dissolved borax will form around the seed crystal instead of forming many small crystals.
You can control the rate of evaporation by covering and uncovering the holes in the cardboard disc. If the crystal seems to have stopped growing, uncover more holes. If the crystal is growing too rapidly, many small crystals will start to appear, and the large crystal will be poorly formed. In this case, you should slow down the evaporation rate by covering the holes.
Modern Safety Practice
Strictly follow standard procedures for working with chemicals, Note 17 in Appendix E.
Can You Work Like a Scientist?
1. You can use many chemicals in crystal growing. Below are listed a few common chemicals that can be used to grow beautiful, colorful crystals.
|
Alum |
Magnesium sulfate (Epsom salt) |
|
Boric acid |
Ammonium sulfate |
|
Washing soda |
Potassium chromate |
|
Baking soda |
Potassium dichromate |
|
Salt |
Potassium permanganate |
|
Sugar |
Sodium thiosulfate (used by photographers as hypo) |
|
Zinc sulfate |
Nickel sulfate |
|
Cobalt chloride |
Manganese sulfate |
|
Copper sulfate |
Chromium potassium sulfate |
|
Ferrous sulfate |
2. Can you determine the amount of each chemical it takes to saturate a certain amount of boiling water?
3. Can you dissolve more of the chemical if you place the chemical in water and then heat the water under pressure in a pressure cooker?
4. Can you keep a graph of the amount of a chemical that will dissolve at different temperatures up to the boiling point of water?
5. Is this graph a straight line or does it suddenly curve upward at a certain temperature for each chemical?
6. If you can slow down the rate of cooling of the solution, larger crystals will form. Can you devise a way in which the solution will cool very gradually?
7. Crystals usually have certain shapes. Can you make up a classification system for crystals based on the shape of the crystals?
8. You might be able to control the rate of evaporation of the solution by using a wick and running the wick through a jar lid that covers the jar. The wick can be a piece of clothesline rope.
9. Can you use a crystal of one type as a seed for another type of crystal?
10.Place small seed crystals under the microscope or microprojector. Try using the polarizer filter and examining the crystals under polarized light. Some crystals are left-handed and some are right-handed. To determine this, turn the polarizer filters so that light is almost completely shut out (cross the two filters). Place the crystal on the stage. You should notice that the crystal now transmits light. Turn one polarizer until you again shut out or darken the light going through the crystal. Measure how many degrees you had to turn the polarizer. This is your angle of polarization for the crystal. Check to see if you turned the filter to the right (clockwise) or to the left (counterclockwise). This will tell you if the crystal is right- or left-handed.
11.Is each type of crystal either right- or left-handed, or can a crystal of a certain chemical be both? What seems to determine this?
12.What crystals exhibit the piezo-electrical effect? This effect is an electrical current given off by the crystal when struck with a hammer and jarred.
13.Can you experiment with splitting your crystals along certain faces or planes?
Recipes for Growing Crystals
Purpose: These recipes will help you grow a varied crystal collection. With the many colored crystals you can try various experiments as to electrical, mechanical, optical, and geometric properties of these crystals.
Materials: Each recipe will include the amount of material necessary to make the supersaturated solution as described under growing gem crystals (A). The second part of the formula is the material you add to the saturated solution to make the growing solution (B).
The proportion mentioned in the recipe is quite exact and should be followed closely. Any major variation from the formula will result in poorly grown crystals. However, the formula cannot take into consideration the many variables that may exist from one growing session to another. Therefore, the experimenter is encouraged to alter the formula carefully to suit his own conditions. If the crystal grows too quickly, it will have many “veils” and look milky. If this occurs, reduce the amount of the crystal material in solution (B). A second problem is caused if solution (A) is too strong. In this case the veiled crystal plus the bits of crystals in the bottom of the jar weigh more than the crystal material used in solution (B). This means that solution (A) was more than saturated when you combined it with the growing solution (B). Reduce the amount of crystal material in solution (A).
You can make any amount of solution using the proportion mentioned. If you wish to grow very large crystals, you should double or triple the suggested amount given in the formula.
Potassium Aluminum Sulfate
(Potassium alum—a colorless cube type)
1. Supersaturated solution from which you make a saturated solution:
a. Proportion of 20 grams of potassium aluminum sulfate to each 100 cc of water. Minimum amount—4 ounces of alum.
2. Add to the saturated solution to make a growing solution:
a. 4 grams of alum for each of the original 100 cc of water. Minimum amount—22 grams of alum.
Potassium Chromium Sulfate
(Chrome alum—purple cube type)
1. Supersaturated solution from which you make a saturated solution:
a. Proportion of 60 grams for each 100 cc of water. Minimum amount of potassium chromium sulfate—120 grams.
2. Add to the saturated solution to make a growing solution:
a. 5 grams of potassium chromium sulfate for each of the original 100 cc of water. Minimum amount—10 grams.
This crystal is usually quite dark and hard to observe in the growing solution. You can lighten the final color by substituting some potassium aluminum sulfate for the potassium chromium sulfate. In this case the molecules of aluminum sulfate will substitute for the chromium sulfate when combining with molecules of potassium sulfate. Since aluminum alum is colorless, the mixture will dilute the final color . You can grow an aluminum alum crystal for a while and then place the seed in chromium alum. The dark purple will form over the light aluminum alum. You can then place the seed crystal back into aluminum alum. Thus you can make a layered crystal of unusual size.
Potassium Sodium Tartrate
(Rochelle salt—colorless orthorhombic type)
1. Supersaturated solution from which you make a saturated solution:
a. Proportion of 130 grams of Rochelle salt to each 100 cc of water. Minimum amount—one pound of Rochelle salt.
2. Add to the saturated solution to make a growing solution:
a. 9 grams of Rochelle salt (potassium sodium tartrate) for each of the original 100 cc of water. Minimum amount—one ounce or 31 grams of Rochelle salt.
Rochelle salt crystals are somewhat harder to grow than alum crystals. It is sometimes difficult to get the seed crystals to grow in your supersaturated solution. In that case add extra Rochelle salt to the supersaturated solution. The seeds grow rapidly once they are started.
The solubility, or dissolving of Rochelle salt in water, depends on the temperature of the water. Slight changes in temperature affect the solubility greatly. If you are not very careful, you will dissolve your seed crystal off the string when you place it in the growing solution.
The final crystal is orthorhombic or block-shaped. The faces of the crystal vary in size, with the length being greater than the width. Rochelle salts are difficult to keep since the crystals lose water easily. In order to prevent this, wrap the crystals in cloth or cotton and store in a closed mason jar.
You can experiment with different forms of Rochelle salt. Add a solution of copper acetate (one gram per 10 cc of water) to each 100 cc of growing solution of Rochelle salt. Very long thin crystals should form. If you add one large piece of sodium hydroxide to the copper acetate solution, the crystal form will change again.
Sodium Chlorate
(NaClO3— similar to table salt but containing three atoms of oxygen in each molecule. It is a colorless cube type of crystal.)
1. Supersaturated solution from which you make a saturated solution:
a. Proportion of 113 grams (¼ Lb.) to 100 cc of water. Minimum amount—one pound of sodium chlorate.
2. Add to the saturated solution to make the growing solution:
a. 4 grams of sodium chlorate per 100 cc of water originally used. This crystal is quite easy to grow. You can experiment with this crystal’s shape by adding borax to the solution. You should add 6 grams for each 100 grams of sodium chlorate in the growing solution.
Sodium Bromate
(This is a colorless cube type of crystal)
1. Supersaturated solution from which you make a saturated solution:
a. Proportion of 50 grams of sodium bromate with each 100 cc of water. Minimum amount—8 ounces or 240 grams of sodium bromate.
2. Add to the saturated solution to make the growing solution:
a. 2 grams of sodium bromate for each original 100 cc of water.
Sodium bromate crystals must be grown very slowly to prevent veils from forming on the faces of the crystal.
Sodium Nitrate
(This is a colorless hexagonal-type crystal)
1. Supersaturated solution from which you make a saturated solution:
a. Proportion of 110 grams of sodium nitrate for each 100 cc of water. Minimum amount—1 pound of sodium nitrate.
2. Add to the saturated solution to make the growing solution:
a. 3 grams of sodium nitrate for each of the original 100 cc of water.
Growth is very sensitive to temperature changes. If your seed dissolves when it is placed in the growing solution, reseed the solution at a slightly lower temperature.
Sodium nitrate is an ideal crystal to study since it can be used to study double refraction (gives two images), cleavage (property of breaking cleanly along a certain face), and glide (part of the crystal shifting position or moving apart as the result of pressure such as the blade of a knife on the corner of a crystal.
Potassium Ferricyanide
(Red Prussiate of potash—red monoclinic type)
1. Supersaturated solution from which you make a saturated solution:
a. Proportion of 46 grams of potassium ferricyanide to each 100 cc of water. Minimum amount—92 grams of potassium ferricyanide.
2. Carry on experimentation to determine the amount of potassium ferricyanide you should add to the saturated solution to make the growing solution. If you add too much, the crystal will grow too rapidly. If the amount is too small, the crystal will grow only to a very small size.
Modern Safety Practice
Several of these chemicals that happen to grow nice crystals are also toxic or irritants. It is standard practice to consider all chemicals that you encounter to be hazardous, unless you have firm evidence to the contrary. Crystals that you have grown may look harmless (and even beautiful), but they are still chemicals. Review safety procedures for working with chemicals, Note 17 in Appendix E.
Polarimeter
Purpose: A polarimeter is used to polarize or screen out certain light rays so that the effect of particular rays on crystals can be measured.
Materials: Cardboard tube from a toilet paper roll, piece of thin cardboard such as a file card, Polaroid filter57 or lens from a pair of Polaroid sunglasses.
What to Do: Wrap the file card around the cardboard tubing and fasten the file card with Scotch tape. Slide the file card tubing off the toilet roll tubing. Cut two round cardboard discs just large enough to cover the end of each of the two pieces of tubing. Cut a one-inch diameter hole in the center of each disc and glue or Scotch tape a Polaroid filter over each disc. Slip the smaller disc in the end of the toilet paper roll tubing and glue in place. Slip the other disc over the end of the roll tubing you made and glue in place. Slip the two pieces of tubing together. Look through the smaller tube end (analyzer) while you slowly turn the file card tubing (polarizer). You should reach a position where the light is completely blacked out. Mark the outside of both tubes for this position and label it 0°. Now divide the outside of the file card tubing into 360°. The mark just opposite the 0° mark should be labeled 180°. In this position you should not be able to see light through your polarimeter.
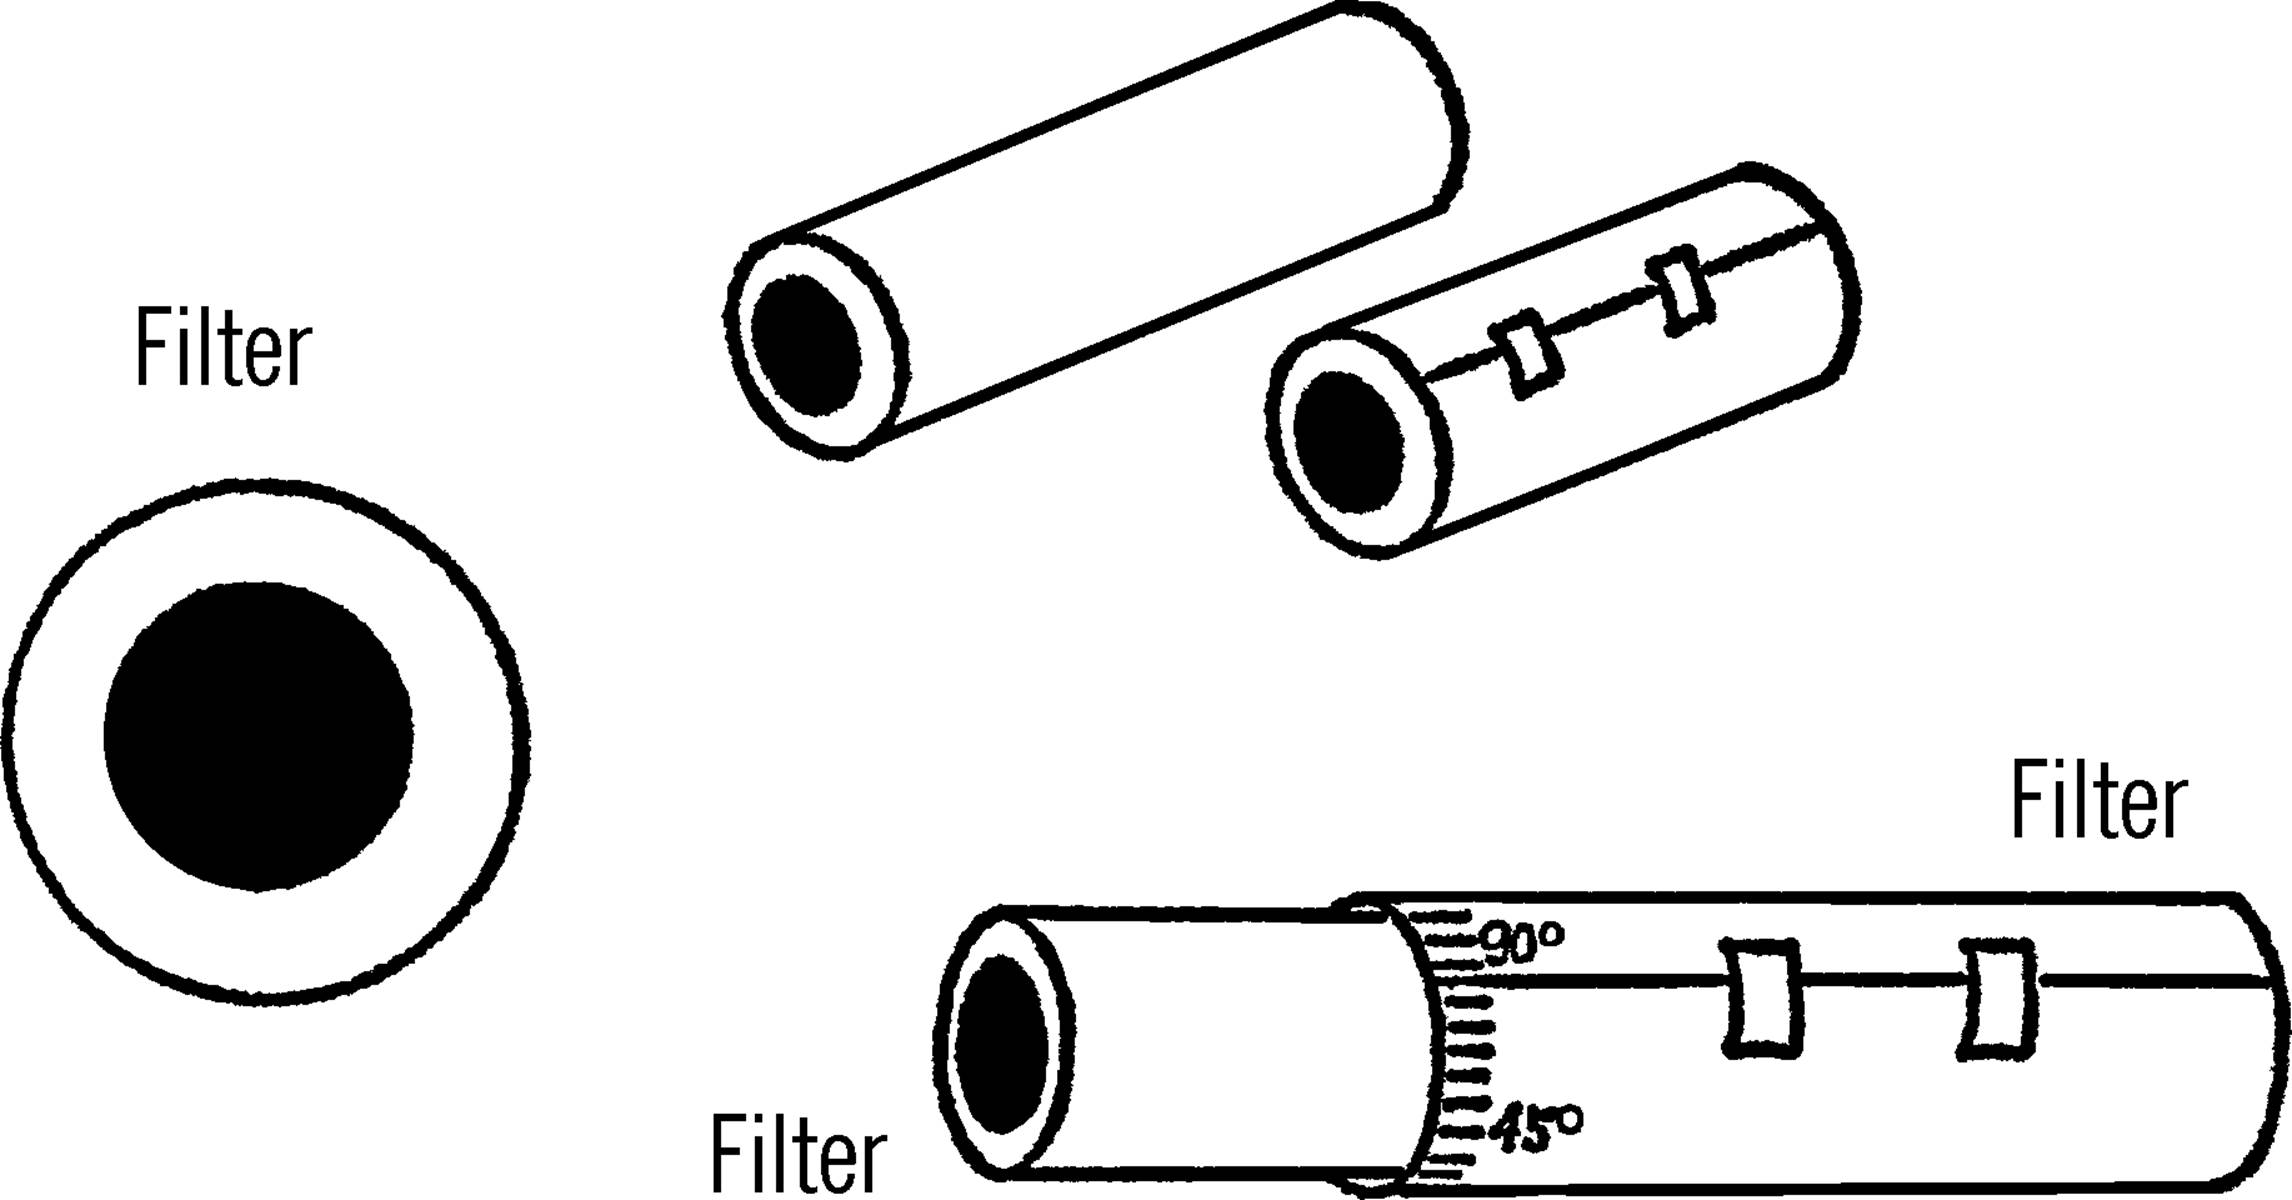
Operation of Equipment: In order to use the polarimeter, slide the two pieces of tubing apart and insert the crystal or material to be viewed into the end of the smaller tube. Slide the two pieces of tubing together and point the polarizer end toward a strong light source, such as a light bulb. Turn the polarizer end slowly until the light through the crystal is at its darkest, probably a dark blue. Look at the scale on the analyzer end of the tube and see how many degrees you had to turn the polarizer from zero and what direction you had to turn it. Each crystal has an angle of polarization. Some crystals require you to turn the polarizer clockwise while others require a counterclockwise direction. This is determined by the way the crystal is grown.
Can You Work Like a Scientist?
1. Twist a piece of Scotch tape and fasten it into the opening of the small tube. When the polarizer is set on zero, do you see any light coming from the Scotch tape? Which way do you have to turn the polarizer in order to darken the light rays to dark blue?
2. Try several thicknesses of Scotch tape. Does the thickness of the material have anything to do with the number of degrees the polarizer is turned?
3. Place crystals in the tube. What direction and how many degrees must you turn the file card tube in order to turn the light rays to dark blue?
Hydrometer
Purpose: A hydrometer is used to measure the specific gravity58 or weight of molecules in different liquids, as compared with water.
Materials: Test tube, cork or stopper, and some BBs or small shot.59
What to Do: Put some shot in the bottom of the test tube. Seal the test tube with the cork. Place the test tube in a glass of water. The test tube should float and be upright in the water. Half the test tube should be under the surface of the water. Add or subtract shot until the test tube floats in the correct way.
Place a strip of adhesive vertically up the side of the test tube, as shown.

Can You Work Like a Scientist?
1. Place your test tube hydrometer in a glass or jar full of water. Note the level of the water on the side of the test tube. Place a mark on the tape at this level and label the mark 1.00. Most hydrometers use the density of water as a standard and call this standard 1.00.
2. If the molecules of water were closer together, would the hydrometer float higher or lower in the water? What if the molecules were heavier?
3. If the molecules were farther apart (less dense), would the hydrometer float higher or lower in the water?
4. Make a mark on the glass or jar to show the level of the water. Be sure your test tube hydrometer is floating in the water.
5. Add salt to the water. Does the salt raise the level of the water in the glass or jar?
6. How much salt must be added before the water level starts to rise?
7. What happens to the salt you add to the water? Does all of the salt sink to the bottom of the jar?
8. If some of the salt dissolves in the water, is the water more or less dense? Remember you added salt molecules (NaCl).
9. Does the hydrometer float higher or lower in the water? Try adding sugar instead of salt.
10.Try other liquids. Make a mark on your test tube hydrometer for each of these liquids. Above is a chart of some liquids and their specific gravity as compared with water. Place these numbers on your test tube. Specific gravity is the weight of a sample of a liquid as compared with an equal amount (volume) of water. Specific gravity depends on the weight of the molecules and the number of molecules in a certain space.
11.Can you find the specific gravity of cream? Of milk? Which is the highest?
12.Can you find the specific gravity of different weights of motor oil?
13.What effect has heat on the specific gravity of liquids? (Be careful not to heat liquids that will burn, such as gas or alcohol.)
14.What effect has cooling on the specific gravity of liquids? (No danger here. Remember to use your refrigerator.)
15.Could you separate different liquids by their specific gravity? Try ice, alcohol, water, gasoline. What are your problems?
Cartesian Diver
Purpose: A cartesian diver is used in the study of the buoyancy of objects in water and other liquids.
Materials: Type A: a gallon jug, balloon or sheet rubber, and an eyedropper. Type B: a flat-sided bottle with a screw lid and an eyedropper.
What to Do: Type A: Fill the gallon jug with water. Let the water stand in the jug until it is room temperature. Fill the eyedropper partly full of water. Try to float the eyedropper in a glass of water. If the dropper sinks, remove a drop or two of water until the amount of water in the dropper is just enough to allow the dropper to barely float. Place the dropper in the gallon jug and then cover the opening to the jug with rubber from a balloon or sheet rubber. The rubber can be fastened in place with tape or rubber bands.60
Type B: Fill the flat-sided bottle completely full of water. Add water to the eyedropper until it barely floats in a glass of water. Carefully place the eyedropper in the bottle and screw the lid down tightly.
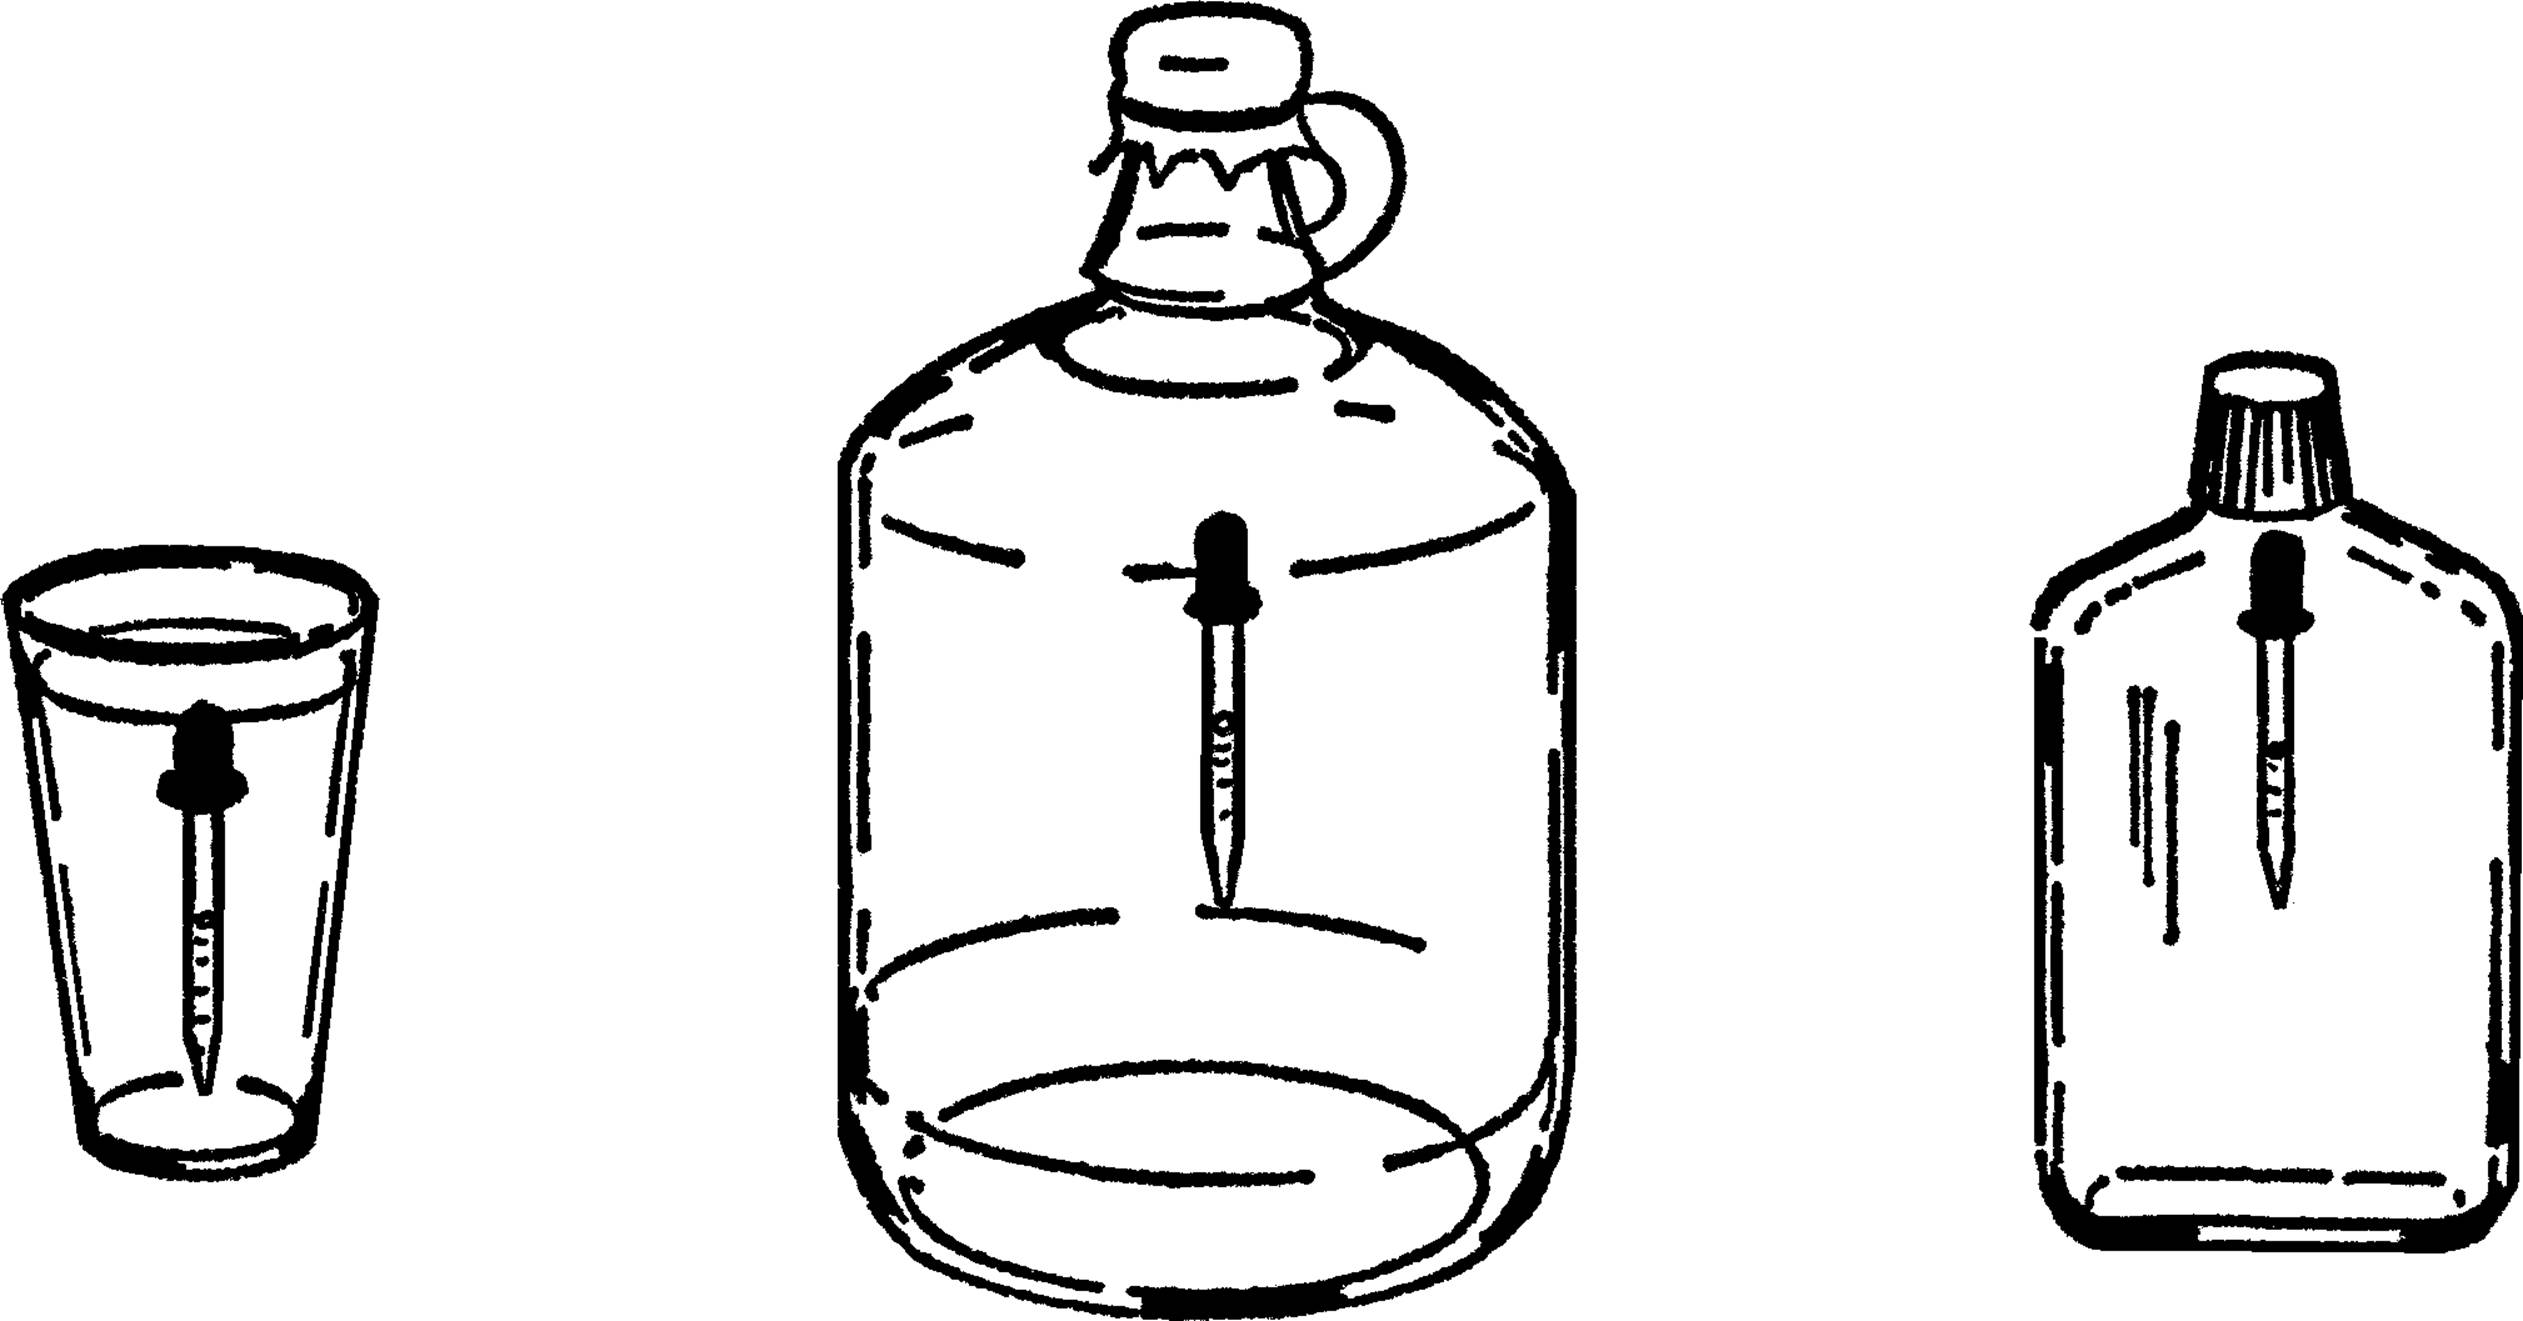
Operation of Equipment: The eyedropper is normally less dense than water and will float. The air inside the eyedropper prevents any water from entering. When you add water to the eyedropper, you make the dropper heavier, and yet you don’t increase its volume or size. When you reach a point where the eyedropper plus the water it holds exactly balances the weight of the water the eyedropper pushes aside because of its size, the dropper will barely float on the surface. If any water is added to the dropper, the weight of the dropper will become greater than the water it pushes aside, and it will sink. In type A, when you push on the rubber, you compress the air in the neck of the bottle. This air pushes on the surface of the water. Since water can’t be compressed, the added pressure pushes against the air in the opening to the eyedropper. As more pressure is applied, the air in the eyedropper is compressed and more water enters it. This makes the eyedropper heavier, and it sinks. When you release the rubber, the pressure is reduced, and the air inside the dropper pushes the excess water out. The eyedropper becomes lighter and floats.61
Can You Work Like a Scientist?
1. Notice the level of the water in the eyedropper as you press on the rubber. Can you see the level of the water change?
2. When you press on the sides of the flat bottle, why does the eyedropper sink?62
3. Can you stop the eyedropper halfway down the jar?
Problems to Investigate in the Study of Chemistry
(P)-Primary
(I)-Intermediate
(U)-Upper
1. Can you list the materials around you which are solids? Liquids? Gases? (P)
2. Can you change materials (matter) from one state to another (solid to liquid)? (P)
3. What does the flame of a candle consist of? Blow out a candle and then bring a lighted match into the gas given off.63 (P)
4. Can you collect the vapors from a candle and change them into a solid? Conduct the vapors into a cold bottle by using bent glass tubing. (I)
5. Is hydrogen gas given off during the burning of a candle? Hold a cold glass over a candle flame. Test the inside of the glass with your finger. (P)
6. Does a candle contain carbon? Hold a dish over a candle flame. (P)
7. What part of a candle flame is the hottest? (I)
8. Does a candle flame give off carbon dioxide? Collect gas from a candle flame. Pour Lime water into the bottle containing the gas. Lime water turns cloudy if carbon dioxide is present. (P)
9. Can you measure the amount of heat given off at various parts of a candle flame? (U)
10.What is the difference between a mixture and a compound? Mix iron filings and sulfur together. Is this a mixture or a compound? Can you separate the iron and sulfur? (I)
11.Mix two grams of sulfur and 3.5 grams of iron filings in a test tube. Heat with an alcohol burner. Can you separate the iron and sulfur? Is this a compound or a mixture? (I)
12.What materials will dissolve in water? What materials will not dissolve in water? (P)
13.What effect does heat have on the ability of water to dissolve materials? Try dissolving different materials in water of varying temperatures. (P)
14.What effect does the amount of surface area have on the rate at which a substance dissolves in a liquid? Try dissolving a large piece of material. Then try breaking the material into small pieces. (I)
15.In what reactions is water a catalyst? (U)
16.What is the water cycle? Can you make an artificial water cycle? (P)
17.Can you determine the amount of minerals in different water samples by the process of distillation? Do you lose any of the water during the process? Be sure to measure and keep track of your findings. (I)
18.How can you separate water electrically by electrolysis? If you use washing soda as an electrolyte (substance in water to help conduct electricity), what effect does the amount of electrolyte in solution have on the rate of gas production of hydrogen? Of oxygen? (I)
19.In breaking water apart by electrolysis, what does increasing the distance between the electrodes have on the production of hydrogen and oxygen? (I)
20.What is the ratio of hydrogen to oxygen in various types of water? Is the ratio the same in sea water? (I)
21.What is the effect of increasing the amount of current on the rate at which water breaks up during electrolysis? Will electrolysis work with both AC and DC current? (I)
22.What pole gives off hydrogen? Oxygen? Is this always true? (I)
23.What part of different materials consists of oxygen? Can you think of a way to determine this? (U)
24.Does soil contain oxygen? Does water contain oxygen? Do rocks contain oxygen? Place soil in water. Observe closely. Watch for gas bubbles in water. (P)
25.Oxygen forms what part of air? Pour water around a burning candle attached to the bottom of a bowl or pie plate. Place a baby bottle over the candle. How high did the water rise in the bottle? This distance indicates the amount of oxygen used up in the burning. (P)
26.What effect does oxygen have on burning wood? Get a small bottle of oxygen from a shop that has a cutting torch. Light a splinter of wood and blow out the flame. Quickly lower the wood into the bottle of oxygen.64 (P)
27.What effect does oxygen have on burning? Heat some steel wool in the flame of an alcohol burner. Place the red hot steel wool into a bottle of oxygen. Light some sulfur with a match. Lower the sulfur into a bottle of oxygen. (I)
28.What materials will burn? What materials will not burn? (P)
29.What temperature is necessary for different materials to start to burn? This temperature is called the kindling temperature. (I)
30.Will all wood start to burn at the same temperature? (P)
31.Is oxygen heavier or lighter than air? Can you determine this experimentally? (I)
32.Is water given off when hydrogen is burned? Hold a cold glass over a hydrogen flame.65 (I)
33.What materials can be used to generate hydrogen? (I)
34.Is hydrogen lighter than air? (P)
35.To what altitude will a homemade hydrogen balloon rise? (I)
36.What is the effect of temperature and pressure on the rate at which a balloon filled with hydrogen will rise? (U)
37.Can you set up a carbon cycle in a closed aquarium? (P)
38.How does a carbon dioxide fire extinguisher work? Can you make a homemade extinguisher?66 If you use baking soda and vinegar, what effect does the temperature of the vinegar have on the thrust of the water out of the nozzle? (I)
39.Can you pour invisible carbon dioxide? Is carbon dioxide heavier than air? (P)
40.What effect does carbon dioxide have on burning? (P)
41.Why does lime water turn milky when exposed to carbon dioxide? Make lime water by mixing a teaspoon of hydrated lime with one pint of water. After the lime sinks to the bottom of the bottle, filter the liquid and then screw the lid down tightly. (I)
42.Does your breath contain carbon dioxide? Blow through a straw into a test tube containing lime water.67(P)
43.Does the air around us contain carbon dioxide? Place a dish of lime water on a table. Observe later. If carbon dioxide is present, there should be a scum on the water. (P)
44.What effect does exercise have on the production of carbon dioxide? Run a distance and then test your breath by blowing into a test tube containing lime water. (I)
45.What rocks when combined with acids will produce carbon dioxide? Try marble, limestone, granite, and other common rocks. (I)
46.What part of the atmosphere is nitrogen? Burn a candle in a bowl of water. Cover the candle with a baby bottle. The gas remaining in the bottle after the water rises is almost all nitrogen. (P)
47.Can you determine the solubility of various gases? (U)
48.What effect does temperature have on the solubility of gases in water? (U)
49.What gases are soluble in liquids other than water? How does the solubility in other liquids compare with that of water? (U)
50.How can you produce ammonia gas? Heat household ammonia gently and collect gas. What are the properties of ammonia gas? Is it heavier or lighter than air?68 (I)
51.Is ammonia gas soluble in water? Place a test tube of the gas upside down over a bowl of water. Remove your finger covering the opening. The solubility of the gas is shown by the amount of water that rushes up the test tube. (I)
52.What effect does ammonia have on litmus paper? Check both the liquid and the gas forms. (I)
53.What causes the white smoke when the fumes of hydrochloric acid come in contact with the fumes of ammonia? Dampen the inside of a jar with hydrochloric acid. Fill a second jar with ammonia gas. Place a piece of cardboard over the jar with hydrochloric acid. Turn the jar containing ammonia gas over and place it on the cardboard. Remove the cardboard. (I)
54.What effect does chlorine have on living things? Place a drop of Clorox or other bleach in a drop of water containing protozoa and other microscopic plants and animals. Examine the life through a microscope or microprojector. (P)
55.What liquids and other materials contain chlorine? Mix a half teaspoonful of starch with about 60 ml of water. Bring the water to a boil. Dissolve a very small amount of potassium iodide (about as much as 4 grains of rice) in the mixture. Dip strips of filter paper or paper towels in the mixture and then dry them. A strip will turn blue in the presence of chlorine. (I)
56.Can chlorine be made from hydrochloric acid? Put a gram of manganese dioxide into a test tube. Add 6 ml (about ¼ of the test tube) of hydrochloric acid and heat gently. Test with chlorine test paper. Be careful not to breathe into the gas directly. Move your hand back and forth over the test tube and sniff the air as the gas moves toward you. (I)
57.How can chlorine gas be made in large amounts?69 Pour about an inch of Clorox or other bleach into the bottom of a baby bottle. Add about half a teaspoonful of sodium bisulfate. Collect the gas by using a stopper with a piece of glass tubing leading to a second bottle. A third bottle containing lye mixed with water is connected to the second bottle by glass or rubber tubing. The lye water then absorbs the excess chlorine gas formed. Be sure chlorine gas does not escape into the room. (U)
58.Is chlorine water soluble? Add some water to a bottle containing chlorine. Cover the mouth of the bottle with the bottom of your hand. What should happen if some of the chlorine dissolves in the water? (I)
59.Will chlorine react with hydrogen and hydrogen compounds? Lower a burning candle into a bottle of chlorine. The candle is made of hydrogen and carbon. If the chlorine combines with the hydrogen, what should be given off? (I)
60.Will chlorine combine with different metals? Twist a piece of wire around some steel wool. Heat the steel wool with a match. Lower the steel wool into a bottle containing chlorine. If the chlorine mixes with the iron in the steel wool, iron chloride should be formed. Iron chloride is a brownish gas. (I)
61.Does chlorine bleach cotton and linen? Hang a colored strip of cotton or linen cloth in a bottle of chlorine. Cover the bottle. Try a second bottle of gas, but this time moisten the cloth. If it is the chlorine that does the bleaching, the dry cloth should turn white. (I)
62.What effect does chlorine have on living things? Place an insect in a bottle containing chlorine gas. Can you devise a way of testing the effect of chlorine gas on micro-organisms such as paramecium? (I)
63.Is chlorine heavier than air? Test to see if chlorine will rise out of a bottle. Be careful not to breath the gas. (I)
64.How can you recognize an acid? Dilute acid, such as hydrochloric, in a ratio of one part acid to three parts water. Dip the tip of one finger in the acid water mixture. How does acid taste?70 How does an acid feel to the touch? Wash your hand immediately in cold, soapy water. (P)
65.How can you detect an acid? Place a drop of acid on a strip of blue litmus paper. Does the litmus paper change color? Try other acids. Are the results the same? (P)
66.What effect do acids have on metals? Place small bits of a metal in a test tube. Add a strong acid, such as hydrochloric. What happens to the metal? Is a gas given off? (P)
67.Do acids have the same effect on all metals? (P)
68.Do all acids react the same on a certain kind of metal? (I)
69.How can you recognize a base? Dissolve a teaspoonful of lye71 in a half glass of water. Place about ten drops of this solution into a glass of water. Dip your finger into this very diluted solution and then taste. (I)
70.Do all bases have the same characteristic taste? Try other bases.72 Be sure to dilute the base with a large amount of water. (I)
71.How can you detect a base? Place a drop of lye on blue litmus paper. Try placing another drop on red litmus paper. (P)
72.What liquids in your household are bases? (P)
73.How can you make litmus paper? Slice leaves of red cabbage into strips. Boil these cabbage strips in hot water and let stand for about a half hour. The liquid can then be used as an indicator. You can soak: paper towel strips in the colored water and then let dry. Try making other indicators by using blueberries, cherries, different flowers, and other plants and vegetables. (P)
74.What effect do acids have on bases? Make a lye solution. Place a drop of phenolphthalein solution into a small solution of lye in a test tube. The phenolphthalein should color the solution. Now add an acid such as hydrochloric. Is the solution of hydrochloric acid and lye base an acid or a base? (I)
75.What effect does a base have on fat material? Drop a lump of fat into a test tube containing a lye solution. Heat gently. What happens to the fat? What does the solution feel like? (I)
76.What effect do bases have on acids? Put a drop of phenolphthalein solution into a small amount of diluted hydrochloric acid. Pour this solution into a lye solution. The ratio of hydrochloric acid to lye solution should be about two parts acid to five parts base. Try other acids and bases and see if all bases act on acids in the same manner. (I)
77.How is phenolphthalein solution made? Get some phenolphthalein powder from a drugstore.73 Mix a pinch of the powder in a one-ounce bottle of denatured alcohol. Try out your mixture on different bases. (U)
78.What solutions conduct electricity? Wire up a flashlight bulb in series with a container for liquids. Attach carbon rods to the two ends of the wires going into the liquid solution. When current passes through a liquid which conducts electricity, the bulb will light up. If the liquid will not conduct electricity, the bulb will not light. (I)
79.What effect does temperature of the water have on the amount of a material that will dissolve in it? Try dissolving a measured amount of salt in cold water. Try dissolving the same amount in warm water. Can you keep a graph of the amount of salt that will dissolve at different temperatures? (I)
80.What is a saturated solution? A supersaturated solution? Add a chemical to water. Stir until you find that some of the chemical won’t dissolve with any amount of stirring. The solution is saturated. Heat and add more of the chemical. The solution is now supersaturated—it holds more of the chemical than it normally can at room temperature. Cool the liquid. What should happen? (I)
81.Will all chemicals dissolve in the same amounts in water at given temperatures? Can you keep a chart of the amount of different chemicals that will dissolve at a given temperature? How does the amount that will dissolve compare with the atomic weight of the substance? (U)
82.What effect does temperature have on the formation of crystals? Make a supersaturated solution of alum or Epsom salt. Pour some of the solution on a warm piece of glass or microscope slide. Pour another sample of the solution on a cold pane of glass. (I)
83.Can you determine the temperature at which different chemicals in solution will crystallize? (U)
84.If you add materials to a liquid in order to make a solution such as salt to water, does this raise or lower the freezing and boiling point of the liquid? Try various chemicals and liquids. (I)
85.What effect has the rate of evaporation on the formation of crystals? Make a supersaturated solution of sugar. Pour some of this into several jars. Suspend a string into the center of the sugar solution in each jar. Control the rate of evaporation by using jars with different size openings. (I)
86.What foods and materials found around the house contain acid? Which ones contain bases? Try ammonia, tea, soda pop, lye, aspirin, grapefruits, oranges, milk of magnesia, lime water, cleanser, tomatoes, vinegar, milk, cream, and similar materials. (I)
87.Can you determine the pH (acidity or alkalinity) of the soil in various areas around your home or city? Use litmus or pHydrion paper. (U)
88.What effect does the pH of the soil have on the type of native plants found growing in it? (U)
89.Can you determine the normal pH of the cells of various plants and animals? (U)
90.Can you determine the normal pH condition in the mouths of various animals and humans? (I)
91.Can you determine the strength of various bases by titration? Make up a weak solution of ammonia and water. Add a drop of phenolphthalein to color the solution pink. Add drops of dilute hydrochloric acid until the color is gone. Compare the amount of acid needed in order to neutralize the base to the amount of ammonia solution. This is the relative strength of the base. (U)
92.Can you experiment with different acids and bases in order to determine what kind of salts are formed when the acids and bases neutralize each other? (U)
93.Can you make a salt from a metal and an acid? Try a few drops of hydrochloric acid on zinc or aluminum strips. Test with blue and red litmus paper. A salt should not affect either colored litmus paper. (I)
94.How can iodine crystals be collected? Mix two parts of sodium bisulfate with one part of potassium iodide and one part of manganese dioxide. Heat the mixture gently. Collect the violet gas fumes on the bottom of a pan containing ice and water. The gas vapor cools rapidly and crystallizes on the bottom of the pan. Scrape the crystals off the bottom of the pan and store in a tightly closed bottle. Be careful not to breathe the gas fumes. (U)
95.How do iodine crystals appear under polarized light? Use the polarizing filters on either a microprojector or a microscope. Examine a crystal on a microscope slide. (U)
96.In what liquids is iodine soluble? Place a few crystals in a test tube containing water. Try the crystals in water containing potassium iodide. Try dissolving the crystals in alcohol, fingernail polish remover, and other liquids that evaporate quickly. (U)
97.How is iodine used as a test for starch? Mix starch with water, and then bring to a boil. Mix a drop of the starch solution with 10 cc of water. Place a drop of iodine into the water and starch solution. (P)
98.What foods contain starch? Use the iodine test. (P)
99.Is iodine freed when chlorine is added to a solution of potassium iodide crystals? Add a few drops of Clorox or other bleach to a solution of potassium iodide crystals. (I)
100. How can iodine stains be removed? Stain a cloth with iodine. Mix a few hypo (sodium thiosulfate) crystals in water. Place drops of hypo on the stain. (I)
101. What do you observe when you melt sulfur? Does the sulfur seem to go through stages? (I)
102. In what form does sulfur exist as crystals? Examine flowers of sulfur under the microscope. Heat sulfur in a test tube. Filter the sulfur through a paper towel or filter paper. Examine crystals formed on filter paper under the microscope. Examine under polarized light. (I)
103. What effect do sulfur fumes have on the color in different materials? Heat a small amount of sulfur powder in metal lid. Hold the lid by wrapping a stiff wire around the lid for a handle. When the sulfur in the lid starts to burn well, lower the burning sulfur into a mason jar. Sulfur dioxide fumes will be given off in the jar. Place differently colored materials into the jar and then cover the jar so that the fumes cannot escape. (I)
104. How is sulfuric acid made? Lower burning sulfur into a jar. After the fumes fill the jar, remove the burning sulfur and add a few cc of water. Shake the bottle and then test with litmus paper. (I)
105. Is sulfur dioxide soluble in water? Fill a baby bottle with sulfur dioxide fumes. Insert a one-hole stopper containing a piece of glass tubing. Invert the gas-filled bottle over a container of water. If the gas is water-soluble, the water should run up the glass tubing and into the bottle containing the gas. (I)
106. Will sulfur dioxide support burning? (I)
107. How can you make hydrogen sulfide in your home laboratory? Fill a test tube one-eighth full of powdered sulfur. Add a small lump of candle wax. Heat the test tube. Hydrogen sulfide has the smell of rotten eggs and is quite unpleasant.74 (I)
108. How is hydrogen sulfide used in analyzing the type of metal found in an unknown salt? Generate hydrogen sulfide. By the means of rubber and glass tubing, bubble the gas through the unknown metal salt. The color of the solution indicates the metal present. Try this method in making an analysis of unknown salt solutions. (U)
109. Will hydrogen sulfide burn? (I)
110. How do you grow a silicon garden? Place a layer of sand on the bottom of a wide-mouth mason jar. Fill the jar with an equal mixture of water and water glass (sodium silicate). Add crystals of different salts such as copper sulfate, alum, Epsom salt, zinc sulfate, and sodium sulfate. Let the jar stand undisturbed. (P)
111. How is borax used in chemical analysis? Make a small loop by wrapping the end of a piece of nichrome wire around the end of a pencil. Insert the other end of the wire into a piece of heated glass tubing or a cork. Either the cork or the glass tubing will serve as a handle. Heat the wire loop and dip the loop into melted borax to form a bead. Touch the bead to the chemical to be tested and then heat the bead again in a very hot flame. You may use a blowpipe with an alcohol lamp. The color of the bead when cold compared to the color when the bead is hot is used to determine the metal. (I)
112. What are the properties of boric acid? Make boric acid by heating a solution of two parts borax. to five parts water. Add one part hydrochloric acid to the boiling solution. The boric acid crystallizes out as the solution gradually cools. Filter the liquid and then wash with cold water to remove salt formed with boric acid crystals on the filter paper. Let the crystals dry on the filter paper. Examine under polarized light. (U)
113. How can you test for boric acid? Make an indicator paper by dipping strips of paper toweling in mustard.75 Wash the mustard off and allow the strips to dry. The strip turns brown when exposed to boric acid. This is because of the coloring matter (turmeric) in the mustard. (I)
114. Can you use the flame test in order to identify sodium and potassium compounds? Clean your nichrome wire loop with hydrochloric acid and then heat the loop. Dip the loop into the unknown compound and then hold the loop in the flame. Sodium gives off a bright yellow-red color. Potassium gives off a violet color and can be viewed best by observing through blue glass or cellophane. Try table salt and potassium nitrate (saltpeter).76 (U)
115. Can you test the hardness of water around the area in which you live? Make a test solution by dissolving about a gram of soap flakes in about twenty cc of denatured alcohol or duplicator fluid. Filter the solution. Test the unknown sample by filling a baby bottle half full of the water. Add about ten drops of your soapy test solution to the water. Cover and shake the baby bottle. The amount of foam indicates the degree of hardness, with very hard water making little foam. Check the amount of foam formed by using rain water and distilled water. (I)
116. Can you distill hard water and remove impurities? Test your distilled water with a hardness test. (I)
117. What are the properties of magnesium? Hold a piece of magnesium ribbon with a pair of tweezers. Light the end.77 Test the magnesium also for reaction with acids such as vinegar. Place a piece of magnesium ribbon in boiling hot water. (U)
118. Can you determine the density of different metals? Weigh the sample. Determine the volume by the amount of water displaced when you submerge the metal in water. Figure the weight per unit volume. (I)
119. Do metals give off a characteristic color when they burn? Sprinkle bits of different metals into the flame of an alcohol burner. Record the colors given off. Aluminum is easily available in the form of pie tins or foil. (I)
120. What is the reaction of aluminum with a base? With an acid? Drop strips of aluminum into HCl. What gas is formed? Make up a weak-base solution of sodium hydroxide (lye). Drop the aluminum strips into the lye. What gas is given off? What is left in the bottle? (I)
121. Can crystals be grown with double salts? Make a supersaturated solution of potassium aluminum sulfate or ammonium aluminum sulfate. These double salts are called alums. Heat your solution and add your salt until no more can be dissolved. Strain off the liquid and allow the undissolved alum to cool. Save the liquid. Pick out the largest of the crystals and discard the rest. Replace the discarded alum crystals with an equal amount of fresh alum salt. Heat to dissolve the new crystals in the liquid you have saved. Allow this solution to cool and then pour the solution into a baby bottle. Tie a thread around the largest crystal you have saved. This crystal is then suspended in the solution in the baby bottle. The solution should be allowed to evaporate slowly and remain undisturbed. (P)
122. How can alum be used to clear water? Add a spoonful of dirt to two jars of water. Stir to mix the dirt throughout the water. In one of the jars add about a half teaspoonful of alum and two teaspoonsful of ammonia. Why does the dirt seem to settle out? What effect does temperature have on this? (I)
123. How small is a molecule? Dissolve a gram of potassium permanganate in 100 cc of water. This gives a solution of 1/100 or 1 to 100. The color is due to the KMn04 molecules moving around in the water. Remove 10 cc of this solution and add to 90 cc of fresh water. You now have a solution of 1 to 1000. Can you still see a color? Repeat this with several additional bottles of water. Be sure always to take your colored solution from the bottle containing the weakest solution. Can you still see the molecules after you have diluted the solution to 1 to a million parts? (P)
124. Will all iron rust? (P)
125. What effect does humidity have on rusting of iron? Wedge a piece of steel wool into the bottom of a glass. Invert the glass over a pie tin containing water. For your control, repeat the experiment but don’t use any water. Compare the results after several days. If water rises in the glass, something must have been used up out of the air in the glass. (P)
126. How can rust be prevented? If rust is iron reacting with oxygen in very slow burning, could you coat iron nails with different materials to prevent the oxygen from reaching the iron? Will rust occur without moisture? (P)
127. How is copper sulfate used in chemical analysis? Crush some copper sulfate crystals and pour them into a test tube. Heat and stir these crystals until they have formed a white powder. You have removed all the water from the copper sulfate. If you add a drop of a liquid that does not contain water, the crystals will not change. If you add a drop of water, blue crystals form. You can test many liquids for the presence of water. Try rubbing alcohol, gasoline, vinegar, and others. (I)
128. What is the replacement series for metals? Metals vary in their amount of activity. The replacement series is a list starting with the most active metal, potassium, and going down to the least active metal, gold. You can discover the correct order of the metals in this series by simple experiments. If a metal such as iron (a nail) is placed in a solution of a salt of a less active metal such as copper sulfate, the more active iron will replace the less active copper. The copper then will form around the nail and plate the nail. Iron then is more active than copper. If we place a piece of copper in a solution of silver nitrate, we find the copper replaces the silver, and the silver is plated on the copper metal. Therefore, copper is more active than silver. All of these activity experiments can be performed under the microscope or microprojector. Place a strand of wire of the metal being tested on a blank microscope slide. Add a drop of the metal salt solution to the wire. (I)
129. How many different kinds of plating can you do? Remember to use one of the metals listed in the replacement series and a salt of another metal that is listed below the first metal (one that is less active). (I)
130. What causes silver to tarnish? (I)
131. Can you make your own photographic paper and make photographs with it? Mix silver bromide with gelatin and spread on a heavy paper. Fasten the paper to a piece of plywood and place it in the sunlight. Place some object such as a leaf on the paper and then cover with a piece of glass or Saran Wrap. In order to fix the print after the paper has turned a dark violet, soak the paper in a solution of hypo for about ten minutes. (U)
132. What forms of carbon will conduct electricity? Try different types of coal, graphite (pencil lead), diamonds, charcoal, and others. (I)
133. What chemicals compose coal? Crush a lump of bituminous coal into a powder. Fill a test tube about one-quarter full of this powdered coal. Place a wad of cotton near the mouth of the test tube to act as a filter. Insert a rubber stopper containing an L-shaped piece of glass tubing. The opening to the tubing should be drawn to a jet point. Heat the coal in the test tube over an alcohol burner. Fumes will form and escape through the jet point. Will these fumes burn? Test the gas by inserting litmus paper into the test tube. Ammonia will turn red litmus paper blue. Acetic acid will turn blue litmus paper red. (I)
134. What chemicals compose wood? Try the same experiment as above. (I)
135. What foods contain carbon? Heat small bits of such foods as bread, potatoes, cheese, and sugar. What is the final product formed after you have heated the food material until it “burns?” (I)
136. Will sugar burn? Can the vapors given off by heated sugar be ignited? (I)
137. Does methane gas come from coal? Break lumps of bituminous coal into a powder. Fill a funnel with the coal powder and place a bottle over the funnel. Turn the bottle over so that the funnel containing the coal powder is resting on the bottom of the bottle. Fill the bottle with water and then place a test tube containing water over the opening to the funnel. If a gas is given off, the gas will rise in the test tube and slowly force the water out. You may have to wait several days. (I)
138. What are the properties of methane? First make sodium acetate by adding washing soda (sodium carbonate) to a half cup of white vinegar until all the carbon dioxide possible is given off. Evaporate the liquid slowly at a low heat. The white powder that remains is sodium acetate. Now mix equal amounts of sodium acetate, calcium oxide, and sodium hydroxide in a test tube and heat slowly. Collect the methane gas given off by bubbling through water.78 (I)
139. Can a gas be turned directly into a solid? Crush moth balls and then heat gently.79 The gas given off is naphthalene. Place a jar containing ice over the gas vapor being given off by the heated moth balls. If the gas can be turned directly into a solid (sublimation), crystals will form on the bottom of the jar. (I)
140. Is turpentine a hydrocarbon? Pour a little turpentine into a jar lid. Place a short piece of clothesline rope or heavy string in the lid to serve as a wick. Light the wick. Hold a jar over the flame. If the turpentine is a hydrocarbon, it should give off carbon when it burns and a black soot should form inside the jar.80 (I)
141. What sweet-tasting foods contain glucose sugar? Make your test solutions “A” and “B.” Solution A is made by dissolving 5 grams of copper sulfate into 70 cc of water. Solution B is made by dissolving 7 grams of lye (sodium hydroxide) into 70 cc of water. Then add 25 grams of Rochelle salt (sodium potassium tartrate) to this solution. In order to use the test solutions, heat a mixture of 3 cc of solution A and 3 cc of solution B. Add a few drops of the material to be tested to the mixture. If glucose is present, a red precipitate (solid) of cuprous oxide will be formed. Test fruits, honey, molasses, corm syrup, cane sugar, maple syrup, and beet sugar. (I)
142. Can one type of sugar be changed into another? Dissolve 2 grams of cane sugar (sucrose) into 20 cc of water. Add about 15 drops of hydrochloric acid. Heat gently and then test with solutions A and B. If the sucrose turns to glucose a red precipitate should be formed. (I)
143. How do you make a test solution for starch? Dilute one part of tincture of iodine with nine parts of water. Iodine gives a blue color to materials composed of starch. (I)
144. Does a potato contain starch? Grate up a potato and then place gratings into a cheesecloth. Dip the cheesecloth into a bowl of water and squeeze the gratings in the cheesecloth. Repeat many times until the juice is in the bowl. Let the material in the bowl settle and then pour off excess water. Let liquid in the bowl evaporate. Test the dried material left in the bowl with an iodine test solution. (U)
145. What effect does saliva from your mouth have on starch materials? (U)
146. Can you make and test the properties of different kinds of alcohol? (U)
147. What foods contain fats? Crush food material and drop some in the bottom of a test tube. Cover the food material with a few drops of carbon tetrachloride.81 Let the material stand for about ten minutes and then pour a few drops on a piece of white paper. After the carbon tetrachloride has evaporated, examine the paper. If the food contains fat, there should be a transparent grease spot on the paper. Remember, carbon tet vapors are dangerous to breathe. Handle with care! (I)
148. What kind of soap or detergent gives the most suds? Fill test tubes with different kinds of detergents and soaps. Add oil drops. Which detergents and soaps mix with the oil? Add one part lime water to two parts solution. Shake the test tube and note the amount of foam compared with other soap products. (I)
149. What is the composition of egg white? Mix a half-and-half mixture of egg white and water. Add an equal amount of denatured alcohol. If albumin is present, it will coagulate into white flecks. (I)
150. What is the composition of albumin? Heat coagulated egg white in a jar lid. Test for ammonia by smell and litmus paper.82 Continue to heat the albumin. If the albumin turns black, it also contains carbon. (I)
151. What does egg yolk contain? (I)
152. What liquids are colloids? Test by shining a pen light through the test liquid. If the liquid is a colloid, the large particles reflect light and the light beam can be seen. Try shampoos, hair oil, gasoline, and other liquids. (U)
153. Can you devise a burning test for different kinds of fabrics such as wool, silk, nylon, linen, cotton, Orlon, cellulose acetate, rayon, and others? Burn small pieces of the material in the flame of an alcohol burner. Note and record characteristics of the flame, the smell, and the remaining ash after the burning. (U)
154. Can you devise a chemical test for different fabrics? Try fabrics in sodium hydroxide solution and then in hydrochloric acid. (U)
155. Can you make rayon? Compare the rayon you make with commercially made rayon strands. (U)
156. Can you test different plastics to determine if they are thermoplastic (molded by heat and pressure and can be remelted and remolded many times), or thermosetting (cannot be reheated and remolded). The hot tip of a glass rod makes a dent in thermoplastic but not in thermosetting plastic. Thermoplastics burn while in flame while thermosetting plastics give off a very strong smell but do not burn. (U)
1 “Oilcloth” means linoleum in this context. Vinyl flooring is a good substitute.
2 See Appendix A for a list of material sources.
3 Electrical connectors used on the power supply.
4 Incandescent light bulb, not fluorescent or LED.
5 Careful! It is not cool enough to touch after 10 seconds!
6 Originally “graduate” here. This terminology has fallen out of favor. Use the term “graduated cylinder” for clarity.
7 See Note 5 in Appendix E about baby bottles.
8 Use pure cotton, not plastic (e.g., polyester), rope for this application. If you happen to have access to it, fiberglass wick material is a better choice than cotton.
9 Denatured alcohol is generally a better choice, and “rubbing alcohol” can mean different things. See Note 6 in Appendix E for more information.
10 Formerly found in an office! See Note 7 in Appendix E about ditto fluid.
11 Again: pure cotton, not plastic, rope.
12 Blowing on the end is an example of pipetting by mouth, and it should be strictly avoided. See “Modern Safety Practice”.
13 See “Support Stand”.
14 Use a metal, not plastic lid.
15 That is, the tripod described in the next project.
16 See Note 8 in Appendix E for more about tin cans and their sizes.
17 #63 jars are no longer made. See Note 9 in Appendix E.
18 “Tongs” not tweezers, and they are no longer this common. Either the coat-hanger ring support described next or a test tube clamp ($1–$3 online) may be a better choice.
19 Specifically, a “lockseam” type curtain rod.
20 A solid wire type coat hanger, not one made of plastic. If you don’t have coat hangers like this, obtain steel “music wire” rod or brass rod from a hardware or home improvement store, roughly 3/32” in diameter.
21 “20 gauge”; see Appendix A for sourcing information.
22 For the carbon arc furnace in particular, see Note 11 in Appendix E for an alternative.
23 The original phrasing here was “In the event of a shock, you are perfectly grounded, and the electricity will pass through you.” A reminder that “perfectly grounded” is not always a good thing!
24 A specific type of battery—one with a carbon rod—is needed. Please see Note 12 in Appendix E. You can also purchase carbon rods alone; see Appendix A.
25 Don’t touch this material directly. Wear protective rubber gloves while cleaning off the rods and wash your hands thoroughly with soap and water when you are done. Read Note 17 in Appendix E for additional discussion about safety around chemicals.
26 See the safety notes in the previous section and Note 11 in Appendix E about safety when using any alternatives to the salt water rheostat.
27 The carbon arc furnace is as bright as the sun: Use a welding shade approved for carbon arc, not just a set of sunglasses. See the Modern Safety Practice notes on this project and also Note 13 in Appendix E.
28 Glass baby bottles. See Note 5 in Appendix E.
29 See Note 14 in Appendix E about working with dry ice.
30 Steel music wire (3/32” in diameter) or 12 gauge solid-core bare copper wire may be substituted.
31 Coffee filters are also available at any grocery store.
32 Today, the term “animal” is carefully defined to mean only multicellular organisms that have certain characteristics. One might properly describe a paramecium as being an animal-like single cell organism. Paramecia (the plural of paramecium) will appear again in Part III.
33 The ultraviolet light in sunlight will typically break down the chlorine in tap water. As an alternative to collecting rainwater, you can leave a (clear) container of water for several days in a sunny place such as a windowsill.
34 Vitamins and nose drops now more commonly come in plastic containers. See “Bottle, Dropper” in Appendix A for sources.
35 Modern laboratory wash bottles have the same function, but they are usually made of squeezable plastic with an air valve. Can you design a version that works this way?
36 Various versions of this project call for paper towels, filter paper, or acid-free paper from an art or office supply store. Can you perform an experiment to find out if there is a difference?
37 An easier approach is to obtain hibiscus herbal tea bags (or dried hibiscus flowers) from a grocery store, lightly wet them, and dip the paper into the resulting red liquid.
38 Other natural indicating substances include rhubarb stems, blueberries, and turmeric. What properties do these indicators have?
39 Or nearly free.
40 E.g., a strip cut from the lid of a tin can. Use tin snips or aviation snips (heavy-duty scissor-like tools available at most hardware stores). Use caution because the cut edges of the tin can be very sharp.
41 This table has been updated with the weights of modern US coins. See Note 15 in Appendix E for more information.
42 Inside a specific type of battery. Please see Note 12 in Appendix E.
43 A glowing splint is a long, thin strip of wood that is used in the laboratory for testing how a sample reacts to a weak flame. A good example of a glowing splint is a long fireplace match, after the head finishes, leaving a long strip of wood with a weak flame on the end. Always wear safety glasses when testing a gas for flammability.
44 See Note 12 in Appendix E about batteries. See Appendix A for additional sources.
45 No longer; see Note 16 in Appendix E about acids.
46 Zinc-carbon battery. Note 12, Appendix E.
47 A long fireplace match (“glowing splint”) will reach without a wire. (Not even this is a good reason to use a cigarette!)
48 What kind of a question is that? Ask any parent, or even better, do the research on your own!
49 It is better to start with clean acid, rather than acid from a battery. Hydrochloric acid can be used as a substitute for sulfuric in this experiment. See Note 16 in Appendix E for more about acids.
50 See Note 5 in Appendix E about baby bottles.
51 It is a general rule to always pour acids into water, rather than water into acid. There are several reasons for this, both for safety and for good mixing. Can you think of what the reasons are?
52 There are many other possible ways to build an adjustable clamp of this nature. Can you design one that could be 3D printed?
53 Some recipes for this “garden” call for using non-iodized salt. Others say to use either iodized or non-iodized salt. Can you do an experiment to learn whether and how iodine affects the growth of the garden?
54 See Note 18 in Appendix E about mercurochrome.
55 You may find it easier to use a bowl that can be put in the microwave. One hazard to watch out for is that water in a microwave can become superheated and boil instantly (and sometimes violently) when you add something to it. You may have seen this phenomenon when adding pasta or a tea bag to water or when stirring hot water with a spoon. Related question: Why do chemists use boiling chips?
56 As alcohol is flammable, it isn’t safe to just fill the kettle with alcohol and put it on the stove. How could you heat it safely, without risk of fire?
57 Most often called “Linear polarizing film.”
58 See Note 19 in Appendix E about specific gravity vs. density.
59 BBs and other types of metal shot can be found at sporting good stores.
60 As an alternative, you can use an old 2-liter soda bottle for type A. Since a 2-liter bottle is squeezable (unlike the glass gallon jug), you can directly screw the cap on and omit the rubber sheet. Can you understand why this is equivalent?
61 Apparently, you can use a (sealed) ketchup packet instead of an eyedropper in this experiment. How and why does that work?
62 Related questions: What else could make the eyedropper float or sink? How does a Galilean thermometer work? Can you now build one?
63 A long fireplace match is a good type of match to use for this experiment.
64 A “bottle” in this context could be (for example) a single mason jar filled with oxygen at atmospheric pressure. Colloquially, a “bottle” of oxygen usually refers to a container of highly compressed oxygen—which you do not want. Compressed oxygen is extremely dangerous.
65 Ask a glassblowing shop to help you with this; they have special hydrogen torches.
66 Even though the answer to this is “yes,” do not consider a homemade extinguisher to be a substitute for having a “proper” one on hand for safety!
67 Take care not to ingest any of the lime water. A better procedure is to blow into a long rubber tube attached to the straw.
68 Ammonia gas is toxic. Use extreme caution and excellent ventilation. If you can smell it, you are risking excess exposure.
69 We recommend reading about and not experimenting with chlorine gas. Chlorine gas is toxic, and producing large amounts of it carries significant safety risks. If you have a compelling reason to generate chlorine gas, consult with a professional chemist or chemistry professor about proper safety practice first.
70 Only ever taste or touch very well diluted food-grade acids that are sold as food. Other acids, or concentrated versions, can be extremely harmful to your body. Food-grade hydrochloric, citric, acetic, phosphoric, and malic acids are potentially good choices if you wish to taste one.
71 Use food-grade lye.
72 Tread carefully: some bases are outright poisonous. Don’t taste anything if you’re not certain that it is safe to eat. A good one to try is hydrated lime (calcium hydroxide, not the fruit), which is used in food preparation. Another to consider is baking soda, which is technically amphoteric, meaning that it can act as either an acid or base in different circumstances.
73 Likely not available at your local drug store. See Appendix A.
74 Hydrogen sulfide is not just unpleasant, it is toxic. Never directly smell chemicals by placing them close to your face. Allow the smell to diffuse towards you naturally, or waft the air towards you with your hand.
75 Classic American-style yellow mustard, not Dijon!
76 What other chemicals and elements will give interesting flame tests? How can you find out?
77 Once you light it, magnesium burns rapidly at extreme temperatures and emits a blinding light. Use a #14 welding shade or equivalent to protect your eyes. See Note 13 in Appendix E for more information. burning metal presents a special hazard, in that fire extinguishers will only make a magnesium flame bigger. Have a plan for extinguishing the flame if you need to. A metal flame can usually be extinguished under a pile of fully dry (not moist) sand. However, it is usually best if you can set the piece of burning magnesium down on a completely fireproof surface and just allow it to burn out on its own.
78 Use caution; methane is a highly flammable gas. It is the same “natural gas” that is used in most gas stoves and heaters.
79 See Note 20 in Appendix E about mothballs.
80 Remember proper safety practice when working with flames. See Note 3 in Appendix E.
81 Do not use carbon tetrachloride. See Note 21 in Appendix E.
82 Again: allow the smell to diffuse towards you naturally, or waft the air around with your hand.