High School Geometry Unlocked (2016)
Chapter 2. Congruence and Theorems
Lesson 2.3. Constructing Lines and Angles
These days, if we want to create a perfectly precise image with circles, straight lines, or other shapes, we could just use a computer program. However, throughout history, when people needed to be precise, they had to get creative by using instruments. A compass is an instrument that aids in drawing perfect circles of almost any size. A straightedge aids in drawing perfectly straight-line segments. You’ll most likely use a ruler as your straightedge. However, keep in mind that when drawing compass-and-straightedge constructions, you should not be using measuring tools, such as the markings on your ruler. You can find compasses and rulers in the school supply section of any well-stocked department store.
Geometry classes today still ask students to use compass and straightedge constructions. This is actually a great way to gain a kinesthetic understanding of concepts such as bisector, perpendicular, and congruence.
Supplies
For this section, you
should have your compass,
straightedge, and scratch
paper ready. You should
be actively practicing the
constructions as you read.
CONSTRUCTING LINE SEGMENTS
![]()
The first basic exercise is to draw a straight line through two points. This may seem trivial to accomplish; however, some people have trouble getting things lined up exactly right, which is mostly due to the thickness of a typical ruler. Practice getting your line to cross the points precisely. Keep your pencil sharp for these exercises, and angle the pencil lead so that there’s no gap between the lead and the edge of the ruler.
Some compasses are
cheaply made, and
frustrating to use. A good
compass will not have
wobbly parts, and will hold
its radius and pencil lead
quite firmly when you use
it. If you’re having a hard
time making circles, the
problem might be your
compass, and not you!
PERPENDICULAR LINE SEGMENTS
In this exercise, you’ll use your compass and straightedge to construct two line segments that are precisely perpendicular to each other. If you’ve never used a compass before, it may take some practice to get the hang of it. If needed, try making some practice circles on your own first.
Supplies
If you prefer not to draw
directly in this book, access
your student tools and
download larger, printable
versions of the images.
Method 1—Start with a Point
It’s important to label
points where indicated in
the instructions, because
you’re going to connect
these points later.
![]()
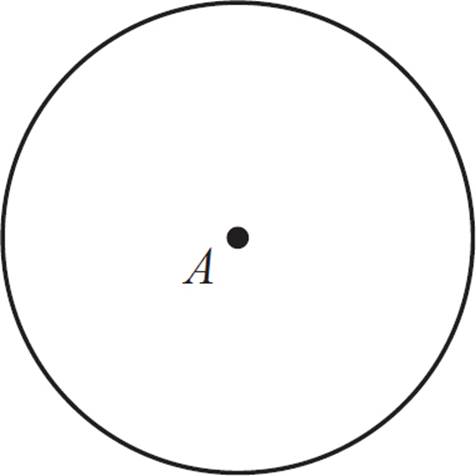
Begin with a point, as in the figure above. For the purposes of this exercise, label the point A. Position the compass so that the needle is on point A, and make a circle that is perhaps a couple of inches in diameter.
Note that with any of these
constructions, it’s generally
better to use larger
circles when possible,
as ultra-small circles
make it more difficult to
find precise intersection
points. Strike a balance
between reasonable size
and clarity in your figures.
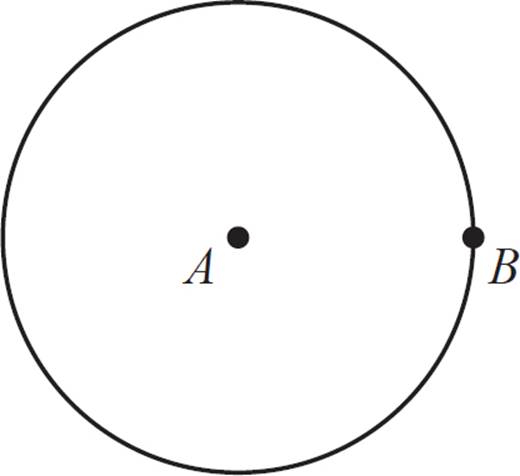
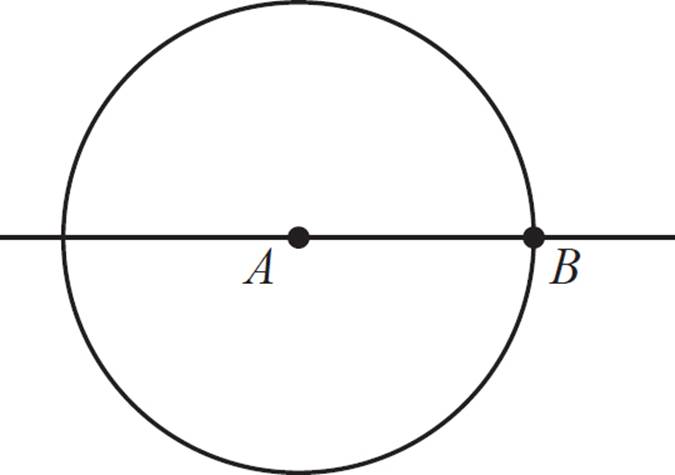
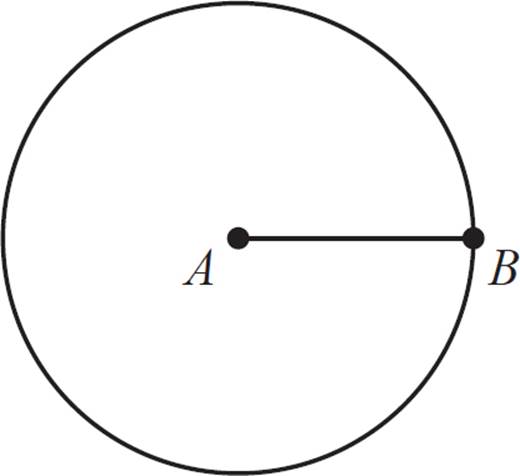
Now, choose any point on the circumference of the circle, and label the point B.
Note: You could have also started with two points, A and B. You would make a circle by placing the compass needle on A, and the drawing point on B. Either way, at this step you’ll have a figure like the one below:
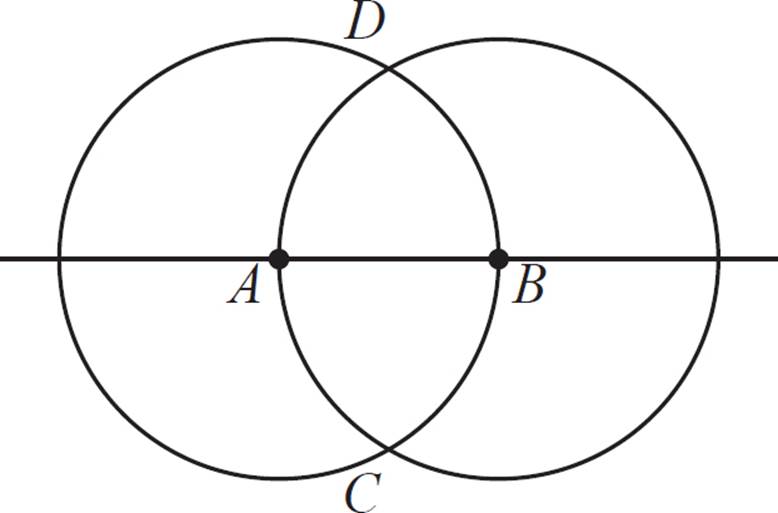
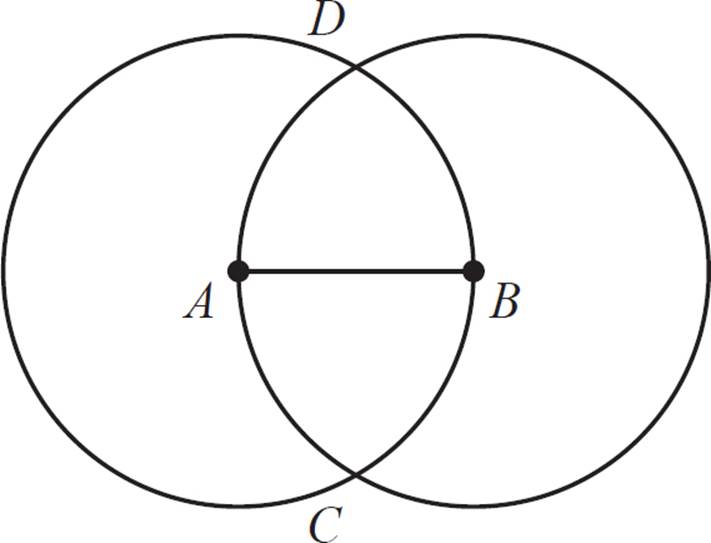
Next, position the compass so that the needle is on point B, and the drawing point is on A. Try to be precise! With this radius, make a second circle, which will intersect the first circle in exactly two places, points C and D. Note that this circle has exactly the same radius as circle A.
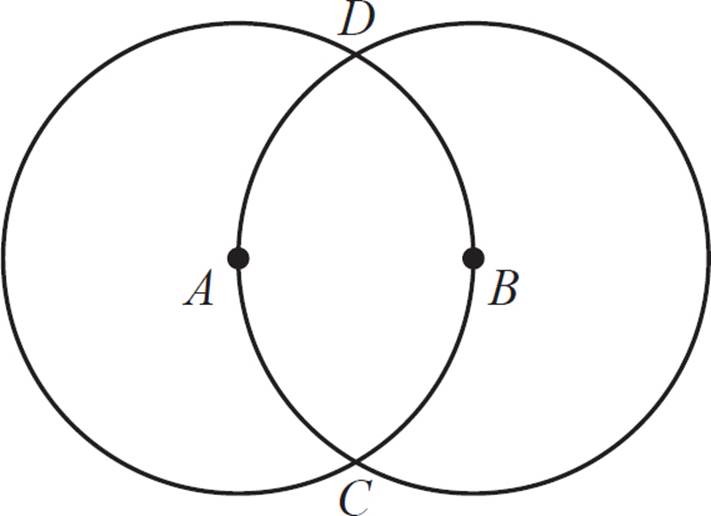
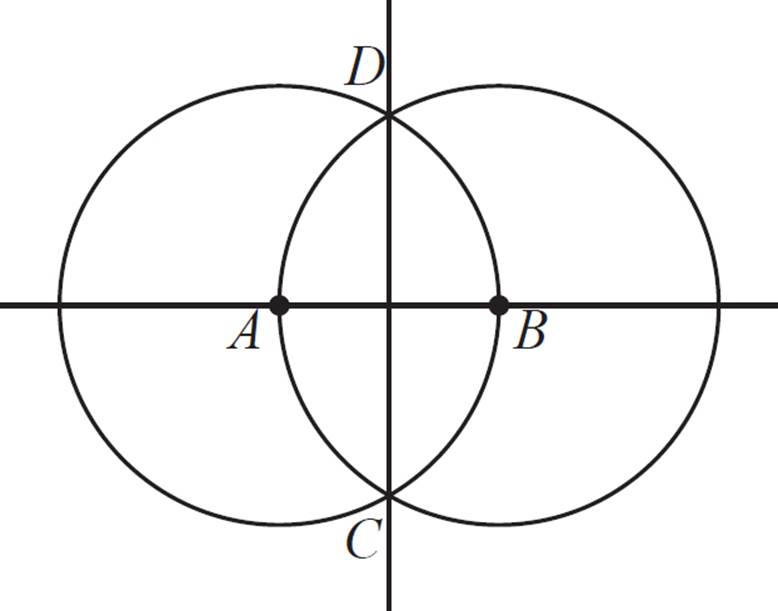
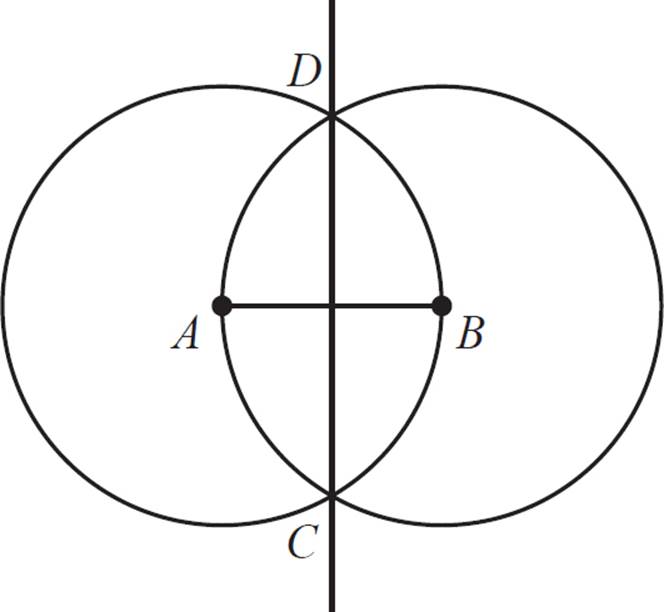
Finally, use your straightedge to draw a line that connects points A and B. Also draw a line that connects the two intersection points of the circles (points C and D in the figure above).
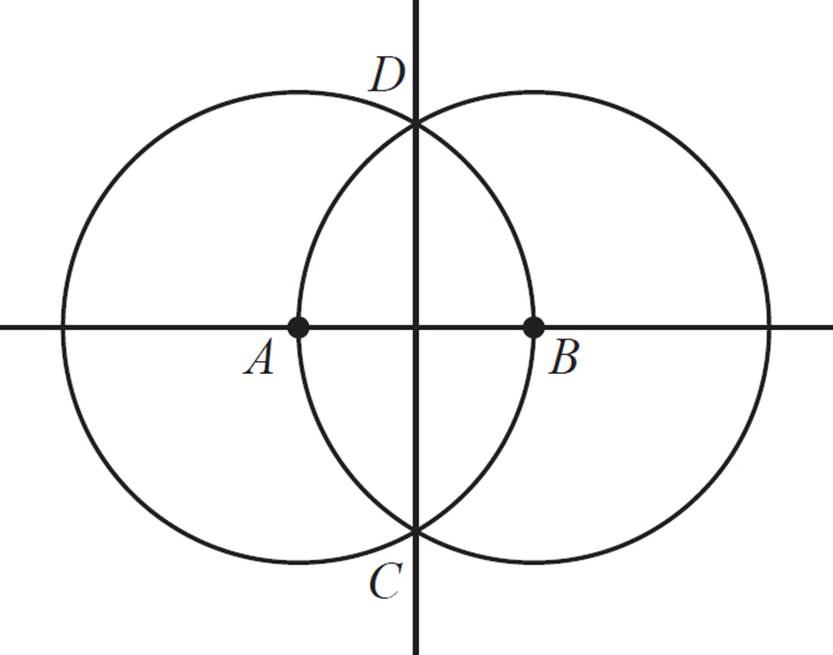
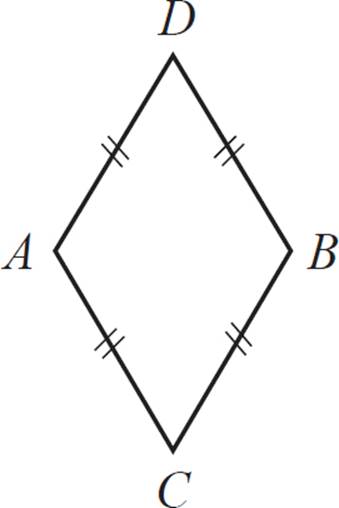
The two lines are precisely perpendicular to each other. One reason this works is that each pair of adjacent points is the same distance apart, as shown in the figure below. Those four points would actually form a rhombus, and by definition, a rhombus has diagonals that are perpendicular to each other.
Method 2—Start with a Line Segment
![]()
This method is essentially the same as Method 1, except that we begin with a line segment instead of just a point. Begin with a straight-line segment like the one above, with a point labeled A on the line segment. Using your compass, make a circle centered at point A.
This circle intersects the line segment in exactly two places. Choose either one of these intersection points and label it B.
Next, position the compass so that the needle is on point B, and the drawing point is on A. With this radius, make the second circle, which will intersect the first circle at exactly two places, points C and D.
Finally, use your straightedge to draw a line between those two intersection points.
The two lines are precisely perpendicular to each other.
Once you’re comfortable with these constructions, you may be able to avoid drawing complete circles with the compass, but instead draw partial arcs at the predicted point(s) of intersection. You would follow the same steps above, but “eyeball” the figure and only draw arcs at the relevant spots on the figure. This is a totally optional adjustment, and may take practice.
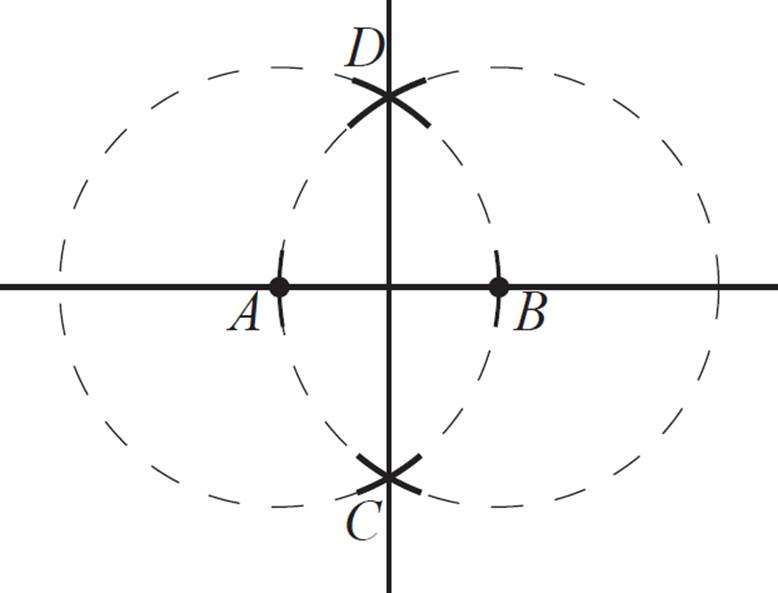
From here on out, we’ll show the full circles with dashes and the relevant “arc spots” highlighted in bold.
Try a few more for practice! Follow the steps as above to construct perpendicular lines. Repeat until you’re comfortable with the process.
PERPENDICULAR BISECTOR OF A LINE SEGMENT
![]()
Next, you’ll use your compass to construct a perpendicular bisector of a line segment. This is the same as the previous exercise, but you’ll use the endpoints of the line segment (A and B in the figure) as your compass points. Use this approach when you need your new perpendicular line to intersect at the exact midpoint of the first line. Begin with a line segment like the one above, with the endpoints labeled A and B. Position the compass so that the needle is on A, and the drawing point is on B, and make a circle.
Next, position the compass so that the needle is on point B, and the drawing point is on A. With this radius, make the second circle, which will intersect the first circle at exactly two places, points C and D.
Finally, use your straightedge to draw a line between those two intersection points.
The two lines are precisely perpendicular to each other. Additionally, the new perpendicular line intersects the exact midpoint of the line segment AB.
Try a few more for practice! Follow the steps as above to create a perpendicular bisector of a line segment. Repeat until you’re comfortable with the process.
PERPENDICULAR LINE THROUGH A POINT

Next, you’ll use your compass to construct a line that is perpendicular to an existing segment, and also passes through a given point. This is a little like the perpendicular bisector construction, but in reverse. Use this approach whenever you need a perpendicular line to go through a particular point in the figure.
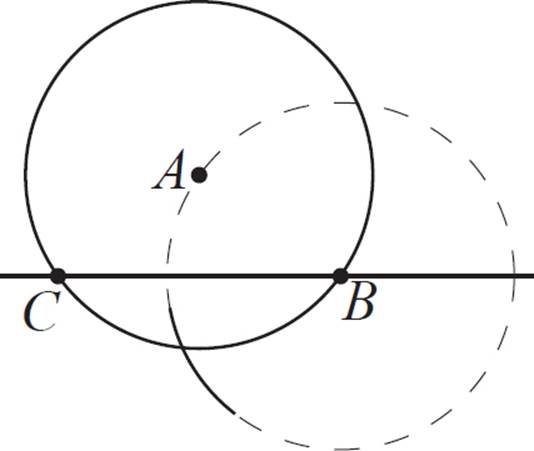
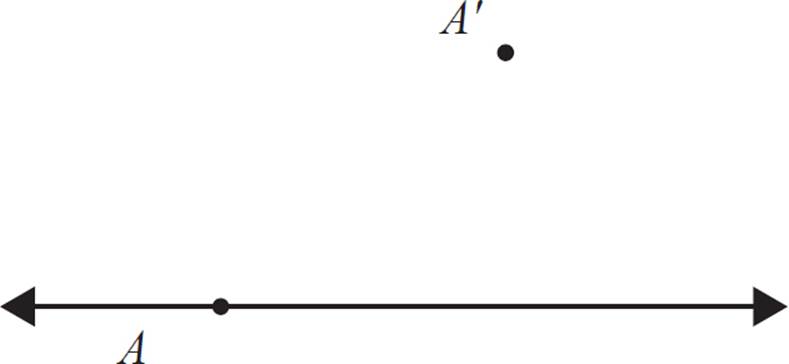
Begin with a line or segment like the one above, and a point A not on the line. Position the compass so that the needle is on A, and make a circle that intersects the line in two places, points C and B. We’ll call these intersection points Band C.

Then, place the compass needle point on B, and the drawing point on A. Make a circle.
Then, place the compass needle point on C, and the drawing point on A. Make a circle.
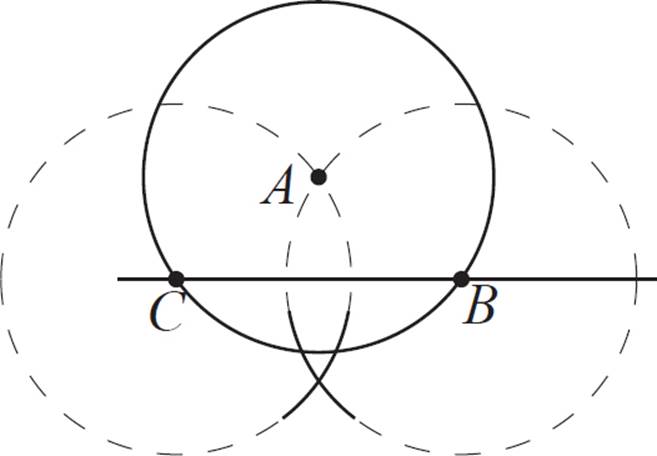
Finally, use your straightedge to draw a line between those two intersection points.
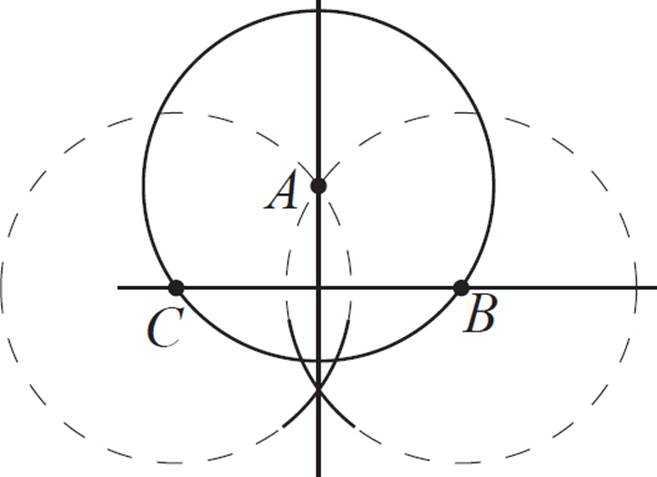
The two lines are precisely perpendicular to each other, and they pass through the point A.
Try a few more for practice! Follow the steps as above to create a perpendicular line through a point. Repeat until you’re comfortable with the process.
ANGLE BISECTOR
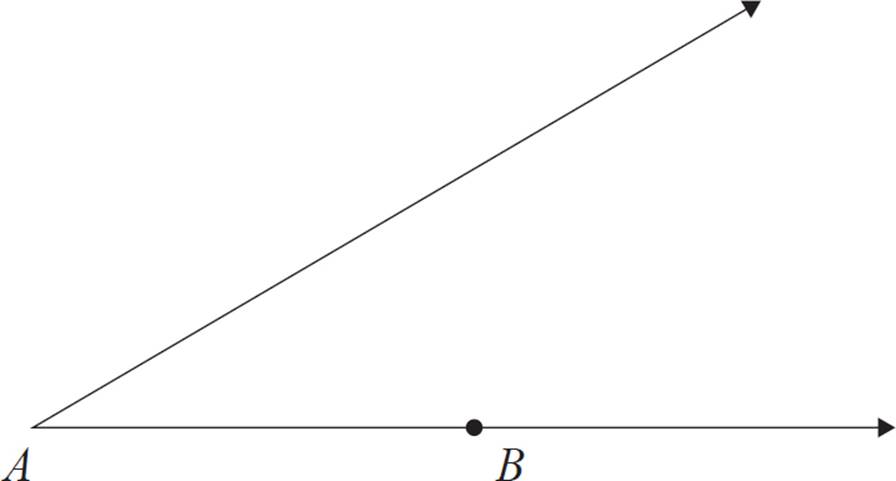
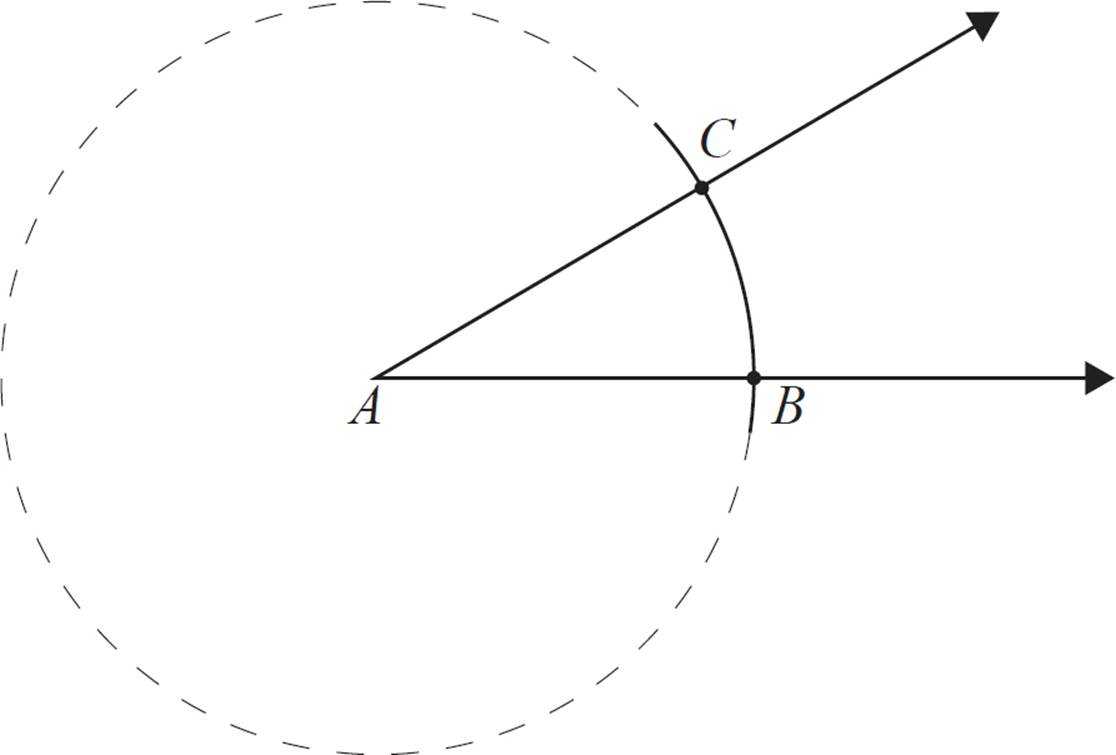
In this exercise, you’ll construct a line segment that precisely bisects an existing angle. Begin with an angle like the one above (drawn using straightedge), with the vertex labeled A, and another point labeled B on one of the angle’s legs. Position your compass so that the needle point is on A, and the drawing point is on point B. Turn the compass to make a circle, or just an arc that crosses both of the angle’s legs. Each of these two intersection points will be equidistant from the angle’s vertex. Label other intersection point C.
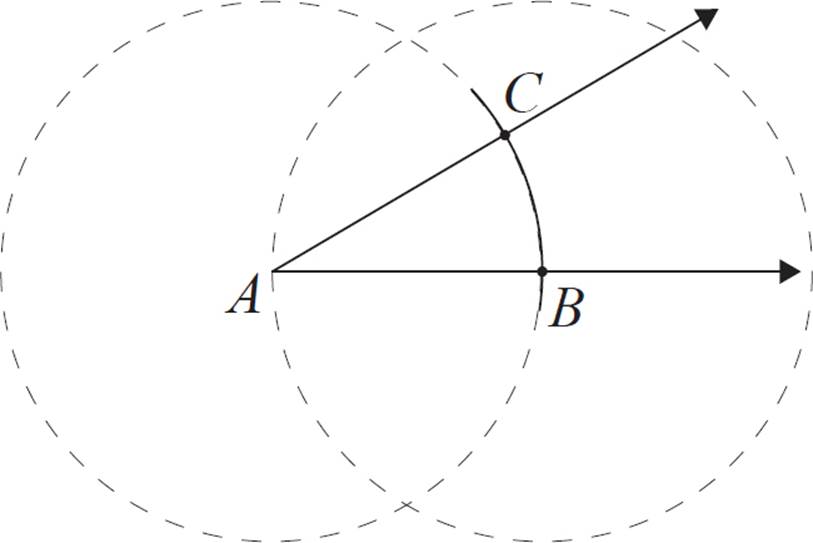
Now, position the compass needle point on B and the drawing point on the vertex A. With this radius, make a circle, or just an arc that spans the angle’s interior.
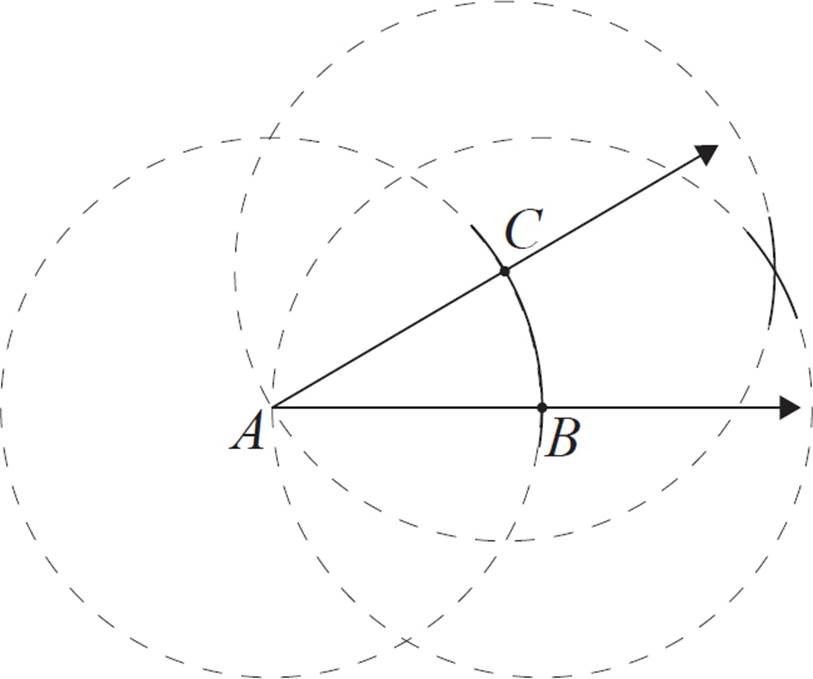
Then, position your compass with the needle point on C and the drawing point on the vertex A. With this radius, make a circle, or just an arc that spans the angle’s interior.
Finally, use your straightedge to draw a line from this new intersection point (labeled D in the figure below) to the angle’s vertex.
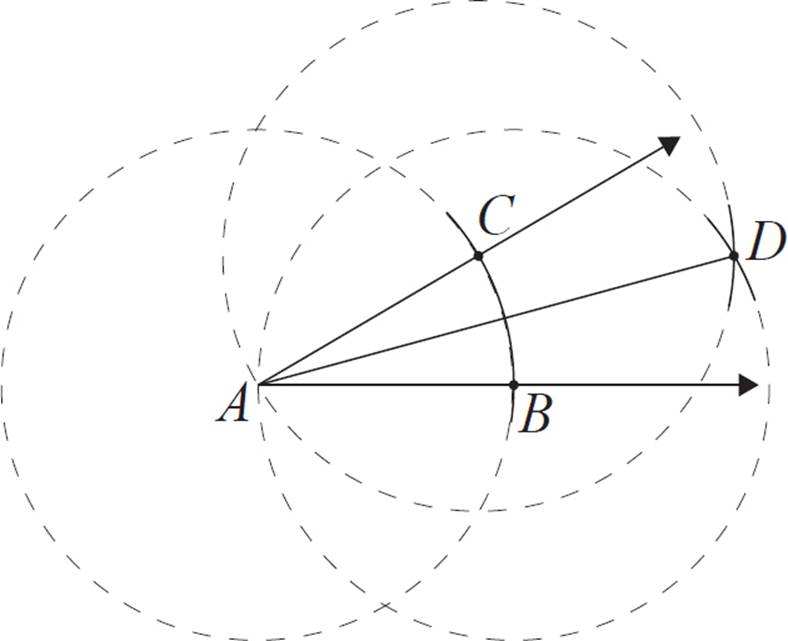
This new line is a bisector of the original angle—it divides the angle precisely in half. One way to prove this is with the SSS triangle congruence theorem. If we connect points to create triangles ABD and ACD, these triangles would be congruent, because they have three pairs of corresponding congruent sides.
Try a few more for practice! Follow the steps as above to construct an angle bisector. Repeat until you’re comfortable with the process.
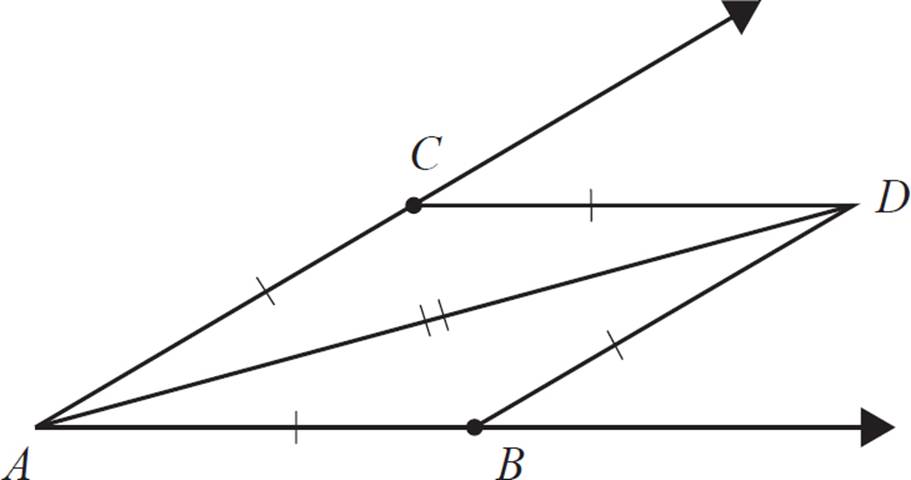
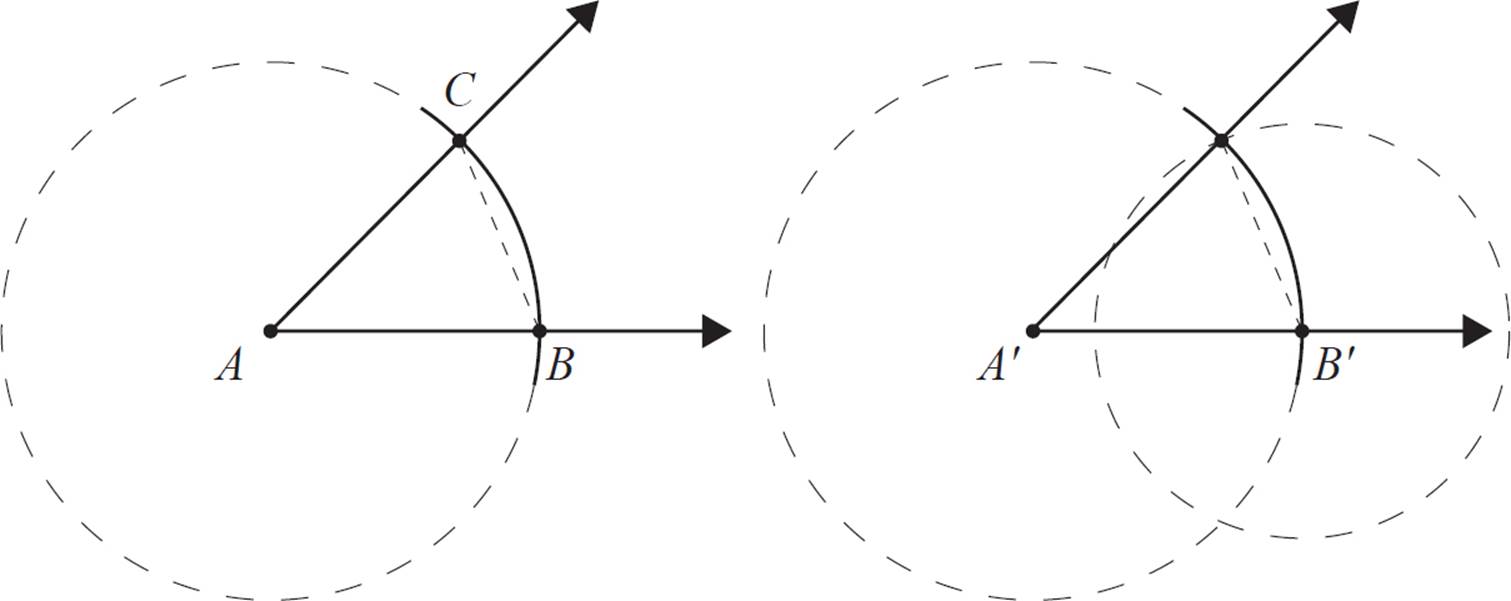
COPY AN ANGLE

Here, you’ll construct an angle that is congruent to another angle. Begin with an angle like the one above, with the vertex labeled A. Then, use your straightedge to draw another line segment nearby. This line segment will be one of the legs of the copied angle. Draw a point on the line segment, and label it A′.

Next, position the compass needle point on the vertex A, and make an arc that intersects both of the angle’s legs. The arc can be any size. Label the intersection points B and C.
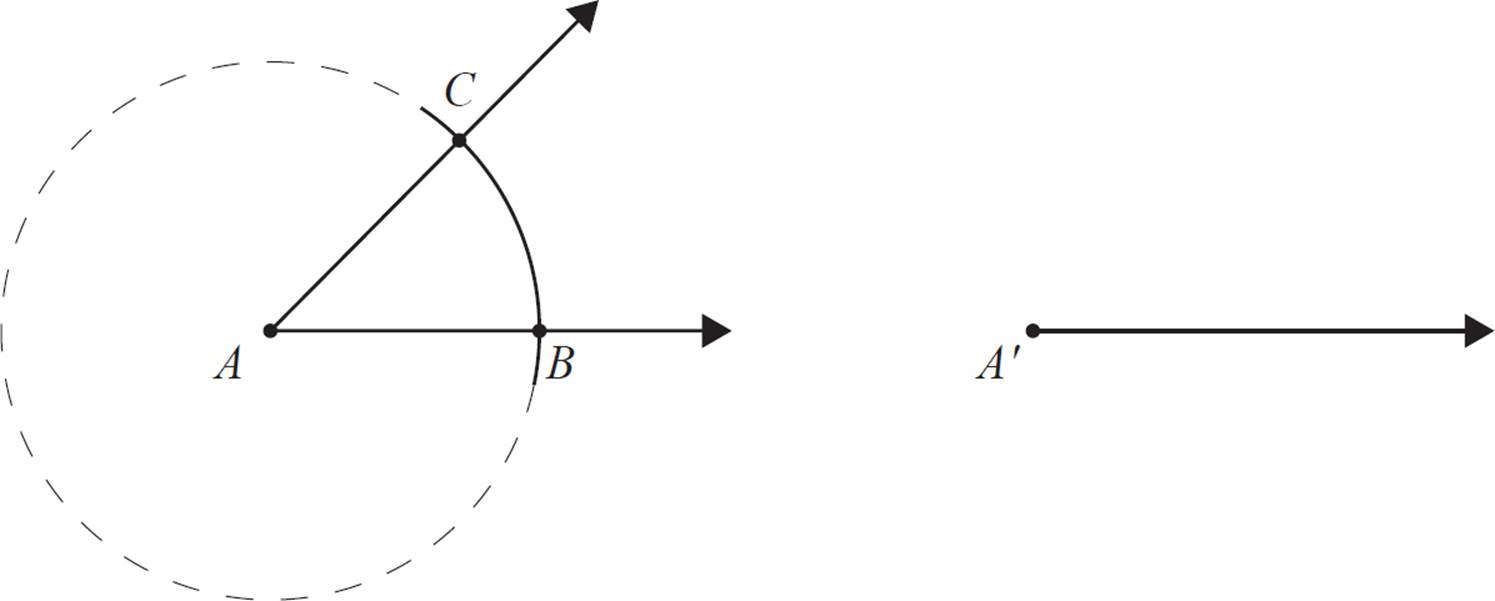
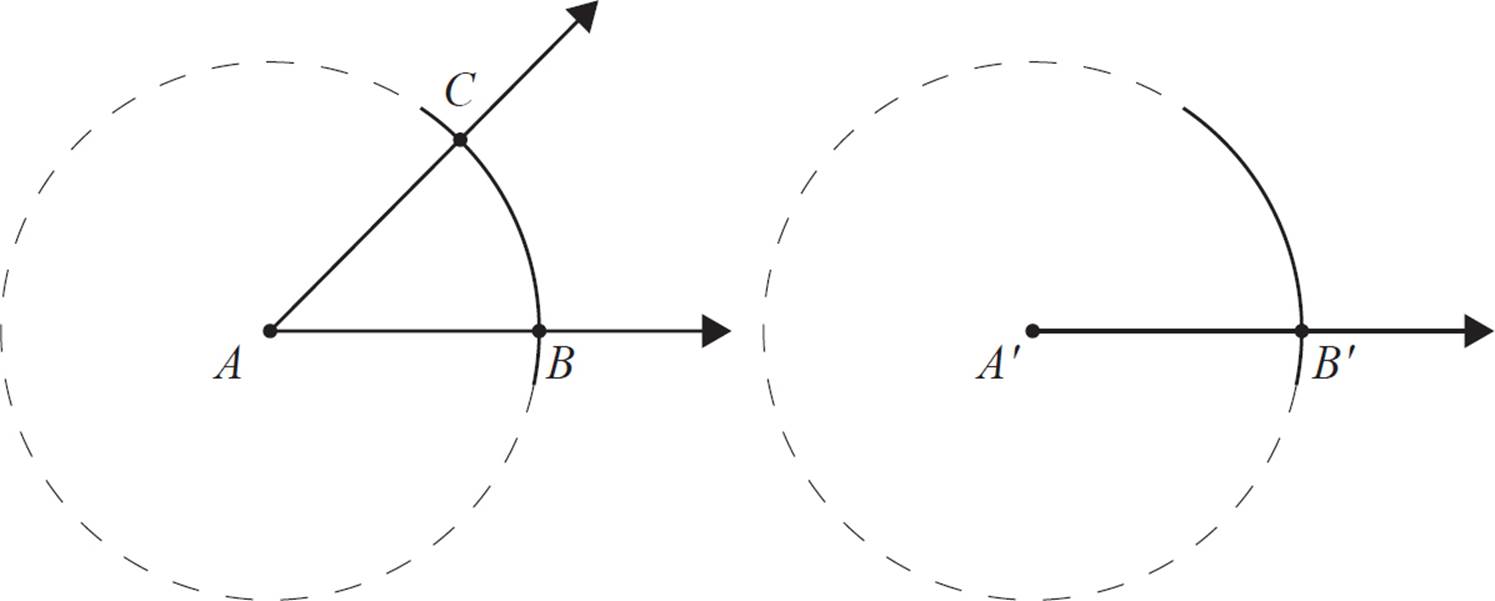
For this step, it’s important to carefully hold the compass to the same radius as for the arc above. Position the needle point at A′, and make a circle, or just a large arc that intersects the line segment. Label the intersection point B′.
Next, use your compass to “measure” the distance between points B and C. Position the compass needle point at B, and the drawing point at C. Carefully holding the compass, position the needle at point B′, and draw an arc that intersects the other arc in your copy figure.
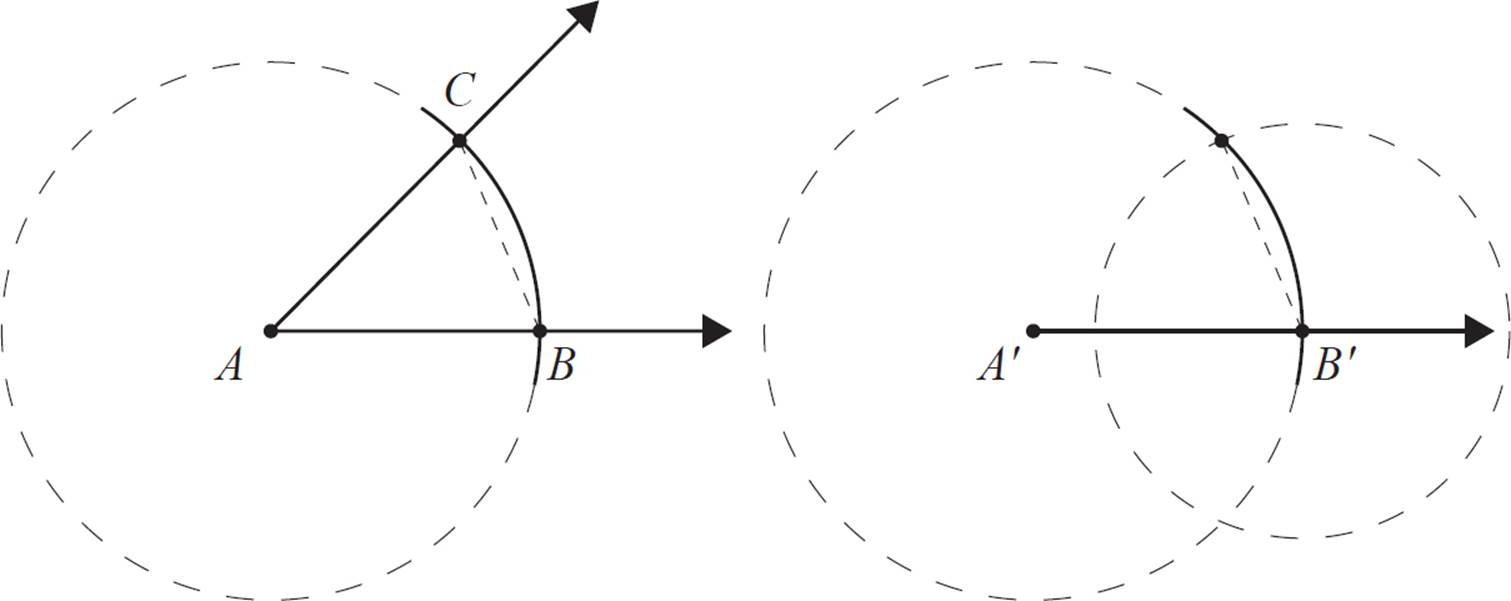
Finally, use your straightedge to draw a line through point A′ and the intersection of the two arcs. This new, copied angle will be congruent to angle A.
Try a few more for practice! Follow the steps as above to construct an copy of an angle. Repeat until you’re comfortable with the process.
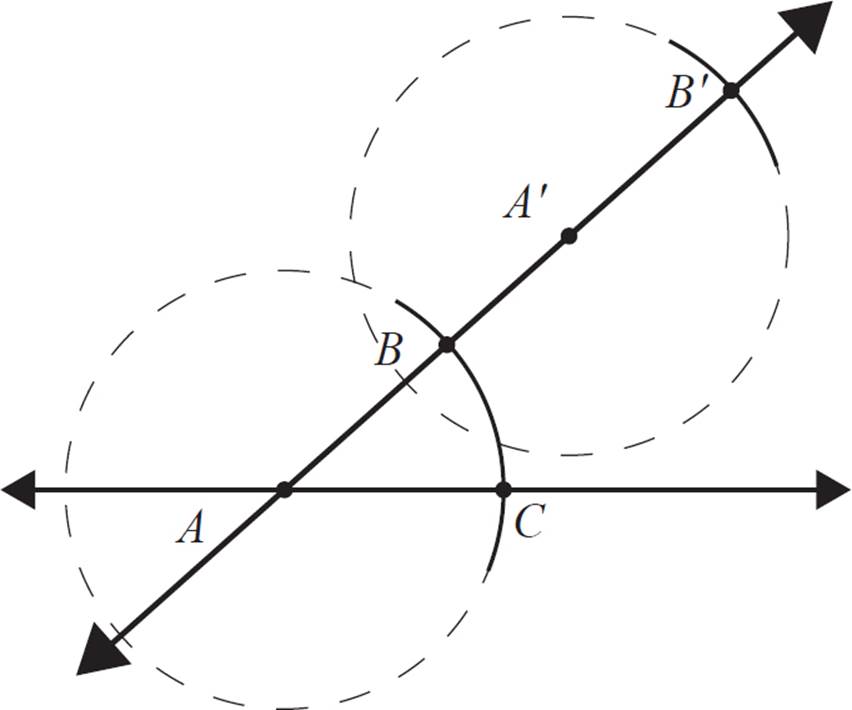
PARALLEL LINE THROUGH A POINT
In this exercise, you’ll construct a line that is parallel to another line, and also goes through a specified point. This method is based on our knowledge of parallel lines and transversals—that when two parallel lines are intersected by a transversal line, the alternate interior angles are congruent. Here, we’ll copy an angle, using the strategy from the previous exercise, in order to create a parallel line.
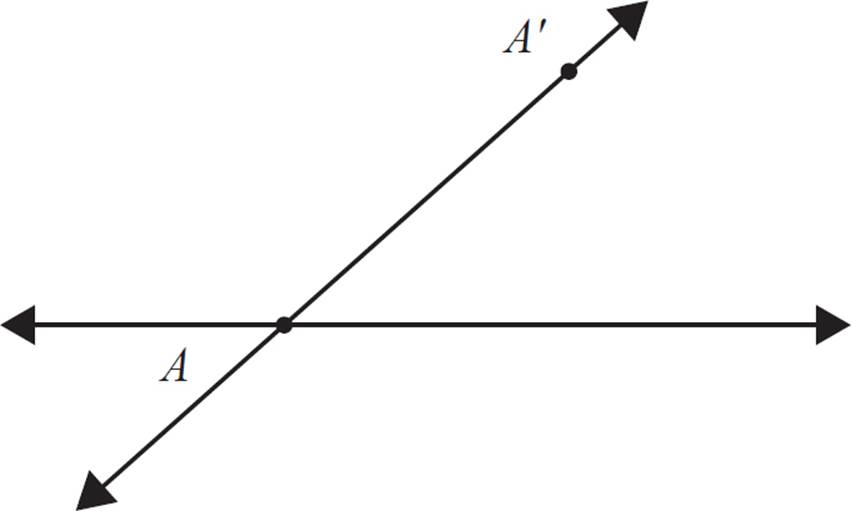
Begin with a line like the one above, with a point somewhere on the line (labeled A) and a point not on the line (labeled A′). Use your straightedge to draw a line segment that intersects A and A′. Make sure to extend the line a little beyond point A′ so that you have space to copy the angle there later.
Next, using the strategy from the previous exercise, copy the angle formed by these two lines. Position the compass needle point on the vertex A, and make an arc that intersects the two line segments. Label the intersection points Band C.
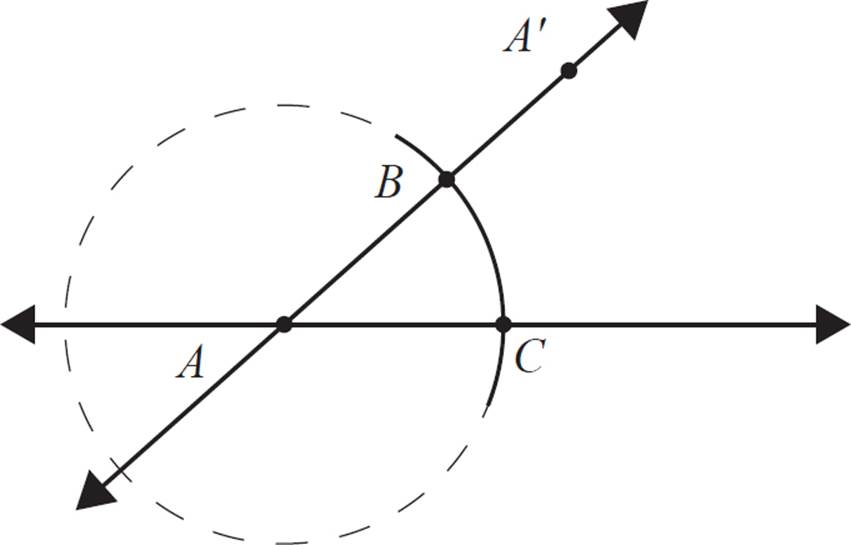
Carefully holding the compass to the same radius, position the needle at point A′. Draw an arc, and label the intersection point B′.
Next, use your compass to “measure” the distance between points B and C. Then, carefully holding the compass to the same radius, position the needle at point B′, and draw an arc that intersects the other arc in your copy figure.
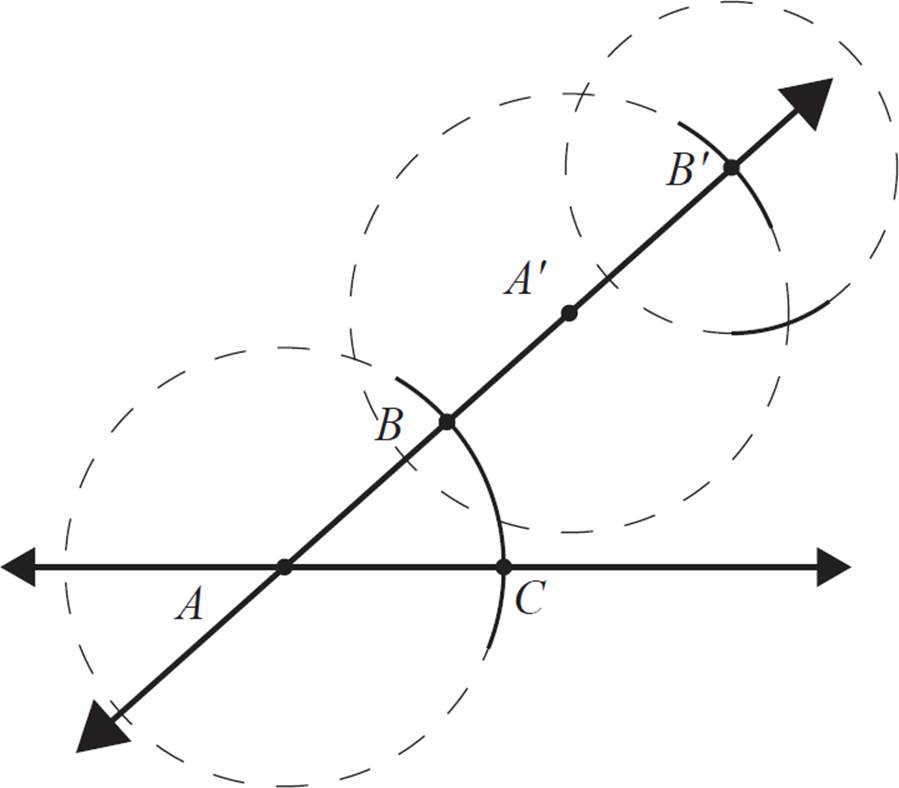
Finally, use your straightedge to draw a line through point A′ and the intersection of the two arcs. This new, copied angle will be congruent to angle A.
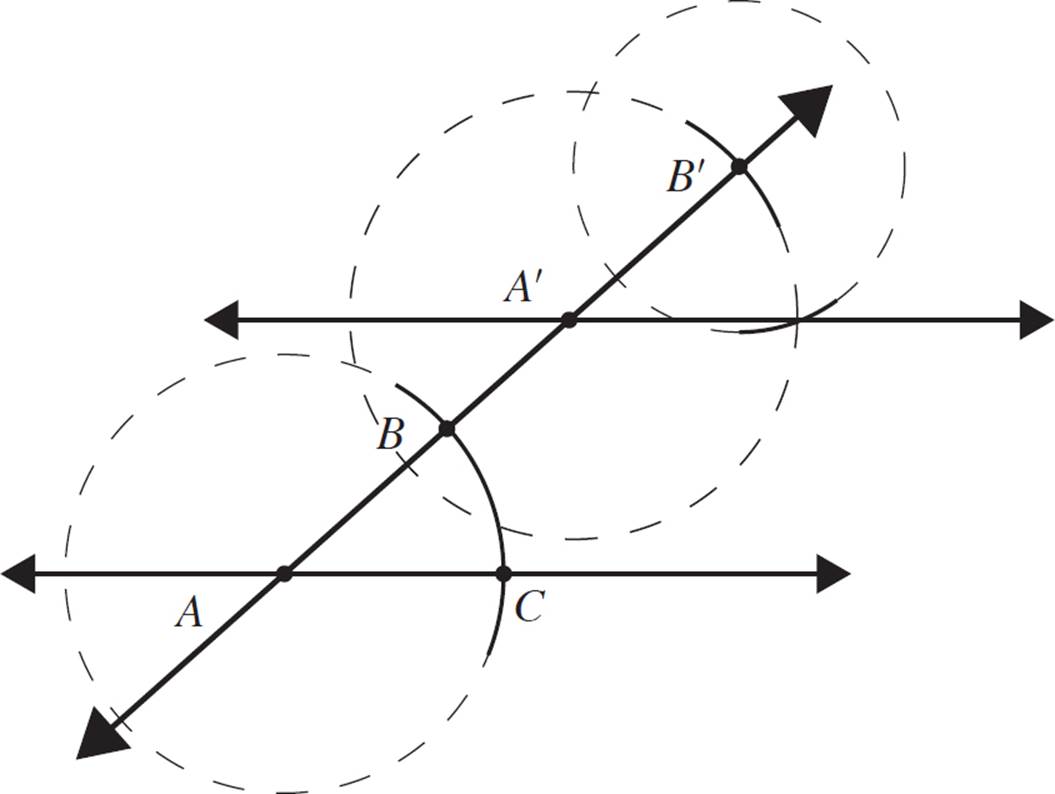
Try a few more for practice! Follow the steps as above to construct a parallel line through a point. Repeat until you’re comfortable with the process.