Pre-Algebra Out Loud: Learning Mathematics Through Reading and Writing Activities (2013)
Chapter 8. Geometry
WHAT? Introduction
The first number systems were developed by the Egyptians and Babylonians some four thousand years ago. Around 400 to 300 B.C., the ancient Greeks became the masters of mathematics, believing that the only way to prove a rule to be true was to use a straightedge (ruler without number marks) and a compass (which was often a piece of rope wrapped around a twig or a stone). For this reason, we think of the Greeks as the discoverers of geometry.
In this chapter, we first explore plane figures: rectangles, circles, triangles, and other two-dimensional figures. According to the Common Core State Standards, fifth-grade students are expected to be able to classify these figures into categories based on their basic properties. The second mini-lesson introduces two of the three-dimensional solids: pyramids and prisms.
WHY? Objectives
Using the activities in this chapter, pre-algebra students:
· Understand and explain various significant features of plane figures
· Complete a semantic feature analysis chart showing and comparing the different features of plane figures
· Write out a method of operation for solving geometry problems
· Create a math story using geometric terms from a lesson
· Learn to paraphrase math content
· Research and write biographies of famous geometers
Mini-Lesson 8.1 Plane Figures
CCSS Standard 7.6: Geometry
Draw, construct, and describe geometrical figures and describe the relationships between them.
In geometry, two-dimensional figures are called plane figures because they are sketched on a flat area. Plane figures have the following properties:
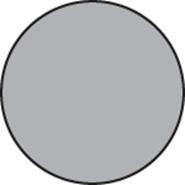
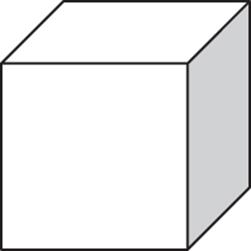
· They are closed sketches made of line segments with sides or curves with no gaps. The following square and circle are plane figures:

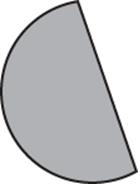
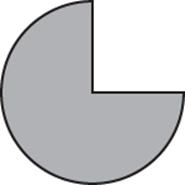
· Plane figures are also convex: any line segment drawn inside the plane figure will not go outside and back in. The first figure is convex, and the second one is not. Because the line segment is not completely contained in the second figure, the second figure is not convex; rather, it is concave.
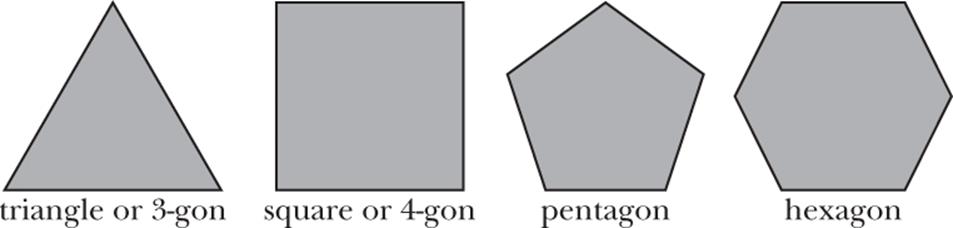
· Polygons are closed, convex figures with line segments for sides. Generally these figures are called n-gons, where “n” is a prefix for the number of sides: five sides for a pentagon, six to a hexagon, seven for a heptagon, and so on. However, a 3-gon is called a triangle, and a 4-gon is a quadrilateral.
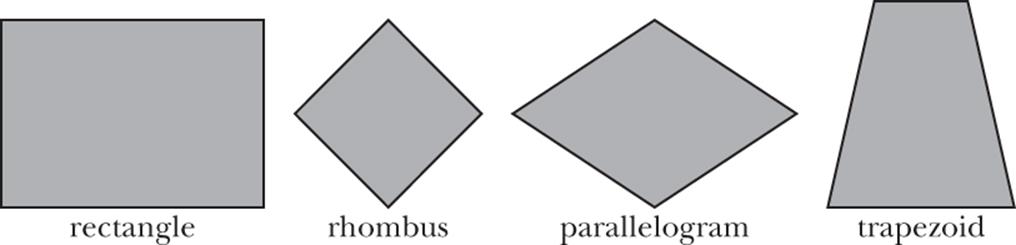
· Quadrilaterals (4-gons) are a special class of polygons. Each has its own set of special properties. (See the semantic feature analysis activity in this chapter.)
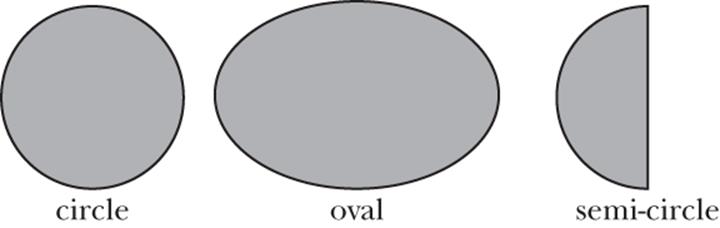
· Circular plane figures are all related to the circle and have curves in place of line segments.
· Triangles (3-gons) have several variations. Three are shown below.
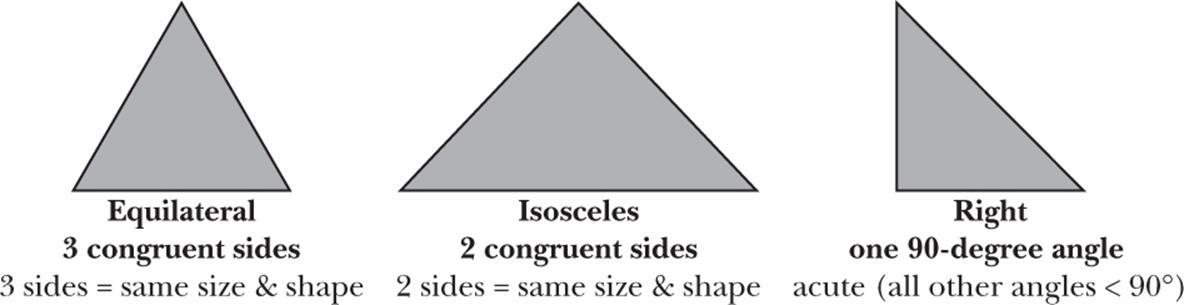
· An equilateral triangle is called a regular triangle. Any n-gon with all congruent sides is said to be regular.
Students who understand these basic shapes will find learning higher-level geometry much simpler.
![]() Teaching Tip
Teaching Tip
Regular polygons have a lot of symmetry. Have students cut an isosceles, equilateral, and several other triangles out of paper or card stock. If a line can be found where the triangle folds exactly on top of itself, you have found a line of symmetry. Try finding all the lines of symmetry for a regular hexagon.
Activity 8.1: Geometric Figure Description
WHAT? Description
This activity encourages students to reflect on and choose appropriate terms to describe the specific features of a geometric figure, increasing their geometric vocabulary in the process. First, sketch two different geometric figures and make copies for each student. Divide students into two groups of equal size. Each student in each group is given a copy of one of the figures to observe and write a description of on a separate sheet of paper. They then trade their descriptions with the members of the opposite group. Each student attempts to sketch the figure based on the written description he or she receives. The original version of the geometric figure is then viewed and students are encouraged to discuss their descriptions and sketches in pairs.
WHY? Objectives
During this activity, pre-algebra students:
· Sketch the described figure when given written descriptions of a geometric figure
· Discuss their misunderstandings or how they understood with their partners after completing the activity
HOW? Examples
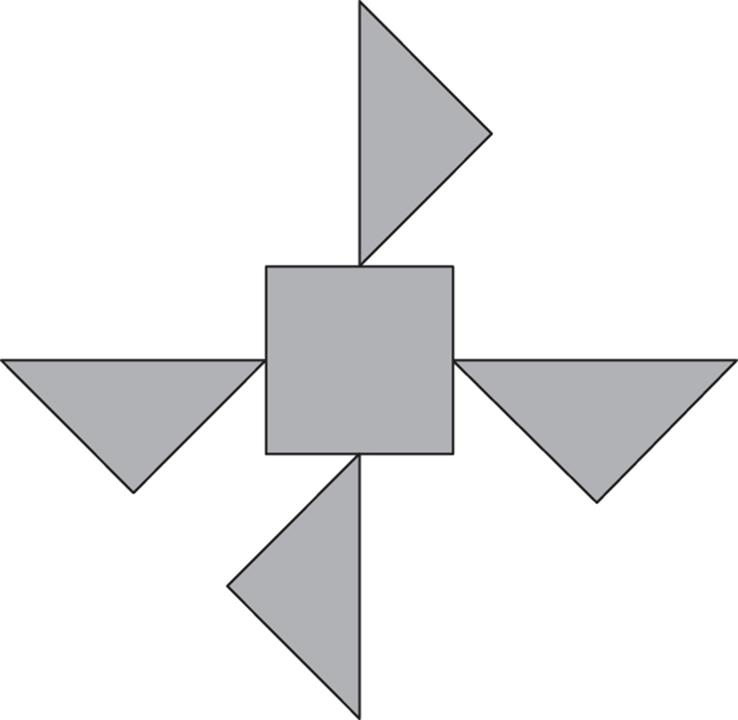
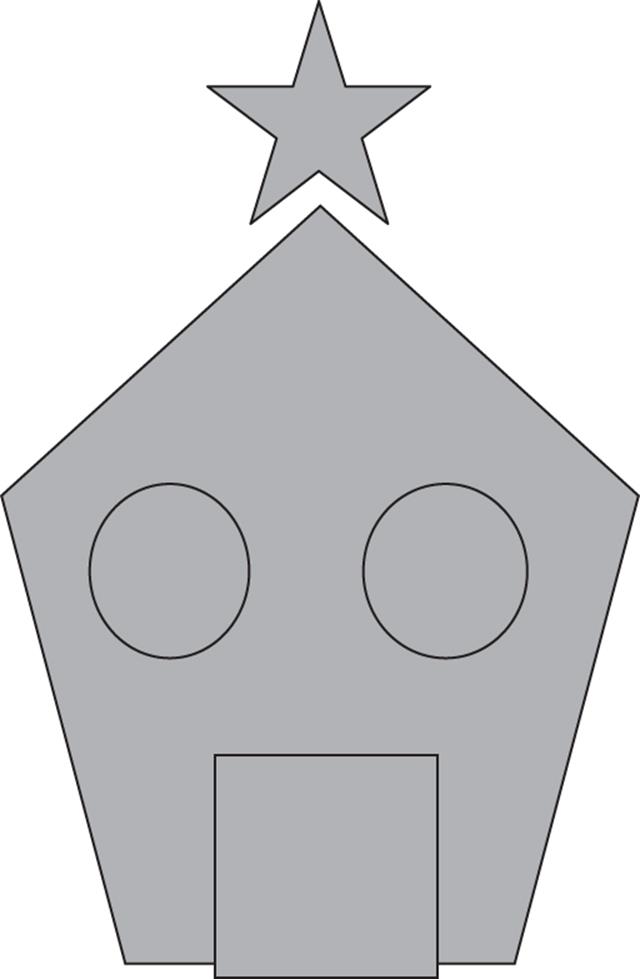
The following example shows a plane figure and three descriptions of the figure. These are the directions:
Write out a description of the given figure in at least two complete sentences. Use language that your peers will understand and from which they will be able to sketch the figure. Then you and your partner trade descriptions of your figure and try to sketch the figure using the description.
These are three students' descriptions and the teacher's rating for each:
Student 1’s description: This is a two-dimensional figure. It has a square in the middle of the figure and 4 triangles of equal size and shape coming out of each side. Each triangle meets the side of the square at one vertex.
Teaching's rating: GOOD. This description works because it uses the correct geometric forms and refers to place and size of all shapes. However, the 4 triangles could be explained further. They are right triangles.
Student 2’s description: There is a large square in the center of the drawing. Around the square are right triangles that are about one-half of the size of the center square. The triangles are attached to the middle of the sides of the square and each seems to be rotated about 90 degrees compared to the prior one.
Teacher's rating: VERY GOOD. This description is excellent, as it refers to all of the figures accurately and goes into great detail about the position of the triangles.
Student 3’s description: This is a picture of a propeller with 4 blades around a square. Each blade meets each side of the square at a corner. The blades are smaller than the square.
Teacher's rating: POOR. This description is vague and nearly impossible to use to accurately sketch the figure.
Worksheet 8.1: Geometric Figure Description Activity
Name _____ Date _____
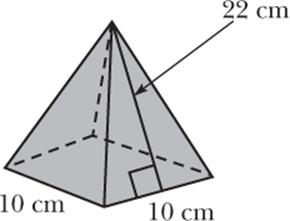
Directions: Consider the three-dimensional figure here. On a separate sheet of paper, write out a description of the figure. Choose your vocabulary carefully so that another student can use your written description to sketch the image. When you are finished, trade your description with another student.

Worksheet 8.2: Geometric Figure Description Activity
Name _____ Date _____
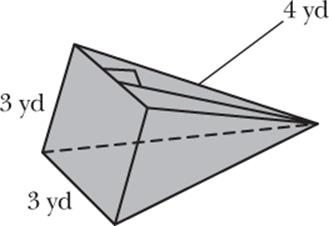
Directions: Consider the three-dimensional figure below. On a separate sheet of paper, write out a description of the figure. Choose your vocabulary carefully so that another student can use your written description to sketch the image. When you are finished, trade your description with another student.
Activity 8.2: Semantic Feature Analysis
WHAT? Description
Semantic feature analysis (Baldwin, Ford, & Readance, 1981) is a reading strategy that asks students to complete a matrix showing how various terms and concepts are alike or different. The terms or concepts are related or fall under a particular category. The matrix itself consists of several columns. The first column contains a listing of the terms. The remaining columns contain headings spelling out features that the terms or concepts might have in common.
This activity lends itself nicely to geometric figures because they have many easily understood features or parts. Usually the list of figures is in the first column of the matrix. Across the top, different yet related features can be placed in the first row of cells.
WHY? Objectives
During this activity, pre-algebra students:
· Compare and contrast features of related mathematical concepts
· Summarize this information
· Refer back to the completed matrix when reviewing for exams
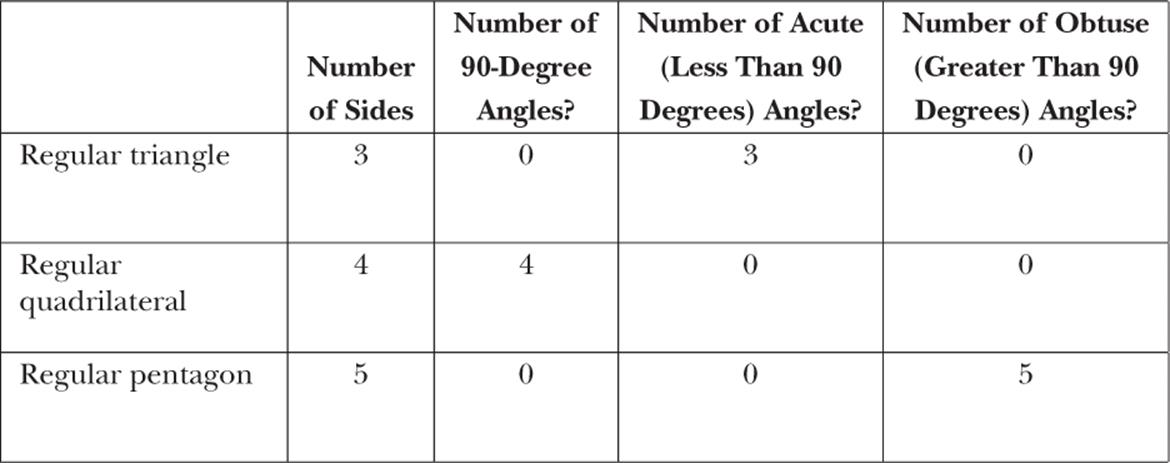
HOW? Example
The table shows an example of a completed semantic feature analysis:
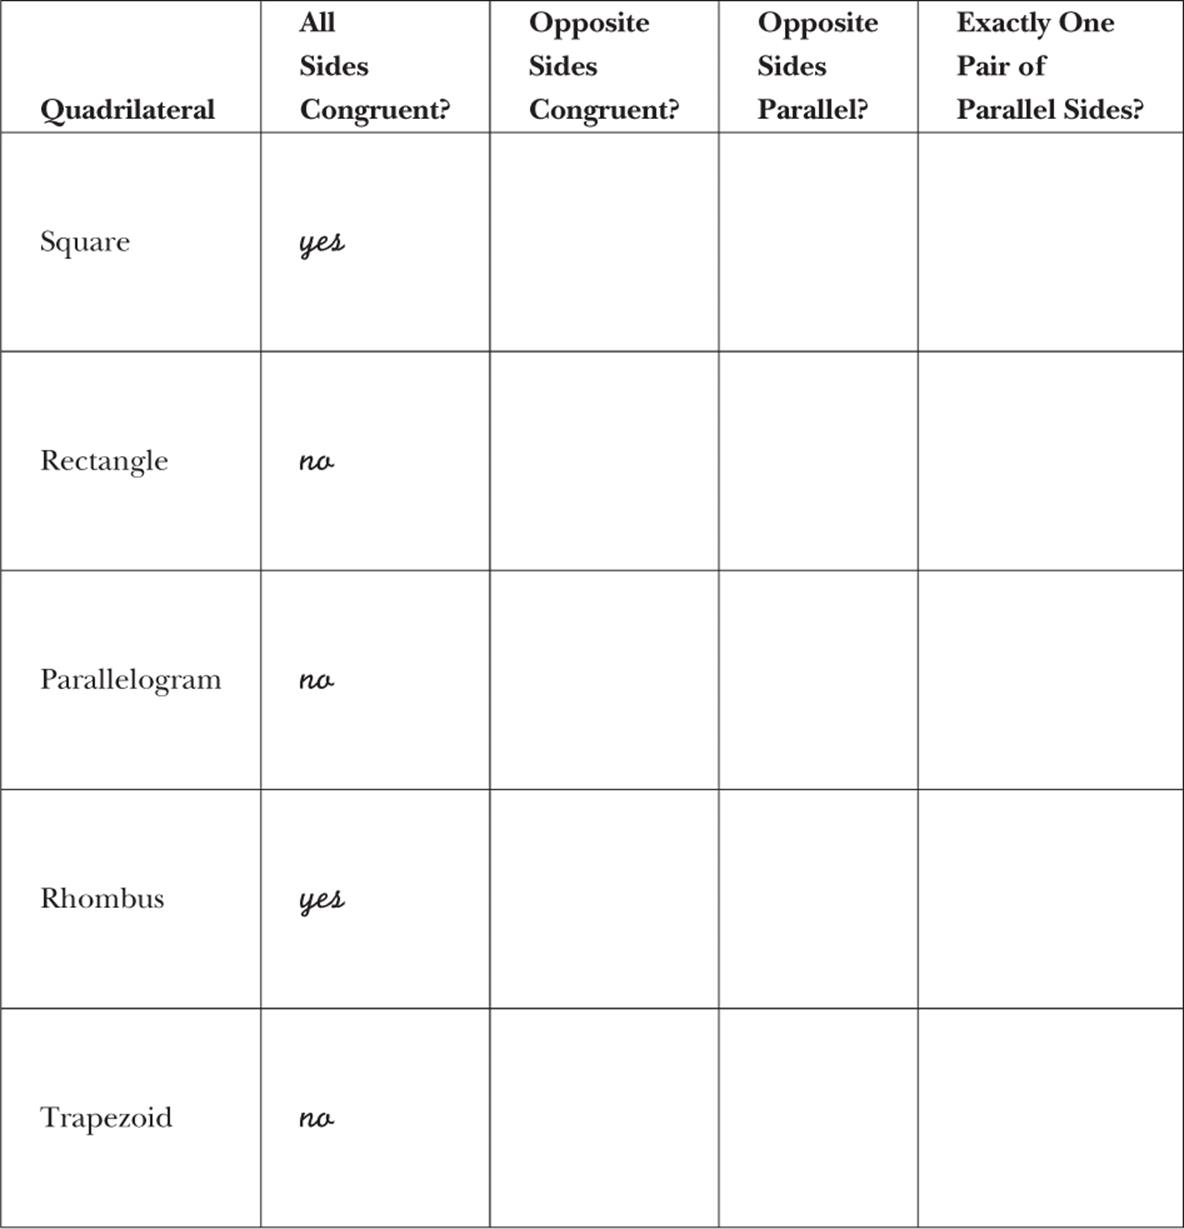
Worksheet 8.3: Semantic Feature Analysis
Name _____ Date _____
Directions: Answer yes or no to each question for each of the different figures regarding the sides of each 4-gon given in the first column. The first column has been completed for you.
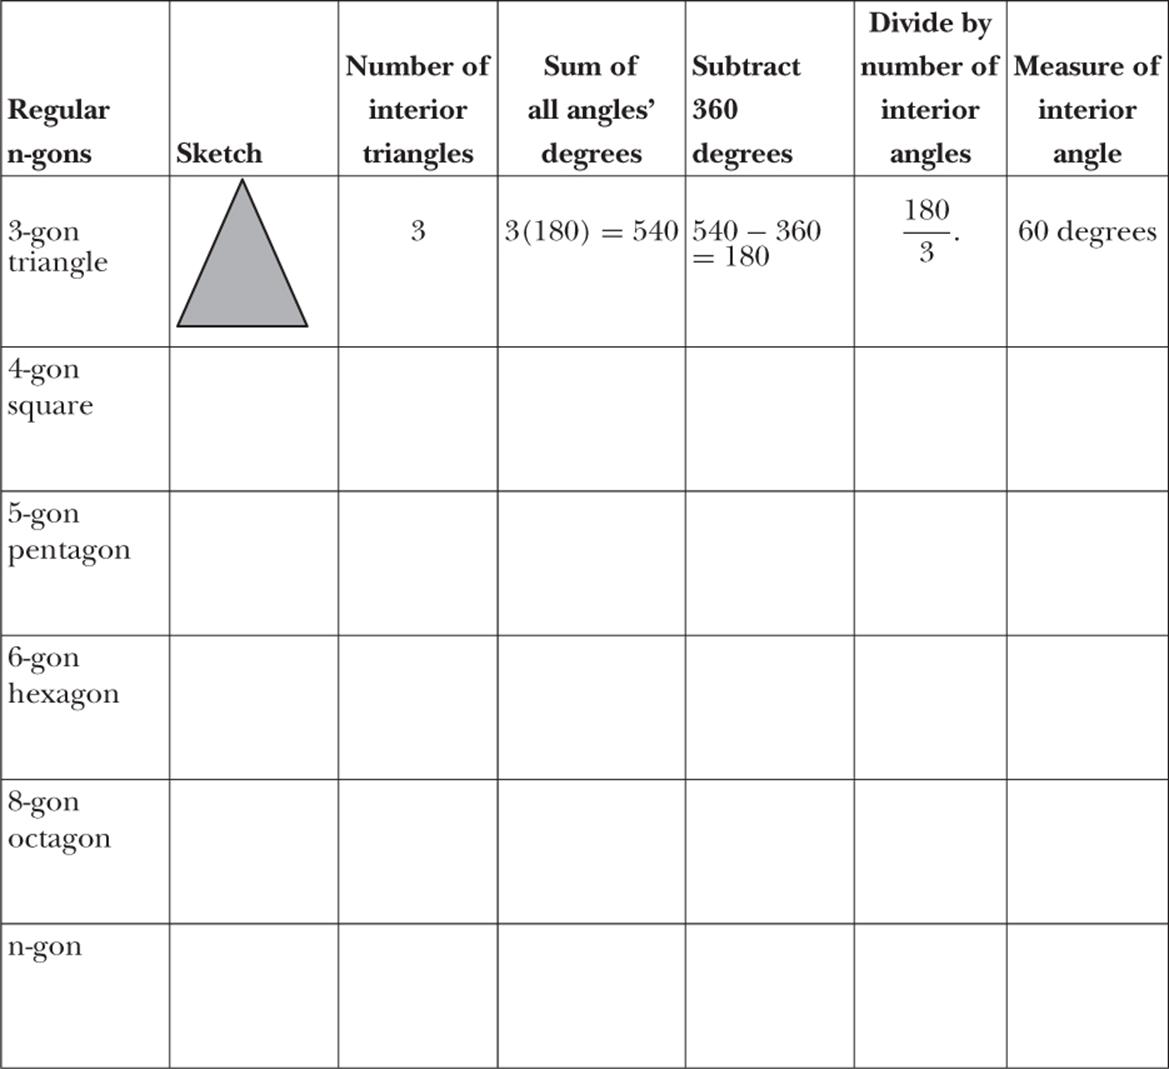
Worksheet 8.4: Semantic Feature Analysis
Regular n-gons are polygons with n number of sides where all angles and sides of each n-gon are congruent. Remember that “congruent” means the figures are the same size and same shape.
Name _____ Date _____
Directions: Using the triangle in the first row as a model, fill in each cell following the directions in the column headings. When you get to the last regular n-gon, your last cell should be a formula that will give the measure of the vertex angles for each regular polygon.
Mini-Lesson 8.2 Pyramids and Prisms
CCSS Standard 7.G: Geometry
Draw, construct, and describe geometrical figures and express the relationships between them.
Many of the solids used in our everyday lives are in the shapes of pyramids and prisms. Both pyramids and prisms are polyhedra (the plural for polyhedron), meaning all their faces are polygons. In this lesson, we compare and contrast the two primary groups of solids: prisms and pyramids.
A pyramid has a polygonal base and triangular sides that form a vertex. A right pyramid has a base that is a polygon and determines the name of the pyramid. A square right pyramid has a square base. For example, the Great Pyramid in Egypt is a supersized-square pyramid.
The world is full of three-dimensional objects; in fact, nearly all things are three-dimensional objects. In terms of polyhedra, pyramids and prisms in particular, we pack mail, toys, storage items, and gifts in boxes, or rectangular prisms. We can find rocks and plants that are roughly pyramid shaped. And buildings, artwork, and decorations often are either pyramids or prisms. As your students study more geometry, they will find many other three-dimensional figures.
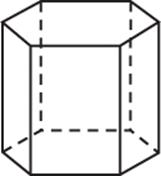
A prism has two parallel and congruent polygonal faces. Its lateral (side) faces are rectangles. If the prism is a right prism, each rectangular side meets the polygonal face (also called base) at right angles. The number of sides of the polygonal faces give the name of the prism. For example, a square, or “right” prism, has two square faces and four rectangular sides. A hexagonal right prism has two hexagonal faces and six rectangular sides.
![]() Teaching Tip
Teaching Tip
Ask your students to break up into small groups and discuss what they think symmetry in a three-dimensional shape would look like.
Activity 8.3: Writing a Method of Operation
WHAT? Description
Most mathematical or geometric content consists of processes. Students need to know the how-tos, or methods, for arriving at or simplifying solutions. Having students write out methods of operation (MO) reinforces their understanding of how to solve problems and helps them consider the fine points of exceptions to the rule.
Students might be asked to write out the MO for finding the midpoint of a line segment using only a straightedge and a compass. They should be encouraged to write out the MO as if they were talking to a classmate who is just learning this process. This motivates the writer to be clear and concise and consider the geometric vocabulary he or she should know.
WHY? Objectives
During this activity, pre-algebra students:
· Complete a method of operation for a geometric process
· Use a completed MO to conduct a geometric process
· Share their MOs with their peers (optional)
HOW? Example
For this activity, you could ask students to do the following:
· Write out the MO for finding the area of any triangle.
· Write out the MO for finding all lines of reflection symmetry of a regular octagon.
· Research and find the method President Garfield invented in 1876 for proving the Pythagorean theorem. Then write out the MO for this proof in your own words.
Example of a Student MO
MO for finding the circumference of a circle with radius of 4 inches.
The formula for the circumference is ![]() .
.
1. Decide on the accuracy you require for ![]() , such as let
, such as let ![]() .
.
2. Apply the formula: multiply ![]() .
.
3. Consider the correct label or unit of measurement: in2.
4. Give the complete solution, C = 50.24 in2.
Worksheet 8.5 offers a method of operations of a Pythagorean theorem proof.
![]() Teaching Tip
Teaching Tip
The Pythagorean formula is a2 + b2 = c2, where a, b, and c, respectively, are the two legs and hypotenuse of a right triangle. The Pythagorean formula is one of the most significant and most proven formulas since the era of Greek mathematics, around 500 to 200 B.C. In his twentieth-century book, The Pythagorean Proposition, E. S. Loomis (1968) gives 370 proofs for the Pythagorean theorem.
Worksheet 8.5: Dissection Proof of the Pythagorean Formula
Name _____ Date _____
A proof is another type of method of operations. It gives the steps for the process you are demonstrating and adds the reasons that each step is accurate.
Directions: Follow the directions (the MO for the proof of the Pythagorean formula) to show a unique proof. Use another sheet of paper for your proof.
1. Sketch an acute right triangle, labeling a and b as the length of the legs and c as the length of the hypotenuse.
2. Sketch a square off your triangle's hypotenuse where one side of the square is the hypo-tenuse of your triangle. Label all lengths of all sides c.
3. Sketch three more right triangles congruent to the original triangle, placing each with c as a side of the square. Again, label all sides. You should end up with a square with sides of length a + b. You may have to rearrange the four triangles to get them in the correct places. Remember that you need to end up with a large square with each side of the square having a length of a + b.
4. Set up an algebraic equation with the left side being ![]() _____. You will need to fill in the blank. Hint: You will need to use the formula for area of a triangle for part of this equation. Solve and see if you end up with
_____. You will need to fill in the blank. Hint: You will need to use the formula for area of a triangle for part of this equation. Solve and see if you end up with ![]() . If you do, you have successfully proven the Pythagorean theorem. Congratulations!!
. If you do, you have successfully proven the Pythagorean theorem. Congratulations!!
Find another geometric proof for the Pythagorean theorem. Write out the proof in your own words, using sketches when you need to. Remember that there are at least 370 of these proofs.
Worksheet 8.6: Methods of Operation for Constructions
Name _____ Date _____
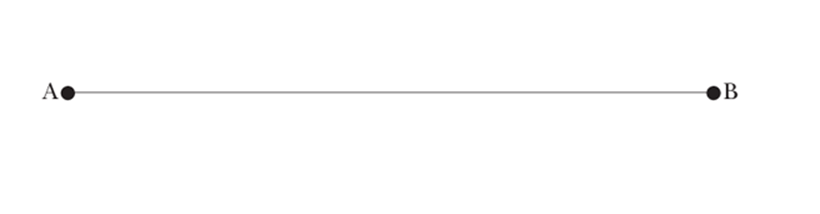
Directions: Consider a line segment, AB:
![]()
Write out the steps for finding the perpendicular bisector of AB using a compass and a straightedge. Use sketches to support your steps. Explain each step as you would to another student who missed this lesson. Two steps are given to get you started.
1. Place the point of the compass on the left end point of the line segment AB and open the compass to the length of AB. Draw an arc.
2. Write out the steps for constructing an equilateral triangle. Use sketches to support your steps.
Worksheet 8.7: Method of Operation for Finding Sum of Degrees of a Triangle
Name _____ Date _____
Directions: You will need a sheet of paper, scissors, and a ruler for this activity.
1. The sum of the measure of all three angles in any triangle is 180 degrees. Therefore, think of other geometric concepts that have that same measure. Some of these might be a straight angle, half the measure of the sum of all central angles of a circle, or the measure of the central angles off the diameter of a circle.
2. How might you use sketches to construct the congruence of these examples and the three angles of a triangle?
3. Consider placing the three angles next to each other to see if they form a straight angle.
4. Sketch several different-sized triangles with different angle measures, such as 30, 60, and 90 degrees or 45, 45, and 90 degrees.
5. Cut each corner of the triangle, with each cut-out showing the angle and its measure.
6. Place each of the cut-out angles next to each other. Do they form a straight angle of 180 degrees?
7. Will this work for all triangles? Write what you think here:
8. Explain why you think it will work all the time.
9. Have you proven this above? Why or why not?
10. What is the sum of all four angles of any quadrilaterals? Can you use the work above to explain why this is true?
Activity 8.4: Math Story
WHAT? Description
For this activity, give students a list of terms or concepts specific to geometry, and ask them to use all of the terms correctly to write a short story. This activity may be used during or after the lesson containing the specified terms. Asking students to use this language requires that they learn the meaning of these terms.
Students are encouraged to be creative, but also to pay close attention to the meanings of the geometrical terms. Their stories may be fiction or nonfiction; they may be witty, silly, sad, or dramatic. Be sure to give them some guidelines to follow when writing their stories. Being explicit about what constitutes an A paper is equally important to the student writer and the teacher reader-grader.
WHY? Objectives
During this activity, pre-algebra students:
· Write a short story using the geometric terms on the worksheet
· Follow all directions and use a dictionary or text to find definitions that you need
· Consider what each geometric term means.
HOW? Example
Example assignment: Write a brief math story using the following terms correctly: pyramid, prism, edge, vertex, volume, and surface area.
Jasmine and Jeff are very competitive and have decided to build two treehouses. Jasmine thinks a square prism would be the best shape for her house, but Jeff thinks a square pyramid would be better.
Both decided to draw a sketch to scale of their treehouse first. As they worked, they decided that the square base of each house would be a square 4 feet by 4 feet, which is 16 square feet. So each edge of the base would be 4 feet, and each angle at the 4 vertices of the base would be 90 degrees.
Before they started building, they decided to compare the surface area of each house so they could find out whose house needed more paint. Without actually computing the surface area of each, Jasmine pointed out that since her treehouse had six squares that were 4 by 4 feet and Jeff's had only one square and four triangles meeting at a vertex top, it would take much more paint for the prism. Then they realized they must compute the volume of each because that would show how much living space each house would contain.
They found that the volume of the square prism, a cube, was 4 cubed, or 64 cubic feet. Jeff knew that to find the volume of his pyramid, he only had to find ![]() of the cube, which was
of the cube, which was ![]() cubic feet!
cubic feet!
After all of this hard work, they decided maybe they should put their two solids together to form a square pyramid atop a cube!
They also decided to take a rest before they started building their treehouse.
Worksheet 8.8: Write Your Own Math Story
Name _____ Date _____
Directions: Use the following guidelines when you write your short story.
1. Be sure your story contains all the listed terms (see the box below).
2. Use each term correctly. Use the text or dictionary to check on definitions and correct usage of terms. You may be creative with each term, but in at least one place use the term correctly or in a manner that clearly demonstrates what the term means.
3. Your story may be fiction or nonfiction.
4. Your story should contain an introduction, conclusion, and follow a logical story line.
5. Your story should be between one and two pages in length.
6. Be creative, and choose a theme that has relevance to you.
Terms
|
Circle |
Radius |
|
Pi |
Diameter |
|
Chord |
Tangent |
|
Secant |
Circumference |
|
Area |
Central angle |
|
Inscribed angle |
Worksheet 8.9: Write Your Own Math Story
Name _____ Date _____
Directions: Use the following guidelines when you write your short story.
1. Be sure your story contains all the listed terms (see the box below).
2. Use each term correctly. Use the text or dictionary to check on definitions and correct usage of terms. You may be creative with each term, but in at least one place use the term correctly or in a manner that clearly demonstrates what the term means.
3. Your story may be fiction or nonfiction.
4. Your story should contain an introduction and conclusion, and follow a logical story line.
5. Your story should be between one and two pages in length.
6. Be creative, and choose a theme that has relevance to you.
Geometric Terms
|
Line |
Point |
|
Angle |
Plane |
|
Parallel |
Perpendicular |
|
Bisect |
Midpoint |
|
Median |
Line segment |
|
Right angle |
Straight angle |
Activity 8.5: In Your Own Words: A Paraphrasing Activity
WHAT? Description
One of the most common excuses that students give for not reading material in their textbook is that they do not understand the language. This activity helps students target and interpret key concepts. By rewriting mathematical passages, students demystify and make personal meaning of mathematical content.
Assign students small portions of the pre-algebra text to read and rewrite in their own words. This activity works equally well with concept definitions, theorems, and examples. Having students read their own versions to each other allows student writers to consider different interpretations and pinpoint misconceptions. If writing is handed in, you can assess your students' understanding of the material.
To extend the activity, allow students to use sketches of geometric shapes as a part of the paraphrasing exercise.
WHY? Objectives
During this activity, pre-algebra students:
· Paraphrase the content of assigned portions of the text
· Share their completed paraphrase handouts with their classmates
HOW? Example
Example assignment: Read the following paragraph about regular polyhedra and paraphrase (write in your own words) what it says:
Regular polyhedra are three-dimensional solids that have convex polygonal faces “Regular” means that all faces are the same size and shape. There are only five regular polyhedra, and they are called the “Platonic solids.” Individually, they are a cube, tetrahedron, duodecahedron, and icosohedron. Plato, who lived around 300 B.C., knew that these were the only regular polyhedral and used mind-pictures to prove this to himself.
This is one student's curious paraphrase:
Some solids are easy to imagine, like the cube. Plato used his imagination to see that these 5 are the only solids that had all the same size and shape faces. A six-sided dice is a cube, and a calendar can be placed on a duodecahedron because it has 12 pentagonal faces and can sit upright on any face.
Worksheet 8.10: In Your Own Words: A Paraphrasing Activity
Name _____ Date _____
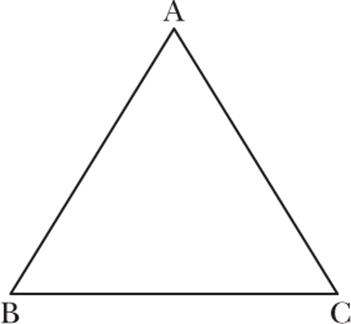
Directions: Read the passage below. Then write out your definition of an equilateral triangle. Be clear and use at least two complete sentences. Be prepared to share your definition with your peers. You may use other sources to help develop your definition.
An equilateral triangle is a triangle with three sides of equal length or three congruent (same size and same shape) sides. By using the following theorem, we can show that all equilateral triangles are equiangular.
Theorem: The two base angles of an isosceles triangle with the congruent sides meeting at the apex (top vertex) of the triangle are congruent.
Your definition of an equilateral triangle:
For extra credit, use another sheet of paper to write out your interpretation of the theorem, using A, B, and C for the angles and AB, AC, and BC for the sides. Then write out or show that an equilateral triangle is also equiangular. You may include sketches and words.
Activity 8.6: Biographies of Geometers
WHAT? Description
In 350 B.C. Euclid wrote the Elements, which details his axiomatic geometry based on the undefined terms points, lines, and planes, five postulates (assumptions), and more than 200 theorems. Each of the theorems is based on the undefined terms, postulates, and the theorems that came before the theorem in question. A theorem is a mathematical statement that can be proved to be true.
Researching a geometer's life and geometric contributions helps students understand the background and the step-by-step development of the various geometries and geometric processes. Several of the mathematicians and their contributions to the field of geometry are listed below. Students may be assigned a particular geometer or choose one of their liking. Also, having students peer-teach about their geometer is an excellent way to disseminate this knowledge to your class.
|
Geometers |
Contributions |
|
Pythagoras |
Geometric proofs |
|
Euclid |
Euclidean geometry |
|
Erastosthenes |
Good approximation of the circumference of the Earth at the equator |
|
Archimedes |
Considered greatest mathematical genius of antiquity; volume of the sphere; physics |
|
René Descartes |
Cartesian coordinate system |
|
Nicolai Lobachevsky |
Non-Euclidean geometry (hyperbolic geometry) |
|
Carl Frederick Gauss |
Hyperbolic geometry |
|
John Bolyai |
Hyperbolic geometry |
|
Berheim Riemann |
Non-Euclidean geometry (spherical or elliptical geometry) |
|
Jacob Steiner |
Projective geometry |
|
Hermann Minkowski |
Taxicab metric |
The research, writing, and sharing of a biography of a mathematician who contributed to the development of geometry helps students consider how and why the field of geometry came about. The development of geometry, like any other field of mathematics, is a step-by-step process of discovery and invention.
The assignment of a biography of a mathematician should include the format for the write-up. For example, each biography might consist of the following parts:
· Early life
· Education and career
· Family or social life
· Mathematical contributions
· Later life
WHY? Objectives
During this activity, pre-algebra students:
· Research a mathematician of their choosing and take notes
· Prepare a write-up of a mathematician's life story
HOW? Example
Grading
Content score = 1 2 3 4 5
· Contains all required parts?
· Contains accurate information?
Mechanics score = 1 2 3 4 5
· Grammar, spelling, clarity, transitions, introduction, conclusion?
· Follows guidelines?
Resources score = 1 2 3 4 5
· Format? Number of sources? Library source?
Final grade = 1 2 3 4 5
Worksheet 8.11: Math Biographies
Name _____ Date _____
Directions: Write a four- or five-page biography of one of the following mathematicians:
|
Geometers |
Contributions |
|
Pythagoras |
Geometric proofs |
|
Euclid |
Euclidean geometry |
|
Erastosthenes |
Good approximation of the circumference of the Earth at the equator |
|
Archimedes |
Considered greatest mathematical genius of antiquity; volume of the sphere; physics |
|
René Descartes |
Cartesian coordinate system |
|
Lobachevsky |
Non-Euclidean geometry (hyperbolic geometry) |
|
Gauss |
Hyperbolic geometry |
|
Bolyai |
Hyperbolic geometry |
|
Riemann |
Non-Euclidean geometry (spherical or elliptical geometry) |
|
Jacob Steiner |
Projective geometry |
|
Hermann Minkowski |
Taxicab metric |
Guidelines
1. The biography must contain the following parts of your mathematician's life:
· Early life
· Education and career
· Family or social life
· Geometric contributions
· Later life
· Resources
2. Use at least three different sources, one of them from the school's library.
3. Word-process the biography.
4. It should be a minimum of 4 pages and maximum of 6 pages in length.
5. The last page should be a bibliography of your sources in a consistent format.
6. End with your mathematician's influence on the field of geometry.