Hacking Education: 10 Quick Fixes for Every School (2015)
HACK 7. THE IN-CLASS FLIP
Bypass the Hurdles of Flipped Learning by Keeping It in School
If you run into a wall, don’t turn around and give up. Figure out how to climb it, go through it, or work around it.
— MICHAEL JORDAN, BASKETBALL PLAYER AND ENTREPRENEUR
THE PROBLEM: FLIPPED LEARNING CAN FALL APART AT HOME
FLIPPED LEARNING HAS become wildly popular in education. Unlike a traditional course setup, where content is delivered in class and students apply and practice their learning through homework, the flipped classroom turns that arrangement on its head: The initial content delivery happens at home (often through a video of some sort), and then students and teachers re-converge in class to apply and practice their learning.
The thinking behind this arrangement is that teachers’ expertise is much more valuable during that application stage; when content is delivered in an automated format, this frees up the teacher to really interact with students as they use and engage with the content through discussion, practice, role-play and simulation, inquiry, and hands-on projects.
Here’s the thing, though: If a lesson is going to flip with any success, the at-home learning absolutely has to happen. Students must learn the initial content in order to apply it. This requires every student to have at home a working device, a reliable, consistent Internet connection, and an environment conducive to concentration. Unfortunately, in many communities, securing all three can be challenging. Even in cases when all of these things can be arranged, their stability can be questionable.
For some teachers, these complications have been enough to make them abandon flipping altogether. They quickly write off flipped learning as a trend that just doesn’t work or isn’t worth the trouble. This is a shame, because in too many cases, these teachers resign themselves to staying in the role of content provider, allowing their time to be consumed with lecture and demonstration when it could be better spent engaging directly with students.
What if you and your students could still get the benefits of flipped learning without messing with all the variables of the home environment? What if the whole flipped process could remain in school?
THE HACK: “FLIP” YOUR CLASS . . . IN CLASS
The In-Class Flip moves the flipped learning model inside the walls of your classroom. Using a set of iPads, tablets, a few classroom computers, or even students’ own devices, the content delivery portion of a lesson—the “home” part in a true flip—would be set up as a station in the classroom. This allows students to receive the content in the same way that they would at home, while freeing up the teacher to engage remaining students as they apply the learning from the video or from previous lessons.
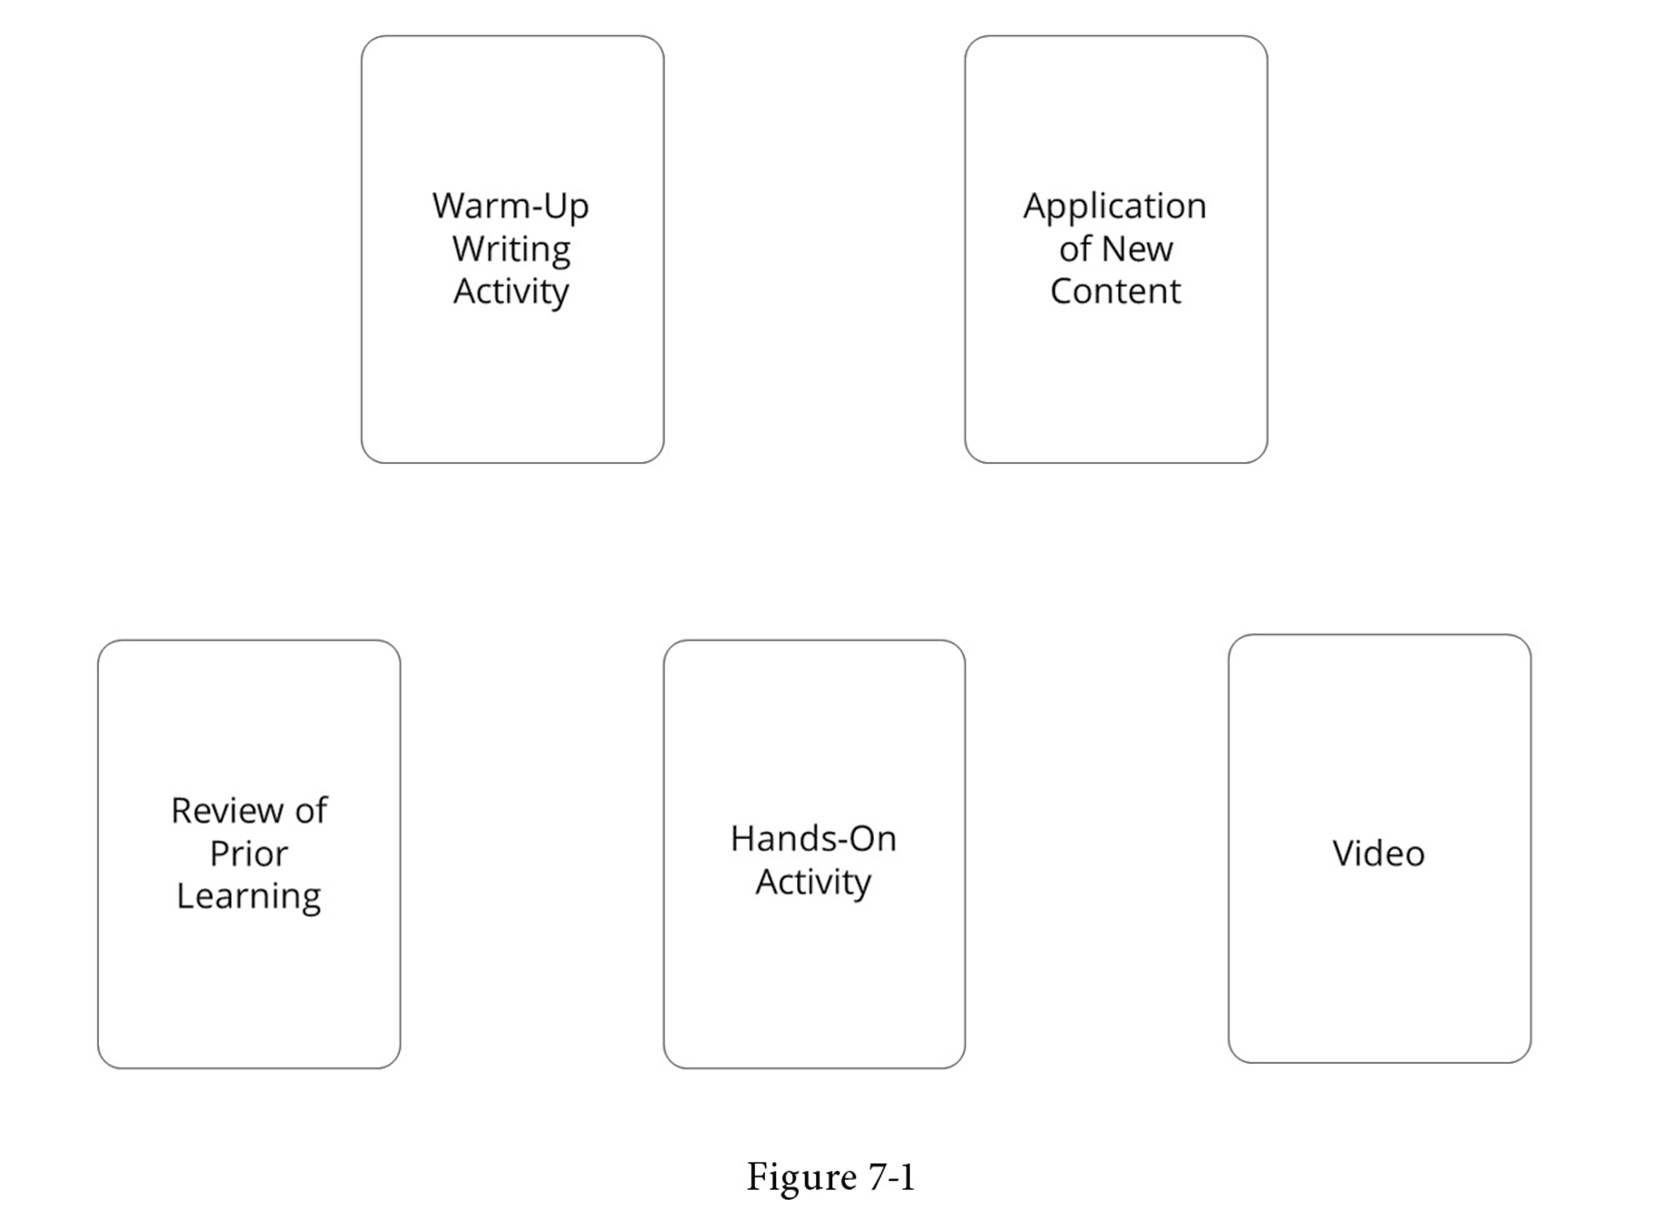
To demonstrate, let’s assume a teacher has a 10-minute recorded video lesson to deliver some portion of his content, and his classroom has six tablets for student use. He sets those tablets up as one station (with earbuds for non-disruptive listening) and arranges to have the 10-minute video accessible through those tablets.
Next, he sets up a station where students will directly apply the concepts introduced in the video, such as a writing assignment, a set of discussion cards, a game, or a practice sheet. Students will go to this station only after they have seen the video. Because he has 24 students, but only six tablets, the teacher needs more stations, so he sets up three more that do not rely on the information from the video. These can be short hands-on activities, skills practices, games, or reviews of prior learning.
When students arrive, they are divided into groups of six and placed at the first four stations. Note that station 5, which students can only do after they have watched the video, stays empty for the first round.
For the following round, students rotate to the next station. This time, the first group of students watching the video is able to apply that content in the next station. Although stations 1 through 3 are just basic classroom activities, the rotation from station 4 to station 5 in this example is basically what replicates a flip.
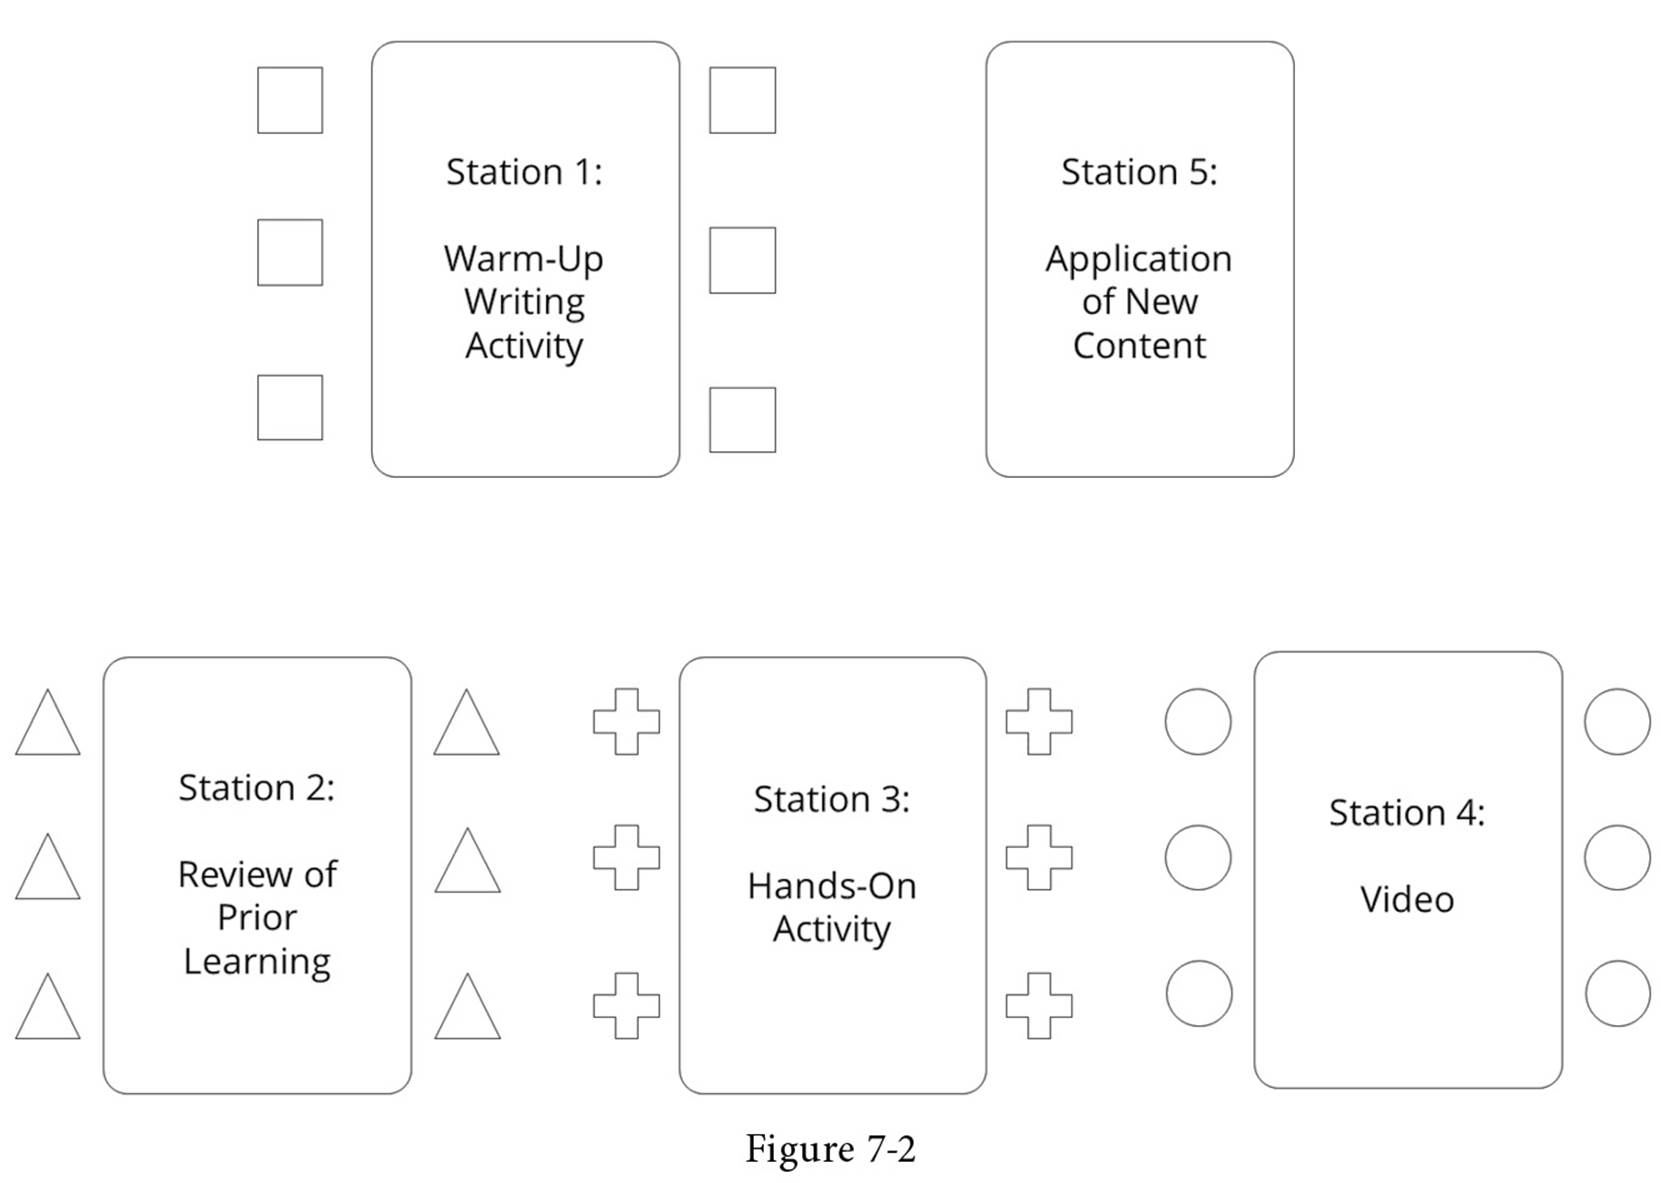
Instead of delivering the new content himself, this teacher now has station 4 to do it for him. This frees him up to rotate around to the other stations, interacting with students as they engage with both the new content at Station 5 and prior learning at Stations 1 through 3.
WHAT YOU CAN DO TOMORROW
Although setting up an In-Class Flip requires planning and preparation, you can get a taste of how it works by trying this mini-version:
· Go on a treasure hunt. Locate a video online that delivers some simple piece of content related to your subject area—something you haven’t taught yet. If YouTube isn’t an option at your school, try looking at Vimeo, TED-Ed, or TeacherTube.
· Prepare a post-video activity. Create some kind of task students can do after they have viewed the video—a written assignment, a quiz, discussion questions, something hands-on—that will require application of the learning from the video.
· Prepare another independent activity. This task should not be directly related to or dependent upon the video in any way. It is not necessary to create a full set of stations for the “non-flipped” time; as long as you assign independent work that will engage the rest of the class while other students rotate through the flip, the class should run smoothly.
· Complete a test run. As part of tomorrow’s class, have students take turns sitting at the video viewing station, then completing the post-video task. Make yourself available to answer questions during the task. Instruct students who are not watching the video or have not yet seen it to do the independent activity during the remaining time.
A BLUEPRINT FOR FULL IMPLEMENTATION
Step 1: Take inventory.
Determine how many reliable classroom devices you have access to on a regular basis. These do not all have to be the same kind; a combination of tablets, laptops, desktop computers, and even smartphones would work—anything that allows students to view pre-recorded videos, either through an Internet connection or by storing the videos on the devices themselves. If you are very short on devices—say, you only have two—consider whether students might be able to pair up on the same device at the same time. Headphone splitters can be purchased for less than $5, allowing you to plug two sets of headphones into the same output jack.
Step 2: Choose lessons to flip.
Decide what portion of the content will be delivered through video. Although video is not the only way to deliver content in a flip, it is the most common, so we’ll use that in our discussion here. The content should be something students can grasp reasonably well on their own. It could be a short lesson that explains a new concept and gives examples, a demonstration of a hands-on task they will do later, or the steps of a skill they will practice after the video is done. Students will only be able to absorb small amounts of content in one stretch, so consider how you will break up the content, providing stops during the video for students to take notes, answer comprehension questions, or briefly practice skills.
Step 3: Record the lessons, or find pre-made videos online.
This is the time-consuming part. If you want to start by looking for videos created by others, consider the libraries offered on sites like EDpuzzle, eduCanon, and TED-Ed. If you are unable to find videos that meet your specific needs—and for many people, this is the case—you’ll need to start making your own. Creating these videos is easier than you think: One way to do it is to build a presentation using PowerPoint or Google Slides, then present it in slideshow mode while you talk, recording the whole thing using screencasting software like Screencast-O-Matic, Jing, or ShowMe.
Step 4: Store your videos for student access.
The easiest way to do this is to create your own YouTube channel, upload the videos there, then share the links with students or embed the videos in a class website. If YouTube is not an option, videos can be uploaded and shared via a cloud-based system like Google Drive or Screencast.com. Of course, if you are an iOS user, it’s easy to simply share anything you create directly from your device. With literally a couple of clicks or swipes, content from your iPhone, Mac or iPad can be shared wirelessly from your screen to your students’ devices. This makes flipping your videos in class astonishingly simple.
Step 5: Set up your viewing station.
Arrange devices in one general area of your classroom—a table, a collection of desks, or designate a few computer stations. Include written instructions for how students should access the video for that lesson, what to do when they are finished, and some general troubleshooting tips. If you want students to take notes as they watch the video, include instructions for that as well.
Step 6: Set up the other stations.
You will need one station for direct application of the content in the video, then a few more for students to visit when they are not viewing the video or applying the video content. To figure out how many you need, consider how many students can view the video at one time—that could be one station. However many students you have at the viewing station is the same number you can have at every other station. Remember to add one additional station, to be left empty in the first round, where students will apply the learning they did in the viewing station.
In the example we talked about earlier, the teacher had six devices and 24 students. If all stations were going to be used during every rotation, he would only need four stations—one for each group of six. But because students can’t use station 5 without viewing the video first, that has to be left empty in round 1. Therefore, the activity requires five total stations, not four.
Step 7: Train students.
In order for your stations to run smoothly, students need to understand how they work. Show students what’s expected of them at each station, what they should do if they finish early, and how you will signal for a rotation. To establish clear guidelines for appropriate use of the devices, consider your answers to the following questions:
· Are students allowed to leave the video screen if they finish before it’s time to rotate?
· What other sites/applications are okay to visit?
· What should students do if they want to re-watch a section of the video?
· How should students conduct themselves within and between the stations?
Step 8: Evaluate and Iterate.
After your first attempt, when some things have inevitably not gone as planned, evaluate what you might need to do differently the next time around. Did some activities take too long, messing up the flow from station to station? Did some stations require more troubleshooting from you, rather than meaningful engagement? Did the station after the video really delve into that content, or could you do better? Ask students for their feedback, reminding them that the goal is to give them more interaction with the content, and with you. And keep in mind that establishing this new model will take some time to get right, but if it ultimately allows you and your students to learn more deeply, it’s worth it.
OVERCOMING PUSHBACK
This is nothing new; it’s called blended learning. Think of the In-Class Flip as a subset of blended learning, a more specific instructional plan that falls under the blended learning umbrella. Blended learning is a general approach to instruction, where teachers combine traditional, face-to-face instruction with online resources, which can include videos, websites, backchannel discussions, and online courses. As long as the method combines online learning and traditional instruction, it qualifies as blended learning.
The In-Class Flip narrows this broad definition into one specific configuration, where station rotation sets up a sequence that mimics the flipped learning experience and teachers select “flipped materials” with the deliberate goal of replacing face-to-face content delivery in order to free up time for deeper exploration of the material.
I don’t have time to make my own videos. Finding just-right videos takes time, and yes, creating them takes even more. As with any other skill, you’ll find that this process takes much longer the first few times you do it, but that you’ll get faster the more you practice.
Start small and simple, with topics that are easy to teach and don’t require long, complex videos. Give yourself permission to create “good enough” videos—if you insist on beautiful, professionally edited productions, they will indeed take forever to create, so go easy on yourself. And remember that the time you spend creating the videos now will be returned to you over and over again as you re-use the videos in future years.
I thought the purpose of flipping was to create more class time for engagement with the teacher; if you play the videos during class, don’t you still lose that time? Yes, to some degree, and that’s what makes this more of a hack, because the content delivery takes away some class time, it can’t offer all of the advantages of a true flip. However, it does provide some things a true flip doesn’t: It allows for greater supervision, increasing the chances that students are actually accessing the content, something that’s harder to measure when it’s done at home. The teacher’s proximity makes it possible for students to ask clarifying questions if they need to. At home, if a student gets hung up on one small issue two minutes into a video, they may spend the remaining 10 minutes feeling confused; with the teacher nearby, they can ask a quick question and get a lot more out of the video. It provides excellent training for a true flip.
Once students get used to the cycle of flipped learning, once they learn how to access the videos and complete whatever work is required to go along with them, once they understand that they must demonstrate comprehension of that content in the follow-up activity, they will be better prepared to participate in a true flip that sends that learning home.
I hate relying on technology; something always goes wrong. This is a legitimate concern. The risk for tech-related problems can be minimized in three ways: (1) Do a test run before trying it with your students. Always open up a few of the individual devices before launching a lesson to make sure they can access the video. (2) Have a backup plan. Consider ahead of time what you can do if the video simply doesn’t work as planned — whether it’s to have an alternate activity ready or a written passage that delivers the same content, albeit in a less dynamic format. (3) Keep a helper on call. Let the “tech people” in your building know when you’ll be flipping, so they can try to stay as available and reachable as they can. (Don’t have enough “tech people” in your building? Take a look at Hack 5: Student Tech Gurus.)
THE HACK IN ACTION
Mark Levezow, a 5th grade literacy and social studies teacher at Omro Elementary School in Omro, Wisconsin, uses this kind of configuration with his students. “Because I work in a rural district,” Levezow says, “many of the students either don’t have devices or Internet access.” By flipping part of his lesson in class, he can still take advantage of pre-recorded lessons without having to rely on at-home technology.
“I use Google Classroom as my hub,” he explains. “My mini-lesson videos are captured via Screencast-O-Matic, and then they are uploaded to my school YouTube account. From there, I use eduCanon to embed questions into the videos. Responses are automatically assessed by eduCanon. I then use the assessment results to see where misconceptions or misunderstandings are occurring. I reteach in small groups, or have students re-watch the video. The blended aspect of our daily routines is only one of four centers during literacy and social studies.”
While Levezow admits that creating the videos is time-consuming and his classroom technology isn’t perfect, he is still a big fan. “It has freed up time for me, so I can work in small groups with the students who need it. And the students love it—they seem motivated to get on their Chromebooks and view the lessons.”

When we try something new and it doesn’t work, it can be tempting to abandon the idea altogether and return to what we’re used to. But with a little adjustment and creativity, we can distill the essence of a new approach and still find ways to make it work for us. Flipped learning—in its purest form, or even in this adaptation—gives teachers more time to engage with their students and the content. That’s a goal worth working toward.