Make: The Annotated Build-It-Yourself Science Laboratory (2015)
Part IV. Appendix
Appendix E. Extended Notes
Note 1. Working with Animals
It is wise to approach the idea of experimenting upon animals — especially living animals — with reservation and skepticism. If you wish to experiment with animals (and there is no blame if you do not), we urge you to read and follow the International Rules and Guidelines for Science Fairs, from the Society for Science & the Public, available online at http://student.societyforscience.org/forms.
The guidelines are particularly strict about experiments involving vertebrate animals, and in many cases, will require a committee of qualified individuals to approve and review your work. If you are working independently at home and need a review committee of your own, you can likely find volunteers to help you. Contact the biology teacher or department at your local high school, college, and/or university, as well as your local veterinarian’s office. Tell them what you are doing and why you need their help.
For the example case of seeing how vertebrate animals react to changes in air pressure (“Vacuum Pump”), it is probably not worth the hassle of forming a research committee just to investigate that particular question. And that is precisely the sort of reasoning that you should employ: An experiment involving animals is only worth doing if it is worth doing right. Doing it right can be a lot of work.
Note 2. Safety: Working with Glass
When cutting, drilling, etching, or shaping cold (i.e., room temperature, not heated) glass, follow these guidelines:
§ Always wear safety glasses. Glass can break unexpectedly, and tiny shards can fly when glass shatters.
§ Use great care to avoid cutting yourself. Glass has very sharp edges that can easily cut through your skin. In some cases, it is appropriate to wear heavy leather gloves to help protect your skin.
§ Work over a tray or cardboard box, that will collect your bits of broken glass. Dispose of any leftover broken glass in such a way that no one (including someone who handles your garbage) could be cut by it. If you have a proper “sharps” container, use it. Otherwise, put your broken glass inside two nested cardboard boxes, each taped shut with packing tape, and label all sides of the outer box clearly: “CAUTION: BROKEN GLASS.”
Additional precautions (Note 4) are required when working with hot glass.
Note 3. Safety: Working with Open Flames
§ Always wear safety glasses while working with a torch or flame.
§ Have a type ABC fire extinguisher on hand and know how to use it.
§ Take care to avoid additional fire hazards: Secure any loose hair or clothing, and remove any other flammable materials from the vicinity where you are working. A clean metal, stone, ceramic, or concrete tabletop or board is an excellent surface for using a burner. If you don’t have a good surface to work on, you can purchase a large stone or ceramic tile at a home improvement store for several dollars.
§ Make sure that your work area is adequately ventilated such that smoke and fumes will not be an issue. If you do not have wide open windows or an exhaust fan that guarantees plenty of fresh air, consider working outside.
§ Know the escape route (preferably, more than one escape route) from your work area.
§ Do not work alone. Have a responsible human on hand who can call the fire department if necessary, even if you are busy with a fire extinguisher.
§ Make sure that children and pets do not enter your work area.
§ Never leave a burning flame unattended.
Note 4. Safety: Working with Hot Glass
Hot glass is potentially very dangerous, and requires a consistent focus on safety. In addition to the guidelines about working with cold glass in Note 2, strictly follow all of the safety guidelines in Note 3 whether or not you have an exposed flame.
§ Wear only natural fiber clothing (no synthetics or blends), including long pants and a long-sleeved shirt. Wear sturdy, closed-toe shoes. Do not wear jewelry such as necklaces, rings, or watches.
§ Wear your safety glasses all the time, even when you don’t have an open flame. Glass can still crack and shatter. Accidentally dropped glass is efficient at creating flying shards.
§ Remember that hot glass looks exactly the same as cold glass. An important aspect of working with glass is that your torches, tools, and glass may remain dangerously hot long after they appear to be safe and cool.
§ Keep your face as far away as reasonably possible from hot glass and flames.
§ When blowing glass by mouth, exhale only. Never risk inhaling hot fumes.
§ Understand that hot glass can potentially drip or stick to clothing or other materials, and cause severe burns or start a fire. Know how you would handle these kinds of situations.
§ Have metal tongs and a tin-can receptacle at hand, to pick up and contain hot glass pieces that end up on your workbench.
§ If you are doing any more than a trivial amount of glassblowing, or work with heat sources hotter than an alcohol burner, consider using a welding helmet or special glasses (for example, Rose Didymium or ACE) designed to protect your eyes from harmful IR and UV rays.
§ Ideally, seek professional training to learn how to work with glass safely. Many communities have resources for learning to blow glass.
Note 5. Baby Bottles
The bottle referred to here is a glass baby bottle in the 8 oz. (240 mL) size. These bottles are still produced under (for example) the EvenFlo brand as the “Classic Glass Bottle.” They are also available in a 4 oz. size. It should be noted that most baby bottles today are of a different shape and plastic composition, and thus far less suitable for laboratory work.
Note 6. About Alcohols
Common “rubbing alcohol” sold in drugstores is now typically a 70% mixture of isopropyl alcohol with water. For applications like an alcohol burner or cloud chamber, you will have much better luck with a 90%, 99%, or higher grade. Denatured alcohol (odorized ethanol, aka “methylated spirits”) is the better choice whenever available: it isn’t watered down. CAUTION: Both rubbing alcohol and denatured alcohol are poisonous and highly flammable.
Alcohol products available at liquor stores (Everclear et al.) tend to be more expensive and are rarely suitable. While some states do allow sales of relatively pure (95% alcohol by volume/190-proof) liquors, it will be more expensive than the alternatives that we have described since it is taxed as liquor. Liquor is also problematic in that if you are below a certain age, it may be illegal to purchase or possess.
Note 7. Ditto Fluid
Spirit duplicating or “ditto” machines were common document duplicating machines in the era before photocopiers and laser printers became inexpensive. They used a fluid (solvent) to operate. That “ditto fluid” is technically still available, but not in common use. If you’re curious, the formula is typically a mixture of isopropanol and methanol. Pure (99%+) rubbing alcohol (see the prior note) is generally a good substitute.
Note 8. Tin Cans
“Tin” cans are actually made of tin plated steel, and come in a number of standardized sizes. A “#300” tin can is 3” in diameter by 4 7/16” tall, and is a traditional “14 oz” size used for canned vegetables and the like. A “#303” tin can is 3 3/16” in diameter by 4 3/8” tall, and is a traditional “16 oz” size used for soups and the like.
Note 9. Mason Jars
Rings (“Bands”) and lids for traditional glass canning jars (mason jars) by Kerr are still made in standard and wide-mouth sizes. The “small mouth” #63 size is no longer manufactured. While it is possible to purchase them from various vintage sources over the Internet, it may be better to simply purchase a wider variety of tin can sizes and adapt them to the purpose.
Note 10. Safety: Exposed Wiring
Several projects in this book involve line voltage (“mains power” i.e., power from household outlets).
Do not touch (or risk touching) exposed line voltage wiring when connected to power. You will receive a serious shock that carries a risk of injury or death. A good rule is to unplug the project from power—such that you can see the unplugged end of the power cord—before touching the wiring. Do not assume that rubber gloves or shoes will protect you from a shock.
Minimize risk when working with line voltage by using a fused isolation transformer and having an easily accessible power switch (such as a wall switch or power strip) that is upstream and separate from any power switch on your project. Never operate projects with exposed line voltage (or any apparatus in this book with a power cord!) without easy access to a separate electrical cut-off switch (e.g., wall switch or circuit breaker panel) that can disconnect power if needed.
If you are a young person, projects with exposed wiring require adult supervision. And regardless of your age, good safety practice requires that you have another responsible human being nearby when working on projects that present potentially lethal hazards, such as exposed line voltage.
The projects in this book are designed for use with the power grid in the US, 117 V AC, at 60 Hz. If you live in an area with different wall power, do not assume that a project involving line voltage can be built without accounting for that change.
In addition to these basics:
§ Always wear safety glasses while working with exposed line voltage.
§ Have a type ABC fire extinguisher on hand and know how to use it.
§ Have a planned escape route (or better, more than one) from your work area.
§ Make sure that children and pets do not enter your work area.
Note 11. An Alternative Load for the Carbon Arc
For the carbon arc furnace in particular, another alternative that might be worth considering is a “reactance” (inductor) specifically designed for this type of carbon arc furnace, described in Popular Science in 1933. You can find the article online at http://blog.modernmechanix.com/experimental-arc-furnace-melts-anything/.
Note 12. Flashlight Batteries
The term “flashlight battery” in this book does not refer to a modern alkaline battery, but instead to a zinc-carbon battery. That type of battery, normally sold under the keywords “heavy duty” (as opposed to “alkaline”), has a zinc inner case, a center carbon rod, and a paste filling made with manganese dioxide. Heavy duty batteries are still manufactured and available as low-cost alternatives to alkalines. The C size is likely a good starting point for the experiments within this book. Modern zinc-carbon batteries have a steel outer case around the inner zinc case (which serves as one of the electrodes).
If you only need the carbon rods, you may wish to consider purchasing carbon rods directly, rather than removing them from batteries. See Appendix A for sources.
Wear protective rubber gloves (preferably nitrile) when handling the contents of a battery, and wash your hands thoroughly with soap and water after. Read Note 17 for additional advice about safety while working with chemicals.
Note 13. Safety: Sungazing and Carbon Arcs
Looking directly at the sun or a carbon arc furnace without proper protection causes permanent damage to your eyes in addition to any temporary damage (e.g., “seeing spots”) that you might notice. Both the part of the sunlight that you can see and the part that you cannot see can damage your eyes. Your eyes are not replaceable; use a proper protective filter between your eyes and the light source.
Improvised solar filters are generally good enough to protect your eyes. Historically, black-and-white photographic film was common, and a fully exposed piece of it was very dark due to its high silver content, and sometimes used as a solar filter. (Color film, including chromogenic “color-process” or “C-41” black-and-white film, is not suitable whatsoever.) Smoked glass (glass with soot applied) is potentially dark enough, but should not be used because it not consistent and wears away easily. Other unsafe filters include sunglasses, neutral density filters, and polarizing filters. Some CDs, DVDs, “space blankets,” and other aluminized materials may be safe, but are not consistently so, since they are not designed to be.
Purpose-made solar viewing film is inexpensive and easy to obtain, either in sheets or glasses. (See “Solar filter” in Appendix A.) A #14 or darker welding shade — the type specified for use with carbon arc welding — is also safe and inexpensive. Most welding lenses, goggles, and helmets (including auto-darkening helmets) are not dark enough for directly viewing the sun, carbon arcs, or burning magnesium. Do not assume a welding shade is safe unless it is labeled with a shade number of 14 or higher.
As a complete alternative to the “shoebox” solar viewer described in the text (“Sunspot Viewer”), you can make an excellent sunspot and solar eclipse viewer by using a set of binoculars to project sunlight onto a board. See spaceweather.com/sunspots/doityourself.html for instructions.
Note 14. Safety: Dry Ice
Dry ice, which is solid frozen carbon dioxide, should be treated with care. It is very cold: -109.3 °F or -78.5 °C. Direct or indirect contact between dry ice and your skin (whether by holding it or storing it in your pocket) can cause frostbite, which is a very serious injury. Do not pick it up, do not hold it in your hand, and most especially, do not put it in your mouth.
Store dry ice in a cooler, preferably a lightweight styrofoam type. Handle it with heavy cotton oven mitts, and only briefly. A good surface to rest dry ice upon is a towel or stack of folded towels.
A secondary risk of dry ice is that it is a concentrated form of carbon dioxide, which can cause asphyxiation (death by suffocation), if allowed to evaporate in an enclosed area. Always ensure excellent ventilation when working with dry ice.
Note 15. Coin Weights
The data table of known weights (“Metric Weights”) includes weights for the US dime, penny, nickel, quarter, and half dollar. The values in that table have been updated with current values from the US mint (http://www.usmint.gov) as of 2014. The modern penny is copper-plated zinc (2.5% copper), while the modern dime, quarter, and half dollar are all 8.33% nickel, with the balance copper. The modern (gold-tone) dollar coin is made of manganese brass: 88.5% Cu, 6% Zn, 3.5% Mn, and 2% Ni.
The original 1963 data from that table was actually quite different, because the dime, quarter, and half-dollar were made from 90% silver and 10% copper until 1964. Additionally, the penny was 95% copper and 5% zinc until 1982. The original weights from that table are given below:
Dime (90% silver) |
2.5 g |
Penny (95% copper) |
3.25 g |
Nickel |
5 g (unchanged) |
Quarter (90% silver) |
6.25 g |
Half Dollar (90% silver) |
12.35 g |
Note 16. Acids and the Corner Drugstore
While the proverbial “corner drugstore” once served the role of both pharmacy and chemical supply house, those roles have diverged. In most places, it is difficult for individuals to purchase most types of concentrated acids. They are, of course, “readily” available from chemical supply houses, which most commonly will only sell to schools, institutions, and businesses. Additionally, hazardous material restrictions and local regulations can make shipping difficult and expensive. You should also keep in mind that they are hazardous substances. They carry health risks that you should understand, and they need to be disposed of safely, and in compliance with your local laws.
You can purchase low-concentration sulfuric acid in the form of “battery acid” at an auto parts store. It is possible to increase the concentration by leaving a container of sulfuric acid solution out for several days with the lid off, to allow some of the water to evaporate. (If you do so, ensure that there is ample fresh air flow and no possibility of spillage.) While it is possible to remove acid from a lead-acid storage battery, it is better not to use that as a source for various reasons, including lead contamination.
As an alternative to directly using sulfuric acid (e.g., in battery projects), you can also use a small amount of sodium bisulfate dissolved in water, ½ teaspoon per 9 fluid ounces of water.
Hydrochloric acid, also known as muriatic acid, is more easily available at home improvement stores and hardware stores. It is used as a chemical for cleaning and etching concrete and for changing the pH of swimming pools.
Note 17. Safety: Working with Chemicals
Basic precautions for working with chemicals:
§ Always wear safety glasses that have side shielding and offer splash protection.
§ Wear sturdy, closed-toe shoes, long pants, and a shirt with long sleeves.
§ Secure any loose hair or clothing. Do not wear jewelry such as necklaces, rings, or watches.
§ A dedicated lab coat—that you leave behind in your chemical work area—can help to prevent accidental transfer of chemicals outside of the area.
§ Nitrile rubber gloves are resistant to many kinds of chemicals, and are good general-purpose laboratory gloves. Leave them behind when you leave the lab, to avoid contaminating other areas.
§ Do not pipette by mouth. (See “Modern Safety Practice” for more.)
§ Do not directly smell chemicals, whether to identify them or otherwise.
§ Do not store or consume food or drink in your work area. And do not store or use chemicals in a food preparation area or refrigerator that is used for food.
§ Wash your hands regularly throughout the day with soap and warm water, and again when you leave your chemical work area.
§ Keep your work areas free of clutter.
§ Have a type ABC fire extinguisher on hand and know how to use it.
§ Have a planned escape route (or better, more than one) from your work area.
§ Have a plan for what to do in case of a chemical spill. Certain types of chemicals (such as mercury) require very specialized spill kits. What can you do to make an acid spill kit (for example) should you need it?
§ Have easy access to a sink or fountain where you can wash your eyes in cold running water—and make sure that you can actually wash your eyes in it. Supplemental or permanent eye wash stations can be purchased as well.
§ Do not work alone. Have a responsible human on hand, who can help in case of emergency.
§ Make sure that children and pets do not enter your work area.
Note 18. Mercurochrome
Mercurochrome is a brightly colored topical antiseptic that contains mercury; it is no longer used in the US and some other countries because of its mercury content. Mercurochrome is not necessary to the project; it is only used here as one of several possible coloring agents. What other kinds of brightly colored substances do you have access to that might be a better substitute?
Note 19. Density Versus Specific Gravity
The density (mass per unit volume) of a substance is a more common figure than specific gravity. The specific gravity of a substance is the ratio of its density to that of a reference substance, usually water (with a density of 1 g/cm3). Thus if the density of a substance (say, water ice) is 0.92 g/cm3, then its specific gravity is just 0.92 — a unitless (dimensionless) quantity.
Note 20. Mothballs
Traditional mothballs are made from naphthalene. They are still available if you care to look for them, but there are also now many other types of mothballs. Check the label to make sure that they are pure naphthalene.
Note 21. Carbon Tetrachloride
Carbon tetrachloride has a number of adverse health and environmental effects, and its use is not recommended. What kind of solvent can you find that will dissolve fat, to replace it in the experiments where it is used as a solvent? Would alcohol, turpentine, or acetone work?
Note 22. Star Charts (Planispheres)
The type of star chart with a turning wheel in the center is called a planisphere. Several excellent ones are available to purchase online, or you can make your own.
Four popular, well-loved planispheres are the Miller Planisphere, Philip’s Planisphere, the David H. Levy “Guide to the Stars,” and Chandler’s “The Night Sky.” You can get one starting at about $10 at your local telescope store, at outdoor gear stores such as REI, or from Amazon.com and various other internet retailers.
Good quality planispheres are designed to work in a specific latitude range, say 30-40 degrees or 40-50 degrees, so be sure to pick one appropriate for your location on Earth. For reference, New Orleans and San Diego are close to 30 degrees North latitude, while Portland Maine and Oregon are at about 45 degrees. If you’re in the equatorial region or southern hemisphere, be sure to get a planisphere designed for the equatorial region or southern hemisphere.
You can also download and print a planisphere. Uncle Al’s Starwheels are maintained by the emeritus director of the Lawrence Hall of Science Planetarium, and are available at http://www.uncleal.net/uncle-als-starwheels.
As a modern alternative, you might also consider “plantarium” software. The basic SkySafari (skysafariastronomy.com) apps for phones and tablets are excellent companions for stargazing, and feature a “night mode” that won’t spoil your night vision. For the desktop computer, Starry Night (starrynight.com) and Stellarium (stellarium.org) are excellent software packages that also simulate the night sky for you.
Note 23. Planet Charts
Six planets can be seen with the unaided eye: Mercury, Venus, Earth, Mars, Jupiter, and Saturn. You should be able to locate Earth on your own. Some planispheres have a chart to help you locate the others. But even if yours does have a chart, it may not be up to date for the current year. You can download a current “Planet Locator” chart from davidchandler.com or use an interactive map at in-the-sky.org.
Note 24. Lenses
Either glass or plastic lenses may be used for simple optics experiments. In most cases, glass lenses are of higher quality. You can obtain inexpensive lenses at scientific surplus shops like American Science and Surplus (sciplus.com), at scientific supply shops like Arbor Scientific (arborsci.com), and from optics sources like Anchor Optics (anchoroptics.com). You can also find useful lens elements inside camera lenses (from a second-hand store) or an old projector (digital, overhead, or film/slide).
Note 25. Diffraction Gratings
Transmissive diffraction gratings like the ones discussed here are frequently sold as “rainbow” glasses. See Appendix A for sources.
Reflective diffraction gratings are actually a little easier to find: A CD or DVD produces rainbows in the sunlight because it acts as a diffraction grating. How could you build a spectrograph that uses a reflective grating instead? Visit sci-toys.com for instructions on how to build a digital spectrograph from a CD.
Note 26. Mercury for a Pressure Gauge
Mercury is no longer considered safe to work with, even in small quantities. Sure, you can buy a vacuum gauge for $10 at an auto parts store (see Appendix A), but can you work like a scientist and figure out how to do this experiment (“Vacuum Jar Pressure Gauge”), even without using mercury?
Questions to investigate:
§ Why was mercury used in the first place?
§ Are there new metal alloys available to purchase that are non-toxic and liquid at room temperature?
§ What other liquids could you use in the gauge instead? What would you have to change?
§ If you used water in your gauge (density 1 g/cm3) instead of mercury (density 13.5 g/cm3), how tall would your columns need to be? Could you use transparent plastic tubing (rather than glass) and try it? Hints: Blue food coloring and a stairwell may come in handy.
§ How can you convert between the barometric reading from the weather service (which is reported in inches of mercury) and inches of water?
§ How long of a straw can you drink out of? What if you were an infinitely-strong comic book superhero?
Note 27. A Telescope to Use
There are great reasons to make your own telescope. And while it is certainly possible to make your own telescope (see “Refracting Telescope”), it should be noted that there are also high-quality, low-cost telescopes available for purchase, such as the Galileoscope, about $50, or (much better) the Orion StarBlast 4.5 Astro Reflector Telescope, about $200.
Note 28. Radioactive Sources
What radioactive sources do you have at home? Would you be surprised if you had any? Look at the warning labels on the smoke detectors in your house. Do they contain radioactive sources? Most commonly, a household smoke detector contains a tiny grain or disk of intensely radioactive americium-241. (Why? How does a smoke detector work?) The americium has a half-life of 432 years, and remains active long after the smoke detector has exceeded its useful life. Is it safe to remove the radioactive source? Is it legal to do so? Is it a good idea?
If you have a clock or watch with a luminous dial or hands that glows even when not exposed to light first, then the glowing paint contains a radioactive source. To be sure, leave the clock in a light-tight drawer for 24 hours, and then open it with the lights off and the room dark. Other common sources include lantern mantles (as used for common gas camping lanterns), which are sometimes made with thorium.
In addition to the usual precautions that you should take when handling chemicals (see Note 17), do not handle radioactive material with your bare hands. Wash thoroughly after working with radioactive materials. And most importantly, note that otherwise “harmless” radioactive materials become very dangerous if swallowed, even in minuscule quantity. Take extreme caution to prevent young children from having access to them.
Questions to investigate:
§ Some foods are radioactive. Is there enough potassium in a banana that you can detect the radiation?
§ Is there enough radium in brazil nuts that you can detect it?
§ Are these foods still safe to eat? Could you build spinthariscopes (see “Spinthariscope”) with different materials to figure out which ones are radioactive?
§ Could you detect the radiation with your cloud chamber (see “Diffusion Cloud Chamber”)?
Note 29. Diffusion Cloud Chamber
Use pure alcohol (99% or higher) when building the diffusion cloud chamber. (See Note 6 for more about alcohols.)
The copper strips are specified as 24 gauge (0.020”, or 0.5 mm) thick, but that dimension is not critical. For the radioactive source, two excellent choices are a thoriated tungsten welding electrode or a uranium glass bead or marble. Both of these sources are essentially free of dangerous dust, so long as you do not intentionally cut into them. (See also note 28.)
The 240-volt photoflash battery is long obsolete. The cloud chamber can still be impressive without the copper, wires, and battery. However, there will be lower contrast, thanks to a more visible background of condensing “fog.”
If you would like to wire up the voltage, you’ll need to come up with an alternate voltage source and a way to manage it safely. 240 V DC is not quite “high voltage,” but it is a much higher voltage than common batteries produce. Certainly enough to give you a painful shock, and potentially enough to injure or kill, depending on how powerful the voltage source is.
Questions to investigate:
§ What safety procedures are required when working with high voltage (i.e., voltage higher than household voltage)?
§ One method to consider would be using a set of 9 V batteries connected in series. 27 of them could give a full 240 V. Perhaps surprisingly, they can also supply enough current to be potentially lethal. Can you understand whythat is dangerous? Are there other types of batteries that could be “stacked” well to supply a higher voltage?
§ What other sources of DC voltage are available to you?
§ Do you need the full 240 V? Is there a minimum voltage that you need, or will using a lower voltage simply produce a weaker effect? Could you compensate for having a lower voltage by moving the lower copper band lower? If so, what does that mean?
Note 30. The No. 6 Dry Cell
The No. 6 dry cell was a type of battery that came with convenient clips or screw terminals on the top. That’s not so different from a modern lantern battery, which has large springs on the top.
Most commonly, a No. 6 dry cell was electrically configured with 1.5 V output, much like an overgrown D cell. However, some versions had two cells internally, for a total of 3 V output. Replicas are made today by connecting a D cell (sometimes, two) to a pair of screw terminals (www.kensclockclinic.com/catalog/batteries/).
A convenient modern interpretation is a regular battery holder, adapted to fit one or two C or D cells. You can make one, starting by harvesting the battery compartment from an old or broken toy that uses C or D cells.
Note 31. Electronic Electroscopes
The electronic electroscope is a vacuum tube circuit based upon a 6AU6 pentode; it’s old technology. While it still works just as it used to, none but the rarest enthusiast designs a circuit this way today. A vacuum tube is now an uncommon component, and it requires more current and voltage than modern solid-state electronics.
You may be able to find a 6AU6 (or 6AU6A) at an electronics or ham radio swap meet, on eBay, or elsewhere online (e.g., http://www.tubesandmore.com).
You can find the design for a solid-state 6AU6 replacement online at http://collinsra.org/home/album/solid-state-6au6/.
Although it may be a hassle to obtain or substitute for the 6AU6 tube, a bigger concern is that the circuit uses mains (line/wall) current and leaves line voltage exposed. Act accordingly, with extreme care. You may wish to consider using an isolation transformer or an isolated variac to minimize risk.
As an alternative, consider building the clever and simple electroscope demonstrated by Alan Yates (vk2zay.net) in his video about making electrets: youtu.be/1DR-tTU8uIM. Watch the video to see how it can be built and used. This electroscope is only sensitive to changes in electric charge, rather than absolute charge. However, it is safe, easy to build, and runs from a single 9 V battery. You’ll also need a few common transistors and resistors, as well as red and blue LEDs as output indicators.
Note 32. Building a “Mercury” Switch
As in Note 26, bare mercury is no longer considered safe to work with, nor is it necessarily easy to purchase in bulk. As the text suggests, you can use salt water as a substitute, but it is not as satisfactory to play with.
Questions to investigate:
§ Some modern thermometers are made with a non-toxic liquid metal mercury substitute. Could you build a “non-mercury” switch by removing that liquid from a thermometer?
§ Modern “tilt switches” (which might be used in a digital camera to sense the camera’s orientation) use a steel ball that rolls from one position to another. Could you use a single conductive steel ball as a substitute for the mercury, otherwise using the same design?
§ Could you use a multitude of tiny steel balls as a substitute for mercury in a switch like this? (Consider, for example McMaster-Carr PN 9291k41, 1/16” stainless steel balls, pkg of 100.)
§ Many hardware stores still sell mercury switches. You might find them in the electronics, automotive, or HVAC sections of the store. (Why are they found in those contexts?) A commercially made mercury switch usually has a clear glass envelope so that you can see the mercury move. So long as you do not actually drop and break the glass envelope, this is a relatively safe way to “play” with mercury and get a feel for how it behaves.
Note 33. A Transformer Versus a Load
An electrical transformer is a magnetic device that uses electromagnetic induction to transfer electrical power between two circuits. In most (but not all) cases, the two circuits are electrically isolated from one another. Transformers are used for electrical isolation, or to step up or step down a given AC voltage.
A key characteristic of transformers is that they transform power: A “step down” transformer (like the filament transformer in the power supply project in the “AC or DC Power Supply”) reduces the voltage, but also supplies a higher amount of current at that lower voltage. A “step up” transformer (which could be that exact same transformer but put into the circuit backwards) produces a higher amount of voltage, but at lower current. In general, for a perfect transformer, IPVP = ISVS, where IP and VP are the the current and voltage on the primary side of the transformer, and IS and VS are the current and voltage on the secondary side of the transformer. Of course, transformers are not perfect, and the actual power out will always be slightly lower in.
The Variable Load project (“Variable Load”) was titled “Power Supply Transformer” at the original time of publication. The operation is similar to a transformer in the sense that it can reduce the amount of voltage available, but it is not actually a transformer. Why? Because it simply reduces the available voltage, rather than transforming the power such that it produces higher current at that voltage.
Questions to investigate:
§ Can a transformer be constructed that works for DC electricity, rather than AC electricity? Why or why not?
§ Can a transformer be constructed that is based on electric fields, rather than magnetic fields?
§ Is it more energy efficient to use a transformer or a variable load?
Note 34. A Filament Transformer
A transformer like the one used here is sometimes called a “filament transformer” because it was used to power the incandescent filament of vacuum tubes.
A specific model that you can use is Hammond Mfg part number 166L6, which can supply up to 2 A of current. Note that this transformer is designed for 115 V 60 Hz (US wall current), and you’ll need a different transformer for different wall power in some other countries. See Appendix A for sources.
Note 35. A Modern Bridge Rectifier
The rectifier bridge shown in the illustration of the power supply project is an old-school selenium rectifier, which was the type used until silicon versions became more popular in the late 1960s. A suitable modern component is the GBU8D rectifier bridge. See Rectifier bridge in Appendix A for sources.
The GBU8D is a simpler-looking block, with 4 pins, all of which come off the same side. Hook the output (“secondary”) wires from the transformer to the two center pins (marked as either “AC” or “~” ). The output is the “+” terminal, which is the pin on the side that has a notched corner.
The “DC” output that this power supply can produce is “full wave rectified.” That means that the voltage does not go negative, but it is also not the constant voltage that is usually expected from a DC voltage source. What could be done to smooth this “full wave rectified” output into more of a true DC output?
The GBU8D is actually more capable than the original selenium rectifier in that it provides both a positive output and a negative output (the pin of the rectifier that is not yet in use).
Questions to investigate:
§ What is the configuration of the diodes inside the selenium rectifier and in the GBU8D that would make this possible?
§ Is there a way to get DC by using the rectifier bridge but without the center tap of the transformer?
§ What would the output voltage be in that case?
Note 36. Current Flow Indicator
The Current Flow Indicator project (“Current Flow Indicator”) is an adaptation of the “Simple Oscilloscope” project that was in this book at the time of its original publication. The original project has been moved here to the appendix; it follows after some discussion.
There are two reasons that we have handled it this way rather than just adding a footnote. First, the original project is based around a General Electric NE-34 neon glow lamp, which is now a genuinely rare component. Second, from all indications, this project never actually worked as described.
The illustration from the original project shows the neon bulb hooked up to a regular dry cell, and claims that it will light up with very low voltage. However, neon bulbs typically require upwards of 70 V DC to “strike” (light up). Digging in further, the original GE specifications for this bulb specify a strike voltage of 65 V. Electrical engineer Jonathan Foote (rotormind.com) was able to perform tests on a vintage NE-34 for us, and confirmed that a working bulb would not light up with even 60 V DC.
Two other quibbles that one might point out: A neon bulb has electrodes, not filaments. More significantly, the term “oscilloscope” is not an apt description of the apparatus. An oscilloscope is typically a precision instrument that graphs how an electrical signal changes as a function of time. It is further distinguished from a chart recorder in that it is capable of displaying very fast and oscillating signals with great “magnification” of time. What this project can do well is to indicate the direction of current flow, and we have retitled the updated project accordingly.
The updated project is based on LEDs and serves the same intended function of the “Simple Oscilloscope,” while working safely at low voltages. The “Can you work like a scientist?” section there has also been updated with a few new questions that might come up when using LED circuits.
The original project is reprinted below.
SIMPLE OSCILLOSCOPE
Purpose: An oscilloscope is used to analyze electrical current to determine whether the current is direct or alternating, the direction of flow, the frequency or times the electricity changes direction, and the strength of the current. Many things such as light and sound can be changed into electrical energy, and thus a picture of them can be formed on an oscilloscope.
Materials: Neon bulb, socket. A neon bulb costs between $1.50 and $2. They may be purchased at most electrical shops.
What to Do: Screw the bulb into the socket. The wires from the object you are going to test are connected to the socket.
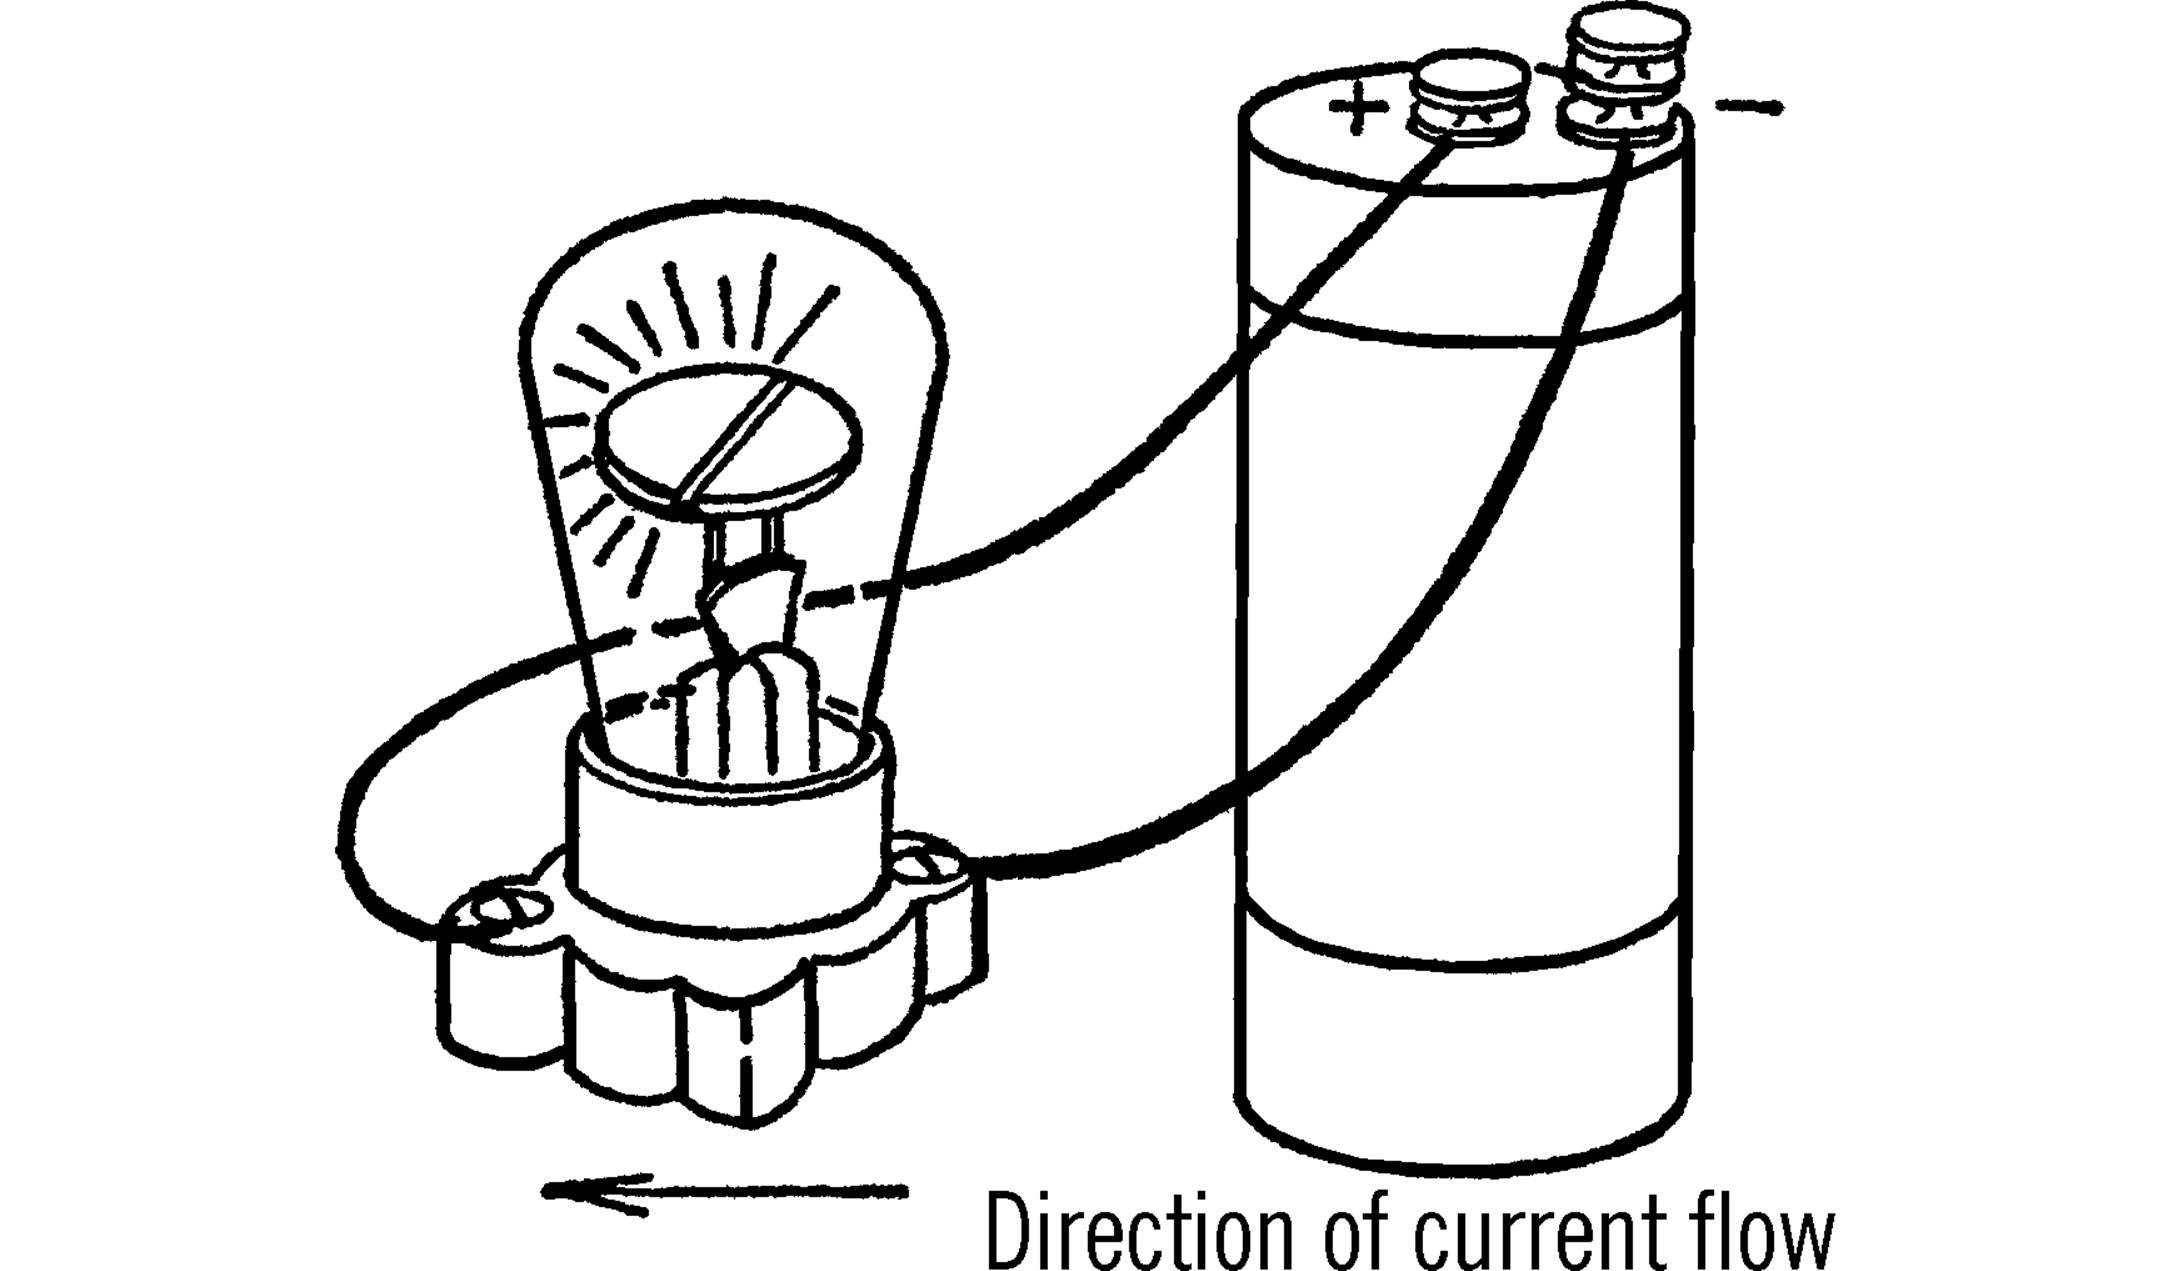
Operation of Equipment: The filament of the neon bulb is divided. When current is flowing in one direction, one side of the filament lights up. When the current flows in the other direction, the other half of the filament lights up. If the current alternates or changes directions, the two halves of the filament alternate, producing a blinking effect. The neon bulb operates on very low voltage and yet will still operate on normal house current.
Note 37. The Digital Computer
The dial-based digital computer (“Digital Computer”) is of the type popularized by the famous computer scientist Edmund C. Berkeley in the 1950s and 1960s. Educational toy computer kits based on this basic design were sold under the names TYNIAC, GENIAC, and BRAINIAC. They were capable of combinational logic, including the simulation of state machines and solving somewhat complex problems, with the help of a human operator to perform sequencing.
While the section in this book on building a digital computer will get you started, it leaves most of the programming up to your ingenuity. Fortunately, there is a wealth of documentation available online, including the original user and wiring guides from several of the kits.
The following resources have scans of one or more of the original manuals. You can also find these and additional resources, as they are found linked online from biyscience.com.
§ At vintagecomputer.net: vintagecomputer.net/Geniac/
§ At computercollector.com: computercollector.com/archive/geniac/
§ Berkeley, E. Callis. (1956). Tyniacs: tiny electric brain machines, and how to make them. Also: Manual for Tyniac Electric Construction Kit (K2). New York: Berkeley Enterprises.
Viewable online at http://bit.ly/1z3Kl6J
§ Berkeley, E. Callis. (1955). Geniacs: simple electric brain machines and how to make them: also, Manual for Geniac Electric Brain Construction Kit No. 1. 2nd printing. New York: Berkeley Enterprises, Inc.
Viewable online at: http://catalog.hathitrust.org/Record/007902253 ( bit.ly/1szUip5 )
Note 38. Centrifugal Force?
If you were in a large bucket — or a space station — being spun around, you would feel an apparent force (an “artificial gravity”) pulling you towards the base of the bucket or the wall of the space station. That apparent force that you would feel is called “centrifugal force,” (centrifugal meaning “fleeing the center”), and you experience it pushing you directly away from the center of rotation.
However, a formal analysis of the forces involved in a situation like that will always show that there is not actually a force acting in that direction. The actual force acting on your body is exerted by the bucket or space station, pushing you directly towards the center: it is called a centripetal force.
This is somewhat counterintuitive, so consider a simpler example: riding in an elevator. When you are in an elevator that is accelerating upwards, you feel “heavier” for a moment. That is to say, you feel an apparent force that pushes you down towards the floor — just as if gravity had momentarily increased in strength. However, there is not actually any new force pushing you down. The actual force being applied to you is by the floor, pushing you upwards.
The case of the bucket or space station is slightly more subtle (because of rotation), but the basic idea is the same: the force that holds you to the wall is not an outward force, but of the bucket/spaceship wall pushing you “upwards” towards the pivot point. That force is inwards, and hence centripetal. In the case of the spinning bucket, that inwards force is applied by the person spinning the bucket, in order to keep it spinning in a circle. In the case of a space station, it is supplied by the structural elements of the station.
Another useful perspective on the subject may be found at: http://xkcd.com/123/
Note 39. Parts for the Motorized Stroboscope
The materials suggested for the project include using a phonograph (record player) record and motor. A piece of cardboard or masonite will make a fine substitute for the record, but there is no single device known as a “phonograph motor”; many different types of motors have been used to turn turntables over the years.
A small battery-driven DC motor is a fine choice for this project. You can commonly find motors like these sold as “hobby motors” or inside of an old RC car or boat. A geared-down version, e.g., the type in a battery-powered hand drill (or even a battery-powered hand drill itself) may be a better choice. Motors like these should be given DC power from batteries, not connected to AC wall power.
The rheostat in this context could be a high-power potentiometer wired up as a variable resistor, or (for example) the pencil rheostat.
Note 40. Phonograph Stop Clock
Timekeeping is easier than it used to be. Most of us carry around devices that function as instant and accurate millisecond timers, with long-term accuracy linked to atomic clocks through precision synchronization via a network of satellites. Nonetheless, it is interesting to consider methods of measuring short time intervals with more basic materials.
The Phonograph Stop Clock project (“Stop Clock”), as described, does have a flaw in that the record player only begins spinning up (to 45 rpm) when you release the clothespin. Thus, its speed of rotation is not constant as it spins up, and the elapsed time per revolution is not constant.
Questions to investigate:
§ Can you devise an alternate means of using the stop clock such that you begin counting time only once it is fully up to speed?
§ Can you accurately measure the elapsed time of the first, second, and third revolutions (perhaps using your digital device), to see how large of an effect it is? Could you measure the effect well enough to compensate for it?
§ How would you improve the precision of an apparatus like this? Would a digital camera be helpful?
Note 41. Soldering to a Tin Can
Common “tin cans” (which are actually tin-plated steel cans) do accept solder but rapidly conduct heat away from the point that you are trying to heat up. A modern soldering iron designed for electronics (usually 15–35 W) has barely enough power to overcome this, and it may be difficult or impossible to solder a can shut. A heavy duty soldering gun or iron designed for plumbing or stained glass (with at least 75–100 W of power) is recommended. A soldering torch may be another avenue worth exploring.
Note that some tin cans are lined (coated) with plastic on their inside surfaces. This plastic coating will not accept solder, and may emit fumes when you solder to the exterior surface. Also, take care that the can may become very hotduring the soldering operation. Work on a fireproof surface, have a fire extinguisher handy, wear safety glasses, and don’t touch the can while it’s hot.
Note 42. Water Barometers
As noted earlier (in Note 26), elemental mercury is no longer considered safe to work with, even in small quantities, and building your own mercury barometer (“Mercury Barometer”) is no longer recommended. In some locations, it is not even legal today. One alternative is to build a water barometer.
Water is much less dense than mercury (1 g/cm3 rather than 13.5 g/cm3), so air pressure can push a column of water much higher. How high is that? And how can you build something that takes that much vertical space? A stairwell, window on a multistory building, water well, tree, crane, ladder, or balloon may provide the answer. Use semi-rigid translucent plastic tubing (e.g., HDPE, nylon, or teflon tubing) instead of glass, and color the water with food coloring to make it visible through the tubing wall.
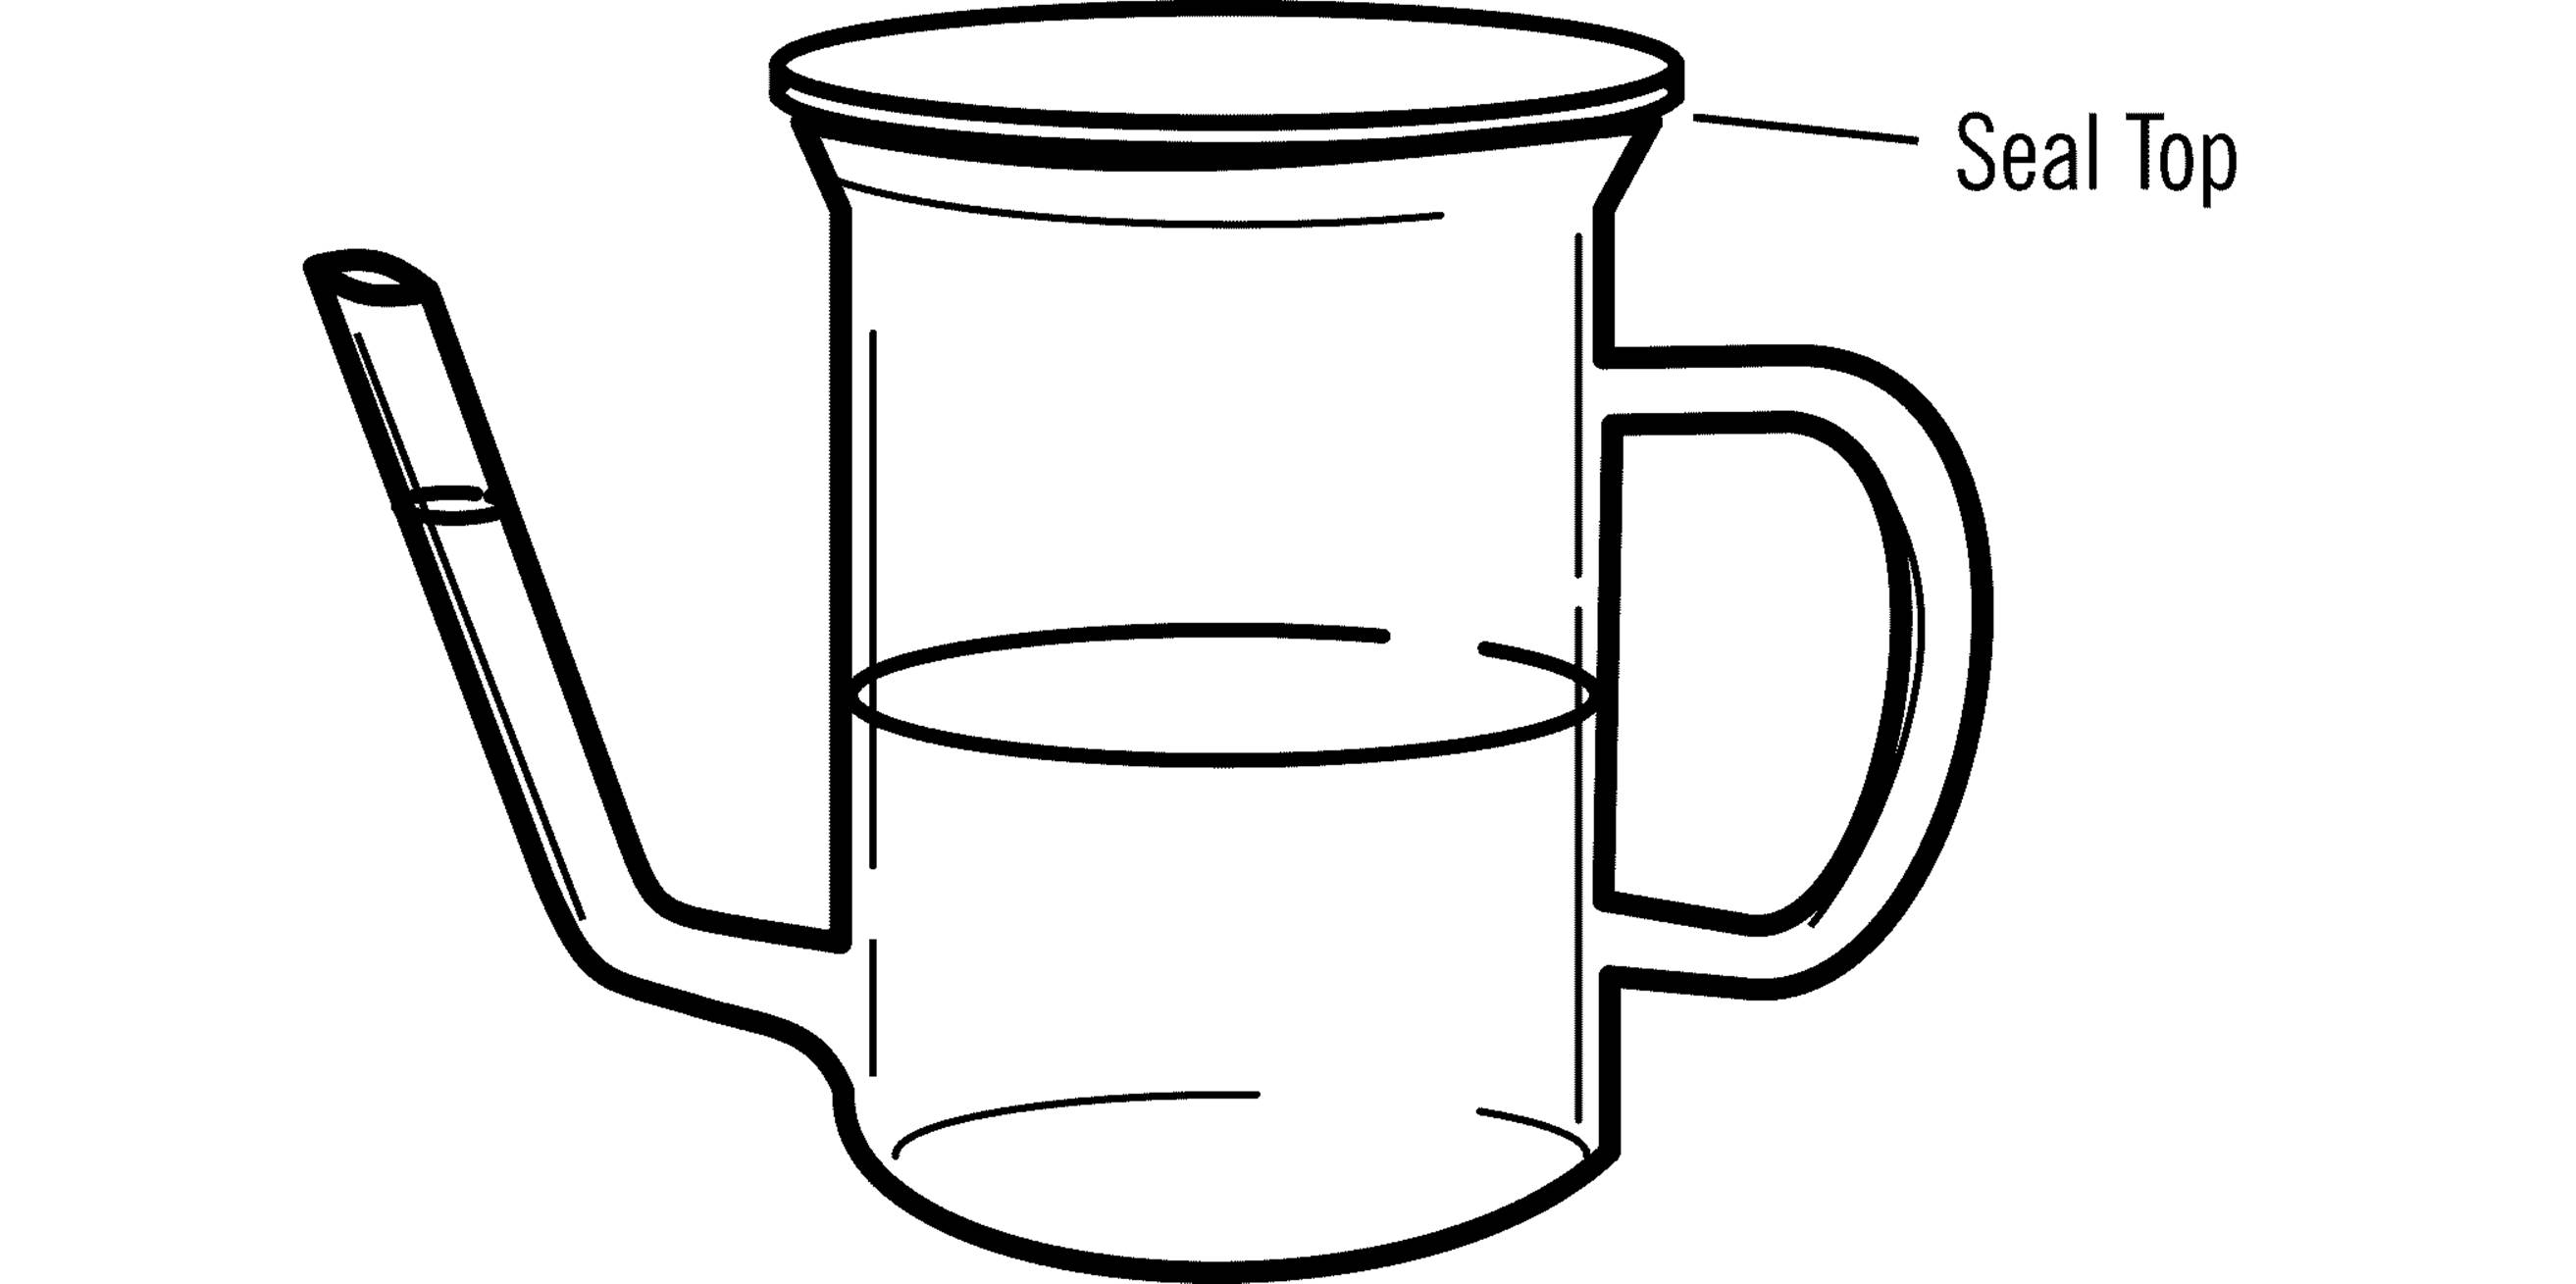
A related but easier (and more common) instrument to build is a weather glass, also known as a “Goethe barometer.” Start with a transparent (glass or clear plastic) teapot or gravy separator of the geometry shown, with a pouring spout that stems from the base.
Fill the main body of the weather glass halfway with water. Seal shut the top of the teapot or gravy separator. If it came with a rigid lid (as most teapots do), use silicone caulking (from a hardware store) or epoxy to seal it in place. The seal needs to be airtight, to make sure that you locate and fill any air holes in the top. If there is not a rigid lid (but soft plastic or mesh), make or improvise one, perhaps using a ceramic tile or coaster from a hardware or home improvement store. Again, seal it shut with silicone or epoxy.
When you first seal the weather glass, the water level in the spout/arm is equal to the water level inside the body of the glass. As atmospheric pressure changes over a period of days, the level in the spout will be higher or lower than that of the body. To make readings of the value, use a ruler and measure the height of the column (at the spout).
Questions to investigate:
§ Can you calibrate your weather glass by comparing the reading on different days to the barometer reading from the weather report?
§ What would happen if the weather glass lid were not airtight?
§ What would happen if the weather glass lid were flexible, not rigid?
§ How is it that this barometer works while being so short, compared to the water barometer described previously that might require a multistorey building? Hint: Compare this apparatus with both the mercury barometer and the “Air Barometer”. How does the principle of operation compare between the three?
§ Does the evaporation of water affect your readings? If so, how much, and can you compensate or correct for it?
§ Does the temperature affect your readings? If so, how much, and can you compensate or correct for it?
§ If you forgot to fill the weather glass before sealing the lid, how could you go about filling it? Can you refill the weather glass if the water evaporates?
Note 43. The Chemical Weather Glass
The chemical weather glass or storm glass is a traditional Victorian weather forecasting instrument developed by Robert FitzRoy, the captain of Darwin’s Beagle. It can be a strikingly beautiful instrument, with fine and feathery crystals that change character daily. It is a wonderful conversation piece, and elegant modern versions are still constructed with large blown glass globes and brass housings.
The text asks the question “How accurate is the chemical weather glass?” Before you build this to rely upon it, here are some hints: Studies as far back as 1863 have shown that the crystal growth is correlated chiefly with temperature changes. Modern anecdotal and informal tests do not seem to indicate any better-than-chance ability of the storm glass to predict the weather.
Questions to investigate:
§ Can you experimentally confirm that the crystal growth is correlated with changes in temperature?
§ Is the crystal status determined by the actual temperature, or by the rate of temperature change? Can you create a calibrated scale for the chemical weather glass, indicating your results?
§ Find (online) and read Charles Tomlinson’s report “An Experimental Examination of the so-called Storm-glass” from 1863. What conclusions were drawn?
§ The text makes the claim that the chemical weather glass “helps you predict the weather.” If you were to assume for argument that the instrument is no different than a crude thermometer, how can a crude thermometer help you to predict the weather? How well could it predict stormy versus fair weather?
Note 44. Tethered Weather Balloon
Spectra cord, available from kite stores, is an exceptionally light and strong cord that might be helpful for this project.
It is worth noting that above a certain height, a balloon becomes a hazard for aircraft. Check your local laws (FAA regulation, in the US) about tethered balloons before going for any substantial altitude. In some places (close enough to an airport) or weather conditions (when clouds are low enough), tethered balloons may not be allowed at all.
Note 45. On Dissections
The idea of killing a living animal (perhaps especially a vertebrate) merely to dissect it is morally questionable—even repugnant—to many. If you’re interested in performing dissections and are resourceful, it is possible to find animal specimens that have died from natural causes or accidents. Consider talking to (for example) the managers of independent pet stores in your town or biology teachers at your local high schools and colleges.
Although it is not the same thing, there are software packages available for download that simulate dissection. You can also now download and 3D print anatomical models, some of which are even “dissectable.” As a starting point, search for “anatomy” on http://www.thingiverse.com.