Make: The Annotated Build-It-Yourself Science Laboratory (2015)
Part II. Physics
Chapter 5. Force, Measurement, and Motion
Spring Scale
Purpose: A spring scale is used to determine the force or pull an object causes or exerts.
Materials: Wood ruler (or half a yardstick), tack, paper clip, and a rubber band.1
What to Do: Cut the rubber band in half. Stick a tack in one end of the ruler. Tie one end of the rubber band around the tack. Bend a paper clip as shown. Tie the other end of the rubber band to the paper clip. Part of the paper clip serves as a marker. The other part of the paper clip serves as a hook from which objects to be weighed can be suspended.
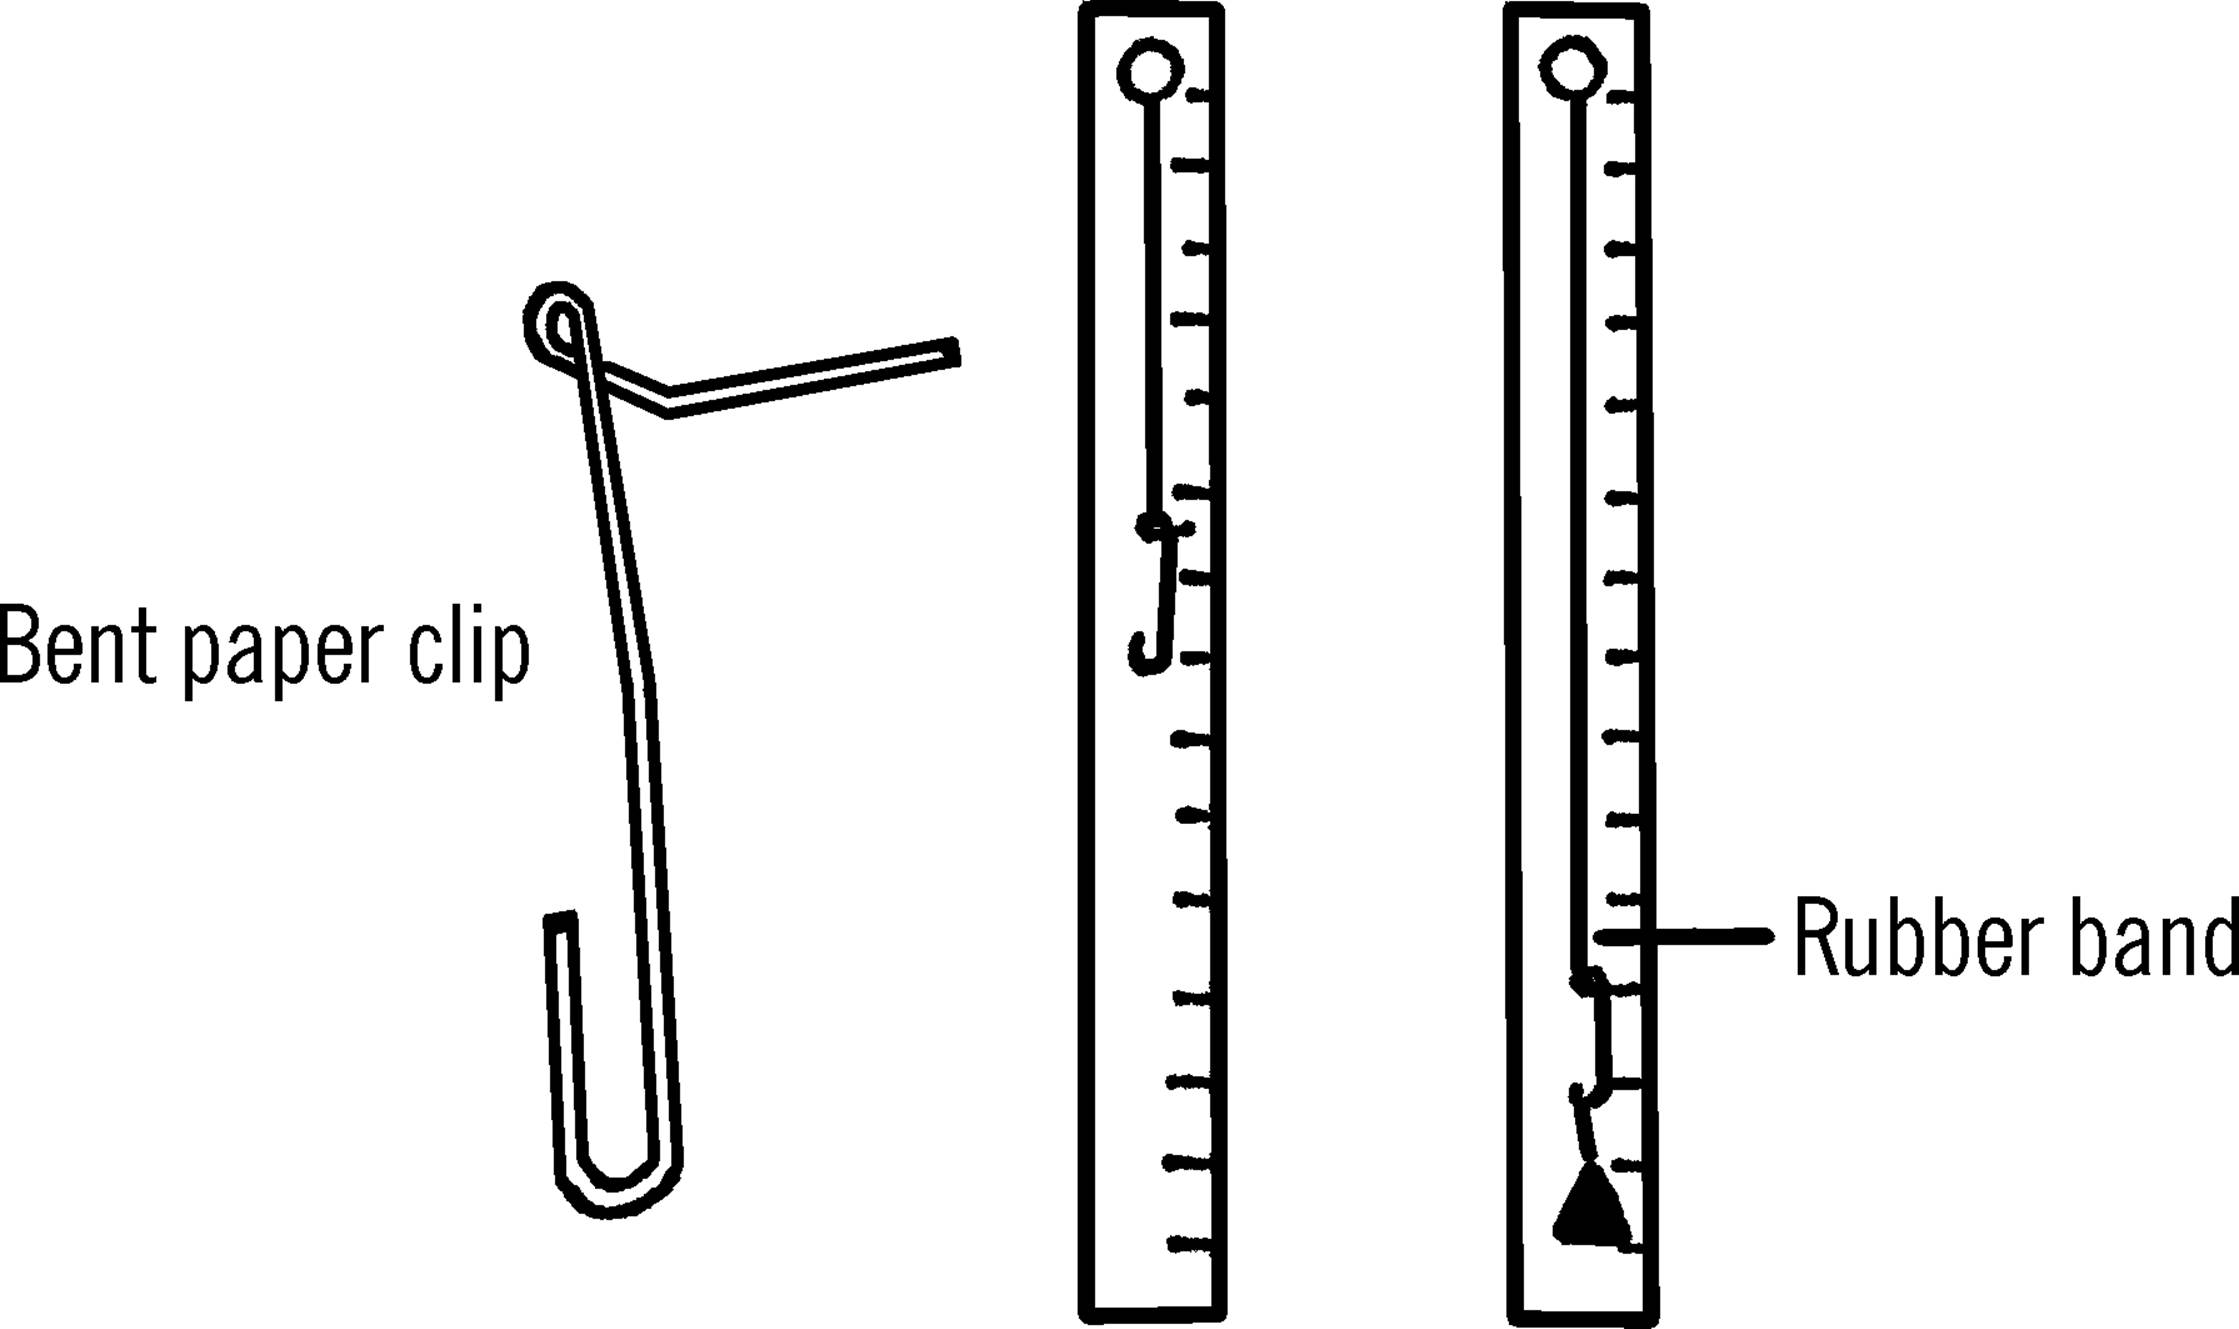
Operation of Equipment: Hang a known weight from the end of the paper clip. Place a piece of adhesive or masking tape at the spot the paper clip indicates. Write the weight of the object on the tape. Do this for several known weights until you have a complete scale.
Can You Work Like a Scientist?
1. Do all rocks that look the same size weigh the same?
2. Do things weigh the same in water as in air?
3. What would you have to change on your rubber band spring scale if you had to weigh very heavy weights?
4. How would you weigh very lightweight objects?
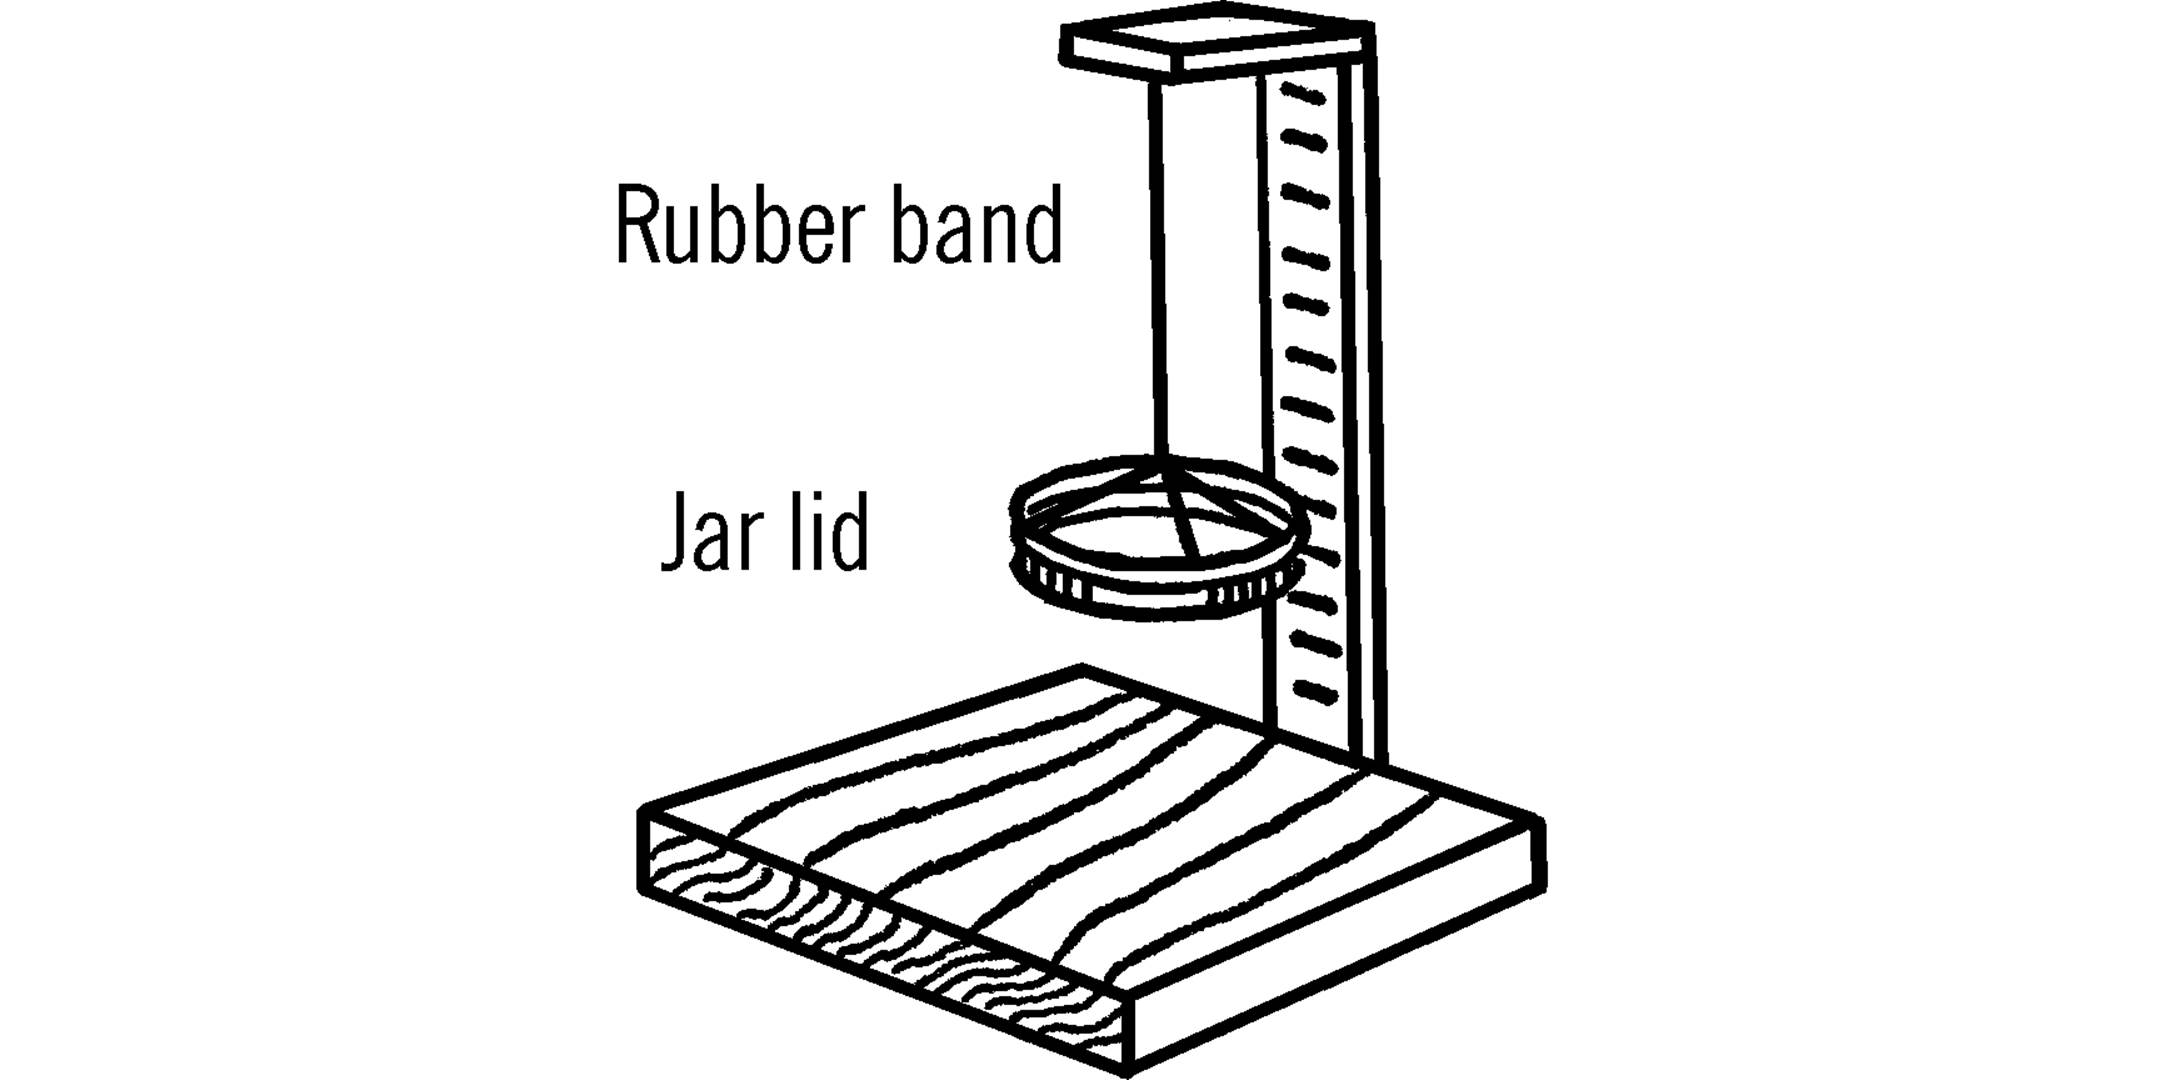
Rubber Band Weighing Scales
Purpose: This type of scale is a simple measuring device to determine weight or the pull of gravity on objects. The scale has certain limitations as to accuracy.
Materials: Rubber band, lid, wood.
Meter Stick
Purpose: A meter stick is similar to a yardstick except that the divisions are much finer and all the measurements are expressed in the metric system which is used by scientists all over the world.
Materials: Yardstick or wood lath, plastic ruler (type with both millimeters and inches), white butcher paper, and glue.
What to Do: A meter stick is almost forty inches long.2 You can make part of a meter stick by just putting metric measurements on the back of a yardstick. A better and more complete meter stick can be made from a piece of smooth lath. Lay such a piece of wood down on a piece of butcher paper. Trace around the wood with a pencil. The outline of the wood on the paper forms your scale. Lay your ruler down on the paper and copy the metric system as well as the English system of measurement on the butcher paper scale. The very small divisions on your ruler are in millimeters, the next largest division is in centimeters. It takes 1000 millimeters or 100 centimeters to make one meter. Therefore, you will have to move your ruler four times along the butcher paper in order to make the complete scale.
When you have finished making the scale, glue the scale on the wood lath. Use rubber cement or Elmer’s glue. After you have finished gluing the scale in place, cut the lath so that it is just 1000 millimeters long.
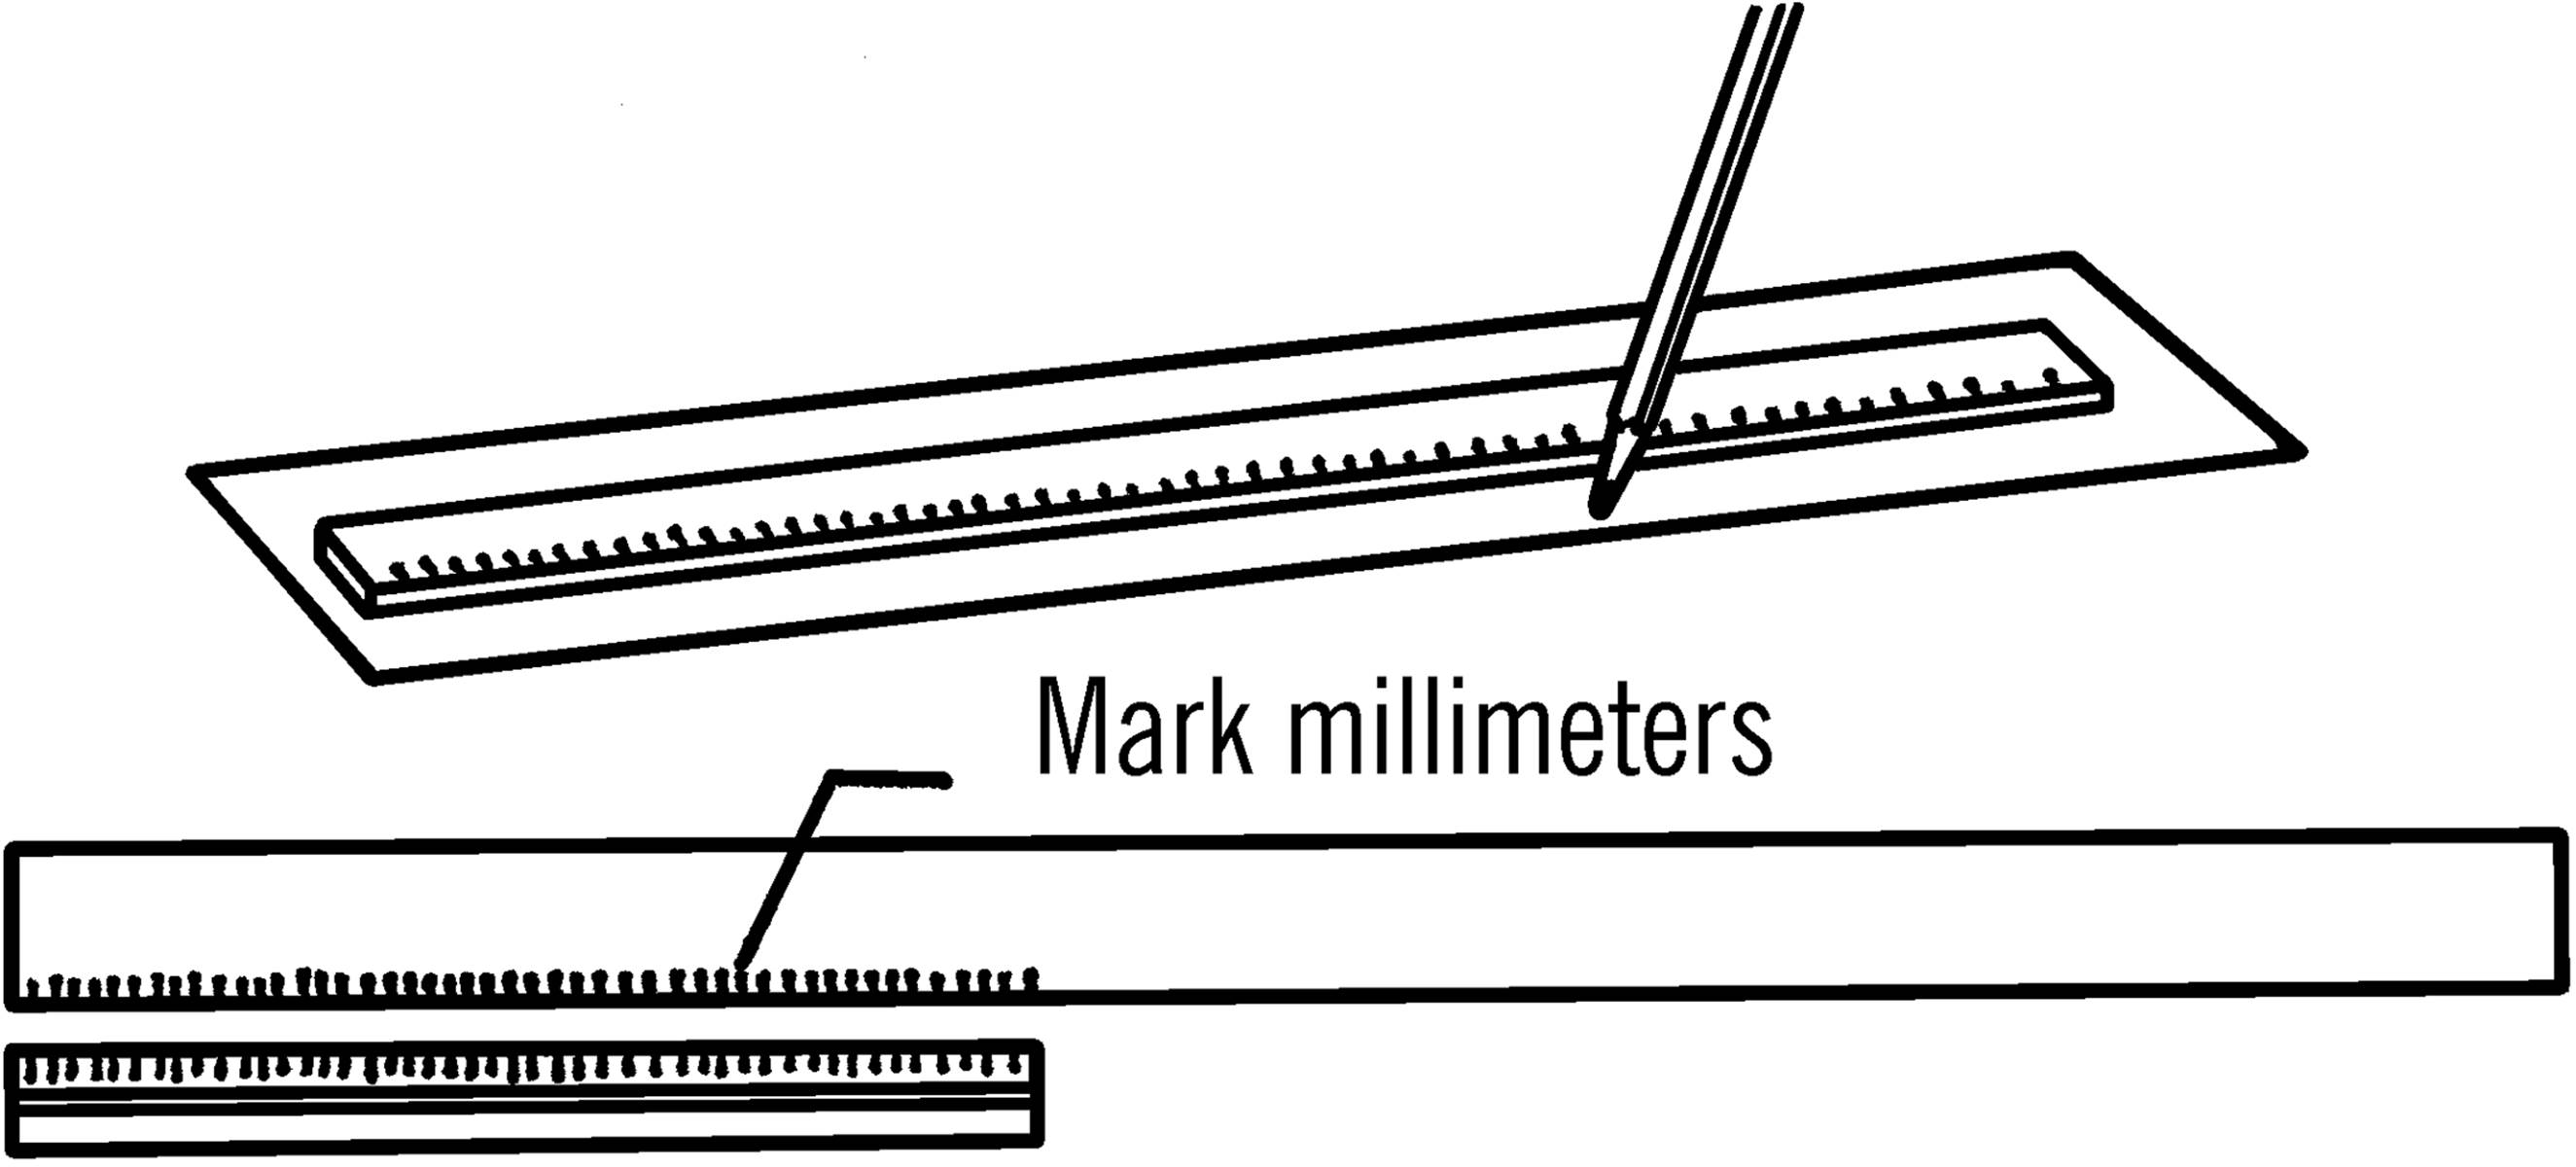
Operation of Equipment: The metric system’s main advantages are finer divisions for more accurate measurement and the ease of changing one measurement into another. For instance, if you want to change centimeters into millimeters you just multiply the centimeters by ten. In actual practice you move the decimal point one place to the right. For example, 36 cm (centimeters) would be written 36. Therefore 36 multiplied by 10 equals 360 mm. (millimeters).
Can You Work Like a Scientist?
1. How would you change millimeters into centimeters? Remember, your answer should be less.
2. How would you change meters into millimeters? Into centimeters?
3. What are the equivalents in the metric system for the inch? Foot? Yard? How many centimeters equal one inch? One yard?
4. What measurement is used for the “mile” in the metric system?
Optical Micrometer
Purpose: A micrometer is used to measure the thickness of very thin objects. The optical micrometer is accurate to a thousandth of an inch.
Materials: Two glass microscope slides, two finishing nails, piece of black art paper, small rubber band, block of wood (4” × 1½” × 1”), wood for the base (8” × 16”) and cardboard for a scale.
What to Do: Cut a 1” × 1¼” notch off the block of wood as shown. Use masking or Scotch tape to fasten one microscope slide to the side of the block of wood. Glue a piece of black art paper over all the slide except for ½ inch near the notched end of the block. The finishing nail near the slide should be driven into the wood base very near the slide at the edge of the notch in the block. A second finishing nail is nailed on the other end of the base about an inch in from the side.
Tie a piece of white thread around the finishing nail near the slide. Fasten another slide to the first slide with a rubber band. The slide should be so positioned that if you press on “B” the slides will open up at ‘`A.’'3 Finally glue or tape a piece of white cardboard to the base for a scale.
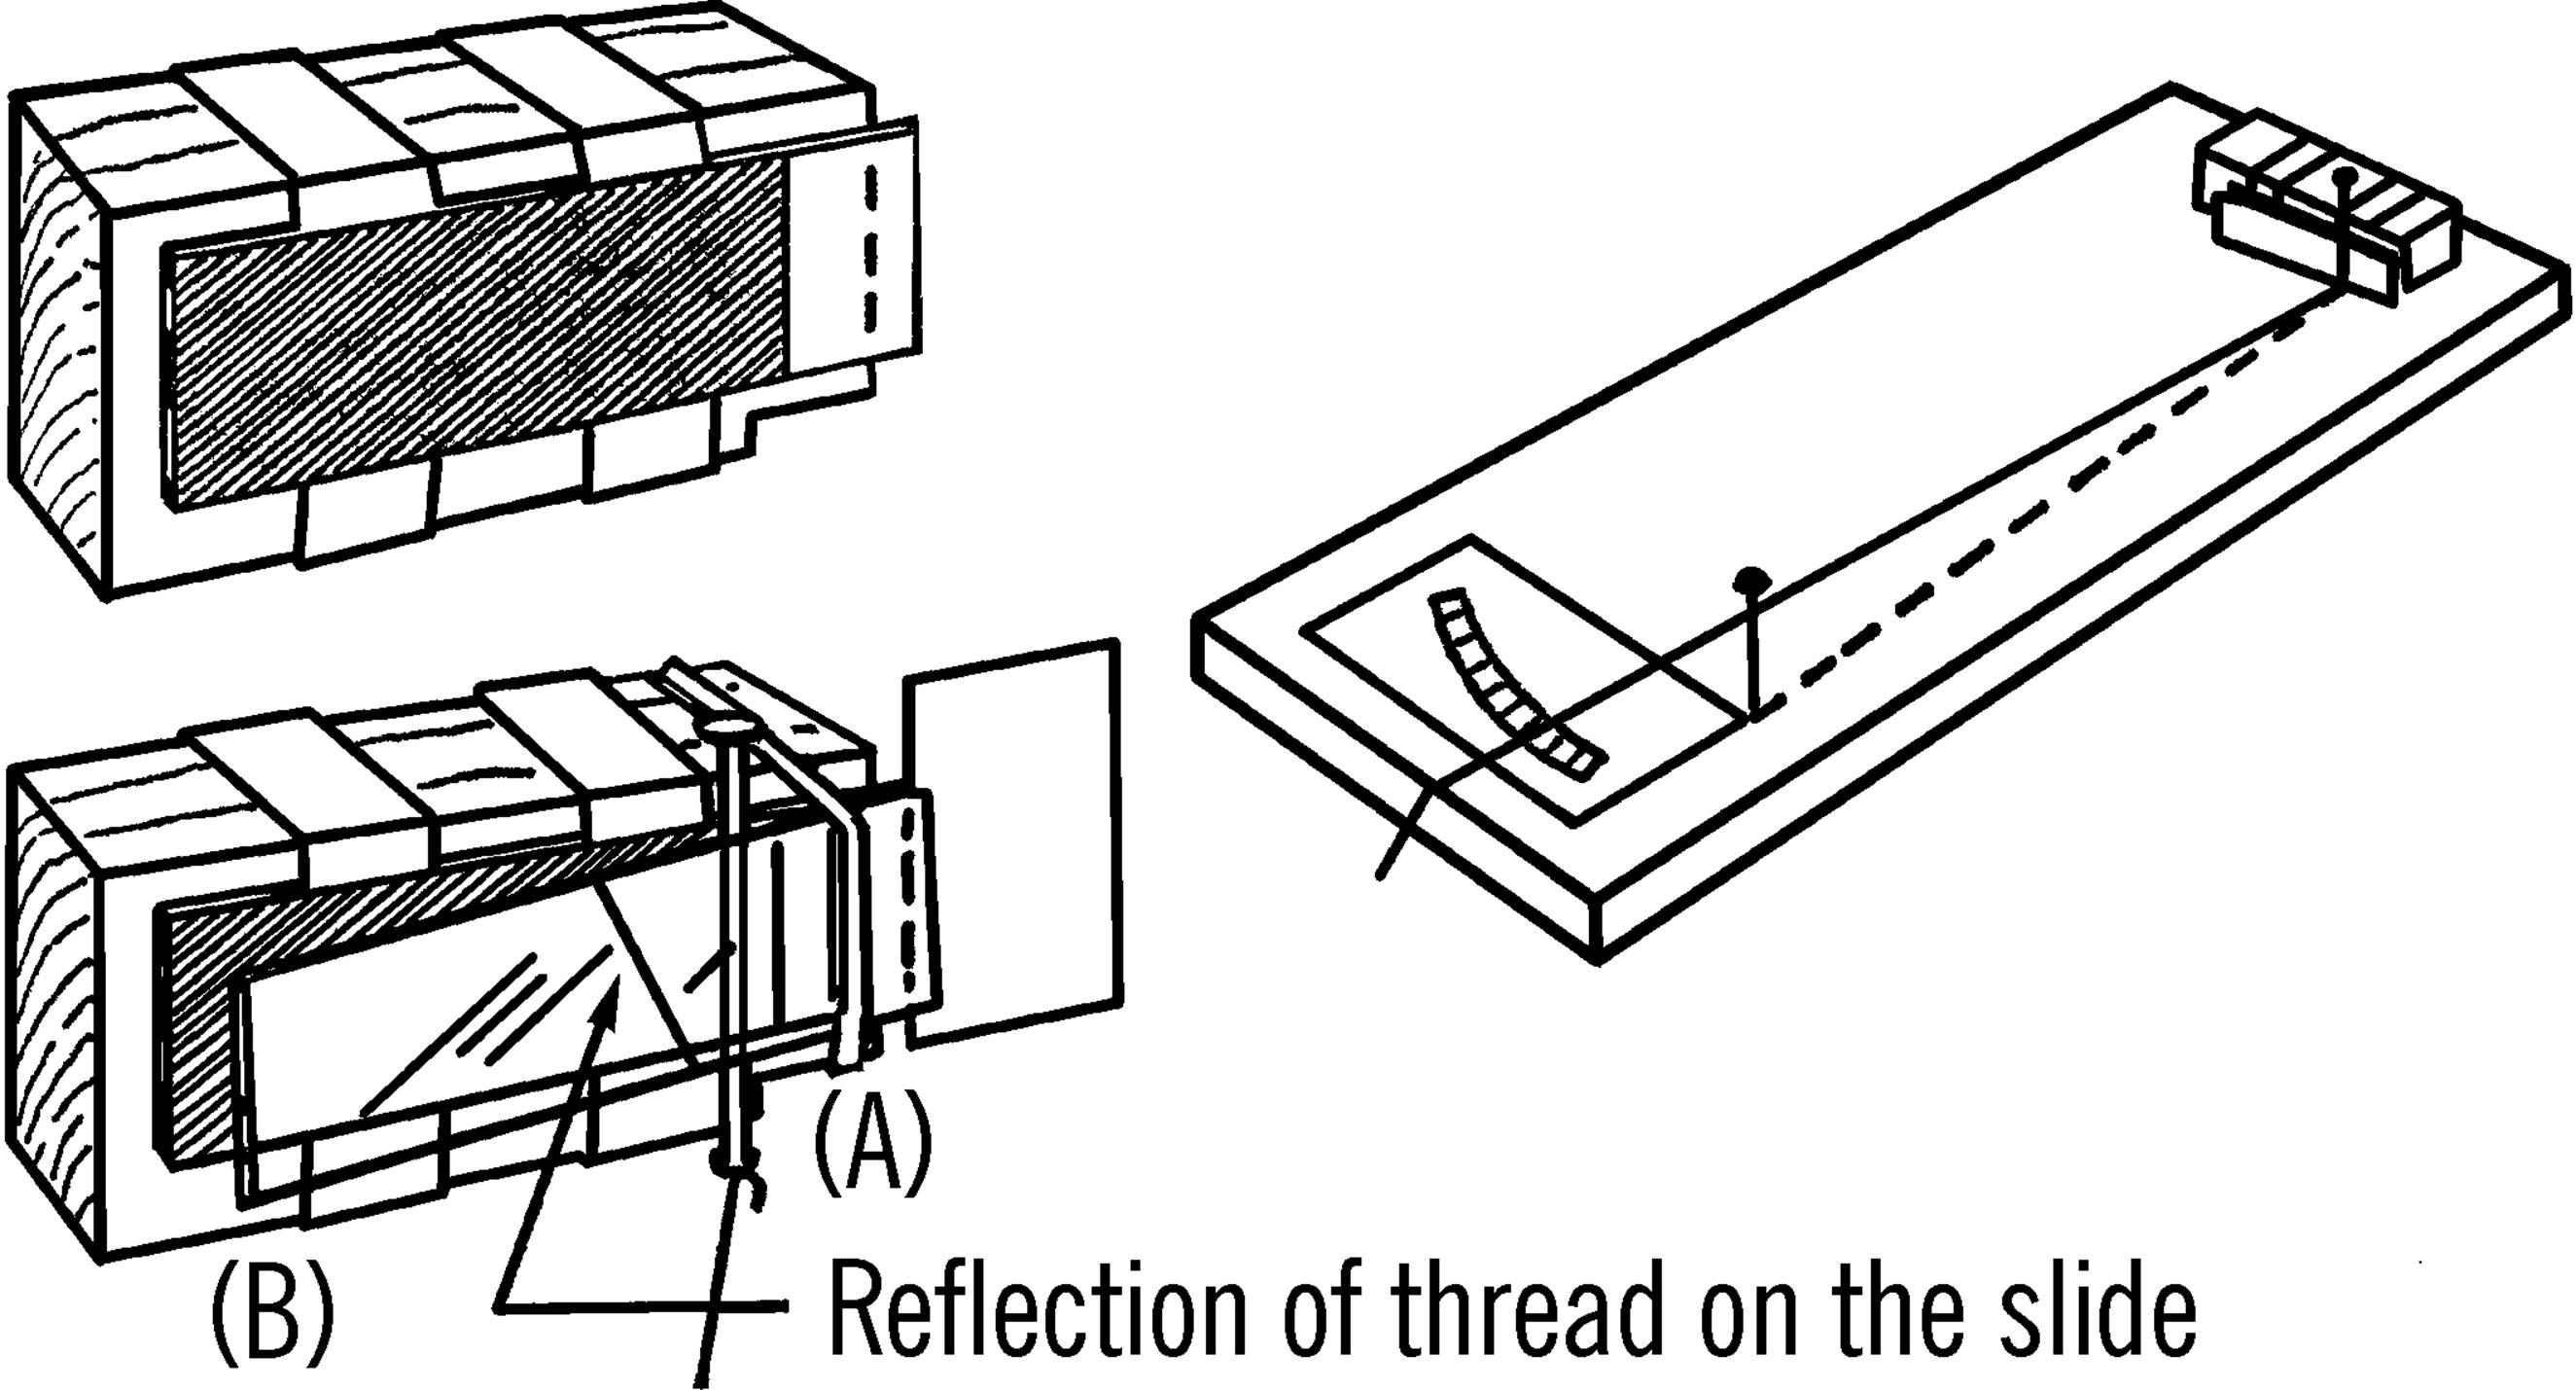
Operation of Equipment: Line up the two finishing nails with your eye so that they lie in a straight line. Now move the thread from one side of the base to the other. You should be able to see the reflection of the thread on the microscope slide. Move the thread so that the reflected image of the thread disappears behind the nail between the slides. Mark this position of the thread “0” on your scale. Slip a piece of newspaper between the two slides at “A.” Move the thread again so the reflection lines up with the two nails. Since a newspaper is .0025 of an inch (2½ thousandths) thick, place a mark on the scale and label this mark 2.5. Now insert two pieces of newspaper between the slides. Mark the correct position 5 for five thousandths of an inch. Repeat this until you have a scale that goes up to fifty thousandths of an inch.4 You can make smaller divisions by dividing the distance between zero and 5 into five equal distances. Then each small mark indicates one-thousandth of an inch.
Can You Work Like a Scientist?
1. Can you measure the thickness of different metals? Hair? Paper? Glass?
2. Can you change your scale into metric measurement?
3. Does glass get thicker when it is heated? How about other things?
4. What is the effect of freezing temperatures on various things?
Centrifugal Force Indicator
Purpose: This instrument is used to measure the force necessary to balance the outward pull of a mass that is whirled at different speeds and at different distances (radii). With this indicator you can measure the increased gravitational force exerted on an object that is whirling in a circular path.
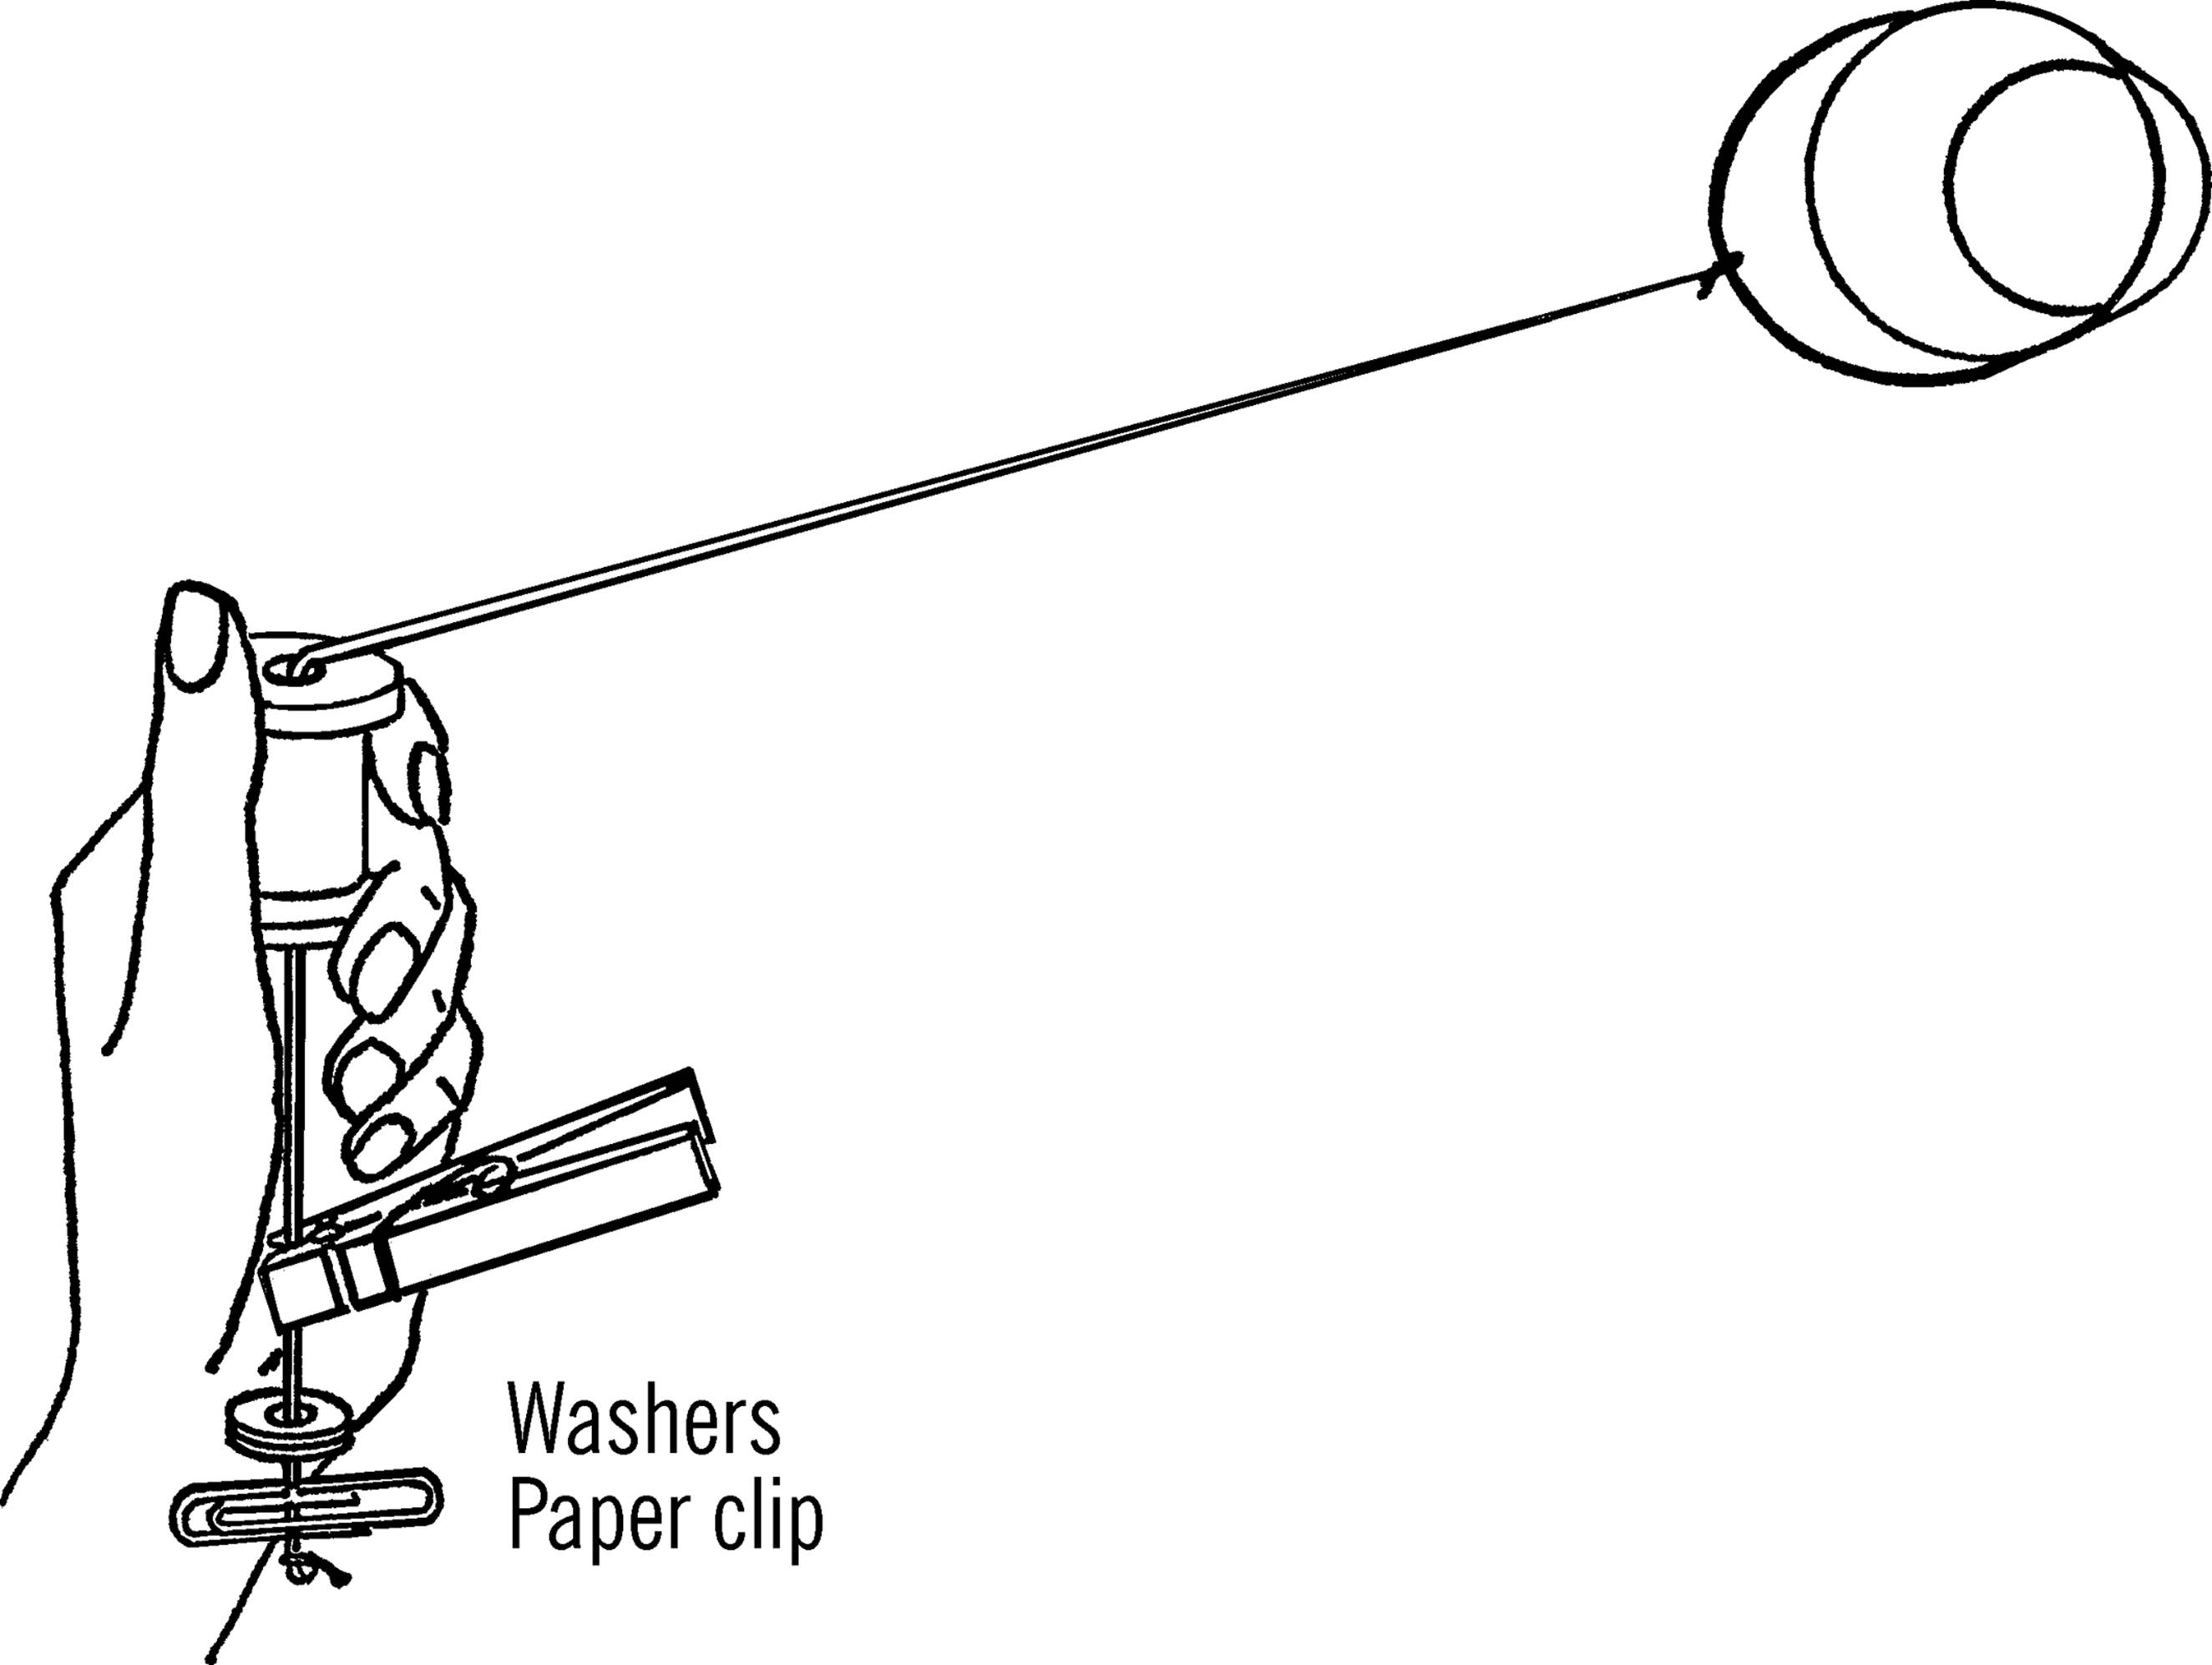
Materials: Small bucket or can with a handle, strong cord about four feet long, large spool, clothespin, paper clip, and several washers for weights.
What to Do: Tie one end of the cord on the handle of the small bucket or can. Slip the other end of the cord through the spool. Tie a paper clip on the other end of the string in such a manner that washers can be slipped over the paper clip and yet won’t fall off. Clip a clothespin onto the cord at a certain distance from the handle of the can. This distance is the radius for your particular experiment. Add washer weights till the pull of the can balances the weights.
Operation of Equipment: Whirl the can by holding the spool in your hand and turning the spool as you whip the can around your head. When the clothespin is pulled up to the bottom of the spool the outward force is too great. Add washer weights till the outward pull just balances the inward pull.5 The amount of weight required to balance this outward pull is a measure of the “centrifugal force” or artificial gravity on the bucket.6
Can You Work Like a Scientist?
1. Does it require more or fewer weights to balance the whirling bucket if you increase the speed at which you are rotating the bucket?
2. Time the number of rotations you make in fifteen seconds. If you know the radius, can you figure the miles per hour the object is moving?
3. Can you keep a graph of the weight required to balance the outward pull as the bucket increases its speed around you?
4. What effect does increasing the radius have to do with miles per hour and total force needed to balance the outward pull?
5. What effect does adding a weight in the bucket have on the outward pull at various speeds? Does increasing the speed of rotation seem to increase the weight of the object?
6. Try whirling small animals in the bucket. Put a lid on the bucket. What effects does an increase in gravitational force have on small animals?7
7. Can you whirl an animal in such a way as to equal the force that would be exerted on the animal on the planet Jupiter?
8. The pull of gravity is measured in “G’s.” One G is the regular weight of the object. If it takes twice the normal weight of the object to balance the object when you whirl it, the object is subjected to two “G’s.” How many “G’s” can you cause by whirling an object?
Hand Stroboscope
Purpose: This instrument is used for measuring and examining objects that rotate or reappear up to sixty times per second. The stroboscope seems to stop the motion of a moving object by matching its speed with that of a rotating object.
Materials: Plywood or masonite disc as shown, wood handle, screw, and washer.
What to Do: Cut twelve slots in the wooden disc as shown. Attach the handle by using the washer and the wood screw. Drill a hole next to the handle. The hole should be large enough for your finger. The disc should turn easily when you rotate it with your finger.
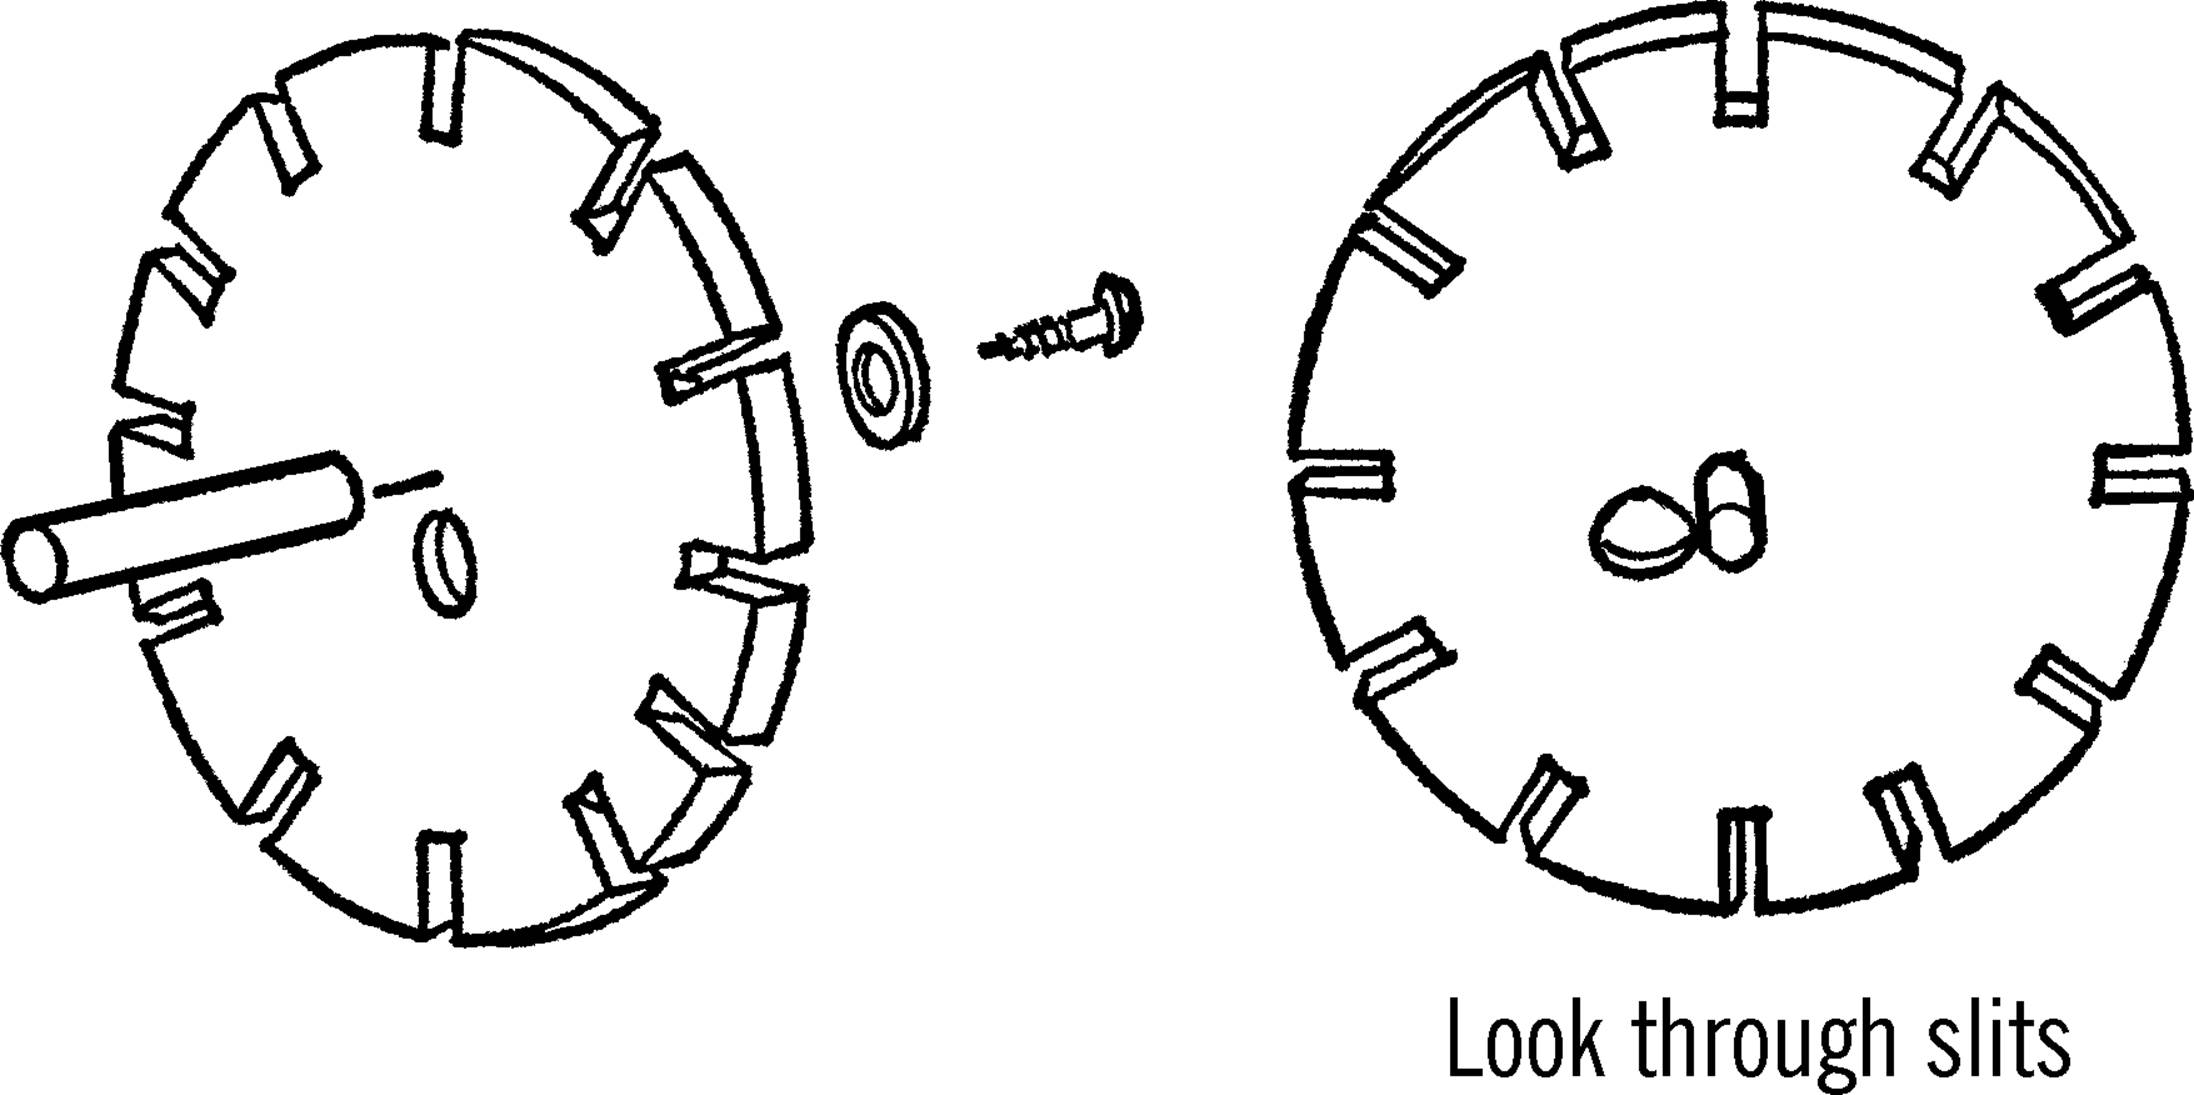
Operation of Equipment: The stroboscope operates on the principle that if you always see a moving object in the same place, it looks as if it is standing still. Move your finger back and forth in front of your face. Close your eyes before you move your finger to one side. Open your eyes when your finger is in its original position in front of your face again. It looks as if your finger is always in the same position even though you know it is moving back and forth. This is how the stroboscope works. A vibrating or rotating object is viewed through the slits in the disc. If the object is vibrating slowly enough, all the slits but one can be covered with masking tape. Then if you rotate the stroboscope at the exact speed the object is vibrating or rotating, you will always see the object in the same place, and the object will appear as if it were not in motion. By counting the rate at which you rotate the hand stroboscope, you know the rate at which the object is rotating or vibrating. If the object is vibrating too fast, uncover a second slit. Then each half rotation of the disc is equal to one rotation or vibration of the object. If you have two slits uncovered and you rotate the stroboscope thirty times in a minute to stop the motion, you have seen the object thirty times two or sixty times in the minute at the same spot. Therefore, the object has rotated sixty times in a minute.
Can You Work Like a Scientist?
1. Fasten a hacksaw blade in a vise. Pluck the blade so it vibrates. Can you determine the rate of vibration?
2. Can you stop the motion of an engine with your stroboscope and determine the revolutions per minute? If not, what do you conclude?
3. If your stroboscope is moving too slowly, the slot won’t quite get around for each rotation of the object. Will the object seem to be moving slowly forward or backward?
4. If your stroboscope is moving too rapidly, the object will not quite make one complete turn each time you see it. Will the object seem to be moving backward or forward?
5. Why do the wheels of wagons in the movies appear to be moving backward?
Motorized Stroboscope
Purpose: The stroboscope is used seemingly to stop the motion of rapidly rotating or vibrating objects in order to examine them at high speeds or determine the speed at which they are rotating. The motorized stroboscope is capable of stopping the movement of high-speed motors. When the stroboscope is hooked up with a rheostat, the speed of the stroboscope can be matched up with the unknown speed of the object to be viewed.
Materials: Small motor such as a phonograph motor, a rheostat, and a plastic phonograph record or round piece of masonite.8
What to Do: Cut six slits in the record or masonite as shown. You can drill holes in place of the slits if necessary. Attach the record to the shaft of the small motor. You may need to wrap tape around the shaft in order for the record to fit tightly on the shaft. Connect the rheostat to the motor and the plug as shown.
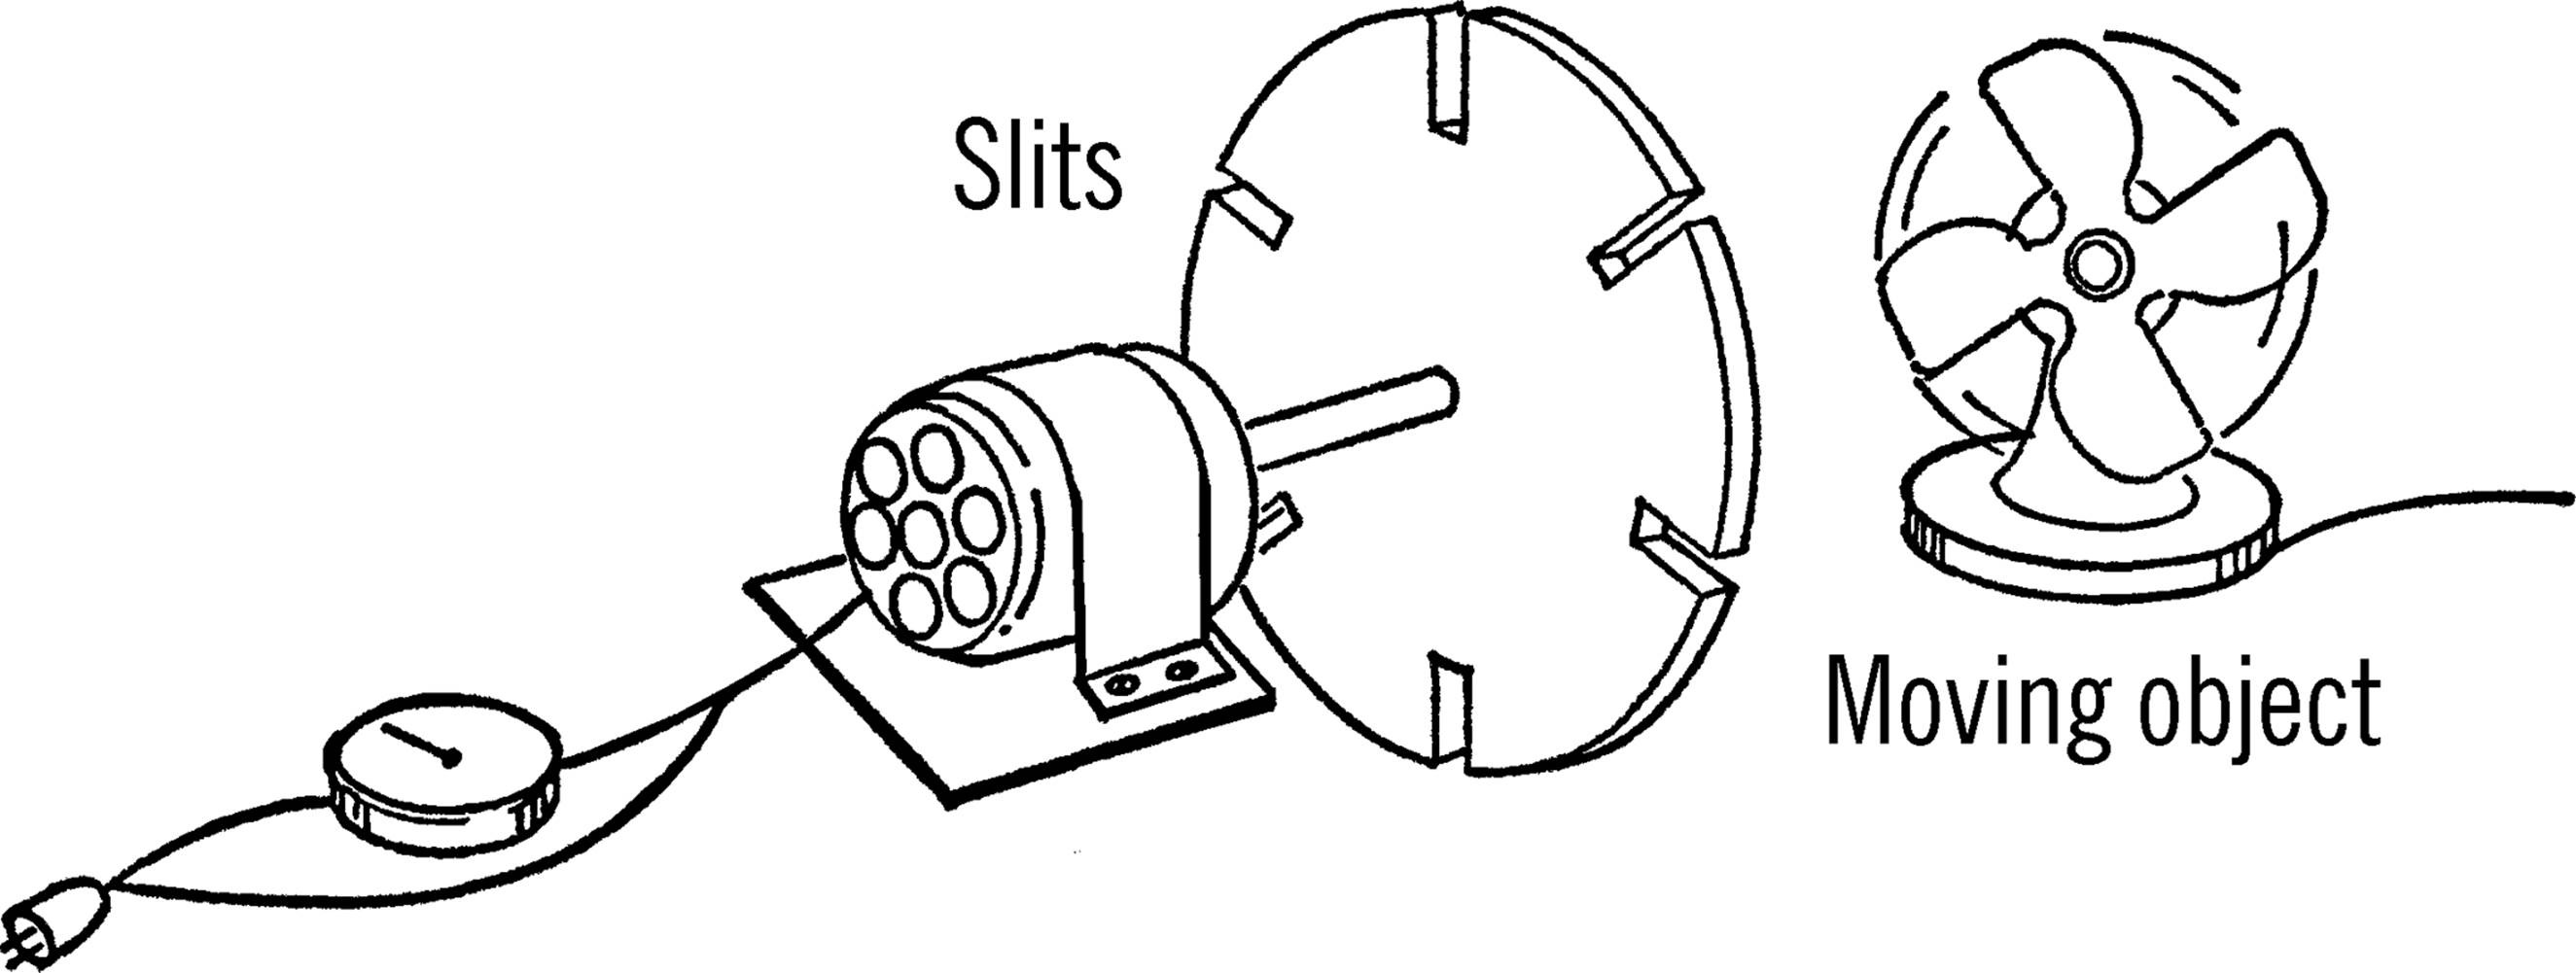
Operation of Equipment: Cover up five of the six holes with masking tape. Look through the remaining hole of the rotating record at a fan that is turning at a known number of revolutions per minute.9 Use your rheostat to control the speed of your stroboscope. When the speed of the stroboscope matches that of the fan, the blades of the fan will seem to stand still. Make a mark on your rheostat and label it with the number of revolutions the fan is making. You can determine other speeds for your stroboscope by using similar rotating motors of known speed.
If you want to double the speed of your stroboscope, uncover a second hole on the disc. The hole should be opposite the first hole. Three holes triple the rate of your stroboscope reading. Six holes will increase the rate six times. Thus, if your rheostat gives a rate of 1200 revolutions per minute and you were using six holes, the total number of revolutions would be six times 1200 or 7200 revolutions per minute. An intense light on the object being viewed makes examination much easier.
Can You Work Like a Scientist?
1. Can you use your stroboscope on fluorescent lights? Do fluorescent lights give a steady light?
2. If the stroboscope turned twice as fast as a motor being examined, would the motor still appear to be stopped?
3. If the stroboscope turned four times as fast as the motor, what pattern would you see through the stroboscope disc?
4. How is a stroboscope used to help time a car engine? Ask a mechanic.
Water Hourglass
Purpose: This water glass clock is used to measure a certain length of time. The amount of time is controlled by the amount of water used.
Materials: Two bottles, two rubber stoppers, and two short pieces of glass tubing. Baby bottles are very good since they have measuring marks on them. Baby bottles require size #6½ stoppers. (You can use clay for a stopper and soda straws for tubing.)
What to Do: Cut two short pieces of glass tubing about an inch long (see “Cutting Glass Tubing”). Use the tubing to connect the stoppers. If you use soap suds, the tubing will slip into the stopper more easily.
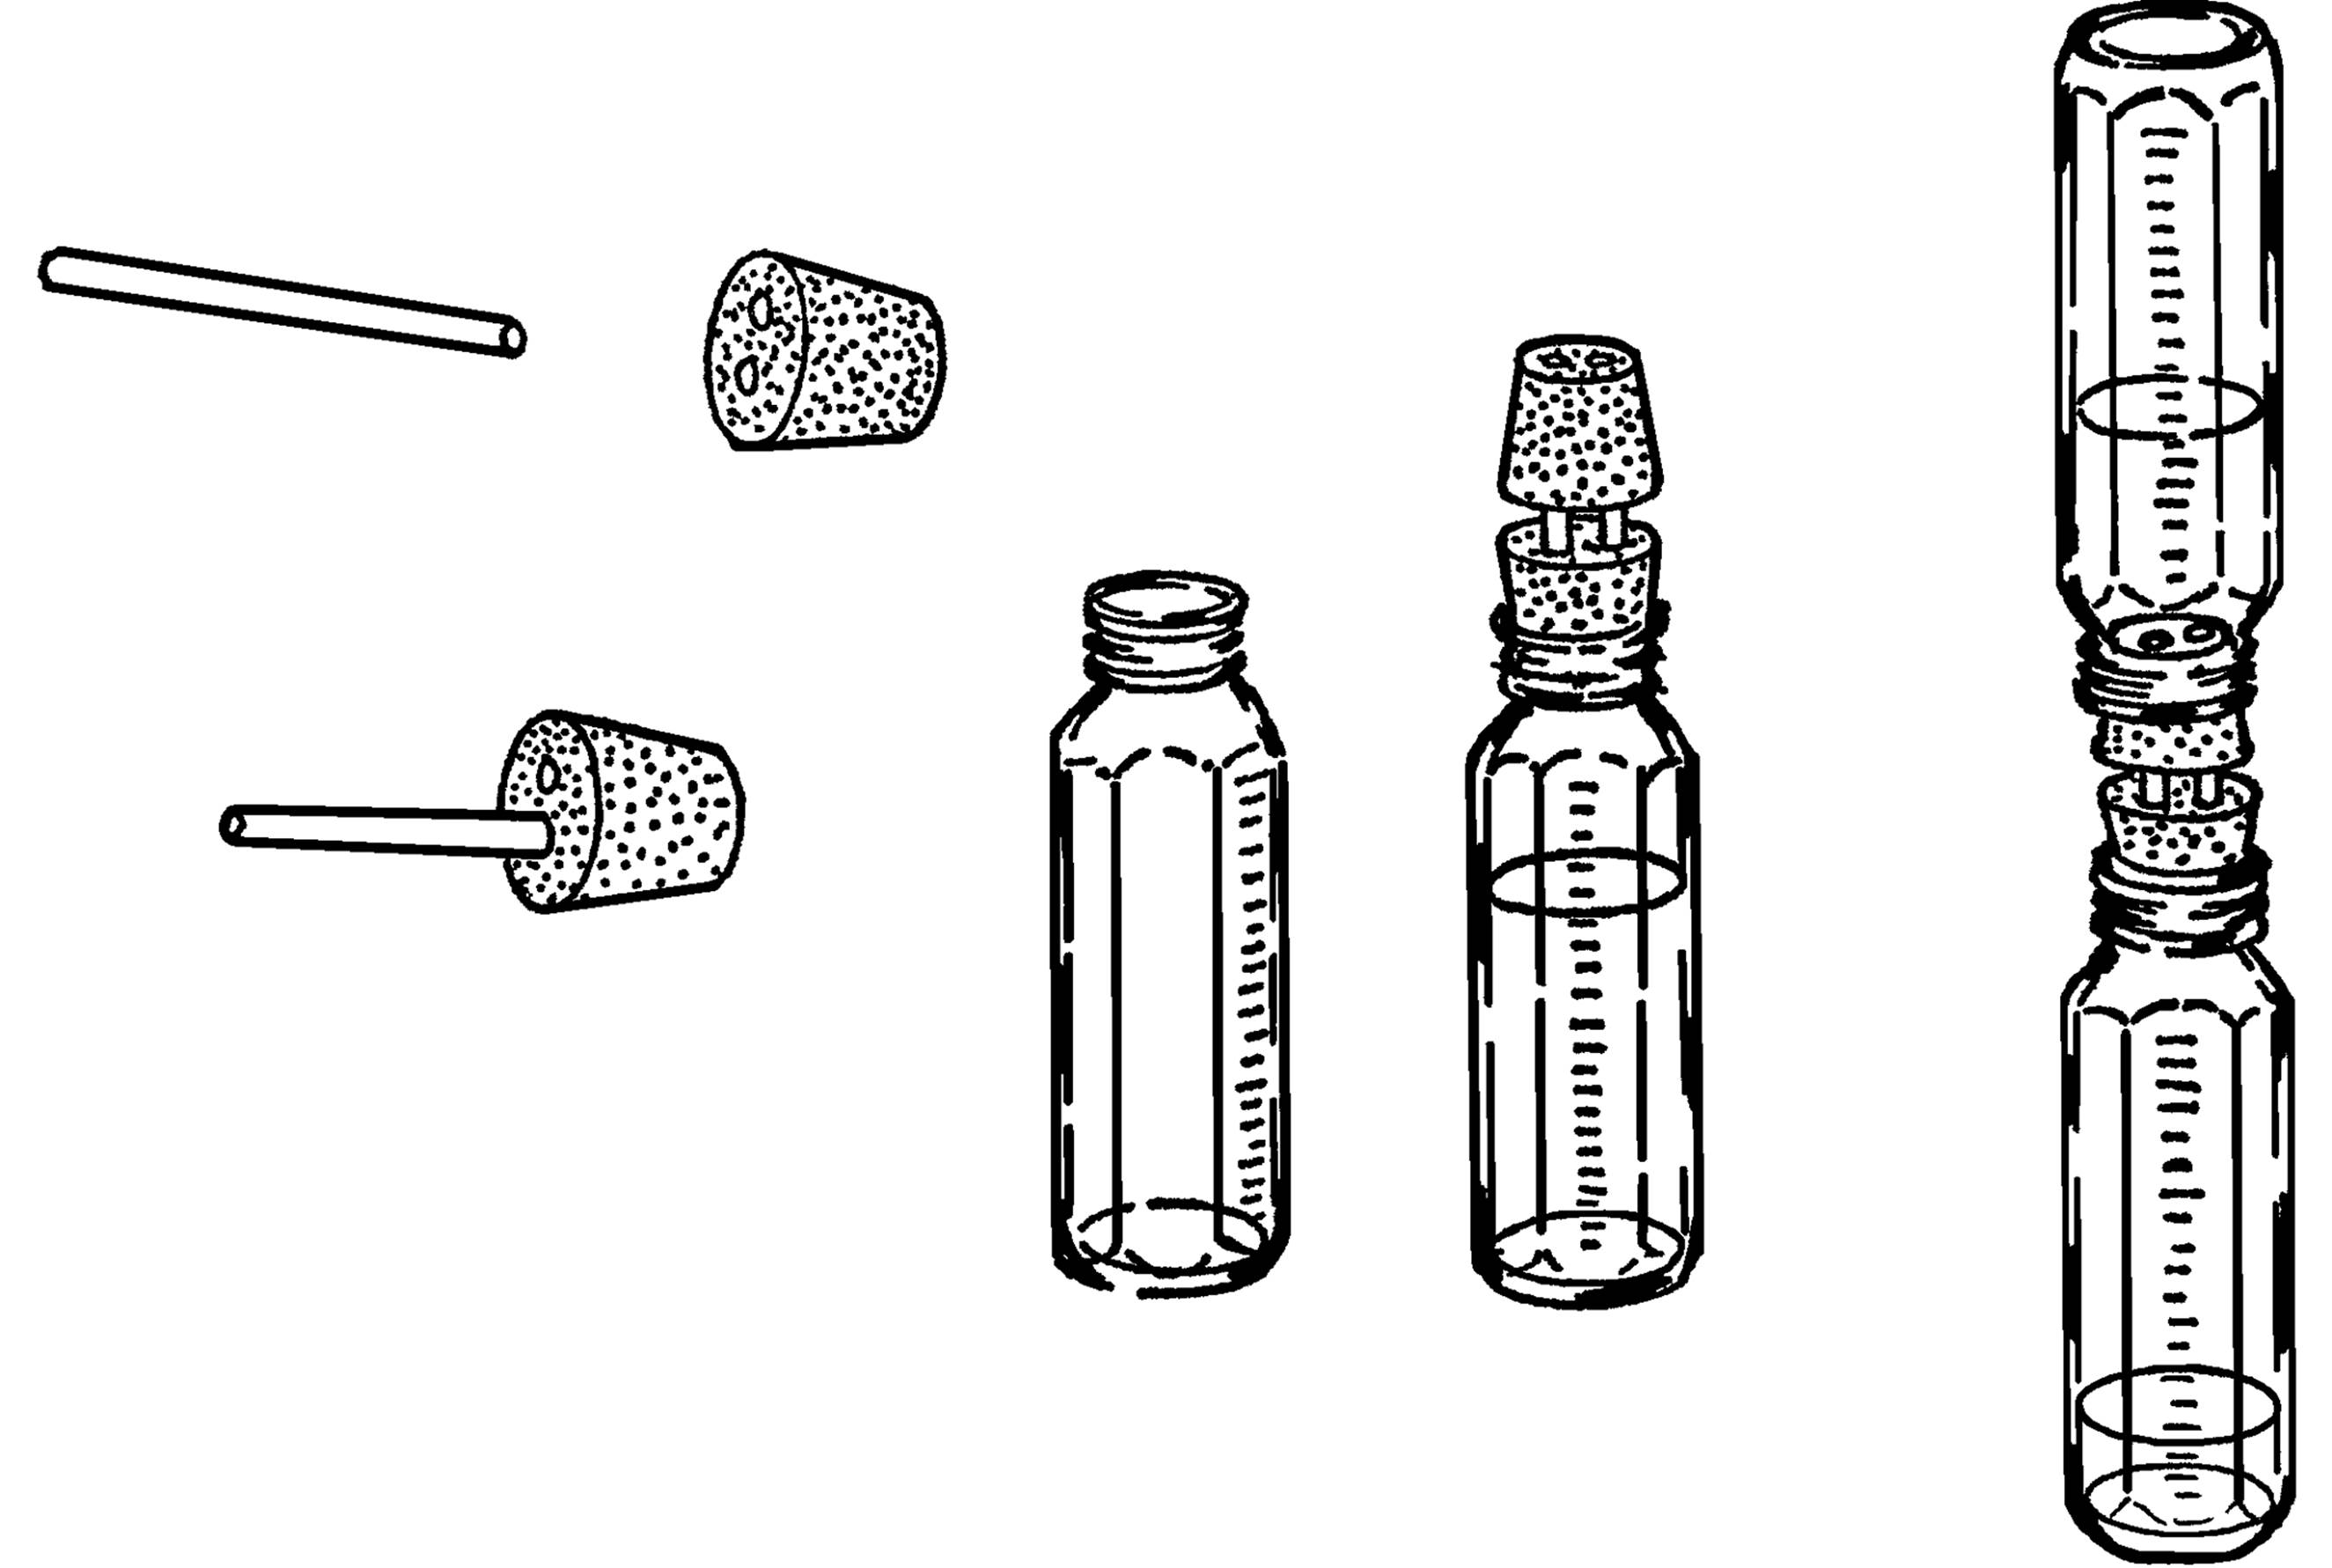
Operation of Equipment: Baby bottles are marked in milliliters. Fill one bottle with 200 ml of water. Place the stoppers in both bottles. Turn the bottles over and time how long it takes for the water to go from the upper to the lower bottle. If you want only half the time for a measurement, put in only half the water.
Can You Work Like a Scientist?
1. How many milliliters of water would be necessary for three minutes? Is this long enough to soft-boil an egg?
2. What clock is the most accurate, the water clock or the phonograph stop clock (“Stop Clock”)? Can you think of times when one would be better than the other?
3. If a student is to give a two-minute talk, can you set your water clock for just two minutes? Will this help classmates keep track of the time?
4. How many baskets can you shoot in five minutes (use your water clock)?
5. How many arithmetic problems can you do in fifteen minutes?
6. What effect does the amount of light have on plant growth? Time the experiment with your water clock.
7. Try making your hourglass with just one-hole stoppers.
8. Put water in a baby bottle. Use a two-hole stopper. Will the water run out if one hole is covered? Will it run out if neither hole is covered?
Stop Clock
Purpose: There are many uses in science for the accurate measurement of time. Often it is necessary to measure time in parts of a second. With this stop clock you can break time up and measure it down to one-hundredth of a second.10
Materials: Phonograph turntable (should have 45 rpm speed), old phonograph record, spring clothespin, and a large empty spool for thread.
What to Do: With a protractor divide a phonograph record into a hundred sections as shown. Mark these divisions by using tape. Mount a clothespin as shown on a block of wood. The block should raise the clothespin to the same height as the record on the phonograph.
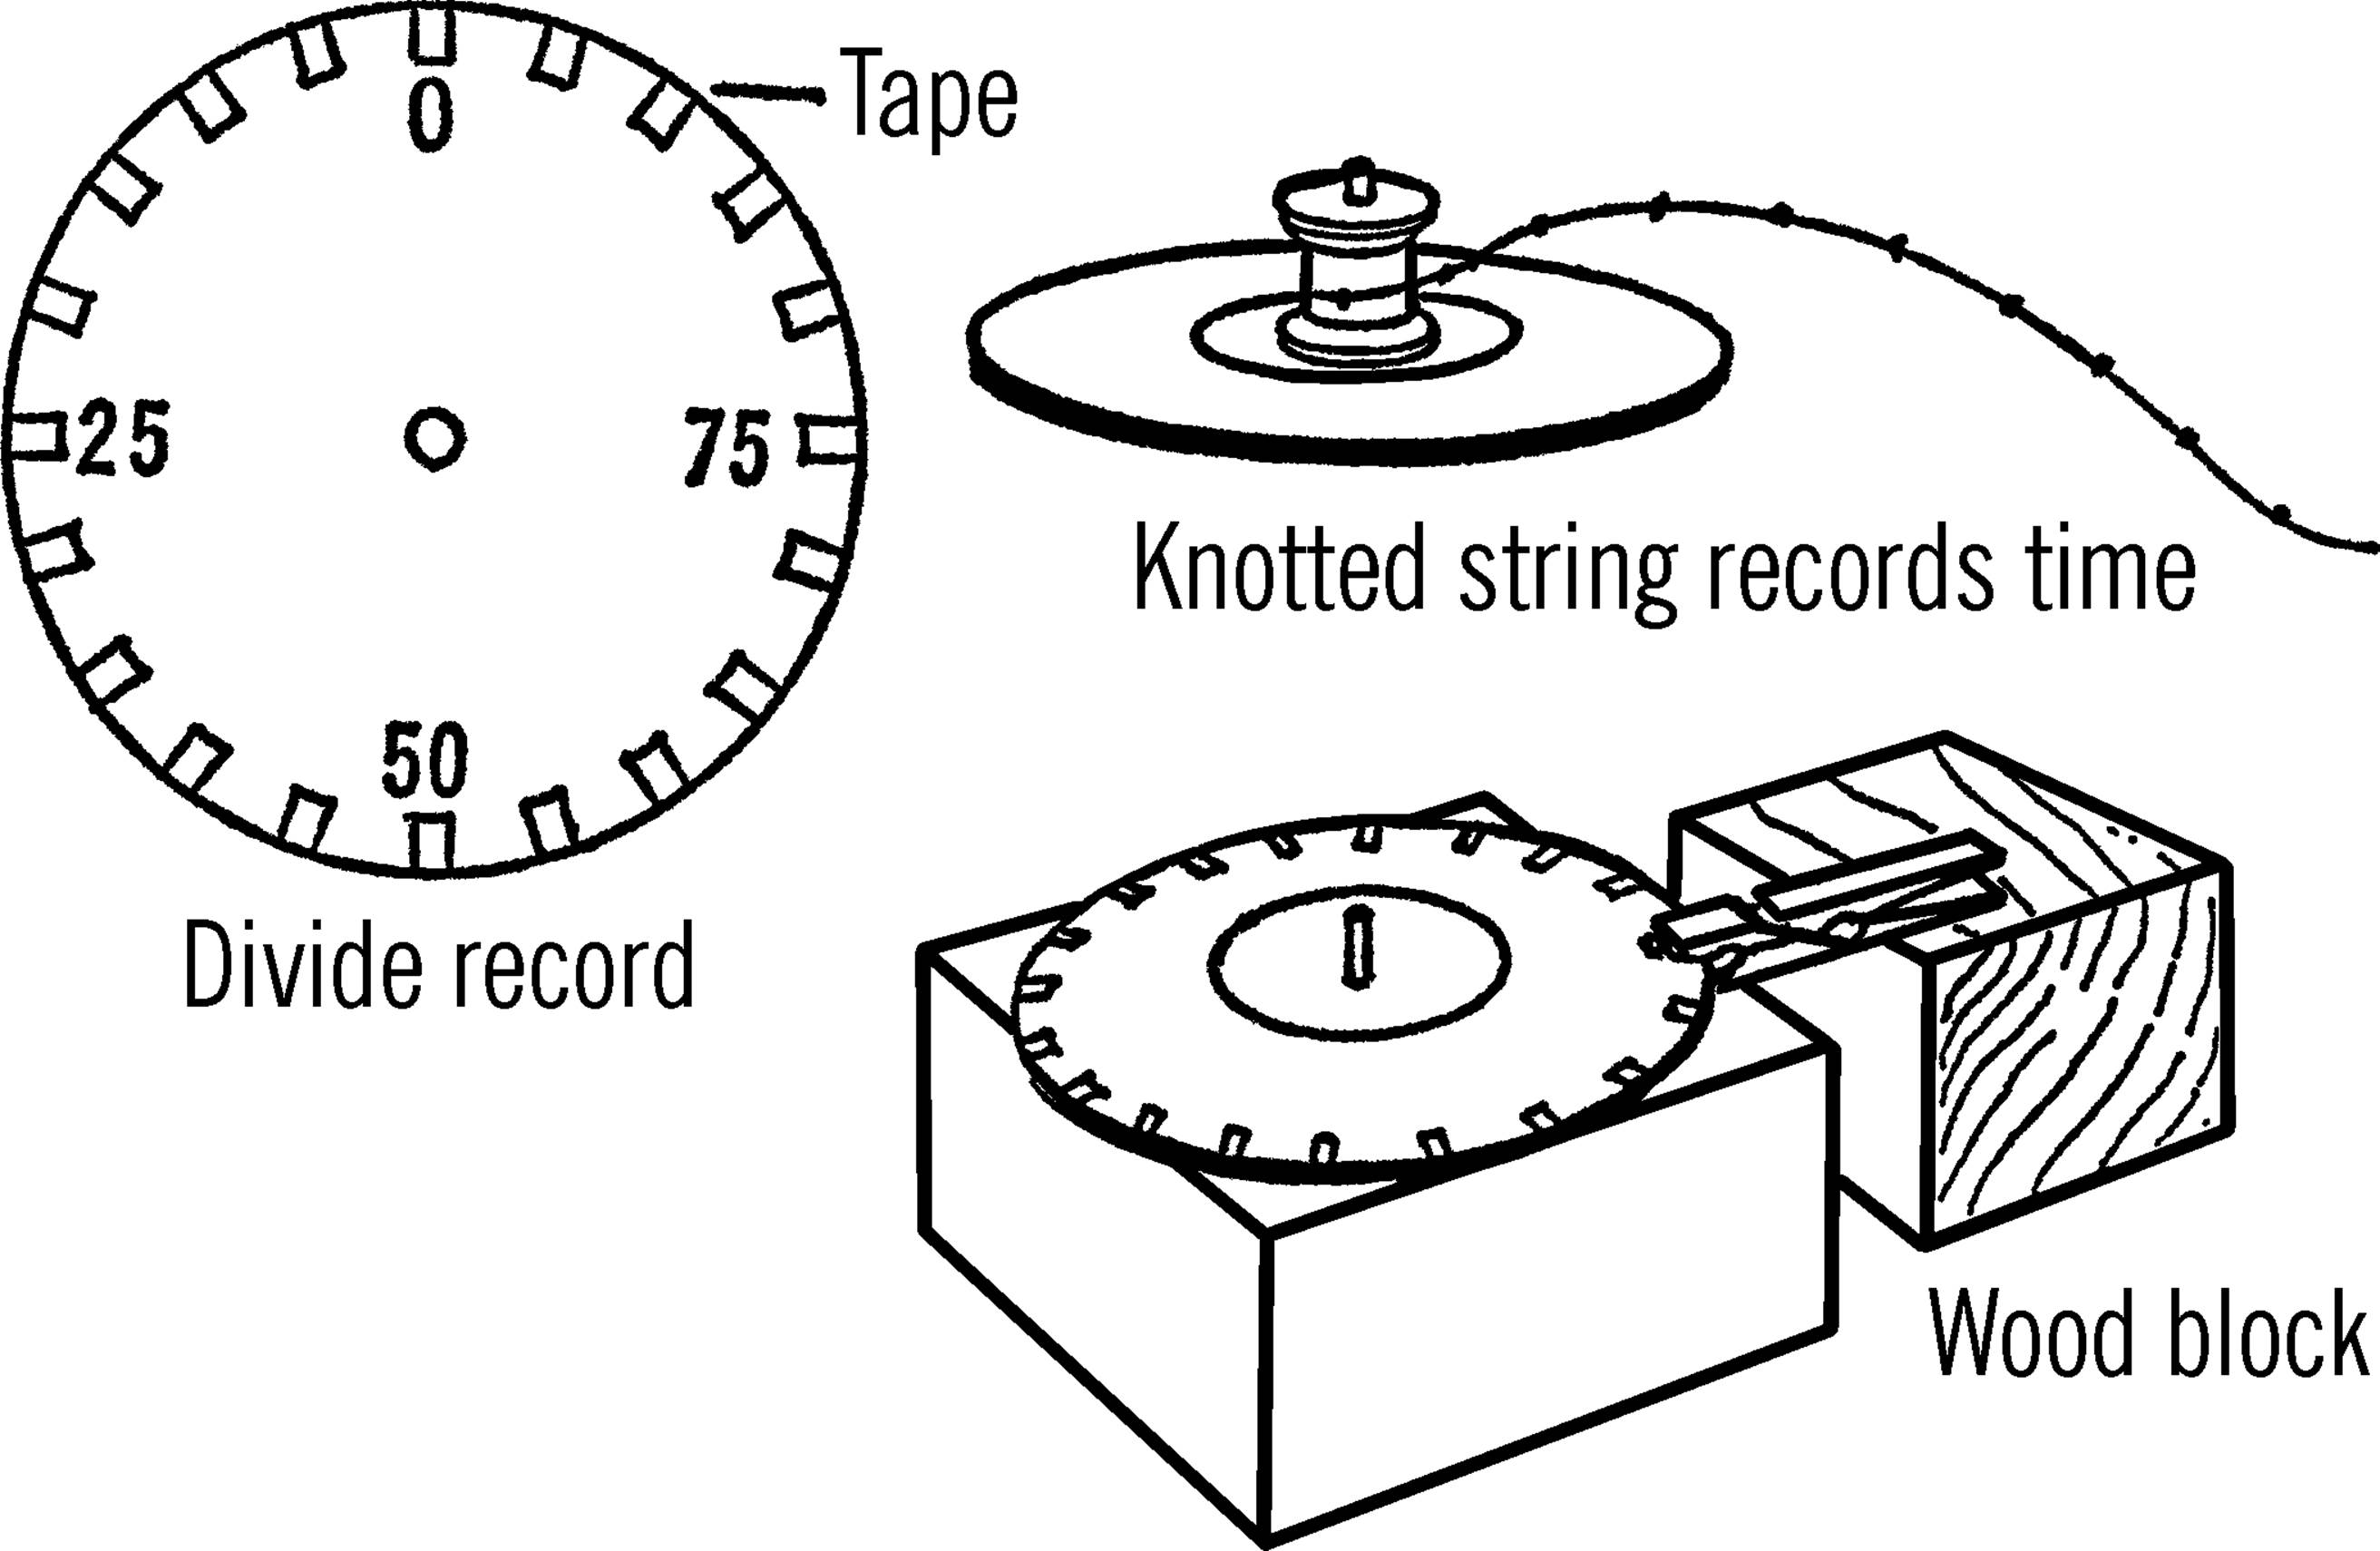
How to Operate Equipment: Place the phonograph record on the turntable. Turn on the record player at 45 rpm. Keep the record from revolving by pinching it with the clothespin. The record should be turned so that “0” is at the spot marked by the clothespin. To start the time clock, press on the clothespin. To stop it, release the pressure on the clothespin. In order to figure the time, count the total times the record went around.11 Add the part of the turn as shown by the clothespin. An example would be: 9 full turns and 25/100 of a turn. Since the record turns only 45 times a minute, it makes only ¾ of a turn each second. To change your reading to seconds, multiply by 4/3. On the example, 4/3 times 9.25 gives an answer of about 12 and ⅓, so the time would be 12.33 seconds.
If you wish to record the time without watching the record player, tie a long piece of string onto a spool. Glue the spool to the center of the record. Tie knots on the string to show one turn of the spool as it winds the string. Mark every fifth knot with some color for easy counting. After the record has stopped, count the number of knots on the spool. Add the part of a record and multiply by 4/3.
Can You Work Like a Scientist?
1. Use your timer clock to time reactions of boys and girls.
2. Time the fall of objects. See how fast they fall as compared with the distance they fall.
3. Time a student running a set distance. Figure their speed in miles per hour.
4. What clock is the most accurate, the water clock or the phonograph stop clock?
5. Time the complete swing of a pendulum (see “Foucault Pendulum”).
Harmonograph
Purpose: Harmonic motion is a movement or motion that repeats itself. A pendulum is a good example of harmonic motion. When two forces work together, the result is a pattern of movement that combines the movements of both forces. The harmonograph records such movement in pleasing and unusual designs.
Materials: Wood for stand, piece of plywood, two wooden rods about 5’ long, two metal collars, two cans, two clamps for the rods, four spikes, cement for the cans.
What to Do: File four slots in each metal collar or ring. Two slots should be on the top side of the collar and two on the underneath side as shown. Build the stand. Make the two pendulums out of the wood rods or doweling. Drill a hole about one foot from the top of each rod and drive a spike through each hole. Cut off the head of the spike. Attach a plywood board to the top of one rod and an arm with a hole for a ball point pen on the top of the other rod.
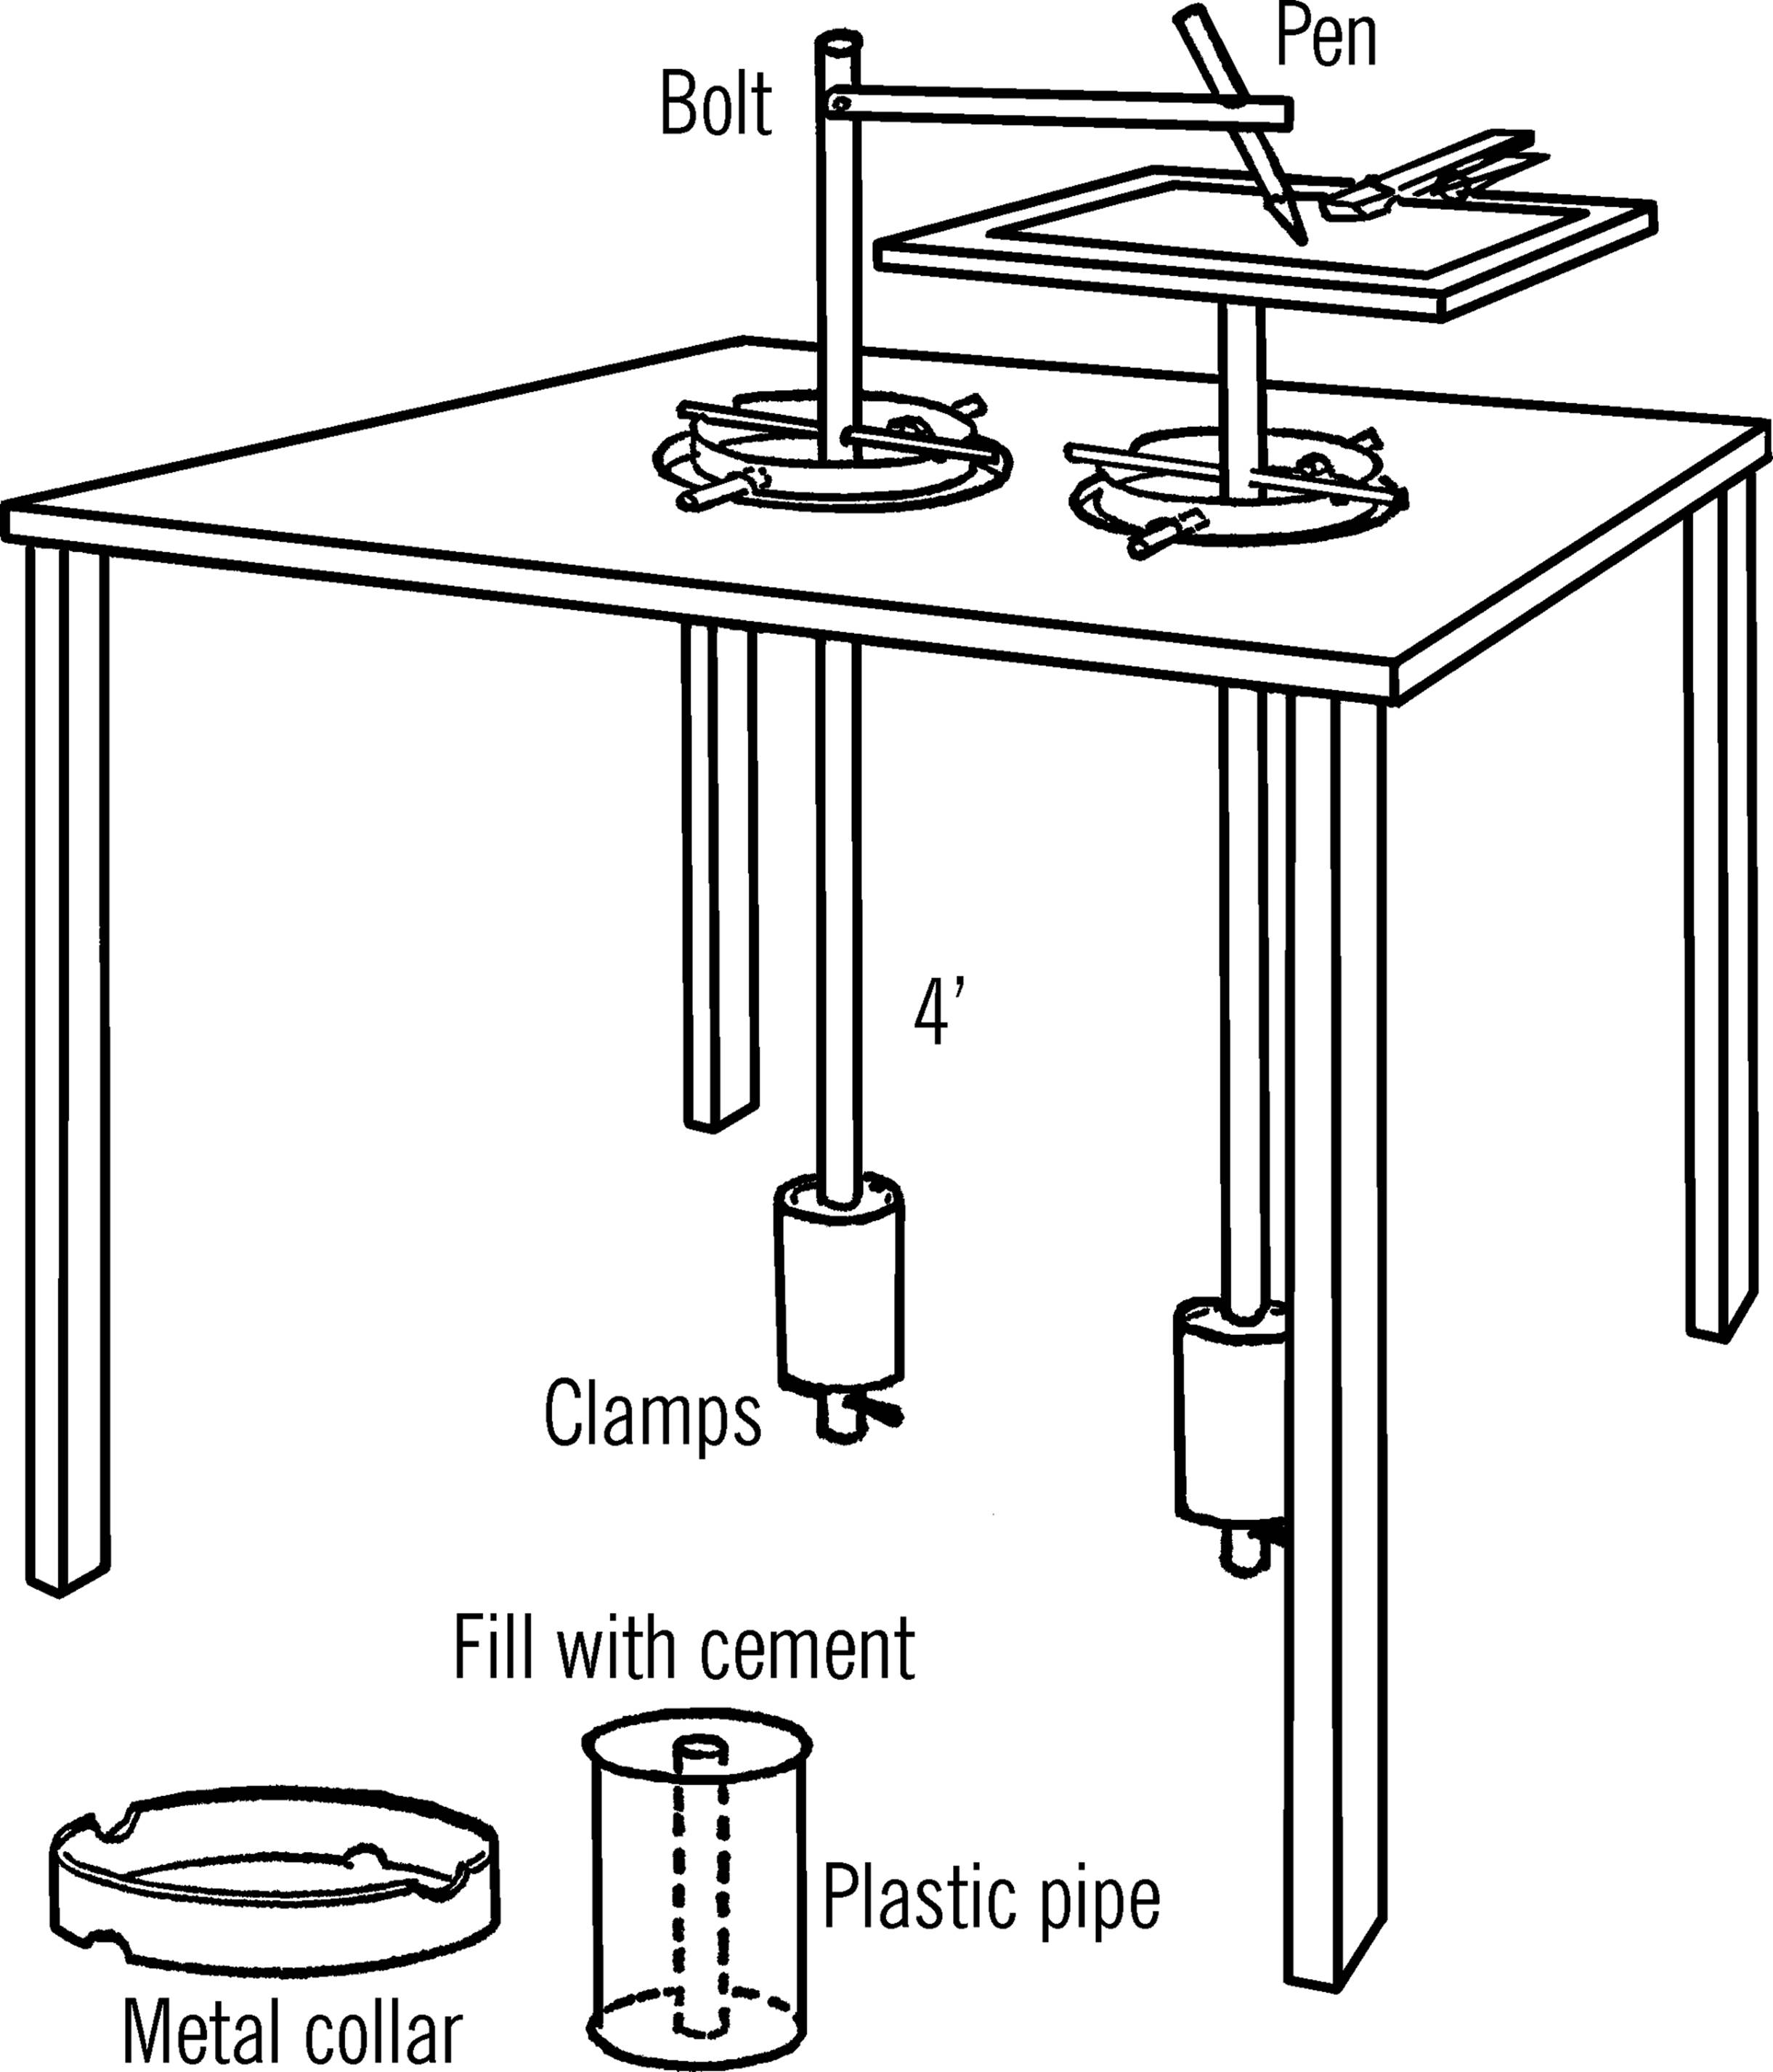
The cans are used for weights. These should be large fruit juice cans. Cut a hole in the top and bottom of each can. Slip in a piece of plastic pipe that is just large enough to slip over your wood rods. Pour cement in the cans and let the cement harden. The weights are then slipped over the wood rods and kept in position by an adjustable clamp or a pin through the rod.
The short pins that the collars ride on can be spikes fastened to the table of the stand. Slip the rods into position through the holes. Clamp on the weights.
Operation of Equipment: Fasten a sheet of paper to the plywood board at the top of one rod. Start both pendulums going by releasing the weights. The pen will draw various patterns depending on the direction and motion of the pendulums. Try adjusting the weights in various positions until you develop patterns that suit you.
1 Could you use a metal spring instead of the rubber band?
2 To slightly higher precision, 39.37 inches. What is the exact conversion?
3 That is to say, the two slides are hinged by the nail that is between them, like the two sides of a spring-loaded clothespin.
4 You may want to consider using other types of objects—possibly better known than newspaper thickness—to define your scale. A good reference point is that a (shiny, new) US dime is 1.35 mm (0.053 inches) thick.
5 Depending on the weight of your bucket, you may want to use a second bucket that you fill for weight, rather than just more or heavier washers.
6 Does centrifugal force really exist? See Note 38 in Appendix E.
7 See Note 1 in Appendix E about working with animals.
8 Please read Note 39 in Appendix E about materials for this project.
9 How would you know the rpm speed of a fan? Are there other consistent speed references that you can find? What about LED lights, or an orange neon “pilot” bulb in a power strip?
10 At first glance, this may seem absurd: most of us already carry around at least one digital device that has a fast stopwatch function. But how could you do it if you couldn’t use modern digital electronics? Here, one plausible method is illustrated.
11 Do you notice a flaw in this method? See Note 40 in Appendix E.